23' trailer cruiser

The friendliest place on the web for anyone who enjoys boating.
If you have answers, please help by responding to the unanswered posts.
Well I got it ready for paint today and pulled it to clean up everything and took this shot. I will fit my transition molding for the side wood to the trunk . But it will have to wait until it warms up maybe in another two weeks. I have plenty to do though. I will do the fits on my fixed window plexiglass and interior moldings. in the mean time. The cockpit seat storage lockers are next.
 

Attachments

  • red knot ready for paint.jpg
    red knot ready for paint.jpg
    91.3 KB · Views: 92
Scratch,
If making a bend that needs a little help but probably not a candidate for steam use kerosene. I’ve not done it but read about it in Calder’s book “Of Schooners andSkiffs” or someth’in like that. I use it whan painting and/or varnishing as Calder says it’s the best penetrant ... goes deep into the wood.
But it’s supposed to help significantly for bending. Calder did it in prep for bending too.
 
Oh the fun stuff,, Even with the cold weather, patience for the glue to dry and one step closer. The cabin wings have been finished with foam core, veneers and solid sawn mouldings. This took 8/4 and 10/4 stock, which was required to do the endings of the cabin side veneers and mouldings. The exterior veneers and mouldings will get painted, two contrasting but complimenting colors, to minimize the maintainance outside.
 

Attachments

  • IMG_1785.jpg
    IMG_1785.jpg
    101.8 KB · Views: 91
  • IMG_1787.jpg
    IMG_1787.jpg
    90 KB · Views: 88
  • IMG_1789.jpg
    IMG_1789.jpg
    91.7 KB · Views: 79
Well I got it ready for paint today and pulled it to clean up everything and took this shot. I will fit my transition molding for the side wood to the trunk . But it will have to wait until it warms up maybe in another two weeks. I have plenty to do though. I will do the fits on my fixed window plexiglass and interior moldings. in the mean time. The cockpit seat storage lockers are next.


Dude, that profile looks sooooo nice.

What hull did you start with?
 
Progress, progress, progress.
Might want to leave something to do in the spring and early summer.
Looking good
 
Dude, that profile looks sooooo nice.

What hull did you start with?
I have built the hull on my own, in part around the length of the interior of the storage shed and the door as it relates to the height. with the boat on a trailer. The full shape reflects packing ten pounds in a five pound of sorts.
 
Oh! Wow. Even more impressive.
 
Still slowly making my way thru the details while dealing with the cold weather that blocks a lot of paint work and slows the glue. Not that this progress is charming, but a huge step towards closing the entire cabin in with the window work. I have gotten all of the Plexiglas in place.[some with the protective paper and vinyl still in place]. I framed my fold out center window after creating a large offset for the frame. Then the window frame, sitting in place will get the glass with the hinged hardware. Then the seal tape will go on the two offset components in hopes that this will seal up and not allow water to wick around the frame work..
 

Attachments

  • IMG_1816.jpg
    IMG_1816.jpg
    106.3 KB · Views: 70
  • IMG_1815.jpg
    IMG_1815.jpg
    111.5 KB · Views: 72
  • IMG_1812.jpg
    IMG_1812.jpg
    93.7 KB · Views: 67
  • IMG_1813.jpg
    IMG_1813.jpg
    90.1 KB · Views: 69
Hi Scratch:

Pardon my lack of knowledge, but what is "seal tape?" Does it eliminate the need to caulk in the window frame?
 
Might consider using a quality butyl tape instead of the foam tape.
 
Well progress has been made, after a long battle with the flu and the crud. Our swim platforms have been done and backing plates installed. I will still need to add my mounting brackets to the transom for the hinge set up that I plan on using. Since the boat is a shallow draft, I cannot use bottom supports like fix mounted platforms. So I back these up with aluminum plate fastened to the teak on the underside. Its still a work in progress with the finish work.
 

Attachments

  • IMG_1853.jpg
    IMG_1853.jpg
    163 KB · Views: 81
  • IMG_1854.jpg
    IMG_1854.jpg
    119.4 KB · Views: 71
Got out on the water this afternoon to run the engine with a new prop. Its ideal and a very comfortable ride. I still need to add my gear forward, which may bring the nose down a bit. But its fast, like really fast. The mid range is probably where I will run the boat and its roughly 23 mph at 4,500 rpm.
 

Attachments

  • IMG_1866.jpg
    IMG_1866.jpg
    87.7 KB · Views: 85
Nice! That had to make you feel relieved. Or did you have a pretty good idea how it would perform?
 
I think your angle of attack is perfect. Need about 7-10 degrees to get the lift for efficiency. Planing boats work best right where you are in the picture.
I have a heavier boat w less power and go slower. 17-18 I think. 3300rpm. But that’s only w two aboard and not much gear. I have much more deadrise and a higher AOA both for the deadrise and the lower speed.
Wish I had a cabin like yours.
 
You have a great plan. Getting on the water to "test". WINK WINK

One day, after you get your gear all onboard, you will go out on the water to "test" for a couple of days or weeks. SMILE
 
Unlike displacement hulls you never really know how these one off planing hulls will perform after the hopefully initial get up on plane properly. But with some additional "getting on the water" moments you can get an idea of what they say as "what you need to do on the next one" for that perfect hull.:D Right,,, hehe

Part of the appearance of the bow up is that the sheer helps with that elusion. I am just a bit critical even though its a nice and steady feeling inside without launch day drinks spilling over, you know.;)

I probably could have given up some cabin space for a bit more cockpit area. But the plans are that we will spend more time in the northern areas in early summer where the weather may require us to be inside in comfort with family, hince the need for the additional protected area.

All is good for now. Need to keep sanding and putting a few more parts in the cockpit area for cocktailing in the evening with the wine and cheese you know.:thumb:
 
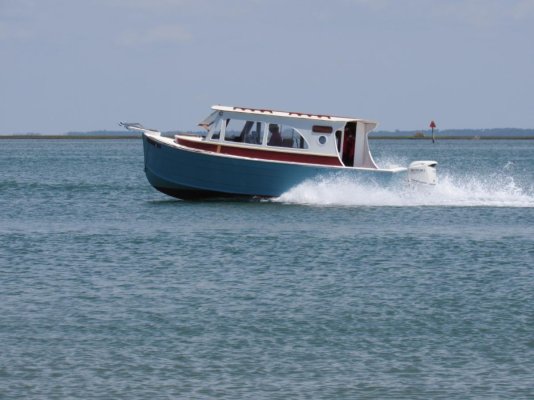
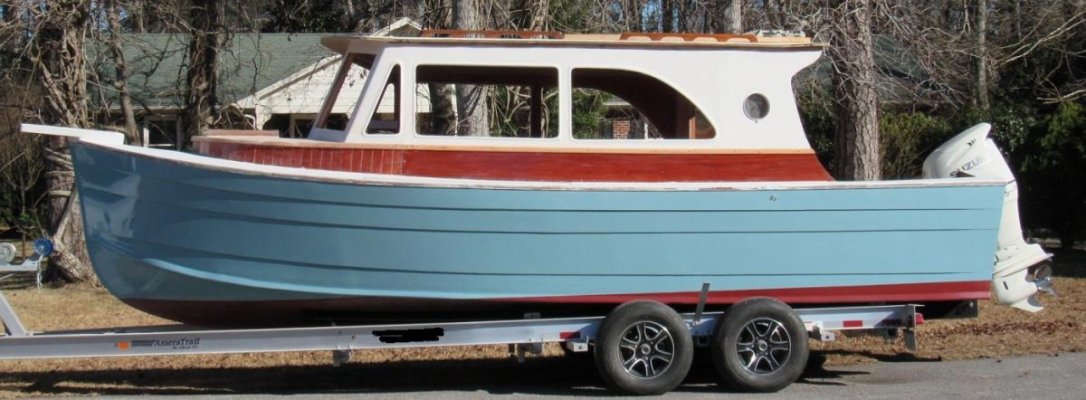
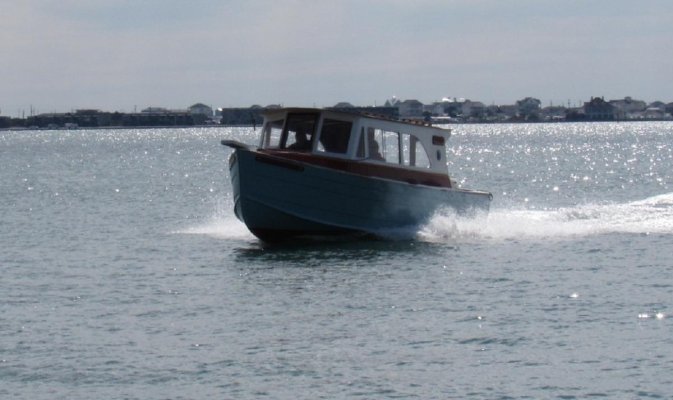
Well for anyone still following or wonders, we are still working our way towards the finish work. Winter has a tight grip on us, and still slowing things down. But I got most of the wiring done for the main components and electronics. So we took the boat out today for a long sea trial to put a few more hours on it during the break in period. We carried 42 gallons of fuel, 20 gallons of water and a fair amount of gear so that we could get an idea of the speed and wheel selection .

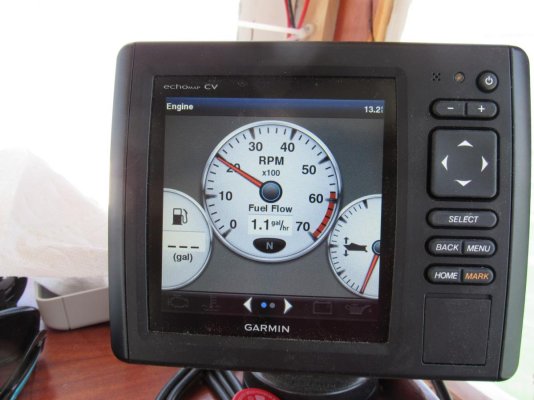
Results are as follow, at around 4,100 we ran 22.9. This was a super cruising speed in comfort. At 5,000 rpm we ran 27.3 and topped out for a brief moment at 5,800 rpm with a speed of 31 mph. The fuel burn at 4100 was approx. 3 gallons an hour. that's probably what we will normally run loaded and on any distant runs.

We hope that we will get all the cosmetics done by around the first or second week of June and then head north, towing to the northern border of Conn. and launch it for an initial trip to Martha's Vineyard to see some old wooden boat friends. Then to points north for about four weeks.
 
Nice!


There are some other members that have that that speed capability, but you'd be the only one to do it @ 3 gallons/hr.
 
Nice!


There are some other members that have that that speed capability, but you'd be the only one to do it @ 3 gallons/hr.
My boat weighs out rigged now just over 2500 lbs, plus the engine, 410 lbs. So this does give me some advantage along with the type of reverse chines and lifting strakes that releases the entire hull's running surface from the water. This is the hull sides at the transom. I am not what is known as "running up hill" on a planning hull when the hull is trying to get out of the water when its partially buried while on plane.
 

Attachments

  • IMG_1907.jpg
    IMG_1907.jpg
    114.4 KB · Views: 77
The simple things in life can be so rewarding when they come together. These smaller hulls are always a compromise. But my love seat and portable head is roughed in and works like a champ. This gives me two additional seats inside when the need calls for it, as long as the guests are not queen sizes. ;):eek:

The bench folds up and covers the bulk of the back window. Then I can either lift out the knee wall or just step across and hang my curtain overhead on the inside and around the front of the area to the side windows. and have at it.:thumb:

I am excited anyway. And the back will be hinged up against the portside of the cabin and fold down to allow the garbage can to be accessed in the unusable space.


We are happy so far with the Theftford elongated portapotty. The price was by far more acceptable[132] than the composting toilet and can be dumped easily. Its freshwater flush with its own self contained battery operated pump and water tank.
 

Attachments

  • IMG_1948.jpg
    IMG_1948.jpg
    110.1 KB · Views: 65
  • IMG_1949.jpg
    IMG_1949.jpg
    104.9 KB · Views: 66
Last edited:
The swim platform is on and works out great. It can be folded up and pinned. But so far I have left the handrail on it and down without much problem around docks and backing with the extra length outward . A few shakedown trips to fine tune some of the cruising features inside and to figure out our needs for anchoring in a variety of areas with some rigging has also been beneficial.
 

Attachments

  • IMG_1919.jpg
    IMG_1919.jpg
    113.1 KB · Views: 55
Thank you, Scratch, for posting all of these great pics. Do you still think you will be finished in about a month? Your plan for trailering the boat up north in June sounds wonderful!
 
Thank you, Scratch, for posting all of these great pics. Do you still think you will be finished in about a month? Your plan for trailering the boat up north in June sounds wonderful!

Well we are still planning on our trip. We will be doing this in two stages, the bay for two plus weeks and then a break and then Mass. and Maine for probably three plus weeks after towing northin, as long as the weather allows us when we get to the bays in Maine as it relates to fog in particular. Cosmetically the boat may not be a 10. But being on the water is a 10 for us.

So folks that try to nitpick may have to look the other way.;):D LOL This winter has not been a favorable one for painting. I'm not making excuses, but the 40 foot finish has been applied. and it comes clean when I wash it now. Mechanically and the working parts are all up and running except mounting the solar panel. But my AGM house batteries are in place and being charged by my engine right now. This engine has a pretty large alternator.

I had a new experience this week. For anyone with modern outboards, I hooked up the NMEA 2000 system to my Garmin unit and that's the cats meow. This was critical for me as it relates to fuel capacity and fuel burn.
 
Last edited:
Just to complete the circle of the head-loveseat arrangement, I fit the curtain to day and its easy to install with the button snaps.
 

Attachments

  • IMG_1952.jpg
    IMG_1952.jpg
    123 KB · Views: 60
  • IMG_1951.jpg
    IMG_1951.jpg
    113.1 KB · Views: 53
I got in a few more break in hours yesterday and got some shots of running and the luxury of being able to sneak up to the beach in certain areas for funning on the beach. I managed to get my ideal "trawler" speed fuel burn at 1.1 gph, 7.4 mph, depending on the current of course with my new interface to the Garmin, giving me incredible range for some distance runs without facilities.

Of course extended low end running is not too advisable for these new fangled outboards. But if I mix it with mid range, I am I good shape for my planned trips and this keeps things in order for the four strokes.


I am carrying 42 gallons for now in duel tanks, one larger than the other so I can keep the fuel fresh when I don't need the full amount. Luckily in our area non-ethanol is available, unlike in some states and regions of the world.

Still painting, summer is coming too quickly though, where I am ready to throw off the lines for a while.
 

Attachments

  • IMG_1965.jpg
    IMG_1965.jpg
    112 KB · Views: 62
  • IMG_1960.jpg
    IMG_1960.jpg
    95.4 KB · Views: 66
  • IMG_1982.jpg
    IMG_1982.jpg
    102.7 KB · Views: 62
Last edited:
been following a bit but just reread the entire thread. nice work! i know you mentioned a side door for dock access but have not seen a pic of it. have one? great idea i think, especially for older folks like me. have a fun and safe trip.


jim
 
been following a bit but just reread the entire thread. nice work! i know you mentioned a side door for dock access but have not seen a pic of it. have one? great idea i think, especially for older folks like me. have a fun and safe trip.


jim
Thank you. Yes the door is on the agenda. and pretty sure at a rate of 99 percent that it will get done. But that's the last thing I plan on doing after I get all of my cockpit and covering boards finished. Its a big deal with a fair amount of reinforcing before I make the cut so that the door area will maintain the tumblehome shape.
 
Thank you. Yes the door is on the agenda. and pretty sure at a rate of 99 percent that it will get done. But that's the last thing I plan on doing after I get all of my cockpit and covering boards finished. Its a big deal with a fair amount of reinforcing before I make the cut so that the door area will maintain the tumblehome shape.

I just found this thread on your project. Didn't know you were planing a side door. The side door in my boat is probably one of the best extras. Specially when we use the boat in a campground.
It did take a lot of reinforcement ribs at the door area and cutting it out was a tense moment.

Egbert
 
Back
Top Bottom