Recoring Cabin Roof Seeking advice

The friendliest place on the web for anyone who enjoys boating.
If you have answers, please help by responding to the unanswered posts.
If I was going to do it, I would use thichened epoxy. It will cost more but it would be stronger. The cost of materials is not the over riding concern to me, the finished product is. A laminated panel will be much stronger than just nailing the panels together.
 
If the roof is too shot to laminate ply (sealants/glue of your choice) the simplest is to use a core material.

On the Californian we used less expensive Nadia core 3/4 inch material on a flat concrete floor.

The camber was created with a 2x6 laid under the center with 2x4 a couple of ft. away to maintain a fair curve.

The lamination was 1 1/2 oz mat 3/4 oz woven roving and then another layer of mat.

It was allowed to cure overnight , then VERY carefully turned over so the inner portion was now up and glassed.

I am no fan of waxed resin so the unit was taken outside to sun cure.

As mentioned it was about 3 lbs per sq ft , so no fun to move.

The inside (the overhead when finished ) was lightly sanded and spray on rubber cement holds auto style roofing material.

The outside was lightly sanded (# 20 silicone carbide floor sanding discs) and painted with no skid.

Under a week to build ,and get up in place longer to trim and mount
 
Last edited:
We jacked the fly bridge up from inside the cabin to get the “sag” out, glassed down the coosa boards, screwed down edges until cured then took out the screws, lowered the jack inside and nothing moved up top! Solid fix and no more soft spots or water seepage issues. There are many uses for coosa board, strong, water absorption >1%, takes fiberglass well, nice addition to marine industry!
 
The coosa board and glass will hopefully be a 1 and done repair. Also used it on a couple of soft spots on the deck. Good stuff, solid fix.


JimW: I hadn't heard of Coosa board before your post, but have now google'd it. Why did you choose it over 1/4" or 1/2" scarf-cut marine ply? Was it because it is a lot lighter but still stiff/strong enough to walk over, or cost, or easier to work, or....? I'm in early days of investigating alternative approaches to a partial ( I hope) core replacement on my flybridge/boat deck.


thanks ![/QUOTE]


Came at the recommendation of Hooks Marine Services (Pensacola Shipyard) they have used extensively with good results. Cost is much more expensive than marine plywood, but the structure, weight and nearly 0% absorption rate makes it superior to most other materials. Kind of a 1 and done. I was dealing with teak on the fly bridge that had soft spots and water would not drain off the deck as over time it had sagged a bit puddling water then weeping into the core of the fly bridge. No more teak, just a solid fly bridge of glass, slick coat and non-skid. Low maintenance and solid footing.
 
Deck core

Hi Seamoose,
As you know I am currently doing this exact same job on my 34. Its construction is exactly as you described, a paper thin Fiberglass layer, 1/2 inch wood squares (off cuts I assume) and then a heavier top layer of glass. I ended up gutting out the whole top as I just couldn’t leave a puzzle of luan up there. I too decided to cut the bottom layer as it had been damaged by me, and also to check out what was beneath it and if it had been effected by water ingress. There was no bracing needed as the framework seemed like it was carrying all of the load. I am about to go tomorrow and start laying it all back down. You will see pics on my thread as the project continues. I have sat there and pondered how they originally constructed it, and I have come to the conclusion that it was made in a mould upside down. The top layer of glass was very consistent, and the luan ply squares, although they varied in thickness, were all epoxied flat against the top glass layer, but the thin bottom layer was not flat, it followed the levels of the ply thickness. The only way this would be possible is if it was built upside down, meaning the thin layer was applied last, let to cure, flipped over and installed onto the boat. It was not glued or screwed to the structural timbers at all, it appeared to just float over the top, and secured to the cabin walls etc.
Was yours like this?
 
Hello 34 Clipper!
Yes, this is EXACTLY how mine was put together and I have had the same, exact thoughts about how they built it. Structurally, it makes no sense at all.

My current plan (too cold here in Michigan to work on boats just yet) is to do the same, rip out all the luan blocks, and use marine ply, but have a physical connection to the bracing, not just floating in air.

At the same time I'd like to make a PVC pipe "chase" so I can run more wiring from the mast to the lower station.

Thanks Again

Will you post or PM me a link to your thread so I can see the pictures?
 
What do you mean that it is too cold in Michigan? I have been working all through the winter on mine. Just have a propane heater or two...
 
Deck core

Haha us owners must think alike, I have already repaired the structural beam at the step up to the top bridge, and in the process I added a 1 inch pvc pipe to do exactly as you described. I didn’t want to run it toward the bow as I didn’t want to weaken the structure, so I ran it from the centre where the mast is and ran it to starboard. It pokes down through the bottom of the deck next to the mast, and the other end pops up through the top but inside the Wall cavity of the flybridge structure (where your speakers are).
I’ll take photos today.
 
What do you mean that it is too cold in Michigan?

At the Marina where the boat is they are only open 3 days a week, and not on weekends. Had I sprung for heated storage I could get in and work on it anytime, but the folks who store in heated would probably have a huge fit if I started making dust as that's where all the really expensive boats are.

But don't worry, I have an old farmhouse I work on during the winter.
 
Update:
Having spent the first three months of the boating season doing free work for the Marina (I'm the I.T. guy and we put in a Marina wide Wi-Fi system plus other upgrades) I have finally started.

The construction is exactly as others have found, except that I discovered the luan blocks were screwed into the cabin supporting frame.

As I progress with demolition and re-assembly I'll post pictures.
 
Deck

Now that you mention it, my old patchwork quilt core was also screwed to the frame but I had forgotten as I only noticed the screws after I had removed all the rotten wood.
There was only about 6 screws in total though, nothing over the top.
 
Update...

Got the rest of the skin off

IMG_2129.JPG


Found more rot along the port side, probably due to the railing stanchions leaking

IMG_2133.JPG


By the end of the day, had all of the luan blocks out and had started cleaning up the edges. So hopefully next weekend I can finish prepping for the new core, lay foam insulation in the space between the core and the cabin top, and run a few extra wires for later.
 
what do you plan to use for foam insulation between New core and underside glass layer? why do you feel this is necessary ?
 
Hi Aquabelle
I'll be using foam board. Insulating the roof will help keep the interior cool in the summer as well as hold in heat during the fall.

I have a canvas shade that stretches from the Bimini to the fly bridge aft rail that is the difference between barely comfortable to pleasant on sunny days. So more insulation won't hurt, and foam board is better than air!
 
Update

The PLAN on Saturday was to clean up all the edges, run some wiring for later, remove the rest of the stanchions, and clean everything up. But like ALL projects on the Sea Moose, a.k.a. the SS Wood Rot, things didn't quite go according to plan...

The aft end of the cabin roof has a nice bevel on the back. The bevel was made by laying in pieces of scrap about a foot long each against the beams that support the cabin structure. Not sure what kind of wood they used, it wasn't teak... more like sponge wood, it was soaked and rotted badly:

IMG_2145.JPG


So I spent an hour carefully cutting off the top strip only to discover there was mush underneath, so another hour cutting it off at the bottom.

We're having a heat wave in the Midwest, it was easily a hundred degrees in the metal building at the Marina, too bushed to continue today. So probably another two days labor to fabricate a new beveled piece, run some wiring, cut up the insulation, screw down the new core, and start thinking about glassing.
 
your giving me nightmares . it looks like you're defiantly getting the bad stuff out.:thumb:
""screw down the new core, and start thinking about glassing."" so no fiberglass under the core ?
 
Last edited:
If you own one of these, it's full of rot... :rofl::eek:

I've been digging rot out of the S.S. Wood Rot going on 20 years. I've recored the decks, the bottom foot or so of the house all around, and two large panels where it was rotted top to bottom.

There's really no need to glass the bottom of the plywood, as the structural support for the house is the frame. The walls are glass on the outside, wood on the inside as well.
 
SeaMoose...can you clarify please: are you just sitting new core on top of the lower skin of glass? You are not sanding that lower skin, coating with thickened epoxy and bedding the new core into that? Or were you talking about the sides of the deckhouse, not the cabin roof?
 
Last edited:
Update...

By the end of the day, had all of the luan blocks out and had started cleaning up the edges. So hopefully next weekend I can finish prepping for the new core, lay foam insulation in the space between the core and the cabin top, and run a few extra wires for later.


If you plan to put a layer of foam insulation down first and then a layer of core (what kind?), then don't. Core needs to be fully bonded to the top and bottom fiberglass layers. That won't happen with a layer of insulation in between and your floor will not have its original load bearing capability.


Real foam core or balsa is a pretty good insulator and you really don't need any more.


David
 
Clarification:
Please look at the pictures...

The insulation is going between the timber bracing that holds up the house. Previously this was an air gap.

The way the boat was built is:

After gluing the two halves of the hull together and flipping it over they built a stick frame out of 2x2 teak for the saloon. Then, they screwed 3/4" Marine Ply to the frame sides with holes for the windows and the doors, spraying that with a chopper gun.

The roof mold was then laid upside down, luan blocks were glued to the roof, and a paper thin (and I mean paper thin) layer of chopper glass was put down. This assembly was then flipped over and screwed down to the frame, and a few layers of 18oz cloth was laid on the main floor.

So it's NOT a torsion box, like a deck. The paper thin bottom layer was there to hold the blocks together... What's holding the house together is the stick frame, which is reinforced by the walls/ceiling plywood.

When you're sitting in the boat in the summer time, and the hot sun is beating down on the cabin roof, you need all the insulation on that roof you can get! I had my canvas guy make a "sun shade" that runs from the aft edge of the Bimini to the aft fly bridge railing it is the difference between sweating and being cool, even with the air conditioning running full blast. Trouble is, it's a big production to put it up, especially in a wind, and if the wind is really strong on the bow you don't want it up at all, it puts too much lift strain on the Bimini. So 2" of foam between the timbers is worth the extra effort.
 
The pics show the wet area of our sundeck after the soaked core has been removed removed. It was so badly damaged that the fiberglass layer under the core had completely delaminated and what you see are a few glass mat fibers left behind. Luckily, our boat has a second fiberglass layer that actually comprises the roof of the master cabin below. This area would not have lasted much longer. The yard will create a new substrate prior to re coring.

Not sure what the original coring material was but it didn't take well to water.

Glad we decided to do it.
 

Attachments

  • Soft Area.jpg
    Soft Area.jpg
    160.1 KB · Views: 95
  • Soft Area_2.jpg
    Soft Area_2.jpg
    127.7 KB · Views: 93
I can sympathize....did a big section of my flybridge deck a few years ago....need to do another or just the whole roof.... all those useless blocks of teak.

I know not all tubs were constructed this way, but many were.

I love when the comments about how great the construction of their boat is and how its built "like a tank" come up.......but they have never cut their decks up, replaced their windows, cored the majority of their bottoms, etc....

Nice to see the real guts of a machine..... :)
 
@psneeld You got that right! My decks were cored with what was clearly scraps laying around the yard. The cabin roof coring isn't even teak, it's luan, light as feather. The polyester resin holding it together has zero filler, one whack with a hammer and it shatters.

In many cases over the years I've pulled up a layer of chopper gun glass to find completely dry cloth underneath, zero resin infusion, they sprayed right onto the cloth. Pathetic.
 
oh no.... mines built like a tank! :)
 
Weekend Update...

Made a new piece for the aft end. As the piece I needed was 2 7/8 by 1 3/4 with a 60 degree bevel on the outside face had to make it from a 4x4 which was quite the production on my little $79 Craftsman portable table saw. As this piece is basically filler, used plain old pressure treated house lumber.

Got everything cleaned up:

IMG_2154.JPG


Got the 2" foam insulation in place. I think this will make a noticeable difference in the summer and the spring/fall. Now if I could only figure out a way to make the door seal better!

IMG_2159.JPG


Ran some fresh wiring to the aft end, and installed a USB plug to power a Go-Pro backup camera + an 12v lighter socket for an aft spotlight. Discovered my plugs were too tall for the space, so will have to use the drill press to make some little wooden ring washers out of 1/2 plywood during the week.

The little overhang on the aft end that had all the rot in it is a mess. The builders supported it by using scraps of plywood and nails. On the starboard side this was semi-intact, so used resin mixed with milled fibers to re-attach it to the aft support beam.

IMG_2163.JPG


The port side will need to be reconstructed, cut some nice strips of 1/2 plywood to use but alas I am out of filler! So I had to stop for the day.

Next weekend should be huge, as I'm picking up 2 sheets of Douglas fir 3/4" Marine plywood. If all goes well I'll be ready for the cloth over lay the weekend after that.
 
Another weekend...

Picked up 2 4x8 sheets of Douglas Fir 3/4" Marine Plywood for $68.20 a sheet. Started Saturday by making paper templates:

IMG_2175.JPG


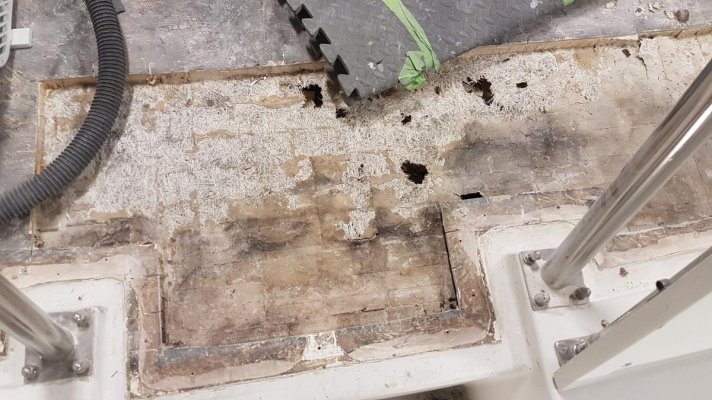
As I had a helper on Saturday to assist with lifting these beasts up on the flybridge stopped that work for a few hours to remove the original equipment NeverCold Fridge that is on it's last gasp. That turned into a major ordeal as the wood trim around the fridge had swelled over the years, took nearly two hours to get the darn thing out.

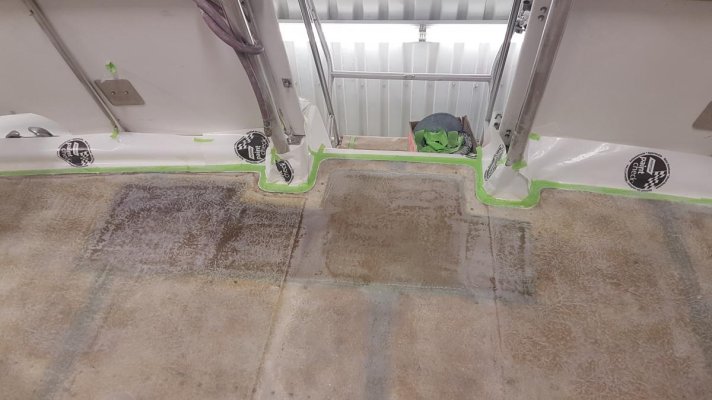
Ended the day epoxying strips of 1/2" marine ply in the aft overhang to reinforce it, that I can screw the new plywood in from the top, and the existing 1/4" base to the bottom.

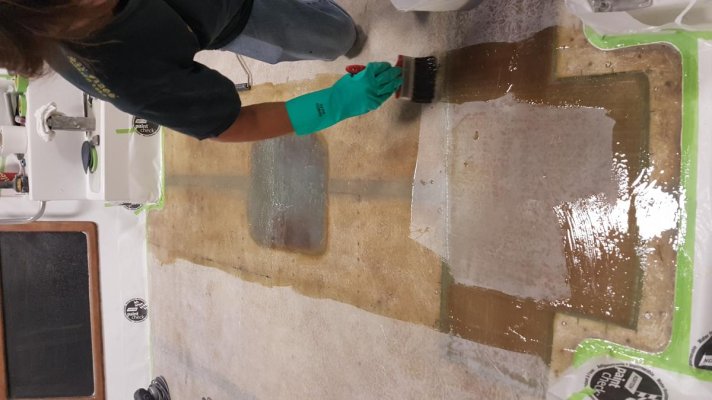
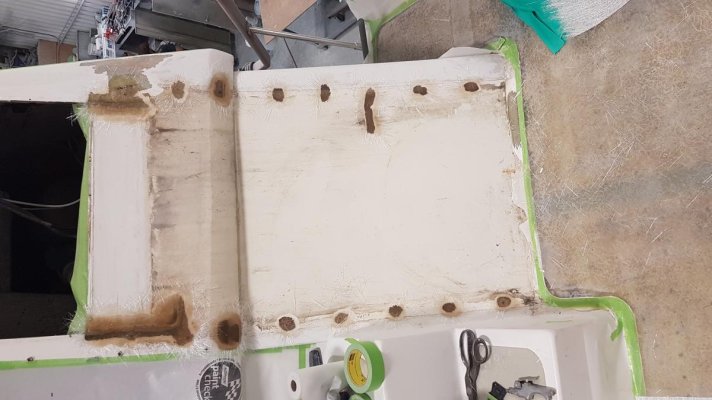
By early Sunday afternoon had the plywood fitting perfectly, screwed down, and a peanut butter mix of cabosil/milled fibers/q-cells (A balance of strength and sandability) filling the gaps in the edges:

IMG_2193.JPG


This was a lot of fun as there is a slight crown to it, so I used some pretty beefy SS screws to pull the sides down. In my younger days I would have worked the rest of the day but the heat meant I had to do the fill really quick and it was just too hot.

Next weekend I'll bring the belt sander and the long boards down, to make sure it slopes downward and has a slight crown, plus I need to finish off the aft end to have a nice bevel... and if the temperature cooperates do the big 18oz glass overlay.

Here's a picture of my companion who puts up with the extreme heat in the boat shed:

IMG_2189.JPG


I think she's telling me I need to switch battery packs on the drill :rofl:
 
Wet area recored and glassed. Rest of the deck had been filled in and glassed. Spot added for a table pedestal. Old sink removed and repair started on that as well.
 

Attachments

  • 20180712_105110.jpg
    20180712_105110.jpg
    99.9 KB · Views: 70
  • 20180712_105925.jpg
    20180712_105925.jpg
    97.1 KB · Views: 67
  • 20180712_105151.jpg
    20180712_105151.jpg
    105 KB · Views: 70
Back
Top Bottom