Teak Deck Removal

The friendliest place on the web for anyone who enjoys boating.
If you have answers, please help by responding to the unanswered posts.

Tony B

Guru
Joined
Jul 18, 2011
Messages
1,251
Location
Cruising/Live-Aboard USA
Vessel Name
Serenity
Vessel Make
Mainship 36 Dual Cabin -1986
I'm still actively looking for a trawler so in light of the last survey and rejection......

Exactly how difficult and how time consuming is removing a teak deck and re-coring the deck and replacing with fiberglass? I know size matters so lets assume a 40' trawler.*
 
Count the screw holes. They all have to come out. 40 footer *perhaps*1 or*2 thousand.

chissel & chip and then see how much underlayment there is and what the deck looks like under the teak. Scrape, sand, grind,* then you are ready to start the fiberglass work.

If you know what you are doing figgure 2 weeks at 40 hours a week.

Double it* Then multiply by about*10 and add a couple of x-tra *boat units.

SD*
 
* My Trawler is a Marine Trader 40' sedan, it is a 1977 and has a glass hull and wood house with glass over it. It is a royal pain. Having to deal with the weather is the main issue. I used the large cheap tarps avallable most everywhere. On the front deck I deluded myself into thinking that I could reuse the teak, so I drilled and removed each plug then each screw. Getting the teak up was impossible the builder must have used black 3M 5200. Old Teak is very brittle and would not come up in one piece. Pulling up the plywood was easy as was replacing it and glassing it. I used epoxy resin as it is better than polyester resin even though it is more expensive, in my opinion it is well worth the extra cost, it took 16 gallons for the front deck. For the rear deck I used a crow bar and just ripped it all up with no concern for saving any of it.

** It took about two weeks to remove the front and one day for the rear. Someone else here has said that it makes no since to fix the deck then drill 2,000 holes in it for the teak.

*

*
 
Before we bought*Hobo I traveled to the East Coast and looked at a 42 KK that had teak on the fore-decks.* I sounded the decks and other than a few soft spots the sub-deck (plywood) appeared*fine.* I met with the yard manager at Huckins Yachts in Jacksonville and he gave a detailed estimate to remove the teak, repair the sub-deck and glass/finish.* Just under $10,000.
 
Just talked with a gent who has a 34' CHB with former teak decks. He said it was a 2 week job for him to rip out the old, glass over and paint with non-skid.

The impressive part is this is his first boat - he has owned it for the last 2 years. Did all the work himself and it came out great.


Second the epoxy resin.

good luck
 
awpptdt wrote:
***.....Having to deal with the weather is the main issue.**************************** If I have to do this, I can lease a covered slip by the month in my area.

Pulling up the plywood was easy as was replacing it and glassing it.******* That is nice to know.*How did you remove the original glass on the deck? With a router *cutting around the area and peeling back?

For the rear deck I used a crow bar and just ripped it all up with no concern for saving any of it.**************************************************************************** This is also nice to know

** It took about two weeks to remove the front and one day for the rear.

This is*most*useful*info, thanks a bunch.

Tony B*

*
*
 
Tony, router to cut up old decks would be slow and irritating....take a circular saw set just a hair deeper than the depth of the teak and the underlying deck and you will have it cut out within the hour. I didn't have teak decks on our Monk but we recored 2 soft spots on the decks...didn't want to do it again and materials are cheap so we cut out entire foredeck and entire aft bridge deck in one sheet. *Picture attached is the aft bridge deck cut out showing the old square coring that was still attached to the old fiberglass we removed. *I say "we" but we really means my fiberglass guy!!! *
biggrin.gif
 

Attachments

  • dscf3303.jpg
    dscf3303.jpg
    229.2 KB · Views: 370
skipperdude wrote:
Count the screw holes. They all have to come out. 40 footer *perhaps*1 or*2 thousand.

chissel & chip and then see how much underlayment there is and what the deck looks like under the teak. Scrape, sand, grind,* then you are ready to start the fiberglass work.

If you know what you are doing figgure 2 weeks at 40 hours a week.

Double it* Then multiply by about*10 and add a couple of x-tra *boat units.

SD*
*Agreed. It took me ,with partner, 6 weeks to do the above. Hard dirty work.

Remember when you detect a soft spot in the deck it usually means that the core has rotted away. Depending on the boat you buy the core is usually blocks of hardwood glued together, as in IG's, or marine ply.

Once water gets in to the core it has no where to go, as it is sandwiched between the glass deck and the thinner secondary glass deck beneath the core.In effect the core is in a sealed compartment.Depending where the water is getting in and how long this has been happening will dictate the extent of the repair.

Cutting out a section of soft deck and replacing will not necessarily be enough in the long term, as you may still have a soaked core that has not completely failed yet, but will eventually, as it can not dry out. For a core to fail it must have been letting in water for many years and chances are most if not all of the core will be affected to a lesser or greater degree.

We took 20 core samples around the boat before realising that the whole thing would have to come up.Our initial problem was a soft deck about 2 square feet near the foot winch on the foredeck.

*

*
 
Tony B wrote:
I'm still actively looking for a trawler so in light of the last survey and rejection......

Exactly how difficult and how time consuming is removing a teak deck and re-coring the deck and replacing with fiberglass? I know size matters so lets assume a 40' trawler.*
*Tony, Last year we removed the teak deck from our 37' Europa flying bridge. We took the drill out of a 3/4" hole saw leaving the hole saw without a pilot--after a little practice we were able to hole-saw aound the head of each screw (about 1800) to a depth of about 1/4". The next step was to "pop" the plug off the top of the screws by taking a screwdriver in the crack and push down.* After the screw head is exposed we had to clean the epoxy from the slot by*holding a screwdriver at an angle and tapping with*a hammer. A drill motor with a screwdriver attachment made fast work out of removing the screws and the teak comes off pretty fast.*

Now the real work begins.* Beneath the teak is a rubber type sealent that must be scraped off with a wide wood chisel--couldn't find an easier way.* Then the whole deck had to be ground with an angle grinder with a very rough sandpaper disk until we got to the clean fiberglass-one held a shop-vac while the other ground.* Thankfully, everything was in good shape and*we were able to fill the screw holes with marine putty and turn it over to the fiberglass guy.* We had one small section that was de-laminated and we cut the fiberglass by using a Dremel with a diamond blade, removed the patch and dried the area out.* We*used epoxy to put it*back in place and everything was covered with glass when the deck was glassed.

Three of us were able to remove all the teak from the bridge in a day.*Two of us put in a long week scraping, grinding and filling holes, and the glass guy glassed over and painted with non-skid.* Turned out terrific and eliminated some leaks that prompted us to do this to begin with.* Was it worth the time and expense?* You bet--in fact, we did the lower deck from the foward step back this year and it also turned out great. We figured we saved about 2/3 the cost by doing the grunt work--a lot of owners can do the glass work also but we left that to someone who knew what he was doing.

The teak looks wonderful and was probably watertight*when the boat was new, but it's a real pain in the neck when the water finally works it's way to the screws that hold it on.

Geezer

*
 
When the old core is removed, do you buy a new core or fabricate something?
And what is the process of bedding in the new core? Just pour in epoxy and set the core on top?
Thanks in advance.

Tony B
 
One more question......

When the old core is removed, I assume that there is nothing left except the bottom layer of fiberglass which is probably one continuous thin sheet. If so, is this safe to walk on/work on? If not, how do you go about laying in the new core?
 
"If not, how do you go about laying in the new core? "

No way you can walk on the interior covering .

*

These are NOT "cored " boats in the conventional sense , they are a plywood deck with a slathering og GRP on one side and frequently formica inside.

If the core rot is minor it is frequently replaced , but if large areas are shot , the best course seems to be to ignore it and simply lay up a new deck over the old one.

Shovel off the teak, lay up 1/4 inch of new glass , insert a cheap core like Nadiacore , and glass the top.

Great workmanship?, lay on patterned no skid , rough ? grind and install sand paint.

When the moisture stops getting into the old oly , the wood will dry up and the smell will go away.


-- Edited by FF on Saturday 20th of August 2011 04:33:53 AM
 
FF wrote:
...No way you can walk on the interior covering .......*if large areas are shot , the best course seems to be to ignore it and simply lay up a new deck over the old one.....Shovel off the teak, lay up 1/4 inch of new glass , insert a cheap core like Nadiacore , and glass the top.....
*FF, I was wondering about that. Actually, that was going to be my next question.

Thanks

Tony B
 
I did some pretty extensive core replacement on the flybridge *on my old Mainship 34. If you send me an e mail** jleonard@usa.norgren.com* I will send you some photos.

I did mine in sections then knitted it back together. I used exterior plywood as a core folowing instructions from a local fiberglass products distributor/boatbuilder (LBI).

After scraping out the old core, I laid in the plywood using "bondo-lite" which is fiberglass reinforced bondo. I was using polyester resin, and bondo is compatable. After setting the plywood down I simply added many layers of 1 1/2 ounce mat with a layer of roving for some extra strength. Afterwards we ground the crown back, then rolled on two coats of anti skid gelcoat.

I came out really nice and I'm sure it was stronger than the original.
 
* How did I remove the fiberglass under the teak?* There was only a*thin layer of what looked like 6 oz. cloth, there wasn't much resin but a lot of black 5200. I guess the 5200 was suppose to seal the surface as it was on both sides of the glass. I used a small circular saw and with a modified sole plate that allowed me to cut* right up the the side of the house. Then a sharp wood chisel to remove the rest. Now here is a special note. I don't know if all were made this way, but most likely are. The deck is glassed to the interior panel of the gunnel not to the hull. This leaves 2 or so inches with no protection if the seal at the hull cap leaks, as the water runs down behind the panel. It also leaves the hull attached to the deck with one 1/4" bolt through the ends of the deck beams to a 2x4 glassed to the hull. What I did was remove the interior hull*panels and glassed up the side of the house about 6",*across the deck and up the inside of the hull about 6 inches. I prepped the house and hull interior wall*by grinding with a #50 disk to give the glass/resin some real mechanical grip.
 
Feel fortunate I cancelled the installation of teak on the decks.* Figure I saved a lot of money and future headache.

img_58073_0_8d7db6729ab1bc6653a8a0ed0d53b2e1.jpg


*


-- Edited by markpierce on Saturday 20th of August 2011 06:44:04 PM
 
Looking at those deck fills , they present a danger weather they are gas or diesel,tho waste pump out is OK.

Should an O ring age/fail , or the unit not tightened the chance of filling whatever they are for with rain or sea water exists.

Our solution was to install an 8 inch bronze deck plate , after lowering the fills below the deck.That way a simple pipe cap will shed water , not into the tanks , should a deck leak occur.

Not as KISS as surface plates , but EZ to live with.
 
A below deck fuel fill would never be an option for me.
 
It seems to me that, especially on a steel hull boat, the deck fills could be raised and welded to the bulwark.* This would get them out of the deck water problem.* Seahorse Marine I am sure know this* I would be a good feature on their boats or any other boat for that matter* Seams like it could be done to Mark"S boat the next time he paints
 
My boat has recessed deck fills and pumpouts, away from the deck traffic.

*

To the left of the ER air intake, is the waste tank fitting. (double vented) & to the right is the fuel fill. The water tank fill is in the cockpit. (Not much chance of contaminating with fuel and vice versa.)

*


-- Edited by SeaHorse II on Sunday 21st of August 2011 10:33:19 AM
 

Attachments

  • seahorse.jpg
    seahorse.jpg
    117.2 KB · Views: 189
  • img_3866.jpg
    img_3866.jpg
    133.4 KB · Views: 197
SeaHorse II wrote:
My boat has recessed deck fills and pumpouts, away from the deck traffic.

*

To the left of the ER air intake, is the waste tank fitting. (double vented) & to the right is the fuel fill.
*Excellnt solution.
clap.gif
 
Tony B wrote:Exactly how difficult and how time consuming is removing a teak deck and re-coring the deck and replacing with fiberglass?
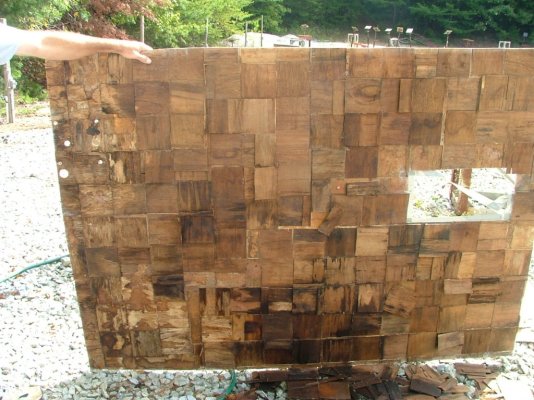
*Regardless of what you might hear otherwise, to do it right is a major job.* A few years ago we watched a fellow on our dock replace the teak decking on his 36' (or maybe 38') Island Gypsy.* He did not have to do any core work, he was just removing the teak.

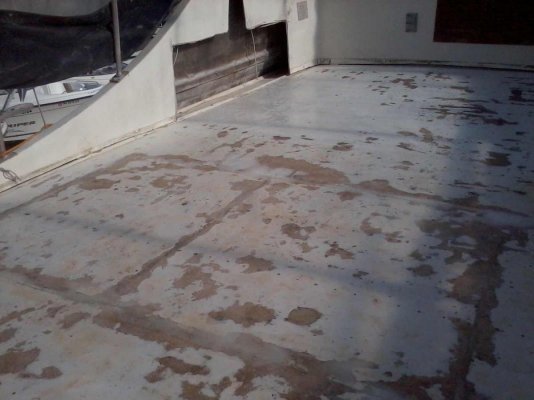
The teak planking on most boats adds stiffness ot the deck (not strength, stiffness, there's a difference) and the builders will most likely take this into account when determining the thickness of the fiberglass-wood-fiberglass sandwich that most subdecks consist of.* So removing the teak planking on many types of boats will reduce the stiffness of the subdeck.* If this stiffness is not restored, the deck will flex more than it should and it's conceivable that small cracks could develop in the upper fiberglass layer that could allow moisture to get down into the core.

So the proper solution is to remove the planking, prep the fiberglass surface of the subdeck, and then add layers of fiberglass matting and resin on top of the subdeck to restore the stiffness followed by whatever sort of non-skid surface you prefer.

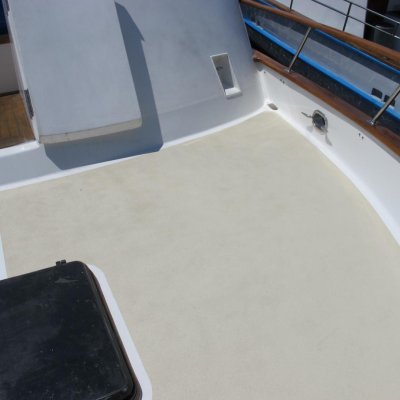
The fellow with the Island Gypsy put four layers of glass over the subdeck of his boat after the wood was removed.* The retired marine engineer who has a boat on our dock and had a career with one of the best-known production boat companies in the US felt that four layers of glass was overkill, and that two would have done the job very nicely.* Most of the people on the Grand Banks owners forum who have removed their boat's original decking went with two layers of glass over the subdeck.

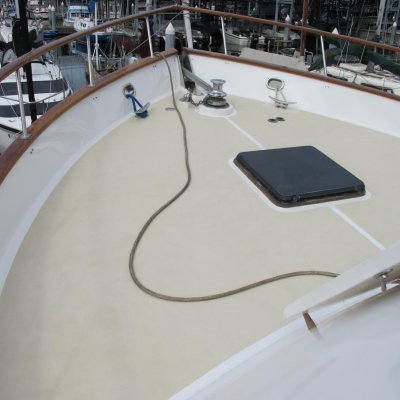
The Island Gypsy owner did an absolutely superb job.* I suspect his work is better than what the manufacturer would have done had they built the boat with a fiberglass-surfaced deck to begin with.* His deck is probably strong and stiff enough to land a plane on :)* But it was a huge amount of work.* It took a full summer plus about half of the following summer to do it.* We talked to him shortly after he'd completed the work and his comment then was, "Had I known at the outset how much time and effort would be required I never would have done it."

As I said, he did not have to do any subdeck replacement so I have no idea how extensive a job that entails.* And while there are people who talk about all sorts of quicky solutions for removing teak planking-- from simply filling screw holes and applying non-skid to using truck-bed liner to you-name-it-- I believe-- as do the experienced shipwrights on the GB forum--- that the only true, permanent solution is to do what the Island Gypsy owner and GB owners have done, and that's to do the job properly from the outset.* Given the amount of work required, it's not something to be taken on lightly.
 
Thanks to everyone for your input.

Hopefully, I will find a boat with the teak deck already removed and repaired. I think that if the teak deck is the only real problem it wont be a deal breaker. If the boat has other major issues, then the deck will probably be the killer.
 
adds stiffness ot the deck (not strength, stiffness, there's a difference) and the builders will most likely take this into account when determining the thickness of the fiberglass-wood-fiberglass sandwich that most subdecks consist of.

Perhaps , but the teak was an OPTION so when the deck was being created there was no certainty the option would be ordered.

Only IF the dealer was able to sell the "teak deck" was the overlay added.
 
FF wrote:
Perhaps , but the teak was an OPTION so when the deck was being created there was no certainty the option would be ordered.

Only IF the dealer was able to sell the "teak deck" was the overlay added.
*That is not the story I got from a person who was looking to become a dealer in the early 80s. He tried to order a boat with fiberglass decks and it cost lots more $$ because they had to add fiberglass layers for stiffness. The teak was standard because it was cheaper than glass work.

At least that is the story I got.
 
On my '86 Krogen, there is perfectly good non-skid molded into the deck under the teak. Then they screwed the teak down with 1000's of screws. Gotta replace about 100 annually due to the deck wear and the bungs fall out at about 1/16" thickness.
 
Woodsong: I'm very interested in your technique of cutting out the whole deck and replacing, rather than taking up the old teak, removing screws, cleaning off black mastic, sanding back, re-glassing sub-deck and then gluing new deck over: your way makes more sense ! Once cut out, how did you go about installing a new deck and what was your finished decking material? I'm needing to 're-do' the foredeck on my 52'-er.
 
I just finished my foredeck. I removed the deck hardware and teak myself, which was fairly easy as the fasteners were square drive screws that the epoxy came out of quite easily. I salvaged over 95% of the teak, but don't know what I'll do with it yet. The rest was completed by a contractor.

For those who just want numbers: contractor ended up at $173/sq ft, to a very well faired finish. Included in that was 2.5 hours labour ($113) and $60 per sq ft in materials.

Because we could not support the deck from underneath due to a complicated headliner on ply then 3-4" gap to the lower glass layer of the deck, we did it in strips about 3' wide across the full width of the deck. Doing it in sections like this increased the labour, but avoided a lot of work to remove and replace the headliner. Had I wanted to store a dinghy up front then removing headliner and using the airspace to put some support bearers would have made sense. If I were ever to do this to another one of these OA's, I might go that route.

The top layer of glass was cut and the wet/rotten balsa core removed. The lower glass was faired to be quite smooth and then two layers of 1/4" marine ply bonded down with overlapping seams. The deck is cambered so the result was reasonably stiff. Then topped off by about 3/16 of new glass. The end result was a deck restored to original 7/8" thickness (excluding the original teak which was 1/2").

But no teak back on top: awlgrip with glass beads to give an excellent non-slip finish instead.

Were I doing it again I might have add a 3rd layer of 1/4" marine ply where the teak had been. ie just leave water channels at the side.
 
Last edited:
Woodsong: I'm very interested in your technique of cutting out the whole deck and replacing, rather than taking up the old teak, removing screws, cleaning off black mastic, sanding back, re-glassing sub-deck and then gluing new deck over: your way makes more sense ! Once cut out, how did you go about installing a new deck and what was your finished decking material? I'm needing to 're-do' the foredeck on my 52'-er.

I did the same for my flybridge soft spot. Area repaired was 7 feet by 3 1/2 feet.

The teak was slow going till I gave up and used a 1/2 inch drill with a 3/4 hole saw no mandrel to drill around the bungs. The teak then pulled up easy and the black stuff came up easy to..what didn't easily sanded. The screws then were easy to deal with...if the head was good, the 1/2 inch drill was used, if the screw head was filled with goop or repair goop...vice grips easily spun it out. The whole bridge deck with cutting out the seats only took a couple days once I discovered the hole saw method.

For the soft spot a circular saw was used to cut the top skin and down through the block core, pulled out all the teak blocks...because the roof beams were so close...I used 1/2 inch marine 7ply as the core with just with splotches of thickened epoxy to tack it down, epoxied the top skin back on and faired in the cuts. Whole top deck got a layer of 6oz cloth, 18 oz roving and topped with 6oz cloth. Paint and non-skid but ultimately will have a light grey outdoor carpet cover the whole area to hide the occasional imperfection, provide traction and a bit of insulation.

Top pic finished repair prior to painting, bottom pic exploratory surgery...
 

Attachments

  • Photo491 (1).jpg
    Photo491 (1).jpg
    97.1 KB · Views: 148
  • Photo361 - Copy.jpg
    Photo361 - Copy.jpg
    23.2 KB · Views: 602
Last edited:
OK, here are a couple of quick photos:

Paint sequence was, after fairing/primer:

Awlgrip Stark White around edges, up to toe rail etc. You can see a line across from the base of the Portuguese bridge door. I've yet to buff the gelcoat above, then the line will be less obvious.

Then Awlgrip MoonDust with glass beads sprinkled on via 'salt shaker'. Two coats -second one gets the non-slip finish really even. Third coat of paint to seal tops of beads.

Masked off around cleats, avoid having non-slip chafe mooring lines.
 

Attachments

  • IMG_0309 sml.jpg
    IMG_0309 sml.jpg
    71.8 KB · Views: 142
  • IMG_0308 sml.jpg
    IMG_0308 sml.jpg
    88.5 KB · Views: 133
  • IMG_0307 sml.jpg
    IMG_0307 sml.jpg
    96.1 KB · Views: 151
Back
Top Bottom