KK Manatee Helm Project

The friendliest place on the web for anyone who enjoys boating.
If you have answers, please help by responding to the unanswered posts.
Joined
Oct 2, 2009
Messages
5,198
Location
USA
Vessel Name
Bucky
Vessel Make
Krogen Manatee 36 North Sea
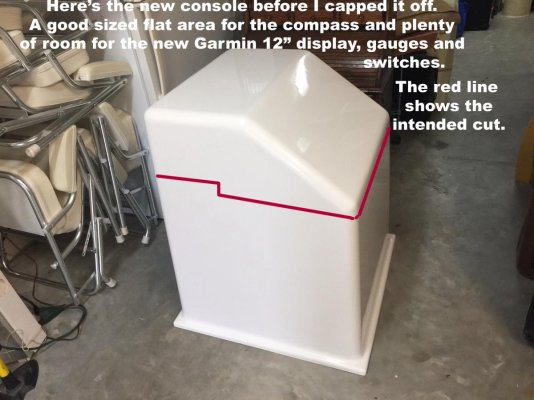
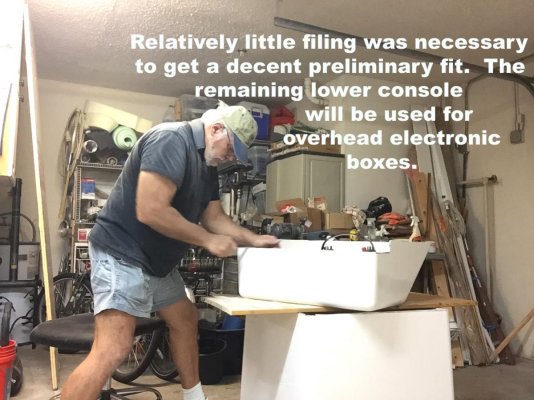
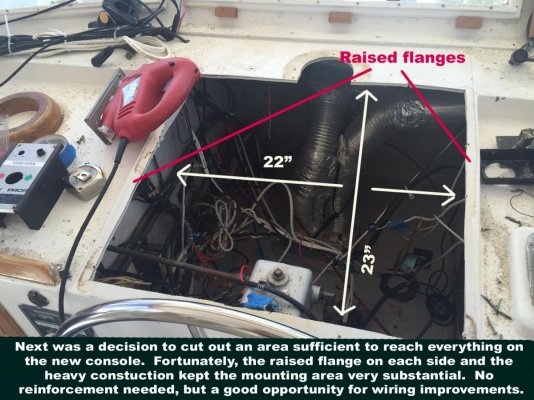
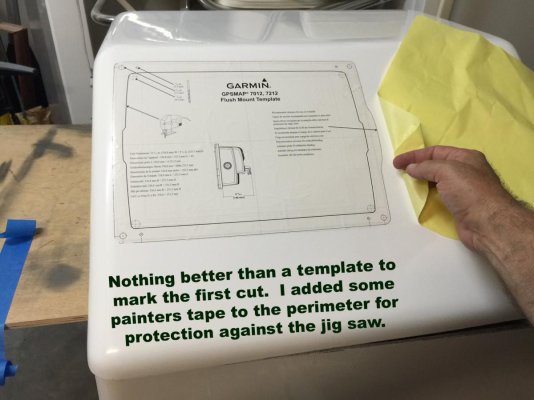
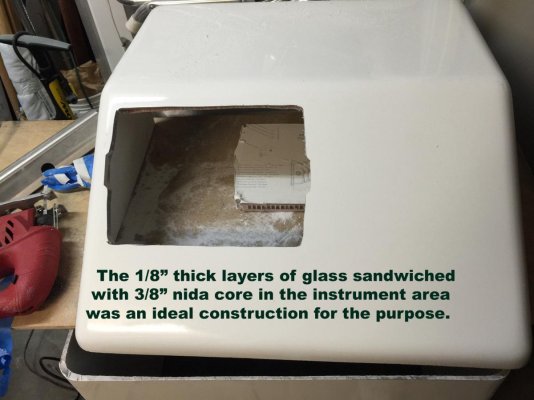
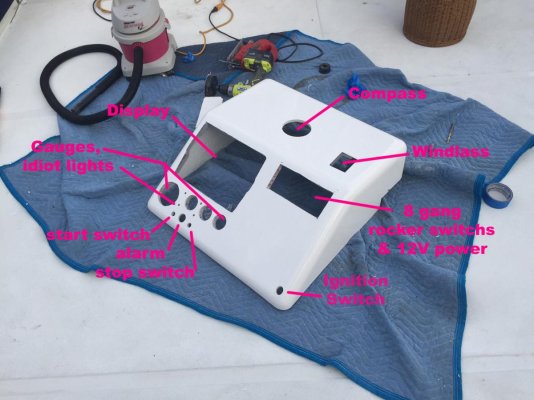
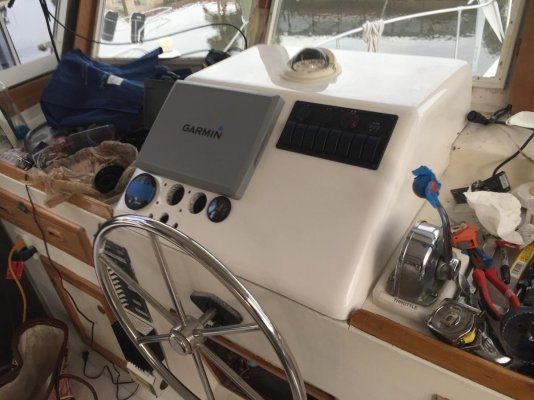
The helm instrument area in our '87 Krogen Manatee is overdue for some updating. Four years ago I bought a new 7212 Garmin touch-screen display, sounder, and 18" radar suite but never installed it. Now, I'm finally getting around to tackling the old instrument area that has been drilled and holed so many times over the years, well it's just not worth trying to restore it to original.

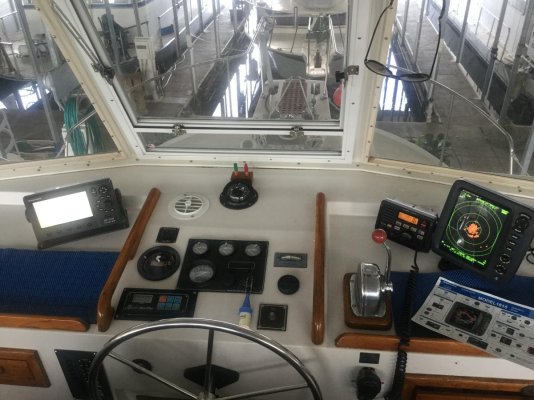
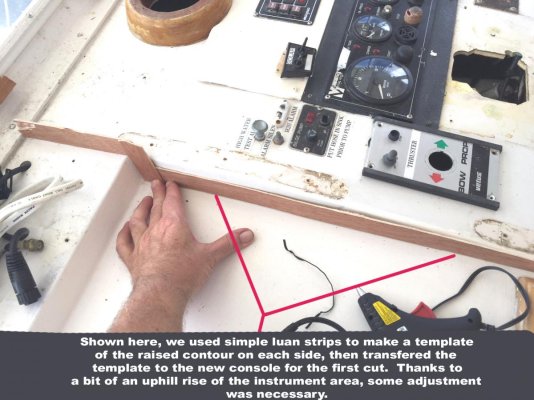
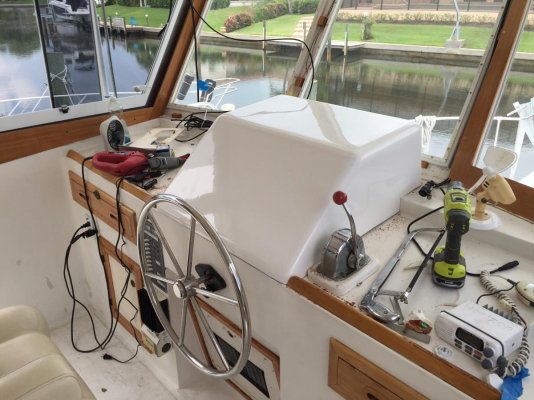
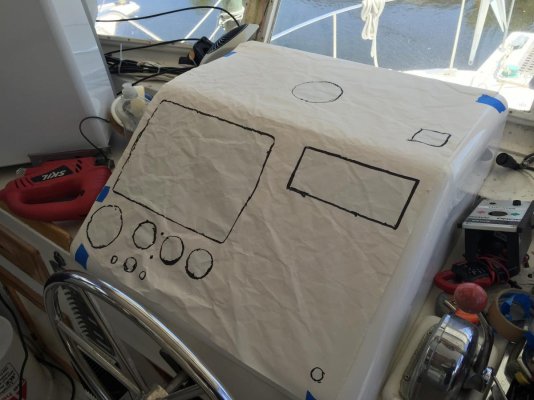
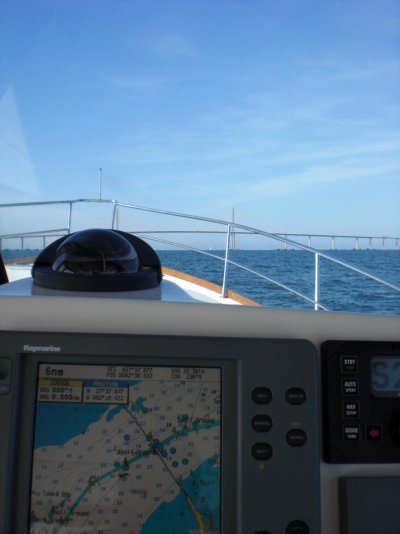
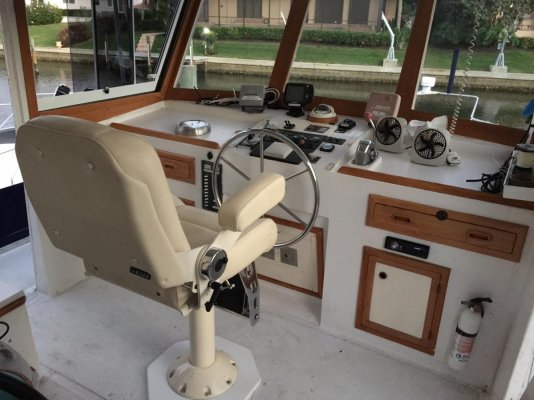
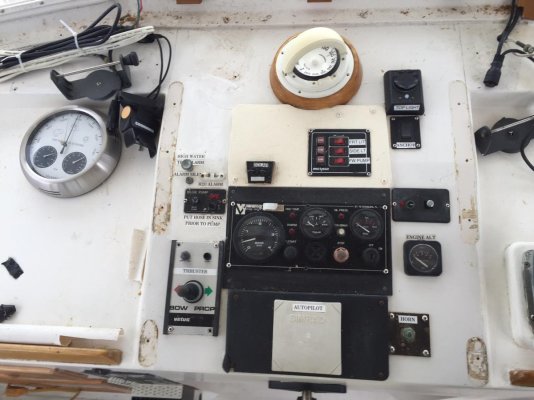
Looking at economic ways to update the appearance and convenience of the area, it seems a face lift to include an instrument panel angled more toward the pilot chair would improve line of sight to the display and analog gauges, not to mention better touch-screen accuracy. Good planning would also make it easier to reach switches and controls while remaining seated . All this, and trying to design a helm that is somewhat congruent with what one might expect in a Krogen pilothouse. Here's a couple of shots of the current helm with old displays mounted on brackets. As you can see, the angle could be better for a modern display. Second shot is of ratty old instrument area with worn controls and trim removed.
 

Attachments

  • current helm and chair.jpg
    current helm and chair.jpg
    130.3 KB · Views: 161
  • old helm, trim removed.jpg
    old helm, trim removed.jpg
    114.9 KB · Views: 163
Last edited:
Does the all-white background bother you? I'd have thought it would throw up a lot of glare. It is inexpensive to cover this with foam-backed vinyl, which comes in a wide variety of darker colours.


I think you are right to re-design on the basis that displays should be near-vertical to make them easy to read & reduce reflection off them.


Have you gone online to see what the helms of the very latest KK's look like? I'd start there for design ideas. The good news is that re-vamping a helm is not that expensive a job by boat standards (of course if it tempts you to install all new nav electronics and instruments that's another story...I'm just talking about the mounting surfaces themselves!)
 
Robert and Dody aboard Mango Mama supervised this good looking Manatee helm modification that solved the sight-angle issue with a modern display. It's neat, clean, organized and looks like it belongs. I really wanted something like this but I also wanted to keep my old compass dead center and on top of the console. This design, nice as it is, wouldn't allow me to do that without additional compromise in vision to the pulpit. I needed something with an angled section closer to the pilot position (to reduce the needed angle) and a flatter section toward the windshield.
 

Attachments

  • image.jpg
    image.jpg
    144.4 KB · Views: 126
Looks great, but how do we know it's real, Larry? :rofl: :hide:

Seriously, the ergonomics look very good. Nice planning and execution!
 
Great project Larry, your remods of the Manatee always good information. I'm old school in that I want a magnetic compass to sight on looking out over the bow. Yes I know about gps headings and flux gate units, I just like a good magnetic compass in front of me. My helm area recently had the addition of the Furuno 1815 radar and it's crowding my Icom VHF so I'm looking at relocating it, nothing like your project but will be interested in yours for sure. :)
Larry, note the a/c & h vent for another project idea.
But I do lust after after a bow thruster after all these year or not ! 100' mid-ship line still works if needed.
I use the perforated blue rubber non-skid that comes in rolls and can be cut to any size to dampen down the white area reflection.
 

Attachments

  • IMG_2165.jpg
    IMG_2165.jpg
    146.4 KB · Views: 122
Last edited:
Robert and Dody aboard Mango Mama supervised this good looking Manatee helm modification that solved the sight-angle issue with a modern display. It's neat, clean, organized and looks like it belongs. I really wanted something like this but I also wanted to keep my old compass dead center and on top of the console. This design, nice as it is, wouldn't allow me to do that without additional compromise in vision to the pulpit. I needed something with an angled section closer to the pilot position (to reduce the needed angle) and a flatter section toward the windshield.

Looks like Roberts setup is a good start for planning your version of the instrument layout. You can change the angles and dimensions to get what you desire. Sounds like a fun project. The stern thruster he has would go well on your rig :socool:
 
Looks great, but how do we know it's real, Larry? :rofl: :hide: Seriously, the ergonomics look very good. Nice planning and execution!

Yes, I really like it, but like most well done custom modifications, this one was big bucks. I was trying to work with a budget around $500 and we're talking about two boat bucks to get this one done. Still, a similar effect could have been had with this bolt-on console from Endeavour Catamarans (first photo below). The size is about the same and it even has a mounting flange for bolting or gluing down to the old helm surface. These are hand-laid consoles Bob Vincent makes in-house for his 36 and 44 trawlercats. He might be talked into making one for around $400.
 

Attachments

  • Endeavour helm.jpg
    Endeavour helm.jpg
    194.8 KB · Views: 111
I'm old school in that I want a magnetic compass to sight on looking out over the bow. Yes I know about gps headings and flux gate units, I just like a good magnetic compass in front of me.
Larry, note the a/c & h vent for another project idea. I use the perforated blue rubber non-skid that comes in rolls and can be cut to any size to dampen down the white area reflection.

Hmmm. Hadn't thought of including heat or A/C vents while I've got this thing torn up. Good idea.

Like you, I can't get past having my compass in easy view and in-line with the bow pulpit. Anyway, after a year or so of fiddling around with Craigslist and Marine Surplus stores, here's what I finally came up with (photo 1).

This center console is mfg. by C & M Products in Lake Placid, Florida. Cost for building one extra thick was $425. The top is an almost square 26w X 27L. The space I wanted to cover on the helm was 24w X 26L, so sawing off the top 12-15" would give me a custom cap to fit completely over the raised contour area of the instrument panel, allowing it to be fastened by screws on each side or, in my case, filled with expanding foam for a snug fit. A large portion of the remaining console will be used for overhead console boxes in a later project.
 

Attachments

  • center console .jpg
    center console .jpg
    116.6 KB · Views: 116
  • making template.jpg
    making template.jpg
    132.9 KB · Views: 113
  • after cut, filing.jpg
    after cut, filing.jpg
    137.3 KB · Views: 106
  • first fit of new console.jpg
    first fit of new console.jpg
    145.7 KB · Views: 111
Where is that Garmin touch screen going?
 
Where is that Garmin touch screen going?

Dave: You're right about the stern thruster. I'd love to be having the problem of finding a space for it. Meanwhile, the Garmin 12" display goes on the upper left of the instrument area. Analog gauges, starter button, stop button and idiot lights beneath the display, switches and 12 volt power supply panel on the upper right, windlass switch on the flat area right side, compass at the center. This should leave a decent space for the auto pilot head at the lower right, and still enough room for an I-pad mini or a couple of 4" displays also on the right.
 

Attachments

  • old helm cut to final size opening.jpg
    old helm cut to final size opening.jpg
    167.6 KB · Views: 102
  • applying template for display cut.jpg
    applying template for display cut.jpg
    102.3 KB · Views: 91
  • display cut made.jpg
    display cut made.jpg
    100.3 KB · Views: 107
Good post.....

Can you comment about the Nida Core, how strong is it?

I've thought of doing an aluminum panel, using .800 thickness, like we use in aircraft panels. One can set up the template on a CNC machine and make a trial panel for fitting. And then easily make minor adjustments if needed. And down the road make another panel if you change something.
My only issue would be sealing the edges to be water proof, but can figure that out. Would probably fasten to a starboard "box" to affix the panel to. Easy to open up and work on things with a hinge on one edge.

But yours looks pretty good, and the glass work isn't hard and very easy to repair if needed. Do you have a hinge to open it up?
 
Nice project Larry . Good idea on the center console. Glad to see you back at it .
 
Seevee: The nida-core was only placed beneath the instrument area. The rest of the console is basically 1/4 to 3/8" solid glass. The nida-core area is absolutely rigid, no flex, and no compromise. Although I cant really see any flex in the 26" span across anywhere on the console, I paid to have several more layers thrown in.

The hinge idea was something I wanted at the outset, but there is a huge open area under the helm that I can actually get into. Once the wiring is done, I'll take a look at how much more length would be needed to extend the harness enough for a hinged access. Otherwise, there's no real issue with servicing from underneath.

Continuing on, after a lot of measuring and decisions where to locate the various controls and gauges, the next step was to drill and cut the openings. The old idiot lights still worked well, so I did what I could to maintain the order of the original Yanmar instrument panel. I bought a new ammeter to match the standard oil pressure and temperature gauge. Additionally, there a push button start and a push button stop switch. Then there was the a circular, surface mounted alarm speaker (about 1 inch in diameter, an 8 gang rocker switch panel with three 12 volt power sources and a volt meter, a key starter switch, a windlass rocker control and my trusty compass yet to mount. Here's the console after cutting and drilling all but the key switch hole, which I will drill at the extreme lower right so the keys will hang off the edge away from the wheel.
 

Attachments

  • new console holed and ready to install.jpg
    new console holed and ready to install.jpg
    119.1 KB · Views: 97
  • using wire cutters to remove gauges and lights from old panel.jpg
    using wire cutters to remove gauges and lights from old panel.jpg
    121.4 KB · Views: 94
  • bare idiot light.jpg
    bare idiot light.jpg
    74.4 KB · Views: 89
Nice writeup Larry, and great job as always. Looks really slick.
 
Smart, thoughtful and efficient update. Good-looking, too. Thanks for sharing that project, Larry.
 
Larry,

Great info and thx.

(the other Larry)
 
Console taking shape. I have a teak pedistal to add under the compass, and I I'll likely pull everything out one more time and use some tracing paper to make a template for cutting out some of that non-skid, non-glare vinyl layment stuff that Bill on HiDHo was mentioning above. Who knows....If we decide later on that it would look better with teak panels, the template would save a lot of time.
 

Attachments

  • image.jpg
    image.jpg
    115.9 KB · Views: 99
Last edited:
Ok...here is the last time you'll see the new helm console in the raw. After thinking of everything I possibly could, it seemed OK to pull everything out one more time and make a stencil of the layout. All I did was use a piece of packing paper and trace all the holes out with a felt pen. As I noted above, there could be many things that I would like to do to improve the console appearance later on. This template will go along way to making that a simple process.

Before quiting today, I sanded the contact areas beneath the perimeter of the console, mixed some epoxy resin and glued the console in place. Then I took some 7 lb. expandable foam and injected it into the void between the inside of the console and outside of the raised flanges of what was already there. I've used this stuff before and it sticks like resin. Tomorrow, re-installing all the equipment and lots of wiring.
 

Attachments

  • image.jpg
    image.jpg
    111.5 KB · Views: 79
Dang Larry, what a great improvement. You will love having all your instruments centrally located and readily visible. Are you planning on hinging the panel to lift for access?

Here's a picture of Moonstruck's helm instruments while underway. Like you, I like my compass at dead center of the panel.
 

Attachments

  • CIMG0104a.jpg
    CIMG0104a.jpg
    67.7 KB · Views: 75
Gosh Larry, that looks beautiful. Every change you've made to Bucky has been a work of art. Very spiffy!

Like you my compass is dead center and constantly in use. I grew up steering a compass course and anything else seems odd.

I do wonder if you're able to see over your instruments now when sitting. It looks high, at least to me. Of course I'm not the tallest individual on the planet!

Your idea for a hinged access is a good one. It is easier to work from above in most cases too.

Congratulations and as others have said, nice job.
 
Are you planning on hinging the panel to lift for access?

Seevee mentioned that earlier. It could be that I would arrange something at some point, but at least for the time being, the access space below the console on these Manatees is so large that one could put a real Manatee in there. Changes, additions, wiring mods, etc. are pretty simple.
 
I do wonder if you're able to see over your instruments now when sitting. It looks high, at least to me. Of course I'm not the tallest individual on the planet!

Yeah, I can see how you would think that, but I must have had you in mind when I kept looking for a lower profile design. At least for the Admiral and I, the reason for choosing this design instead of the higher profile version pictured earlier was because both of us like to align the compass with the pullpit for an easy reference on trajectory. We practiced with different heights of boxes before we settled on this compromise. As before, the pulpit is in the line of sight with the helm chair adjusted for steerage AND at its lowest setting. As you are acutely aware of, those of us with shorter bows need those reference points.
 

Latest posts

Back
Top Bottom