Inside material on side wall replacement

The friendliest place on the web for anyone who enjoys boating.
If you have answers, please help by responding to the unanswered posts.

Beers30

Veteran Member
Joined
Jun 15, 2017
Messages
37
Location
Usa
Vessel Name
No Ship
Vessel Make
1979 30' Californian
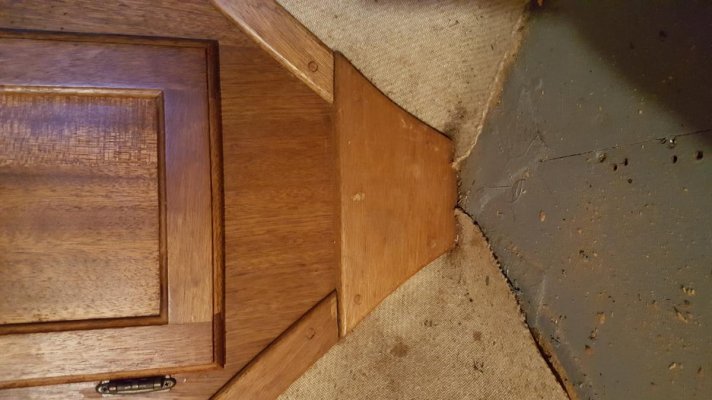
Sorry if this posts more than once but I can't find it after I send. I am replacing the material glued to the sides in the bunk area due to diesel smell and stains. The material is held in by vinyl trim along the too and wood trim on the,sides. The wood looks to have wooden plugs. Do I drill these out and replace? The vinyl trim seems to a have tacks on the underside. I dont want to remove until I figure out how to replace. Any suggestions? Thank you in advance!
 

Attachments

  • 20170716_131305.jpg
    20170716_131305.jpg
    108.2 KB · Views: 122
  • 20170716_131322_001.jpg
    20170716_131322_001.jpg
    102.9 KB · Views: 115
I think that you will find that the material under the wood trim is stapled to the underlying bulkhead. The vinyl trim is actually 2 pcs; one sort of u-shaped & the other moer like a cover piece. The material is stapled thru the bottom piece. At least that is how it was put together on my 34 LRC.
 
Thanks, that makes sense. So the outer piece of the plastic trim should snap on the piece with tacks? I didn't notice the two pieces but will check it out.
 
Doesn't the material need to go under the wood trim? Anyone know the best way to do this?
 
Has anyone else replaced this material before? Any help or ideas would be greatly appreciated!
 
My 34 came to me with that material replaced with carpet. It looks good, adds a bit of insulation and functions well.
 
Thanks, is your carpet glued up to the vinyl and wood trim or was the trim lifted and replaced over the carpet. That is what I am trying to find out, how to go about lifting the trim and repalcing. I might go with carpet too if I just have to butt up against the trim.
 
I don't know how it's attached, but yours looks like a relatively simple pop out the plugs, remove the screws and trim piece, replace the fabric, trim, screws and plugs, sand and varnish.

EDIT: To me, that whole job is a week's worth of work. I absolutely amazes me that dhays gets his entire engine replaced in less time than that! :flowers:
:thumb:
 
Last edited:
I have removed thousands of plugs over the years and most plugs come out with using an ice pick poked into the center. if they were glued in they will break free when split from the center. usually they are less than 1/8 inch thick.
If you have ever worked on a boat with teak decks you will know the drill. Good luck
 
I think you'll find the plugs a lot thicker than 1/8" on the Californian. Be careful pulling the plugs that you don't split the wood around the hole. One way that I found that works relatively well is to get a nice sharp 1/4" wood chisel. Put it in the middle of the plug press and twist.

The screws can be a real bear to get out. Be sure to clean all the glue out first and use the correct size screwdriver so you don't strip out the head. Also, the hole has to be completely clear around the edges or when you back out the screw it will lift and split the top of the wood.
 
Thanks for the input. I started taking the trim off today, opened the 1 piece vinyl trim and pulled the staples where the cloth is and pulled out the plugs like recommended on the wood trim. Worked like a champ. Got one side done in about 1 hour. Do they sell the teak plugs anywhere? At a marine store possibly?
 
Some marine stores will sell plugs, yes.
I've seen them online although where I do not remember.

I make my own.
The plug cutters can be purchased from tool supply places like Lee Valley or your local woodworking supply place. You just need a small supply of scrap teak.
 
Your interior wood is Mahogany so you will need Mahogany plugs not Teak. You are still in luck as you can buy them or make them.

Harbor Freight sells a set of plug cutters for a few $. I made my own plugs using a small drill press and a plug cutter.
 
I was wondering about the wood type. Thank you!
 
Philippine Ribbon Mahogany is the striped wall coverings. The rest is another type of mahogany, but not sure exactly what it is.

I find most woodworking supplies I need at Rockler. Here's a Rockler in Concord near Oakley...

Concord Store

They have flat plugs that get sanded smooth like the ones you have in there now and they have the button-type that fill the hole and leave a rounded button top exposed. They also have stocks of quality wood for making new trim pieces if needed.

I've used mahogany veneers from Rockler to cover holes of removed equipment. They match pretty darn well.

I agree with FlyWright on Rockler. I've used their Honduran Mahogany to make replacement trim pieces and plugs. The solvent borne lacquers really brought out a nice gold tone on the original Mahogany. If you use a modern waterbased polyurethane clear (PUD) then it doesn't quite bring out the rich gold tone on it's own. Most fresh Mahogany is pinkish. The Honduran is a little more to the gold side but still red. I've found that by wiping on a yellow dye stain (Rockler) first that you can get close to the original tone.

P.S. The Californians were Teak on the outside and Mahogany on the interior.
 
Great information, thank you!
 
Thanks Tom, heading to Rockler!
 
Back
Top Bottom