You are using an out of date browser. It may not display this or other websites correctly.
You should upgrade or use an alternative browser.
You should upgrade or use an alternative browser.
New owner of 34 trawler
- Thread starter 34Clipper
- Start date
The friendliest place on the web for anyone who enjoys boating.
If you have answers, please help by responding to the unanswered posts.
If you have answers, please help by responding to the unanswered posts.
Ok you have all reassured me it's ok to make changes to make it my own. I was just worried adding led downlights etc would be trying to make it something it's not.
I think I want it original on the outside, shining in teak, except I think I might swap all the old brass/bronze fittings over to chrome, and a modernized twist on the inside.
Great, made up my mind.
BruceK you prob did see it there, hasn't moved in a while.
Andy G I know the front cabin floor is shot but am unsure of the condition of the supporting timbers. Would it be obvious if the engine stringers are stuffed? Guessing it would be soft and spongy?
Can't wait to get cracking on the whole project, but this rain has been ridiculous!
- Joined
- Jun 25, 2008
- Messages
- 10,104
- Location
- Australia
- Vessel Name
- Now boatless - sold 6/2018
- Vessel Make
- Had a Clipper (CHB) 34
Rain...what rain..? We're just finishing the longest, hottest, driest summer up here in Qld on record. Record number of days above 30º, 90% state now drought declared. Current few storms will disappear in a flash. In fact it has been so hot for so long, one just wanted to stay home in the aircon. Hardly even used the pool. Too warm. I'll feel like it was the summer that never was in terms of boating activity. 
Really Peter? Jeez I wish I could share some of it, cause we have had 3 weeks of rain! My garage has flooded numerous times. We had golfball sized hail at one point. Not boating weather really, but on the plus side I was able to find an entry point for a few leaks, and found how the deck core on the flybridge has rotted out through a crack in the fiberglass. The water has been running down the mast and over the crack. Once it dries up I'll get a start on the repairs. I guess it's best to work from the top down. Hope you queenslanders get some of our rain.
BruceK
Moderator Emeritus
- Joined
- Oct 31, 2011
- Messages
- 13,347
- Vessel Name
- Sojourn
- Vessel Make
- Integrity 386
Another week of rain is predicted. I think it is clearing to the north Peter, you might be in luck. Our summer was the hottest ever too.
Tim, seal the crack with Sikaflex when you can, that will stop the water entry. Then come the repairs.
Tim, seal the crack with Sikaflex when you can, that will stop the water entry. Then come the repairs.
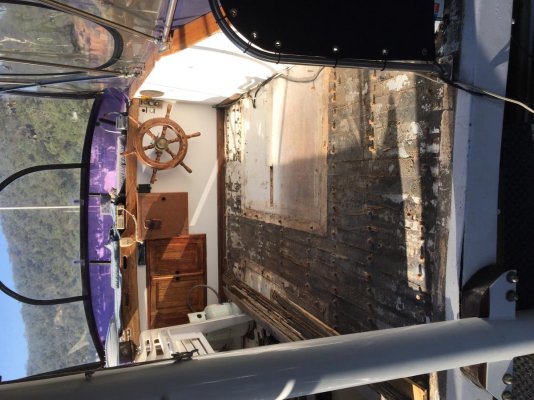
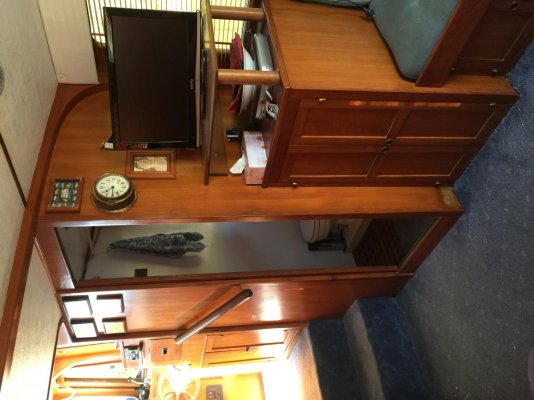
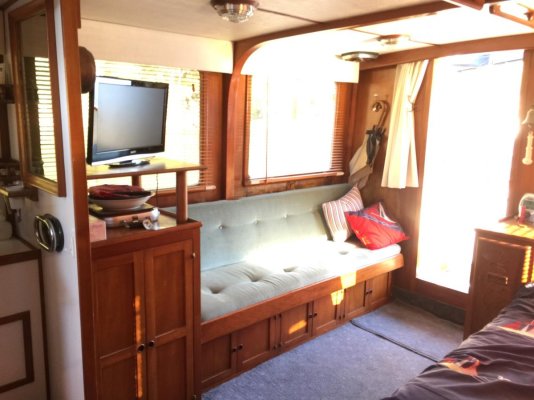
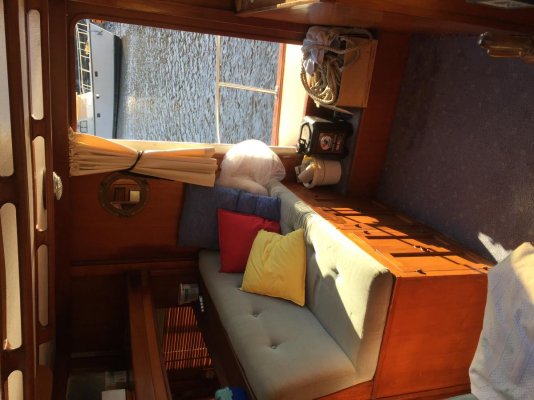
Interior shots
Hi guys,
Finally the rain has gone and I was able to visit the boat this weekend. I spent the day stripping the teak decking from the upper flybridge by drilling around the screws with a hole saw and levering up the planks with a prybar. I can already feel where the core has rotted out.
Took a few progress pics, and a few of the interior as I know you were all intrigued. Please excuse the mess, I have tools and stuff everywhere. The bed is still made up, but this converts back to the conventional dining table and L-shaped lounge so you will have to use your imagination there haha
Attachments


Here is a similar cheoy Lee 36 that I just picked up for a song, but it is rough with all mechanicals rebuilt, thought you may be interested. The only differences I see are the steering opposite, and a bed in place of my sette. They may have been built around the same yard\area. I seem to have read that some of the tt companies made boats for others, or were rebranded.
BruceK
Moderator Emeritus
- Joined
- Oct 31, 2011
- Messages
- 13,347
- Vessel Name
- Sojourn
- Vessel Make
- Integrity 386
Daniel, yours is similar to the boat in the link at post 18.
McGillicuddy
Guru
- Joined
- Dec 4, 2015
- Messages
- 754
- Location
- USA
- Vessel Name
- Scot Free
- Vessel Make
- Cheoy Lee 53' Efficient
Mr Daniel420, I am fairly sure all Cheoy Lee boats were built in Hong Kong at their own facility and not in Taiwan which a completely different country.
- Joined
- Mar 17, 2012
- Messages
- 4,276
- Location
- Australia
- Vessel Name
- Insequent
- Vessel Make
- Ocean Alexander 50 Mk I
Ok you have all reassured me it's ok to make changes to make it my own. I was just worried adding led downlights etc would be trying to make it something it's not.
I think I want it original on the outside, shining in teak, except I think I might swap all the old brass/bronze fittings over to chrome, and a modernized twist on the inside.
Great, made up my mind.
BruceK you prob did see it there, hasn't moved in a while.
Andy G I know the front cabin floor is shot but am unsure of the condition of the supporting timbers. Would it be obvious if the engine stringers are stuffed? Guessing it would be soft and spongy?
Can't wait to get cracking on the whole project, but this rain has been ridiculous!
Get some prices on comparably sized fittings first! Actually, I'd suggest getting some quotes on having your existing fittings chrome-plated (with a good thick coating!) and re-use them.
I remember the 'Skipper a Clipper' ads in the mid 80's when living in Sydney. Still recall the lust! At the time we only had a 19' runabout. Enjoy the boat, but realise that it will eat all the the spare time and money you have available. And I say this a couple of years after my own refit...
Haha, yes I am aware of the time and money it will devour, but for the enjoyment it has given and will give for years to come will be worth it.
Not a bad idea to get the original fittings chrome plated, I assumed a new LED replacement would be cheaper but possibly not so. And I bet "they don't make em like they used to".
I am lucky enough to be skilled with my hands so hopefully doing most of not all the work myself will save a packet.
Thanks for your input.
- Joined
- Jun 25, 2008
- Messages
- 10,104
- Location
- Australia
- Vessel Name
- Now boatless - sold 6/2018
- Vessel Make
- Had a Clipper (CHB) 34
34Clipper, as an owner of a similar vintage boat, I would counsel against getting rid of, or even chrome plating, the original bronze fittings. In fact doing that could even be described as almost a sacrilege. I doubt any would be brass, (but some might be - ok if not actually immersed in salt water), and bronze has not been used on boats for centuries for nothing, as it is the best non-corroding metal for exposure to the elements, especially salt water, going round. However, it does develop a protective layer of verdigris, which is a sort of green colour, and this is not galvanic corrosion, so the bronze can be cleaned and buffed up, and look really salty and seaman-like.
https://en.wikipedia.org/wiki/Verdigris
Just sayin'
https://en.wikipedia.org/wiki/Verdigris
Just sayin'
Last edited:
See peter, this is the sort of feedback I was hoping for when I mentioned modernizing. I am familiar with cars and doing things that are "sacrilege" to their period etc so you may be right.
Only thing that annoys me is inconsistency. Chrome interior lights, stainless handrails, stainless bow roller, stainless bollards and cleats, stainless/chrome everywhere else and then bronze lights.
I dunno, maybe buff them and see how they look.
Only thing that annoys me is inconsistency. Chrome interior lights, stainless handrails, stainless bow roller, stainless bollards and cleats, stainless/chrome everywhere else and then bronze lights.
I dunno, maybe buff them and see how they look.
- Joined
- Jun 25, 2008
- Messages
- 10,104
- Location
- Australia
- Vessel Name
- Now boatless - sold 6/2018
- Vessel Make
- Had a Clipper (CHB) 34
See peter, this is the sort of feedback I was hoping for when I mentioned modernizing. I am familiar with cars and doing things that are "sacrilege" to their period etc so you may be right.
Only thing that annoys me is inconsistency. Chrome interior lights, stainless handrails, stainless bow roller, stainless bollards and cleats, stainless/chrome everywhere else and then bronze lights.
I dunno, maybe buff them and see how they look.
With these boats of that age, they usually used chromed fittings like lights inside, and stainless steel for the main handrail uprights outside, with teak capping rails, but bronze for the cleats and main bow roller. That's how mine was anyway. With as much of the outside bronze removed already I can sympathise with your going all chrome or stainless, but try buffing the bronze fittings up first. Chromed surfaces will not do well outside in the salt air, so have to be stainless, and you might get a pleasant surprise as really shiny bronze looks terrific - much nicer than just stainless or chrome.
PS. Also, now you have been well and truly welcomed, I have moved the thread down to under 'Taiwanese Makes' in that section where the different classes are to be found, so your thread is among others with similar boats for easy info swapping.
Last edited:
BruceK
Moderator Emeritus
- Joined
- Oct 31, 2011
- Messages
- 13,347
- Vessel Name
- Sojourn
- Vessel Make
- Integrity 386
I buffed a very dull door restrainer/catch on my previous boat. Not easy,needed a "flapper" polishing attachment(would work on a Dremel),then applied a good protective metal polish. Looked great, and was maintained by the occasional polish.
I think my bottom deck upright cap rail support brackets, and the end mounts for the hinged flip up gates, are all bronze. Mooring cleats too. I`ll need to be very bored one day to polish them, but they would look good.
I think my bottom deck upright cap rail support brackets, and the end mounts for the hinged flip up gates, are all bronze. Mooring cleats too. I`ll need to be very bored one day to polish them, but they would look good.
- Joined
- Jun 25, 2008
- Messages
- 10,104
- Location
- Australia
- Vessel Name
- Now boatless - sold 6/2018
- Vessel Make
- Had a Clipper (CHB) 34
I buffed a very dull door restrainer/catch on my previous boat. Not easy,needed a "flapper" polishing attachment(would work on a Dremel),then applied a good protective metal polish. Looked great, and was maintained by the occasional polish.
I think my bottom deck upright cap rail support brackets, and the end mounts for the hinged flip up gates, are all bronze. Mooring cleats too. I`ll need to be very bored one day to polish them, but they would look good.
Yes, I draw the line at polishing cleats, as they are usually mostly covered by rope anyway.
PS. Also, now you have been well and truly welcomed, I have moved the thread down to under 'Taiwanese Makes' in that section where the different classes are to be found, so your thread is among others with similar boats for easy info swapping.
Thanks peter,
Very welcomed now and appreciate the move
Andy G
Hospitality Officer
- Joined
- Sep 20, 2010
- Messages
- 1,897
- Location
- Australia
- Vessel Name
- Sarawana
- Vessel Make
- IG 36 Quad Cabin
I know the front cabin floor is shot but am unsure of the condition of the supporting timbers. Would it be obvious if the engine stringers are stuffed? Guessing it would be soft and spongy?
Can't wait to get cracking on the whole project, but this rain has been ridiculous![/QUOE]
If the bearers are shot you may notice the engine mounts start to sag. If that goes on for a while the next thing that may happen is your bilge pump will start working overtime as the weight of the engine/gear box on the drive shaft breaks the seal on the shaft gland stuffing box.
This is not good, replacing the stringers is very expensive.
Don't worry too much about it, but do be aware of it.
Last edited:
Well good news is the stringers seem solid as a rock. Bit of cracked fiberglass, but very solid. Looks like nobody has drilled any holes through it and the rear gland is dry as a nuns....
So a bit of positive news there. I do get a bit of vibration through the boat with the Lehman at idle but I guess that's normal and it's the same as I remember over the last 20 years. I do wonder why they didn't make a bigger steel plate under the engine mount to spread the load a bit more, but I guess they are holding up ok.
So a bit of positive news there. I do get a bit of vibration through the boat with the Lehman at idle but I guess that's normal and it's the same as I remember over the last 20 years. I do wonder why they didn't make a bigger steel plate under the engine mount to spread the load a bit more, but I guess they are holding up ok.
UPDATE! It’s Been a long time
Hi everyone. It’s been a massive year so didn’t get anything done since my last post until this week. I decided to begin the restoration.
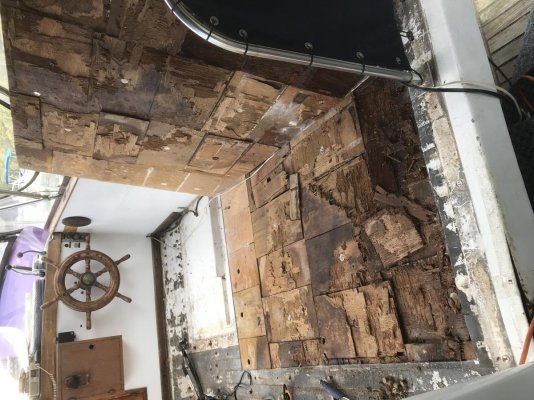
As discussed I had decided to tackle the rot in the upper bridge deck first.
I had already removed the teak decking so I started by cutting the top fiberglass layer with the multi tool and exposed the problem. The plywood was completely rotted and wet as anything. Notice how they used heaps of little squares which are joined with resin instead of big sheets. Some say it is to achieve the curve and isolate sections with resin to stop rot spreading. Others say it was a cost cutting method by using up all the scrap around the boatyard. Whatever the reason it wasn’t the best method. The rot covered at least a third of the upper deck.
Hi everyone. It’s been a massive year so didn’t get anything done since my last post until this week. I decided to begin the restoration.
As discussed I had decided to tackle the rot in the upper bridge deck first.
I had already removed the teak decking so I started by cutting the top fiberglass layer with the multi tool and exposed the problem. The plywood was completely rotted and wet as anything. Notice how they used heaps of little squares which are joined with resin instead of big sheets. Some say it is to achieve the curve and isolate sections with resin to stop rot spreading. Others say it was a cost cutting method by using up all the scrap around the boatyard. Whatever the reason it wasn’t the best method. The rot covered at least a third of the upper deck.
Attachments


Last edited:
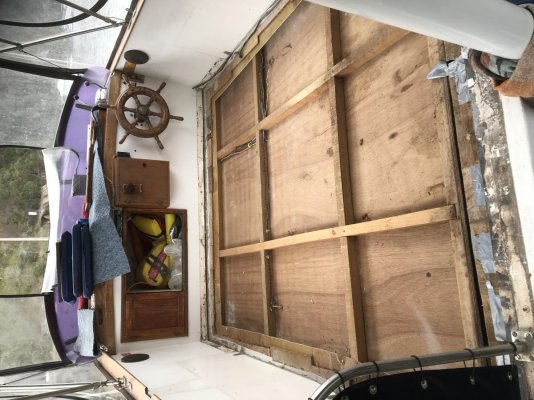
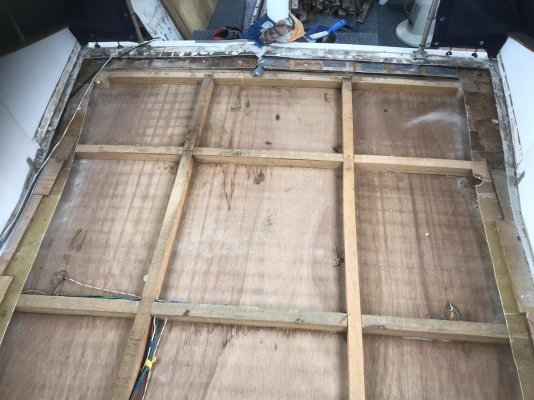
As I had the top layer of fiberglass removed I decided I may as well replace all of the ply, rotten or not as the ply had delaminated from the fiberglass below. These squares were quite easy to pull up. What was left was a 1mm thin sheet of glass under the ply. I was worried that because the rot was so bad, there could be a chance the water had made its way into the structural timbers, and since I had gone this far, I decided to cut the thin sheet of glass to expose the frame. To my surprise.... it looked as good as the day it was built 40 years ago. There was slight signs of water stains so I am glad I got on top of this sooner rather than later.
Attachments
Last edited:
So now the deck has been completely cut away I might run a few wires along side the original loom for other lights etc that have been added on over the years and previous owners simply run wiring along the edge of the deck etc as it could not be hidden any better... until now.
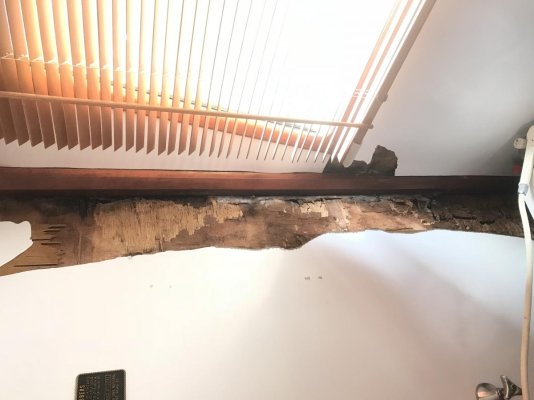
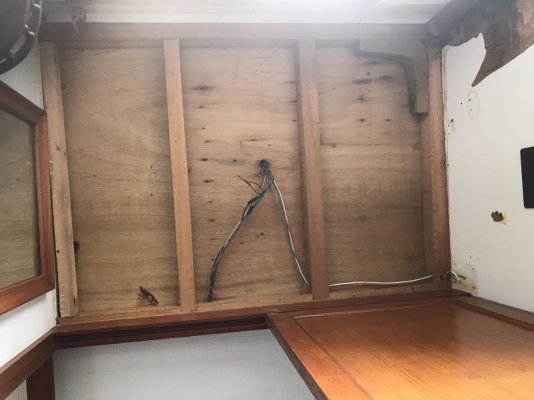
So that led me to chase to loom. It ran to the rear of the top deck and looked like it went down the rear wall into the lower deck. Directly under that is the saloon bathroom . The walls of the bathroom have a fair bit of rot as well from another bad leak so I thought I would start stripping the bathroom to see where the wiring loom went, and to check out if there was water damage under the damaged area above. As I removed the laminate panels I was shocked to see the extent of the rot in the walls, the more I poked the more of the engine room I could see! The ceiling was a different story, not one bit of damage! Very happy there. And a bonus, found the wiring loom too. Was a bit shocked to find the 240v wires running with the 12v. One simple screw through the loom could energize the 12v system with 240v!
So that led me to chase to loom. It ran to the rear of the top deck and looked like it went down the rear wall into the lower deck. Directly under that is the saloon bathroom . The walls of the bathroom have a fair bit of rot as well from another bad leak so I thought I would start stripping the bathroom to see where the wiring loom went, and to check out if there was water damage under the damaged area above. As I removed the laminate panels I was shocked to see the extent of the rot in the walls, the more I poked the more of the engine room I could see! The ceiling was a different story, not one bit of damage! Very happy there. And a bonus, found the wiring loom too. Was a bit shocked to find the 240v wires running with the 12v. One simple screw through the loom could energize the 12v system with 240v!
Attachments

RT Firefly
Enigma
Greetings,
Mr. 34. You have entered the lifelong search for leaks. Welcome to boating!
"...not sure why they are sideways as they aren’t on my phone.." Probably a southern to northern hemisphere transporter malfunction.

Mr. 34. You have entered the lifelong search for leaks. Welcome to boating!
"...not sure why they are sideways as they aren’t on my phone.." Probably a southern to northern hemisphere transporter malfunction.
Haha well at least they aren’t upside down!
Yes it seems like leaks are endless, but I’m just going to keep stripping stuff down until all the rot is out and can hopefully repair the cause as I go. So far I have found the cause of the bridge deck leak, a crack in the fibreglass next to the mast is channeling rainwater into the deck core. And the rot in the bathroom has been caused by exterior cracks and a few screws protruding through the fibreglass from the inside.
Fingers crossed I can learn and successfully work with fibreglass.
Never done it before but I am a keen and relatively fast learner.
Cigatoo
Guru
“So now the deck has been completely cut away I might run a few wires along side the original loom for other lights etc that have been added on over the years and previous owners simply run wiring along the edge of the deck etc as it could not be hidden any better... until now.”
Suggestion......Add a piece of pvc pipe to run your wires through. Be sure to add a chase string through the pvc for future wiring modifications
Suggestion......Add a piece of pvc pipe to run your wires through. Be sure to add a chase string through the pvc for future wiring modifications
SeaMoose
Senior Member
- Joined
- Oct 7, 2007
- Messages
- 360
- Vessel Name
- Sea Moose
- Vessel Make
- 1976 34' D/C Taiwanese Trawler
The biggest question when you own one of these vessels is “when do I stop replacing core?”
Similar threads
- Replies
- 0
- Views
- 325
- Replies
- 3
- Views
- 615