You are using an out of date browser. It may not display this or other websites correctly.
You should upgrade or use an alternative browser.
You should upgrade or use an alternative browser.
DIY Canvas Tips, Tricks, Recommendations
- Thread starter Bacchus
- Start date
The friendliest place on the web for anyone who enjoys boating.
If you have answers, please help by responding to the unanswered posts.
If you have answers, please help by responding to the unanswered posts.
Crusty Chief
Guru
One can never have enuff bags, good luck Kev!
foggysail
Guru
Joining the elites today--
For those interested---Sailrite is offering a 10% discount for most of this month. I just took advantage of it with my order for 30 yards of Navy Blue Sunbrella along with 5 yards of Shelter Rite.
Very busy lately although I hope to squeeze enough time to complete least 1/2 of my boat's canvas before hauling on 24 October. As I type, my helm is completely exposed to the weather after the installation of my new Atlantic Tower's hard top. It matches their hard top I have over my aft deck.
I have already installed awning track and made the needed patterns for sewing.
Foggysail
OP
OP
Here's an interesting product - Zipper Extender - adds an inch to zipper closures that are too tight...interesting product.
They also have an interesting page of tips / considerations when buying a canvas sewing machine - includes several Mfg recommendations
Walking Foot Sewing Machine Tips
They also have an interesting page of tips / considerations when buying a canvas sewing machine - includes several Mfg recommendations
Walking Foot Sewing Machine Tips
ksanders
Moderator Emeritus
canvas patterning
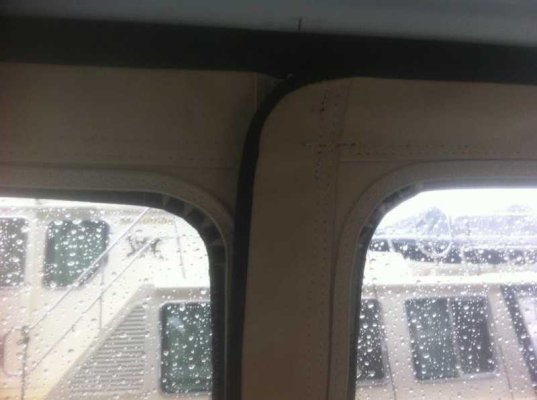
I am starting to think about the rear cockpit canvas on my boat.
Here is an example of that I want to so, same model boat.
What I really like is the rounded corners!
So... How do you think this was built?
How would you hem the curved corners? Or would you? Are they just cut out with a hot knife? Binding tape?
I am SOO curious as to what they did to make those corners
All I have is the photos, but I sure like the end result.
Attachments

ksanders
Moderator Emeritus
I did get a couple of close ups of the corners. It looks like they cut the corner on the radius and used binding on the edge.
On the inside they did the same thing, but with a lighter colored sunbrella.
Most canvas work that I've seen seems to be made using straight pieces, forming hard angles at the corners. I really like the look of the radiused corners on this job.
On the inside they did the same thing, but with a lighter colored sunbrella.
Most canvas work that I've seen seems to be made using straight pieces, forming hard angles at the corners. I really like the look of the radiused corners on this job.
psneeld
Guru
When I did the rounded corners on my flying bridge, my measuring was a bit off for the rounded and sloping surface it needed to look nice. Fortunately fabric and not clear vinyl so cheating as inserting a triangulation piece helped.
I am guessing your example was done by someone very good and/or was a good or persistent pattern maker....
It does look very nice.
I am guessing your example was done by someone very good and/or was a good or persistent pattern maker....
It does look very nice.
ksanders
Moderator Emeritus
Thinking about the corners...
In order to do a hard angle corner you need two strips of material to intersect at whatever angle. Very efficient material wise.
To do a round corner you need a corner piece, plus two separate pieces of material, or one very large piece of material and you cut out the area for the window. Thats how this one looks to me. Like it is a big piece of sunbrella that someone cut out the center of. Not so material efficient, but really nice looking.
On the inside he might have used strips of lighter material, but I cannot see the seam where he would have joined the corner piece to the side and top.
What I think we are looking at is a cut out window in a large piece inside and out with flaps sewn to hide the zippers. I think that the stitching we see in the photo.
Attachments
Last edited:
OP
OP
I am starting to think about the rear cockpit canvas on my boat.
Here is an example of that I want to so, same model boat.
What I really like is the rounded corners!
So... How do you think this was built?
How would you hem the curved corners? Or would you? Are they just cut out with a hot knife? Binding tape?
I am SOO curious as to what they did to make those corners
All I have is the photos, but I sure like the end result.
Kevin
Are you after the clear corner pieces at the aft corners or the - what looks like - small radius around each clear window panel trim?
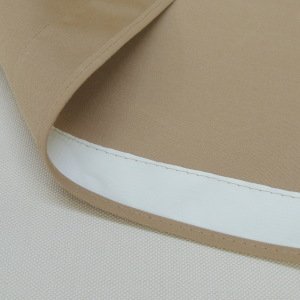
You can but 2" Sunbrella Facing - which will give a 2" edge border on a window and the facing & window are finished with binding at the edge.
For the curved corners you have to custom make the corner piece and leave and extra 1/4 - 3/8" the inside edge to fold under. on the curves you will have to slit the extra 1/4 to give you the curve. I like doing this w/ a hot knife or elec soldiering iron tip to stop raveling.
I'm guessing the small edges might be the facing tape - the wider bottom pieces can be made from strips of fabric left oversize and turned under to give the finished edge at the window - the outside edge being finished w/ binding.
Panels can be made 2 ways -
1) one piece of canvas w/ a cut-out the size & shape you want the window - the actual cut-out is slightly smaller to allow mat'l to be turned under for stitching. For straight edges the turn under is easy fold & stitch for curves you will need to slit as mentioned above. You cut the window oversize and sew it in place before any cut-out in the Sunbrella to retain overall shape - then make the cuts and turn under & sew the edge nearest the window
2) The panels can be made w/ the clear material essentially full size of the desired panel and the edges finished w/ facing tape (sunbrella sells this 2" wide w/ edges already turned under) & binding. If you need a wider flexible piece at the bottom you simply make up a wider "tape" from Sunbrella & turn the edge under before applying it to the bottom of the clear window. Basting tape is useful to get alignment & hold the materials in place while sewing
Pics
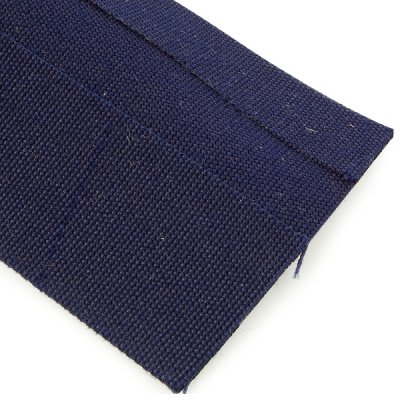
Binding w/ attachment
2" edge turned Sunbrella facing
Panel w/ facing & binding - Note Facing in this case inside for reinforcing but it would be similar if applied to the outside of a clear panel as the edge trim
Attachments
foggysail
Guru
There are videos on Youtube and Sailrite showing how to make corners. My experience is you have to be very careful making the pattern along with copying it. Have to keep your chalk sharp, newer chalk pencils allow you to have less errors in copying the pattern to fabric.
OP
OP
Thinking about the corners...
In order to do a hard angle corner you need two strips of material to intersect at whatever angle. Very efficient material wise.
Exactly - This is where the 2" Sunbrella facing us used
To do a round corner you need a corner piece, plus two separate pieces of material, or one very large piece of material and you cut out the area for the window. Thats how this one looks to me. Like it is a big piece of sunbrella that someone cut out the center of. Not so material efficient, but really nice looking.
I couldn't tell from the outside pic but I'm guessing you are correct - notes in last post discusses turning under the curved sections
On the inside he might have used strips of lighter material, but I cannot see the seam where he would have joined the corner piece to the side and top.
Again agree - it looks like intersecting pieces of 2" facing w/ a small corner radiused piece under them. They also added binding all around the inside to finish the inside. This could probably be avoided and still look finished if the side pieces met at an angle vs adding the radius
What I think we are looking at is a cut out window in a large piece inside and out with flaps sewn to hide the zippers. I think that the stitching we see in the photo.
I agree with you the radiused corners do add a nice look but also do add a level of complexity to make and a premium as far as material utilization.
I've seen many tops I considered very well done that had inside and outside finished but the facing intersections were angles vs radiuses - and they still looked very neat and attractive.
If you do it that way all the narrow pieces can be the pre-made 2" Sunbrella facing and the wider bottom pieces are custom made from SUnbrella fabric w/ 1 - edge turned under.
Finishing the inside does a lot to add a nice finished look and not a great expense if DIY.
Use of seaming tape is req'd for this type of work to look neat and well aligned.
You are wise to look over many boats to see what you like / dislike about various design and details. I have learned a lot by looking at others work.
One other thought - you might call or email Sailrite w/ a phot of what you are trying to copy and ask if any of their How To videos cover that detail. Even if you need to buy one vs a freeby well worth it if it covers the details. - they might be able to tell you ahead if time if / which one does cover it.
Good luck w/ the project
Last edited:
ksanders
Moderator Emeritus
I agree with you the radiused corners do add a nice look but also do add a level of complexity to make and a premium as far as material utilization.
I've seen many tops I considered very well done that had inside and outside finished but the facing intersections were angles vs radiuses - and they still looked very neat and attractive.
If you do it that way all the narrow pieces can be the pre-made 2" Sunbrella facing and the wider bottom pieces are custom made from SUnbrella fabric w/ 1 - edge turned under.
Finishing the inside does a lot to add a nice finished look and not a great expense if DIY.
Use of seaming tape is req'd for this type of work to look neat and well aligned.
You are wise to look over many boats to see what you like / dislike about various design and details. I have learned a lot by looking at others work.
One other thought - you might call or email Sailrite w/ a phot of what you are trying to copy and ask if any of their How To videos cover that detail. Even if you need to buy one vs a freeby well worth it if it covers the details. - they might be able to tell you ahead if time if / which one does cover it.
Good luck w/ the project
Thanks very much!
I have been practicing with my Sailrite sewing machine t build skills. Pillows, grocery bags, that kind of thing. Baby steps.
At the same time I am looking at the construction details of canvas jobs to analyze how they are put together.
101TUG
Senior Member
Machines
I purchased a hardly used Sailrite LS-1 (straight stitch) machine and have been using it for about 10 yrs. Straight stitch is adequate for almost all canvas work. The Zig-zag version LSZ-1 is nice but not essential IMHO - others may feel differently.
Many other heavy duty walking foot machines are out there and may have advantages over the ones mentioned. I only have experience w/ the LS-1
Bacchus,
Are you happy with your machine brand, if you doing again going to purchase same model form Sailrite?
Any recommendation we on the way to send money to doing "like you"
OP
OP
For DIY or hobby business I'd absolutely do it again. I've added the monster wheel and recommend it.Bacchus,
Are you happy with your machine brand, if you doing again going to purchase same model form Sailrite?
Any recommendation we on the way to send money to doing "like you"
Ask them about any current / upcoming specials...they usually have something around boat shows.
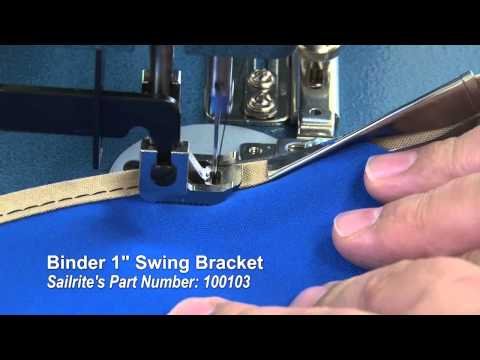
Binding attachment prettyuch essential...otherwise lookback through the thread to see what I and others have set up.
Good luck w the adventure
foggysail
Guru
Bacchus,
Are you happy with your machine brand, if you doing again going to purchase same model form Sailrite?
Any recommendation we on the way to send money to doing "like you"
Suggestion----and usually my suggestions are free and worth only what they cost.
I don't own a Sailrite machine, I own a Juki 1541S with a 1HP clutch motor. My machine has enough gonads to almost be able to sew sheet metal. OK, not trying to push a Juki, rather I want to suggest that you shop EBay or elsewhere for a used walking foot commercial/industrial machine driven with a large motor which is lacking in an inexpensive Sailrite.
Never had a so called "dull" needle problem. And for what its worth, a ball pointed needle is recommended for sewing canvas, not one that is sharp pointed. The only times I change a needle is when I break the one in the machine when it hits a grommet or something similar or teh needle hole wears a sharp edge from the thread being pulled through. The hole wear is rare, maybe after going through a couple of pounds of #92 polyester thread.
Foggy
Last edited:
foggysail
Guru
It's really all about patterning correctly. If you get any Sailrite video on patterning, you will see how to properly create a template/pattern. Then the sewing part is easy.
I agree
ksanders
Moderator Emeritus
I am figuring out that making the stitching is going to be the easy part as well.
It's the design that makes all the difference in the world. Not just technically accurate patterning, but also a design that looks good, and stays looking good over time.
As far as the sewing machine, i can say that one of the big plusses to the sailrite machine is its portability.
The ability to set it up in my salon is going to make allot of jobs easier as it will allow me to avoid the several hours of driving to get to the boat.
Edelweiss
Guru
As far as the sewing machine, i can say that one of the big plusses to the sailrite machine is its portability.
The ability to set it up in my salon is going to make allot of jobs easier as it will allow me to avoid the several hours of driving to get to the boat.
You must be a younger and stronger man than I. Every time I have to move it, I'm shocked by the weight of the Sailrite.
Don't get me wrong, I love my Sailrite, it's a great machine and stitches anything you can punch a needle through. (Including brass grommets
 )
)GoneFarrell
Guru
To you Sailrite owner/operators:
Is the zigzag functionality a necessity or just a nice to have for covers and stuff for the typical trawler?
I can see it being useful for sailmaking, but are you using zigzag function for trawler stuff?
Is the zigzag functionality a necessity or just a nice to have for covers and stuff for the typical trawler?
I can see it being useful for sailmaking, but are you using zigzag function for trawler stuff?
Capt. Jon
Guru
To you Sailrite owner/operators:
Is the zigzag functionality a necessity or just a nice to have for covers and stuff for the typical trawler?
I can see it being useful for sailmaking, but are you using zigzag function for trawler stuff?
Not so much of using the machine for zig-zag. It's the ability to move the needle to the left or the right of center as needed. This can be done without swapping out a foot to get closer to something for sewing. The zig zag model is worth the slightly higher cost.
OP
OP
To you Sailrite owner/operators:
Is the zigzag functionality a necessity or just a nice to have for covers and stuff for the typical trawler?
I can see it being useful for sailmaking, but are you using zigzag function for trawler stuff?
I don't feel that being limited to straightstiches has prevented me from doing any common top or cover projects...might be nice to have but not absolutely necessary. I think most pros doing canvas work use straight stitch machines.
101TUG
Senior Member
For DIY or hobby business I'd absolutely do it again. I've added the monster wheel and recommend it.
Ask them about any current / upcoming specials...they usually have something around boat shows.
Binding attachment prettyuch essential...otherwise lookback through the thread to see what I and others have set up.
Good luck w the adventure
Thanks I will keep you informed
101TUG
Senior Member
Suggestion----and usually my suggestions are free and worth only what they cost.
I don't own a Sailrite machine, I own a Juki 1541S with a 1HP clutch motor. My machine has enough gonads to almost be able to sew sheet metal. OK, not trying to push a Juki, rather I want to suggest that you shop EBay or elsewhere for a used walking foot commercial/industrial machine driven with a large motor which is lacking in an inexpensive Sailrite.
Never had a so called "dull" needle problem. And for what its worth, a ball pointed needle is recommended for sewing canvas, not one that is sharp pointed. The only times I change a needle is when I break the one in the machine when it hits a grommet or something similar or teh needle hole wears a sharp edge from the thread being pulled through. The hole wear is rare, maybe after going through a couple of pounds of #92 polyester thread.
Foggy
Ok I'm going to look the Juki to see difference but we living onboard so effectively a portable machine are definitively important for us
foggysail
Guru
Ok I'm going to look the Juki to see difference but we living onboard so effectively a portable machine are definitively important for us
On board? You're right, a portable is what I would look for also. Mine is on a large table and even with my 40' it would take up the whole salon
OP
OP
Ok I'm going to look the Juki to see difference but we living onboard so effectively a portable machine are definitively important for us
A large flat surface to do layout and lay pieces flat while sewing is really helpful...maybe essential...to doing a neat job. You might look for a location ashore to set up when doing lg pieces.
Crusty Chief
Guru
http://www.trawlerforum.com/forums/s32/new-canvas-22032.html
This is the link of the canvas work I did on Pairadice a little over a year ago if your interested. This was done at the marina using patio tables. Sure, it would have been nice to have a shop, but it can be done without one.
This is the link of the canvas work I did on Pairadice a little over a year ago if your interested. This was done at the marina using patio tables. Sure, it would have been nice to have a shop, but it can be done without one.
101TUG
Senior Member
A large flat surface to do layout and lay pieces flat while sewing is really helpful...maybe essential...to doing a neat job. You might look for a location ashore to set up when doing lg pieces.
how large need to be the place to make usual job?
Hugues