Krogen 42 Fuel Tank Replacement

The friendliest place on the web for anyone who enjoys boating.
If you have answers, please help by responding to the unanswered posts.
Larry and others. Many thanks for sharing your experiences with your tank projects. As a fellow Krogen 42 owner this is invaluable as a resource if / when required. Thanks for the extra effort put forward to let us learn with and from you in this task. Well done.

Glen
 
Larry, any word from Bomac?
 
Things you find that you shouldn't.

Today, we disassembled 3 raw water screens in the engine room to bead blast and replace the gaskets. On one, 4 of the 6 bolts broke off with little effort on the engine screen. Some crevice corrosion and crap SS. I wish I remembered where I bought the bronze nipple though. I installed it. More crap. :mad:

The thru-hull was a little unsettling. It had maybe 2 threads attached. Less than 2 turns and they were apart. :eek: Now is the time to find it; scary but it did last 29 years.

I'd like to tell you the wasting of that nipple is rare, but it's not. Unless you buy name brand (Groco or Buck Algonquin), a lot of the metal is junk from China ect., not quality bronze. Been that way for decades now. :mad:

That thru-hull would keep me awake at night. Mine are all threaded, bolted in place, with 5200. If the threads were to fail, the 5200 and bolted in place should keep the seacock secured to the hull. Disassembling and rebedding seacocks are high on my priority list for any boat purchase. I'm assuming that was done by KK? Are you going to be examining your other seacocks?

Ted
 
Last edited:
Larry, remember we broke planer blades when peeling my hull, because a nail was embedded in the glass. They must have been throwing alot of nails around that place. I don't recall my thru hulls when I was ripping them out, but scary, goes to show you what you can get away with, with some good sealant, huH?!

I had no idea so many nails were used in the assembly; some interior wall coverings, rigid sound insulation, the plywood on the side of the tanks, the over heads in the engine room, plus other areas are/were all secured with ring nails. They sure dropped more than 1 or 2.

The thru hull penetration was done correctly through the core for what's that worth.
 
Larry and others. Many thanks for sharing your experiences with your tank projects. As a fellow Krogen 42 owner this is invaluable as a resource if / when required. Thanks for the extra effort put forward to let us learn with and from you in this task. Well done.

Glen

Thanks.
 
I'd like to tell you the wasting of that nipple is rare, but it's not. Unless you buy name brand (Groco or Buck Algonquin), a lot of the metal is junk from China ect., not quality bronze. Been that way for decades now. :mad:

This was one of nipples that I bought and installed. :facepalm: 
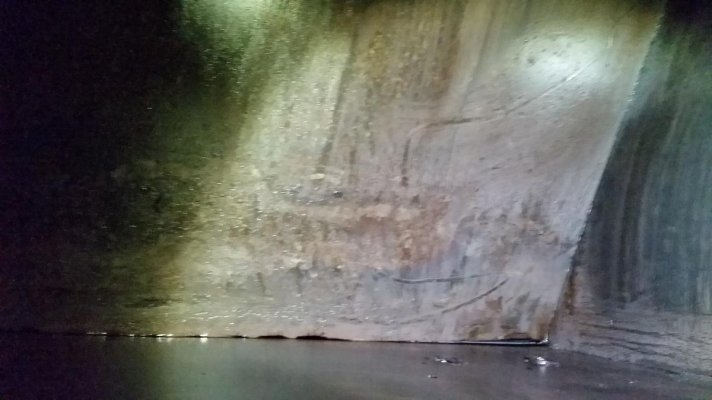
Fortunately of the 3 assemblies that we took apart this was the only one that showed any dezincification

That thru-hull would keep me awake at night. Mine are all threaded, bolted in place, with 5200. If the threads were to fail, the 5200 and bolted in place should keep the seacock secured to the hull. Disassembling and rebedding seacocks are high on my priority list for any boat purchase. I'm assuming that was done by KK? Are you going to be examining your other seacocks? Ted

Assembly was done by KK. Of the 3 in the engine room, this was the only one that didn't have adequate threads. They will all go back with backing plates, 5200 and adequate thread lengths. The others are on the to-do list.
 
Larry, you and Lena stay safe, I hope Hobo is high enough out of any surge. Sue and I are holed up in Orlando, waiting to get back to Daytona. Maybe fortunate that you're laid up for repairs right now.
 
Assembly was done by KK. Of the 3 in the engine room, this was the only one that didn't have adequate threads. They will all go back with backing plates, 5200 and adequate thread lengths. The others are on the to-do list.

Larry, another option is to epoxy them in. I did this using Groco's flanged adapters and backing plates, which allow perfect thread-mating with the through hull and seacock. The backing plate is epoxied to the hull; the through hull and adapter are threaded together and bedded with 5200 and the adapter is also bolted to the backing plate. Finally, the seacock is simply threaded to the adapter, making the entire assembly very robust. A bonus is you can easily swap out the seacock, should it ever malfunction without disturbing the rest of the assembly.

(No affiliation with Groco, other than making a large contribution to their bottom line last year :D.)


We're very much hoping to hear good news about you, Lena and Hobo today.


I also used the groco plates on mine, but purchase their seacocks that have the flange cast into the valve itself. Nice clean install, only issue was one of the flanges was drilled off center, not matching the backing plate. 1 out of 20ish, I guess not to bad. Just check before you smear the sealant everywhere!
 
Yes, they were served their papers. Stowaway mud daubers are pretty common in Florida (where our boat came from), as I'm sure you know. A worse place to find them is in the through hull of your bilge pump discharge. Had that happen when we launched last year at a time our shaft seals were leaking prolifically. Ugh!
 
Last edited:

Now thats a right nice remote oil filter setup. :thumb:

attachment.php
 
I have one thru hull epoxied in place. Same kind of thru hull as the others, the genset one kept loosening, so in necessity got itself epoxied in place. Maybe it was getting vibration from the genset but I doubt it, the 3cyl Onan/Kubota runs smoothly enough.
 
I'd like to tell you the wasting of that nipple is rare, but it's not. Unless you buy name brand (Groco or Buck Algonquin), a lot of the metal is junk from China ect., not quality bronze. Been that way for decades now. :mad:

Bronze wastes away over time as well.

That's why I stopped using metal nipples in most cases a long time ago.
 
Larry, when you get a chance, please let us know how you made out with Matthew. Had my fingers crossed for you...
 
About an ounce over a week showed up in the inboard forward corner, near the site tube. The tank had about 225 gallons in it. I emptied all but 50 and the leak stopped. Maybe a seam? I'll know more later this week.

Great project. I could do it too, but I won't be done until 2050:facepalm:

What you do in a day, takes me a month, and I'm only talking about taping plastic over the furniture:lol:

My leak in the port side fuel tank was in the seam, about a foot from the bottom on the forward inner seam. I think I have a picture. The steel plates had about an 1/8" gap between them inside. The seam had not been completely welded like it should have.

As we had discussed last year, we used an epoxy sealent inside the entire tank and int he process cut four large inspection plates.
All is well now.:dance:

The picture needs to be rotated to the left. That fitting that appears on the picture's bottom right, is actually the return inlet, so that is the inner, upper corner. Look at the weld seam connecting the forward plate and the inner plate. The areas that appear black are voids.
 

Attachments

  • 20160503_141023.jpg
    20160503_141023.jpg
    82.3 KB · Views: 101
Last edited:

Thanks Craig for just doing it:dance:
 
Hobo came out of Matthew with nothing more than a good shower. I used duct tape to seal a couple of areas that we know don't like horizontal rain. We got extremely lucky when the front hit. The tide was ebbing so no storm surge. Losing some days on our schedule, reinstalling the old thru hulls and some storm prep was the only down side.

So back at it today. Since the tanks are 22" shorter than the originals, some things needed to get moved around. I cut out the platforms for the water heater, water lift, start batteries, water maker and autopilot pump. I cut back the original platforms for the house bank 4" for better engine access and glassed in new fronts. Today was spent grinding glass, grinding more glass and grinding more glass, trying to smooth out/prep the hull surfaces and remove the ridges from the the old platforms/glassed in tank attachment points. Tomorrow I'll repair some areas and grind again. Our plan is to get all the grinding/repair areas done by the end of the week. The rest of the platforms will wait till the tanks go in.

The dust, even with good vessel protect, is one giant PIA. If I could have found someone who I trusted and was available, this is one task I probably would have subbed out.
 

Attachments

  • 1.jpg
    1.jpg
    108.9 KB · Views: 112
  • 3.JPG
    3.JPG
    167.7 KB · Views: 121
  • 4.JPG
    4.JPG
    171.1 KB · Views: 119
  • 4a.jpg
    4a.jpg
    83 KB · Views: 134
Hang in there Larry . That is some tough work .
 
Yikes. That looks like hot work.
 
good god that makes me itch just looking at the pics!

great job!
HOLLYWOOD
 
The dust, even with good vessel protect, is one giant PIA. If I could have found someone who I trusted and was available, this is one task I probably would have subbed out.

I've been saying that for as long as I've owned my boat. What little I was able to sub out I wished now I had done myself. Now when I find someone available, I'm suspicious why.
 
Larry, that corroded pipe to hose adapter photo is a textbook example of dezincification (zinc corroding out of a zinc/copper alloy such as brass), evidenced by the pinkish hue, which is a weak porous copper structure that remains. Which means the part was in fact brass and not bronze. I see this so often it keep me up at night, to many builders and yards, and boat owners, unknowingly use brass pipe to hose adapters and pipe nipples (pipe threaded on both ends). Boats have been lost thanks to this type of corrosion, which is entirely a material selection issue.

It's tough to tell the difference between brass and bronze on the shelf, however, there is one unscientific method. Bronze parts tend to be cast, so they are rough, at least parts of them, while brass lends itself better to machining, so they are smooth all over. Brass tends to be more yellow, while bronze is more copper colored. As I said, hardly scientific, but until there's a field test for zinc content...
 

Latest posts

Back
Top Bottom