Holding tank repair suggestions?

The friendliest place on the web for anyone who enjoys boating.
If you have answers, please help by responding to the unanswered posts.

Gilhooley

Veteran Member
Joined
Sep 21, 2014
Messages
66
Location
Greenland
Greetings all,

I tried hiring out seepage on top of my holding tank for months to no avail... looking at it myself, I see this. It appears to me that the fitting to the tank has cracked and the repair will involve some level of fiberglass work.

img_478966_0_dc700e02ed9b4f0984cf7b1c6e5dd593.jpg
[/URL][/IMG]

Can anyone comment on what their thoughts are on the repair this needs? Glass it up? New insert? Some other approach? Thanks.

G
 
Is the tank fiberglass or polyethylene? It appears in the photograph to be PE, but whichever it is, that hose fitting appears to be a very badly done DIY. I'm guessing that's what's leaking. When I know what the tank is made of, I can tell you how to fix it.
 
Did you notice that the disintegrating mess is on the OUTside of the hoses? There are clamps on the hoses and I doubt they're only there for show... so the mess is most likely a DIY attempt to cover up a cracked and leaking female tank fitting. But I can't figure out why the hose clamps would be so high off the tank...at least 2". No tank mfr I've ever heard of installs tank fittings with a nipple longer than 12/-3/4"...most install 'em flush with the outside of the tank.
 
You could be right P.

But I still bet it's factory. Look at the one behind it.

Looks the same. Kind of looks like they fiberglass over a tube/pipe/fitting made out of another material.
 
I'd be interested in the repair advise as mine is FRP and we think a leak has occurred somewhere around the middle of the tank. Opposite side of all fittings.
The thought of tearing the boat part to install a new tank is not what I hope the solution is.
 
If you expand the picture you'll see that there is a fitting sticking up from the tank with female threads. A nylon pipe to hose barb is screwed into that. The hose is clamped to the hose barb.
It looks to me like someone has tried to use epoxy to fix a poly fitting attached to the tank. That's a wasted effort. What ever it is, it looks like that fitting has to go. Maybe replace it with those rubber grommet things that Peggie recommends? Peggie, what am I thinking of? I can't remember the name.
 
Sadly I'd lay money on the fact that is a factory fitting. :banghead:

Always hard to tell with some photos....

But I am with you Capt. Looks like grey gel or thick paint on everything.

If that is the pumpout standpipe, it looks like it was just too thin of a glass collar to support itself.

If it is all glasss, with a good cleanup and a little grinding, and about 6 turns of wide enough fiberglass tape to overlap the tank top by an inch using epoxy and I think you would be good.

I would still look at bracing those hoses to take any strain off the fittings.
 
I would neatly cut that fitting out and replace it with a though hull fitting thread facing up use one that could fit through the sender hole if there access through the sender fitting ? if not cut a hole in the top of the tank next to the fitting and fit a 6inch inspection plate with screw on lid . If that pipe goes to the bottom of the tank use a threaded nylon tube with a nylon nut and washers either side of the tank
 
Last edited:
Greetings,
Mr. G. I concur with your solution regarding access through the sender hole. Adding more material to the outside of the already compromised fitting/seal would be chasing your own tail IMO.
Remove the sender unit, remove the 2 fittings, grind the top of the tank flush and install 2 new fittings with neoprene gaskets, tighten the whole smutz down and you should be good to go.
Could use something similar to this:

abs-tank-connector-plain-to-threaded-652-p.jpg


IF, as you mention, one of the fittings extends to the bottom of the tank, a straight piece of pipe should be able to be glued on the inside.
 
Last edited:
If you expand the picture you'll see that there is a fitting sticking up from the tank with female threads. A nylon pipe to hose barb is screwed into that. The hose is clamped to the hose barb.
It looks to me like someone has tried to use epoxy to fix a poly fitting attached to the tank. That's a wasted effort. What ever it is, it looks like that fitting has to go. Maybe replace it with those rubber grommet things that Peggie recommends? Peggie, what am I thinking of? I can't remember the name.

The Uniseal UNISEAL Warehouse

Right now all we have to go on is one photograph...we don't even know what's leaking. Y'all are jumping to the conclusion it's a fitting because whatever the stuff is around the fitting is a crumbling mess. It may be. Or it could be as simple as, the tank level indicator needs a new gasket under the flange and/or a new o-ring on the cap. So I'm waiting till I have enough information from the OP to know how to repair it--what needs repair--before I offer any advice.
 
Last edited:
I'd be interested in the repair advise as mine is FRP and we think a leak has occurred somewhere around the middle of the tank. Opposite side of all fittings. The thought of tearing the boat part to install a new tank is not what I hope the solution is.

It should be possible to repair a leak in a FRP tank, but whether it's advisable depends on where it is and what most likely caused it.
 
Greetings,
Mr. G. I concur with your solution regarding access through the sender hole. Adding more material to the outside of the already compromised fitting/seal would be chasing your own tail IMO.
Remove the sender unit, remove the 2 fittings, grind the top of the tank flush and install 2 new fittings with neoprene gaskets, tighten the whole smutz down and you should be good to go.
Could use something similar to this:

abs-tank-connector-plain-to-threaded-652-p.jpg


IF, as you mention, one of the fittings extends to the bottom of the tank, a straight piece of pipe should be able to be glued on the inside.

That would work for putting sewage into the tank but not for sucking it out unless it can be moved to the bottom of the tank. Gluing a pipe to the fitting could be a problem.

My vote is to replace the tank with a new one and know that there will be many years of not having to worry about tank integrity. They aren't that expensive.
 
FWIW, the tank is integral to the hull (the holding tank is part of the keel). This is a picture of the top of the tank, which is the floor in the ER, just in front of the engine. This is how our boat is set up. I've heard stories on the owners forum of cracks forming from a clogged vent when pumping out, but no personal experience. I imagine it will need to be reglassed, or glassed over and uniseal type fitting installed in new holes. That is unless the sender seal is leaking. It looks like someone may have tried to repair at some point, as the glass on our boat is finished much better than that around the fittings.
 
Ok... let me see if I can write this out again WITHOUT falling asleep this time...

More information gathered... more pondering has occurred... stuff has been ordered. There is no good order to pen this.

Ponderings...

The tank is no where near full ever. The water isn't taking to wing. It must be arriving from above... either the pump out hose or the hose from the vacuflush units. I will prioritize this as vacuflush more likely, pump out less... as the water seems to build with no regard for my trips to the pump out.

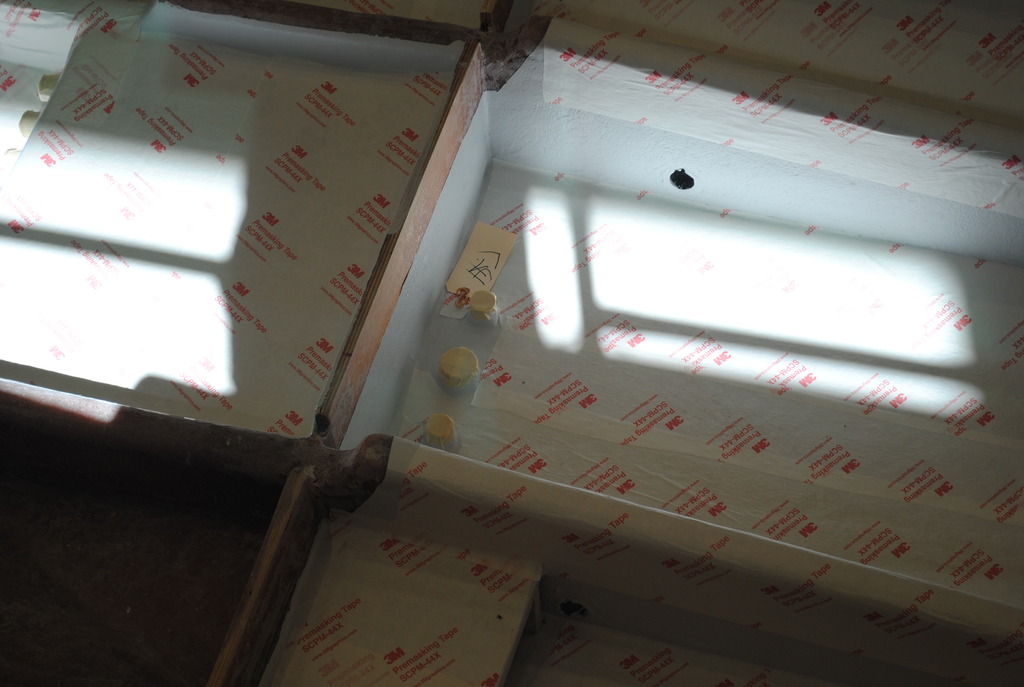
The raped and left for dead port in the photo is the pump out so even if it's the other port, I'd be crazy to leave it in that condition, so I need to figure a repair for both.

In a past life, I was something called a Level III examiner for nondestructive testing of aerospace components including tests that used fluorescent dyes to locate surface anomalies (cracks, inclusions, etc). So... since my box with thousands of dollars of magna flux materials cannot be located, I've ordered some cheapo fluorescent dye and another UV light. I'll start by introducing dye to the vacuflush tank and pushing it thru. Hopefully that big bright yellow-green smile of a cracked aerospace part will repeat quickly here.

Other info...

From the factory... no bladder... the tank is molded in to the hull... a fiberglass cover is glassed over it. The tank connections are robust looking (cf below) FRP glassed into that... into which they screw ABS plumbing fittings. Didn't get the details on how the pump out straw was held in place. In the build photo above, it appears they have not drilled and added the fittings yet. The factory felt they were looking at a screwed up repair in my photos but did not speculate on a path forward.

img_479905_0_6e0f1deb939fef3b3927ad44ffe26c91.jpg


img_479905_1_26241f49e3780c558ace7ed67698eb2f.jpg


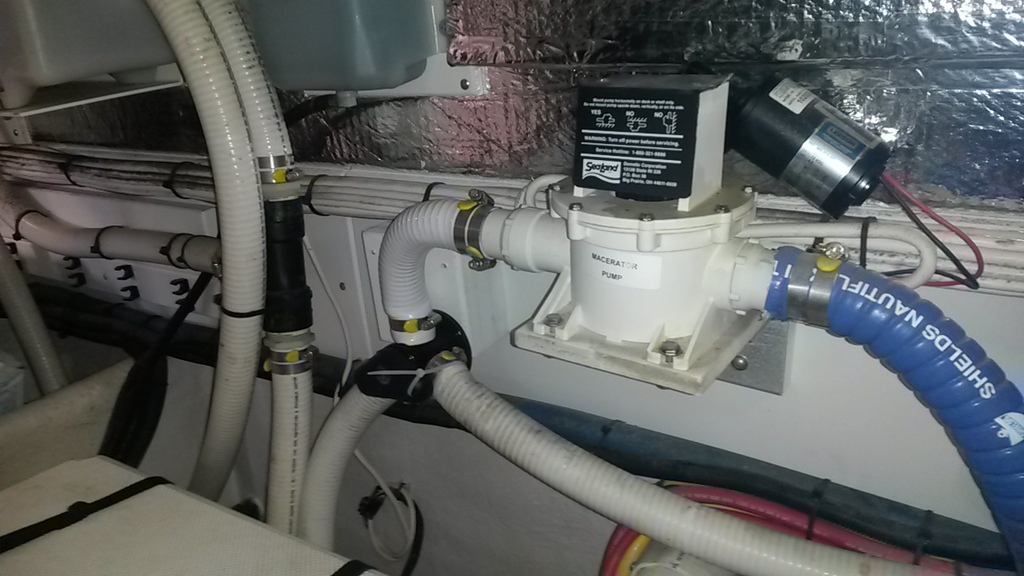
More context for my actual boat/tank showing the connections between tank and the vacuflushes (via that black t-connection) and the y-valve. Not a fan of that y valve btw... going back to the Jabsco I had before the tech decided to give me that one. You can see a third hose all the way to the left... that comes in via PVC plumbing from the starboard head. The starboard head holds vacuum like a champ.. I have no belief I have a leak from that. The port head is slower to build vacuum and will lose some over a week turned off. I'd suspect a minor leak there but as that path goes nowhere near this space, I don't see a reason to think about that.

img_479905_2_dc6c7fe00a0a34a99769885a7bf46271.jpg


img_479905_3_4d9ca6be3d5aa2e9c0f235736d212a81.jpg


Current thoughts about moving forward....

I'm think of the following. Please do not hesitate to correct any lame ideas on my part...

Run the fluorescent dye test... vacuflush side first... pump out second. Identify actual locations of issues.

chip away the bondo... I suspect it's a surface layer from a prior half-a$$ed repair.

Remove the ABS fittings... hopefully the half-a$$er didn't use 5200 as a thread sealant.

Screw two new ones in... suggested sealant anyone?

Attach two new hoses and reapply the clamps.

Seek counseling to get over the bottomless pain of my engine room not smelling like a sewer anymore.
 
Did you notice that the disintegrating mess is on the OUTside of the hoses? There are clamps on the hoses and I doubt they're only there for show... so the mess is most likely a DIY attempt to cover up a cracked and leaking female tank fitting. But I can't figure out why the hose clamps would be so high off the tank...at least 2". No tank mfr I've ever heard of installs tank fittings with a nipple longer than 12/-3/4"...most install 'em flush with the outside of the tank.

I can't imagine the prior owner used clamps that nice:)
 
If you expand the picture you'll see that there is a fitting sticking up from the tank with female threads. A nylon pipe to hose barb is screwed into that. The hose is clamped to the hose barb.
It looks to me like someone has tried to use epoxy to fix a poly fitting attached to the tank. That's a wasted effort. What ever it is, it looks like that fitting has to go. Maybe replace it with those rubber grommet things that Peggie recommends? Peggie, what am I thinking of? I can't remember the name.

I've got the original photo here and I can't find female threads but I'm looking... I see male threads, I think. Where are you looking if I can ask? Thanks in advance.
 
FWIW, the tank is integral to the hull (the holding tank is part of the keel). This is a picture of the top of the tank, which is the floor in the ER, just in front of the engine. This is how our boat is set up. I've heard stories on the owners forum of cracks forming from a clogged vent when pumping out, but no personal experience. I imagine it will need to be reglassed, or glassed over and uniseal type fitting installed in new holes. That is unless the sender seal is leaking. It looks like someone may have tried to repair at some point, as the glass on our boat is finished much better than that around the fittings.

Thank you.. is there any chance you could post a picture of your connections so I could see what the factory norm was?
 
support the hose somehow. I suspect that vibration or pump action causes the hose to move and lever that tank fitting.
 
So at this point you've determined that it's not the tank itself or the fittings leaking but something else and the leak is ending up on the top of the tank?

Have you considered that it might be condensation?

It's pretty hard to diagnose these things over the Internet from a photo or two and it's pretty hard for you to provide all the information needed and for others to understand fully what you have posted. We got off track for a while because of this.

If it was my boat, I would probably take all the hoses and fittings apart and clean up the mess and go from there. You may need new fittings, you may not. This would be a good time to replace the hoses just because they don't last forever.

An easy way to see if the leak is coming from above is to suspend something above the tank and see if it gets wet.
 
The tank is no where near full ever. The water isn't taking to wing. It must be arriving from above... either the pump out hose or the hose from the vacuflush units. I will prioritize this as vacuflush more likely, pump out less... as the water seems to build with no regard for my trips to the pump out.


Just a thought: If you have a macerator pump attached for overboard discharge, raw water can back fill the tank of the thru-hull valve is not closed or leaking, or if there's another valve in line and it's not working. The macerator pump itself won't hold back sea water too well...

-Chris
 
support the hose somehow. I suspect that vibration or pump action causes the hose to move and lever that tank fitting.

Agree. Looks like fatigue of a glassed in metal nipple in the tank. Often times there is a flat ring welded circumferentially on to the nipple that gets glassed in.

Watch it while pumping out. My hose bucks pretty good when pumping out with a macerator in what we call slug flow in the engineering world. If you use a positive displacement diaphragm pump, it would also have discontinuous flow which could lead to fatigue failure.

One could strengthen it with gussets to the tank top. Be a pretty tedious glass or epoxy job though.
 
Back
Top Bottom