New construction: She:Kon

The friendliest place on the web for anyone who enjoys boating.
If you have answers, please help by responding to the unanswered posts.
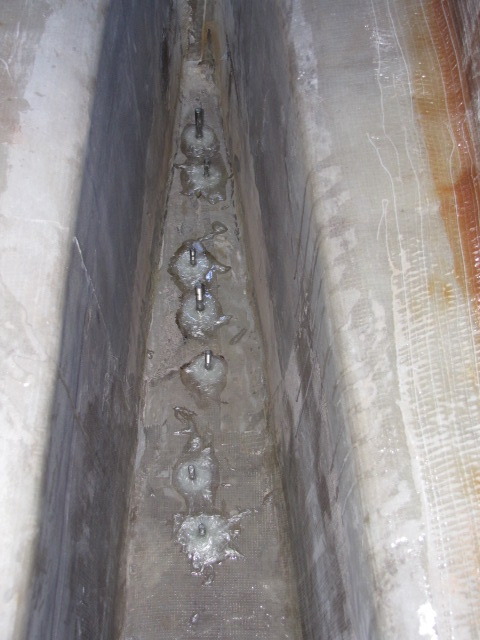
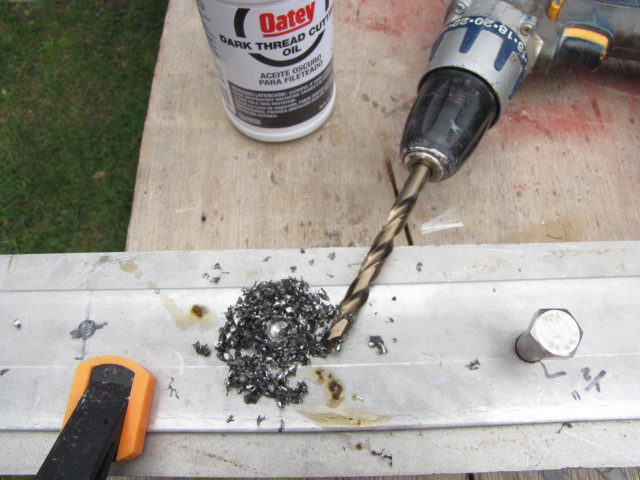
i just read about your drilling problem. when drilling ss it will work harden very quickly if it gets hot even in the slightest. a good sharp cobalt drill and don't peck at it. once you start don't stop till your through and keep it flooded with oil of cutting fluid to keep it cool. also depending on how close of tolerance it needs to be. you might want to drill it under size and finish with a reamer.

Thanks for the tips BC. Got some cobalt bits on order. :thumb:

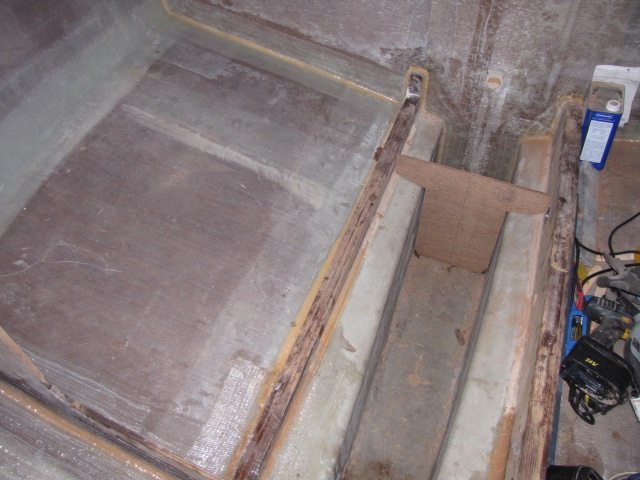
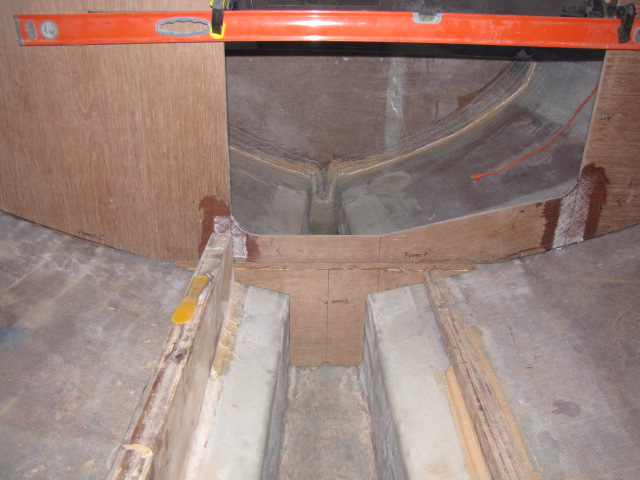
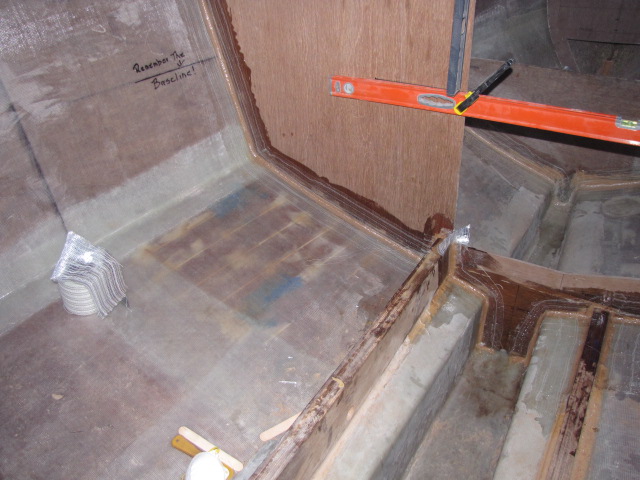
Hacked up Frame A. Top section will provide access to the anchor rode/chain locker. Middle section will likely be just storage and the bottom section a void space. I might be able to squeeze a battery in there for the windlass/bow thruster. Dunno yet.

spacer.gif
img_467596_1_77df4ed308346b9d7da991222314d90e.jpg


Flew in Frame C to get it located. It'll require some mods to the stringers (I think they're a wee bit too long). Have a crack at that tomorrow.

spacer.gif
img_467596_3_dc51aecfff93d6e74d3eecbb694cf47d.jpg


Gotta go buy some coax and a splitter (HoneyDo), the Admiral is buying herself a small TV for her sewing room so she can watch the Olympics as she works.

Standby...
 
The heat has been relentless here lately. Yesterday mercury topped out at about 104F with himidex. Going to be hotter today! :ermm:

I managed to get in to the shed for a couple of hours this morning to get Frame C lined up along the 'BASELINE' as the designer reminded me. I seem to have had a brainfart and forgot all about the 'BASELINE" so not it's written in big letters on the inside of the hull! :banghead:

img_468632_0_b97f3b1a707e5471d242c064ca7fe909.jpg


It's a bit of a beast to wrestle in to the boat and get it lined up. It's heavy and awkward. Lopsided. I've already had it in and out twice for trimming and will have to do it again to get it right.

More musings on deviating from the plans on today's web log update: https://she-kon.blogspot.ca/2016/08/at- ... peril.html

Standby....

PS. Connor Daniel Laporte (ETA end of September 2016). My first Grandchild! :dance:
 
Congrats.I hope it's at least 10+ years away for me.My boys are 13 and 19.
 
We finally got some relief from the heat. Very comfy, but lil' muggy, 19 C (66 F) in the shed this morning. Set to work getting Frame C fitted. No more big gaps and dead nuts on the baseline.

img_469220_0_dd6fa055200f7790295f58e1260c822b.jpg


Set to work filleting & taping the frame.

img_469220_1_5245cf6ac5a983bfe4bd6bd210d9114f.jpg


I'll fillet & tape the other side tomorrow. Wee minor adjustment to the stbd side but that'll happen tomorrow as well. Admiral came out to survey the workings and strategize her sewing work space. Think we got that worked out and it'll be a nice feature once it's done.

Other than plenty of sanding up and down the stringers for the last layer of tape that's about it for today.

Standby....
 
Just some misc. stuff going on.

Got myself some 3/8" Cobalt drill bits to tackle the remaining holes on the stainless steel skeg. Cut through that stuff like a hot nail through cream cheese! :thumb:

img_470330_0_b8b3ecb4b88ac7f65aae1f1ad3e1fa74.jpg


But who knew a 3/8" SS bolt won't go through a 3/8" hole! :facepalm: Now I need a reamer to open up the holes. Frig.

Got a call from the mechanic working on our 4 cyl Yammy. He got it started. Just wanted to warm it up to change the oil. It ran away on him! Zoinks! Nothing hurt. He got it shut down by choking it out. Governor & fuel injection pump is seized up. *sigh* That's gonna cost a B.O.A.T. to fix. Oh well better than having to buy a new one at $4K US.

Fabricated a small bulkhead to go in the box keel in front of Frame E. This will form a nice little dry storage area.

img_470330_1_89ad0c054dc4676efd4876b1193135fa.jpg


Went looking for the floor panel that'll go in here.

img_470330_2_b8cc1e9c53c55a7d8abbeb002b39722f.jpg


And it's under a pile of crap in my leanto. *sigh*

img_470330_3_bc1af32964d5a39997b9d72ae4688eff.jpg


If it weren't pouring buckets outside I'd be in there after it. We desperately need the rain so I guess I can put off that activity for another day.

Project Manager (Ginger) and the Project Director (Grey Tom) came out to inspect the workin's!

spacer.gif
img_470330_5_7592b161586a1e8b049ddaa889f7facf.jpg


They both barked some orders and left me to my own devices.

I did get Frame A located and will likely start fixing that in place soon. So friggin' much to do I can hardly wrap my head around it! :ermm:

This time last year I was laying in the fabric on the inside of the hull.

spacer.gif
img_470330_7_a12f28487e40bcfb8599d604d10988ea.jpg


The progress is slow but steady. You can't rush perfection right?

Standby.....
 
Oh wow, I didn't have any sense of scale for the size of that box keel. It's much bigger than I was thinking. It's a 1.5 body keel!
 
Oh wow, I didn't have any sense of scale for the size of that box keel. It's much bigger than I was thinking. It's a 1.5 body keel!

Or 'bout .75 my body! :ermm:

Just off the top of my head it's about 12" wide by 20" deep at that part.
 
Rick: Just a quick note of thanks for posting. Lena and check your blog and all your posts. You're doing something I could only dream of. A job well done!
 
Rick: Just a quick note of thanks for posting. Lena and check your blog and all your posts. You're doing something I could only dream of. A job well done!

Thanks for the kind words & looking in Larry. It helps keep the enthusiasm for the project up! :thumb:

Some days I wish I had done this 25 yrs ago! :banghead: All I can do now is just keep hammering away at it!

Cheers!
 
Great stuff, Rick! You're making real progress.

Can you tell us again the overall vessel dimensions?
 
Great stuff, Rick! You're making real progress.

Can you tell us again the overall vessel dimensions?

Hey Al. Thanks for looking in.

The bare hull is 31' 5" from tip of bow to top of transom. It's 10' 2" beam. Will likely end up somewhere around 11,000 lbs when fitted out. Hoping it looks something like this when I'm done.

img_471083_0_57141feac84cd0eafc0dd8d39cbc49a7.jpg


Accommodations for 2 + 2 on settees
198 gal fresh water (55 ballast)
60 lt Hot Water Heater
116 gal diesel
12 gal gasoline
62 gal waste

Yanmar 4JH-TE 55 HP Turbo
Lewmar Bow Thruster 140TT2.2 (3HP)
260 Watts solar
2 X 4D AGM batts (200 AH)
1800 Watt inverter
Honda 2000i generator
9000 BTU A/C
Anchorlift Dolphin Windlass
Webasto Air Top 2000 AT diesel heater

We have a propane range and probably going for a 4.3 cu ft under counter refrig.

That's about all I can think of at the moment.
 
Puttered around this morning. Got the engine bay sanded. Not gonna fair it. No one will ever see it anyways. Had to put the engine template back in to locate where I can put the drip tray.

img_471346_0_4afe06a4ef161f191e198a8c54b161d5.jpg


Puttered around some more and made some brackets for the drip tray. By the time I got back to the boat it was HOT!

img_471346_1_239b4f26d9db7970e2f1d2b260fca57e.jpg


35 C that's 95 F. Nope, boat shed closed!

Standby...
 
C'mon Rick, fair and sand sand sand the engine bay. And no fair sanding in less than 95 degree heat.

Looking good :thumb::thumb:
 
Hey Al. Thanks for looking in.

The bare hull is 31' 5" from tip of bow to top of transom. It's 10' 2" beam. Will likely end up somewhere around 11,000 lbs when fitted out. Hoping it looks something like this when I'm done.

img_471413_0_57141feac84cd0eafc0dd8d39cbc49a7.jpg


Accommodations for 2 + 2 on settees
198 gal fresh water (55 ballast)
60 lt Hot Water Heater
116 gal diesel
12 gal gasoline
62 gal waste

Yanmar 4JH-TE 55 HP Turbo
Lewmar Bow Thruster 140TT2.2 (3HP)
260 Watts solar
2 X 4D AGM batts (200 AH)
1800 Watt inverter
Honda 2000i generator
9000 BTU A/C
Anchorlift Dolphin Windlass
Webasto Air Top 2000 AT diesel heater

We have a propane range and probably going for a 4.3 cu ft under counter refrig.

That's about all I can think of at the moment.

Thanks for the refresher and specs, Rick! She'll be a formidable vessel when you're done. :thumb::thumb:
 
I'm thinking Rick will be chasing Richard around the South Pacific in a couple years. :lol:
 
Worked a bit in the keel this morning. Have to get the holes lined up for the skeg. Overdrilled so they can be filled with epoxy prior to installing the skeg. I got 5 of the 7 holes done today before it got too warm in the shed.

img_473216_0_2afa28bb657ce3662c5a6262ea4ac698.jpg


Ya never get used to drilling holes in hull you just spent so much time on getting it right! :rolleyes:

Few more pics & cordless drill battery repair on today's web log update: https://she-kon.blogspot.ca/2016/08/more-box-keel.html
 
Got all the holes drilled & gouged out. Managed NOT to cut all the way through! :rofl:

A good healthy coat of mold release was on the bolts and I stuffed them 'up' through the holes in the bottom of the keel. Taped them in place and backfilled the holes with epoxy & chopped strands.

img_473735_0_9c6bc71afc4d3de70ebf312aa11cc98f.jpg


When these are setup tomorrow I'll pull the bolts & sand smooth. Inching every closer to installing the skeg.

Few more pics on the web log update: https://she-kon.blogspot.ca/2016/08/dri ... lling.html
 
Good idea there,to give the engine something to land on, if it breaks away.
 
Ah ok. These ones.

img_476262_0_9c6bc71afc4d3de70ebf312aa11cc98f.jpg


Yes, Three are in line. The bottom one is a 7/16". It's dead nuts on center and used to align the skeg. The first from the top and 4th are 1/2" and will bear most of the load of the skeg. The remainder are offset just a bit to prevent the skeg from 'wobbling' along the axis. I couldn't spread them any farther out and leave enough material for the nuts to fully seat inside the channel side.

img_476262_1_30e93fc1c0c47a98ed89d1d231f9b417.jpg
 
I just knew you had this bolt location planned out. Now it's time for a sit down with several beers to contemplate the next step!
Cheers!
 
Back
Top Bottom