Next Project: Clean-Up Dash Electronics

The friendliest place on the web for anyone who enjoys boating.
If you have answers, please help by responding to the unanswered posts.

Tom.B

Moderator Emeritus
Joined
Jul 30, 2009
Messages
5,839
Location
USA
Vessel Name
Skinny Dippin'
Vessel Make
Navigator 4200 Classic
Well, now that the fuel rig is up and running (95% anyway), the next project is to upgrade and neaten the wiring under the dash. As I have said before, the PO may have been an artist with wood, but he was no electrician (unless "artist with electrical tape" counts).

I spent about an hour under there yesterday just looking, following wires, doing some labeling, and generally getting to know what is going on under there. It looks like I'll need a few terminal blocks, a lot of wire, and I was thinking of adding a positive terminal buss to add a few power options in the future.

Any help you guys and gals can be would be lovely.

It's not too bad looking and I don't expect it to be more than about $100 in parts. I'm just planning on a decent chunk of time that will need to be invested. While there is a lot of room to squirm around in there and even sit up, getting into and out of that space sucks a little. Oh well...

Here are a few pics of the job ahead.

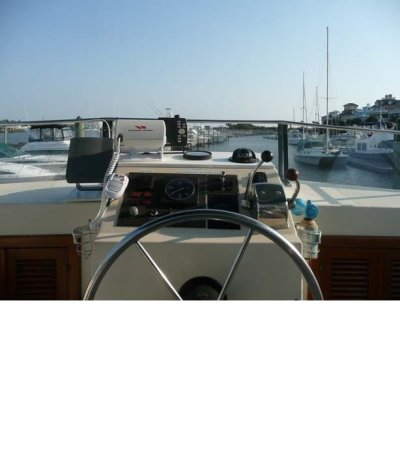
1) Flybridge dash from the top.
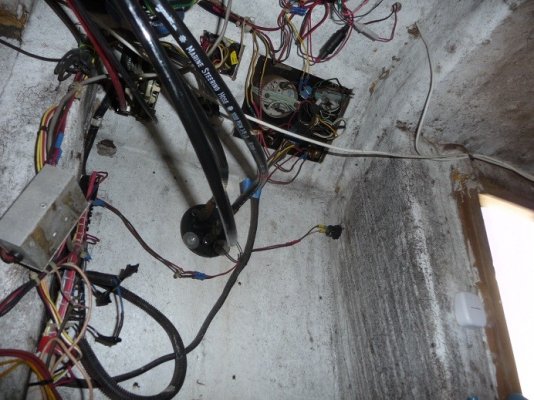
2) Looking up from the underside.
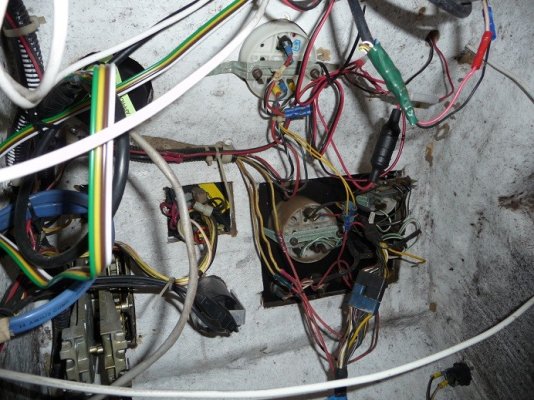
3) Closeup of upper portion
4) Closeup of primary terminal strip
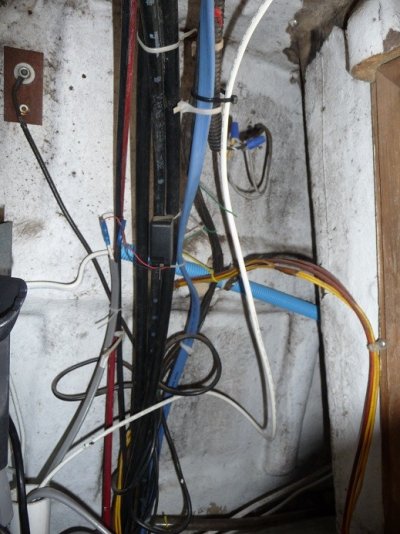
5) Closeup of another messy spot under there. Horns, AM/FM antenna, high water buzzer, etc.

Tom-
 

Attachments

  • dash.jpg
    dash.jpg
    47.1 KB · Views: 88
  • electrics1.jpg
    electrics1.jpg
    138.6 KB · Views: 84
  • electrics2.jpg
    electrics2.jpg
    158.7 KB · Views: 98
  • electrics3.jpg
    electrics3.jpg
    175.3 KB · Views: 77
  • electrics4.jpg
    electrics4.jpg
    115.9 KB · Views: 92
I would just do a very basic job.*Check butt connectors, redo some taping, add some tie wraps.

The problem with straightening things out is wires were installed at different times and often are under and over wires and inorder to make it perfect you have to disconnect them and start over.

It then becomes a big project and unless you are having issues with the system it is not really that important.

If you want to rip it all out and start again, go for it, you will have a new system and it will look better.

Otherwise I would stick to a basic cleanup.** About one hour tops.

JohnP
 
I really just want to secure it all and straighten it up so it makes sense and is more reliable (and label it). I don't want to reinvent the whole thing, but do want to dig into it for those reasons alone. Besides, it could be fun.
biggrin.gif
 
IF its an Upgrade , toss the electric engine instruments and install mechanical Murphy Gauges.

Electric failure will not cost engine operation information , and best of all with the alarm feature , and autopilot any one can stand in as helmsperson.
( And you thought I wasn't PC)
 
I suppose that I failed to mention that one of the end-game goals is to get the dash ready for a few upgrades. One of which is to bring actual gauges (not the idiot lights that are there now) up to the flybridge.
 
Cleaning out ( not up) the electrics will make a huge reliability improvement.
 
I would consider replacing any auto store butt or ring connectors with Ancor or other marine grade connectors. I have eliminated several problems that way. I have also replaced individual wires with marine grade wire and connectors. One of my boat's PO's was a fan of 'twist and tape' connections. I have learned to remove all tape and inspect what is underneath.
 
Larry H wrote:

I would consider replacing any auto store butt or ring connectors with Ancor or other marine grade connectors. I have eliminated several problems that way. I have also replaced individual wires with marine grade wire and connectors. One of my boat's PO's was a fan of 'twist and tape' connections. I have learned to remove all tape and inspect what is underneath.

For sure part of the plan! Actually, I hope to eliminate most (if not all) the butt connectors with terminal strips and buss bars. I still have some learning to do (ie: wire tracking) before I start. I also have to force myself to be slow and methodical about it as not to make it worse rather than better.

The wiring is in the engine room for a twin screw boat, so I plan to use that wire bundle for getting the gauge wires out of the engine room and up to the flybridge. I got a gauge cluster from the consignment shop last year so it will all match. So the real thing now is to get dual gauge sensors for oil pressuse and coolant temp. Still need to look into pulling a voltage reading for a second gauge for that.

Any of y'all ever added second gauges?

Tom-
 
Gonzo,* I did some gauge work in the past with another boat.** Research is the key to a successful outcome.

The gauges I was working with were Faria, their website was great in identifying the exact gauge model I was dealing with.

Their customer support was great in steering me to the correct senders for the application.

My present boat has VDO gauges and I added a fuel guage but only did the lower station.

Are the gauges exactly the same as the lower station?* If so you can toggle up and down and keep the same senders.

Just a thought.* JohnP
 
Now THAT'S a novel idea.

Tom-
 
GonzoF1 wrote:
I spent about an hour under there yesterday just looking, following wires, doing some labeling, and generally getting to know what is going on under there. It looks like I'll need a few terminal blocks, a lot of wire, and I was thinking of adding a positive terminal buss to add a few power options in the future.

Tom-
Sometimes it*gets real hard to know where to draw the line with electrical*system repairs.* Sometimes, there isn't enough wire available to just put on new connectors, and*splicing in new wire is seldom a good answer.* Just doing enough to take care of obvious corrosion may not be enough to prevent future problems.

Labeling is very important, because you will have traced wires enough to be able to create a*schematic of your system, assuming you don't already have one.* This is critical for understanding your system.

After a few years of living with 35 yo wiring, I ended up re-wiring both 12V and 120V systems.* Mainly because of the use of sub-standard wire, undersized wire, lack of drip loops,*lack of proper connectors, lack of heat shrink to seal the connectors, lack of proper distribution terminals, and lack of proper fuses to protect the wiring/system.

ABYC E-11 is very instructive, as is Calder's book.* I ended up using a lot of Blue Sea products, they have a lot of good information on their web site.*

Good Luck!
 
"After a few years of living with 35 yo wiring, I ended up re-wiring both 12V and 120V systems. Mainly because of the use of sub-standard wire, undersized wire, lack of drip loops, lack of proper connectors, lack of heat shrink to seal the connectors, lack of proper distribution terminals, and lack of proper fuses to protect the wiring/system."

Was the wiring disaster from the first construction or decades of "improvements" of owners?

I don't know which is worse!
 
FF wrote:
"After a few years of living with 35 yo wiring, I ended up re-wiring both 12V and 120V systems. Mainly because of the use of sub-standard wire, undersized wire, lack of drip loops, lack of proper connectors, lack of heat shrink to seal the connectors, lack of proper distribution terminals, and lack of proper fuses to protect the wiring/system." Was the wiring disaster from the first construction or decades of "improvements" of owners? I don't know which is worse!
*It was probably a combination of both original and improvements, but mainly original build and*connection condition.**There was a #16 wire going 60 feet round trip to the three wipers (24A), no wonder they didn't work very well.

*
 
"It was probably a combination of both original and improvements, but mainly original build and connection condition."


And folks wonder when I suggest a survey before paying for a new boat!
 
FF wrote:
"It was probably a combination of both original and improvements, but mainly original build and connection condition." And folks wonder when I suggest a survey before paying for a new boat!
*No disrespect but many Surveys will not identify wiring that was the standard on a 20+ year old boat as being deficient, because technically it isn't. The marine electrical standards have improved and changed over the last decade.

I agree a survey should always be done when purchasing a used or new boat.

My Mainship was built in 1992 and the wiring was sized accordingly, however it was sub standard for my needs. I ended up pulling 90% of the DC wiring and almost all of the AC wiring and replacing it with marine grade wire and marine grade crimp connectors.

Many older production boats never came with a true house bank, the standard was one battery per engine and if your boat had a generator one battery for that.

In my case I started with a plan for the DC circuits and didn't care about the old wiring unless I was leaving it in place. Then I tackled the AC wiring. I found in most cases the builder had properly sized the wire for it's intended purpose but since I was refitting the entire vessel I wanted to make everything as efficient as possible. To do this I generally went up 2 sizes in wire gauge because less resistance*=*less wasted power. I added 2 house banks and DC breaker panels, one forward for the bow thruster, sanitation system, wash down, windlass, spot light*and watermaker. The primary new house bank is located under my Salon floor it can feed almost every DC device on my boat and even start the engines if needed. Plan ahead and you can have a very reliable trouble free system. I figured to do it once and do it right. I decided early on that I was going to choose one battery chemistry and stick to it. I chose Lifeline AGM batteries. I have a total of (3) 8D's and (9) 31 series batteries. Each bank has it's own multi-leg smart charger. I can combine any battery bank using either high current switches and or high current ACR's. I also decided all primary DC wiring would be #4/0 marine grade.

A year later I decided to add solar to the mix. I am using (2) 180 watt panels and a 200 watt panel on the hardtop. Because of the solar system's 3 stage charge controller and panel array, chosing low current DC appliances/devices*and properly sizing the battery banks I rarely need to be plugged in or use the generator. The only time I really need high current AC is when I run the reverse AC units. All other AC appliances can be run off the primary house bank smart charger/inverter if needed. I have a wind generator but I have not installed it yet because I haven't had the need for additional charging.

It all comes down to planning and mapping out your ideas and how they will affect your future upgrades. I have saying "start by building*a good foundation and the*system will not fail". I built the boat to be able to live aboard her if needed without having to rely on power, water or traveling 3 miles to dump my waste.

What started out as a basic clean up for me ended up being a major project but it was really a great educational experience. The system is now 6 years old and performs as it did when I 1st installed it.

Good luck with your project.

Bill


-- Edited by Billylll on Sunday 27th of March 2011 09:35:09 AM
 
Wow... Unfortunately, I don't have that kind of coin to throw at this project. Still, I will take it as a learning experience (as I did the fuel system upgrade project) and try and prepare for additions in the future, as well as just make it look better should the day come to sell her in the future. It's hard to resist the urge to do more than I can afford (both money AND time) at this stage. Our boating life requires quite a bit of sacrifice in our regular life to continue it.

Tom-
 
Just stick to the fundementals and you will be fine. I totally ignore the 10% voltage drop suggestion for pumps, AC units, electric stoves etc....
I use the 3% rule but in reality my voltage drop is less than 1% on any circuit under full load (even inductive).
I'm about ready to start a smaller scale project on my Son's 22 Maco center console. It's simply a matter of scale.
You might want to think about running a NMEA2000 cable from the ER, lower helm, arch/mast and bridge helm if your going to be pulling and cleaning up what you have.
Most new navigation equipment is using this standard for their networks backbone. Purchasing unterminated NMEA2000 cable isn't that expensive.
I prefer Maretron cable myself even though most of my navigation equipment is Garmin.
Bill
 
Isn't it just BNC connectors on coaxial cable?
 
GonzoF1 wrote:
Isn't it just BNC connectors on coaxial cable?
*NMEA2000 is like Ethernet cable no the connectors are not BNC they are 5 pins and a grounded shield. The power drops are 2 conductors and a shield.

Bill

*
 
Can any of you recommend a good book to explain marine wiring for dummies preferably with photos and how to instructions.
 
Great thanks I should have guessed I have read several articles he has written in magazines. Again thanks I will pick one up.
 

Latest posts

Back
Top Bottom