Stainless handrail repair

The friendliest place on the web for anyone who enjoys boating.
If you have answers, please help by responding to the unanswered posts.

Toolbuddie

Senior Member
Joined
May 20, 2014
Messages
185
Location
USA
Vessel Name
Sea Note
Vessel Make
Mainship 40
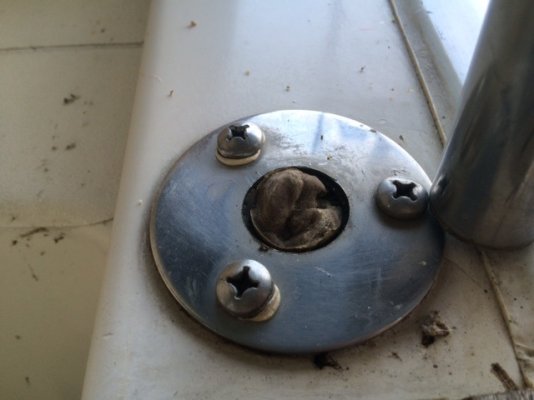
Greetings fellow problem solvers. I found, upon return from extended vacation, someone had apparently pulled themselves up on our boat by pulling on the handrail to hoist themselves up. Bad idea as it relates to me as I now have to repair the handrail. The obvious seems to remove it take to a good weld shop have it TIG welded back to gather re-install with bedding compound. Go back to being very busy doing nothing. Probably the best option but what say all to alternate methods. i.e. is there some sort of drive-it-in from the bottom peg with base already attached? Slip over the outside of the tube bolt to the deck as I have seen on short tubes that support a wooden top rail. My concern with alternates would be would it be as strong as the original. Better in some way. All input welcomed. and Thanks.
One thing I did not capture in the pic is the rail is very tall from this point up onto the rear deck 4 maybe 5 feet above. This tie down point is very leveraged from the excess length to the upper deck. This is the point of my concern. What have others done to repair or IMPROVE the rail fix point. Is this point called the stanchion?
Attempting to attach photos.
Thanks, Dave.
 

Attachments

  • rail.jpg
    rail.jpg
    81.6 KB · Views: 116
  • ralil 2.jpg
    ralil 2.jpg
    73.3 KB · Views: 116
I had a heavy guest slip and fall from his own boat to between our boats. On the way down he fell against my rail and did similar damage to the stanchion at the gate. The weld at the bottom of the SS tubing, attaching it to the mounting plate broke. I took it to a welding shop and had it repaired. You can't tell it was ever damaged and it can take more abuse than what broke it.
Follow your first inclination and you will get a quality repair.

Similar experience here with a good welding and fabrication shop.
 
Welds are often stronger than the base metal.

I would be a little concerned that it failed in this manner. The photo is not clear, but I don't see much weld there. Obviously, you wouldn't want another failure like this potentially tossing someone into the drink, or onto a pier.
 
Cottontop, agreed. It appeared to have been welded from the bottom could not discern a complete weld all the way around. I think I will have all of the bases re-welded for good measure while it is off. Probably take the other side off too and do that while the boat is out of service. SOOOO the bedding compound appears to have been white when installed and is still somewhat pliable. Would this likely be the famous 4200 or similar? I see where there are preferences with Butyal tape and other products. I think i want the compound to squeeze down through the fastener holes to seal it all back up. Could not see any evidence below decks where it has allowed any water through. Seems prudent to use product similar to what is there now. Thoughts?
Seems like consensus is to weld it back. Thanks for that.
 
Yes CP he is local old schoolmate in construct and fab business. Last time I was there he used big industrial machine. 2 miles from marina. But good suggestion. I will drop by before I load it all up. Yes it is unwieldy to transport..
Dhays you were who I was thinking of in the first post. So tell me more about how to use butyl tape correctly and does it come in white-ish color?


Let me refer you to the source that I have used. It surprised me to learn that the sailor whom I knew as "Maine Sail" on sailing forums also at times posts here under another name. Here is his webpage where he describes how to use butyl tape.
http://www.pbase.com/mainecruising/rebedding_hardware&page=1

The color of the tape is kind a light gray color, but the color is irrelevant since it isn't real seen.
 
That's a common fail point, for whatever reason. I have a broken one now on the flybridge that I need to take the rail section too a shop for repair.

Be sure you take it to a shop who has experience welding thin stainless tubing and will use a TIG welder. It pays to ask, as I had one really messed up by a weld shop who used stick rod to repair it. Nasty!:eek:
 
OK Dhays, good job. I am an opinionated self confident self proclaimed know it all. This case you have given enlightenment. I admit butyal "tape" sounded a lot like two sided tape. Hobby style stuff. Not so I now see. That looks like the right way.
This forum is blessed with knowledgeable generous men and women who freely share ideas to make our hobby rewarding and enriched. I am pleased to be allowed to participate. Will update later as I effect repairs. Thanks to all!
Dave.
 
Edelweiss, agreed thin stainless requires proper skill and materials. My local shop is owned by longtime pal with very good skill and knowledge proper tools. Welding is a science truly and not understood by many in the industry. Thanks for your input. Much appreciated. Happy sails, or trails.
Dave
 
OK Dhays, good job. I am an opinionated self confident self proclaimed know it all. This case you have given enlightenment. I admit butyal "tape" sounded a lot like two sided tape. Hobby style stuff. Not so I now see. That looks like the right way.

This forum is blessed with knowledgeable generous men and women who freely share ideas to make our hobby rewarding and enriched. I am pleased to be allowed to participate. Will update later as I effect repairs. Thanks to all!

Dave.


The credit goes to Rod Collins or "Maine Sail". If you decide to use the butyl tape, order it from Rod. It is good stuff and it helps support him being able to provide the web information that he does. A couple of rolls will likely last you a lifetime.
 
Dhays, yes I plan to use this product and order from him. Pay to play is my kind of set up. Thanks for sharing . I am excited to have first rate info to operate with.
Dave.
 
Depending on how far the stanchions are placed apart in that rail section, That can be welded in place. The process involves removing the broken base plate and slightly jacking the rail, Placing a copper or aluminum heat sink under the plate and a thin ceramic plate under the heat sink. This would require jacking the rail maybe 1/2-5/8" a competent welder can weld this in place using (believe it or not) a cardboard box to prevent shield gas from being blown away. Stainless Steel tubing requires minimal heat. You will be looking at more cost to weld in the field than in a shop. I guess you have to weigh the cost of repair to the cost to remove the entire rail. Your post did not indicate how many bases are attached to the entire rail.
 
What dhays said. Rebedded half a dozen stanchions with it in last 6 months. Good stuff. Zero prior experience here. Just follow the directions.
 
HOPCAR Yes thanks. That 316 stainless has my interest. Looks beefy at the deck level where all the stress is placed. Had not seen that quality before, have only seen the cast pot metal and plastic stuff. Those cheap made products were steering me towards welding it back. I think I like these better. For what looks like a way to spread the stress loads a bit. I will be taking measurements to confirm this will fit. Thanks for your input.
Dave
 
I can't tell the diameter of your tube but those fittings are available for 1" or 7/8" OD tubing.
 
Hopcar's suggestion looks like a great Quick resolution. Ask yourself if you went to look at a boat and saw a mismatched stanchion repair, would you question how the owner addressed other issues with the boat? If you plan on removing all the welded base plates and replacing with socket type, then it makes sense. It would be a good interim repair to get you through the season,(provided you don't have to shorten the stanchion). I have found that many times the Interim Repair does not get addressed till another failure occurs. Just something to think about.
 
Good idea to investigate all your stanchions. Remove all and hang upside down on a board with holes in it. Take to your tame TIG welder who will weld all of them from underneath. Price should be reasonable because you brought it right to his shop and mounted the work where he can work on it comfortably.
 
GURRYMAN, Shoalwaters,
Agreed with your observations and concerns. What i see on my boat is a very long distance from the broken stanchion up to the top of the rail. Didn't get that perspective in the pictures. The first stanchion up on the rear deck was broken when we bought the boat. Same on both sides of the boat. SO what i am thinking and have resolved to determine is if the slip on base will add any stability and strength by spreading the forces out over an inch vs the 1/8" or less that will be provided in a weld. Probably more like 1/16". So that is the consideration I am giving for this type of repair. This will give me the remainder of the season to evaluate the repair. If I am not satisfied with it i can take the rails off this winter do as suggested have them ALL re-welded the same and re-install. I can match the first two stanchions on each side of the boat for now and not be so obviously repaired. Thanks for the input, certainly worth considering. Cheers:speed boat:
Dave
 
If you want to increase the strength at the stanchion base, sleeve the lower part of the stanchion with larger diameter stainless steel tube. The sleeved tube could go part way up the stanchion or almost all the way to the top rail. The second and larger diameter weld at the base of each gate stanchion will provide the additional strength for your higher railing.
 
Last edited:
Update for the planned repair. At this time I plan to use the slip on 316 stainless base bedded with butyl tape.
1. Looks like it will be at least as strong as original design.
2. Upon inspection of interior below deck. To remove the hardware securing the entire rail the headliner and teak support frames and accents would all have to be removed in the aft stateroom. That's not something I am prepared to do to enable removal of the entire rail.
Yes, having two stanchions look differently is not most desirable. it for me FAR out weighs the prospect of tearing out the interior of the stateroom.
As to concerns of what this kind of repair may suggest about other repairs or maintenance I will leave all of that to the extremely detailed maintenance log. I log everything down to ER checks, lamp replacements. It's an old boat but the suggestion does have merit and thanks for making the point.
Dave
 
"Yes, having two stanchions look differently is not most desirable"

If the boat matches P&S many bases are far more suitable to clip fenders to.
 
"Yes, having two stanchions look differently is not most desirable"

If the boat matches P&S many bases are far more suitable to clip fenders to.

What is P&S.?
The stanchions are hidden by the skirting around the deck anyway so if you get to see them, you were probably invited aboard. There are a lot of more interesting things to look at around here. Like the margarita mixer for example. And of course the LAVA lamps!.:rofl:
Thanks again for all perspectives
Dave
 
Fog, yes looked at that sleeve initially sleeve would challenge hardware install. Looks doable but tight. To remove the rail completely will require removing the teak supporting structure and headliner in my stateroom. Sounds simple, looks like nightmare to me. Do not intend to create another project. Still very good method of repair were it less invasive to the interior.
Thanks
 
"What is P&S.?"

Port & Starboard AKA Left & Right .

OnlineMetals.com has SS tubing with a variety of ID and OD that might be used to beef up a stanchion.
 
UPDATE. Well the old adage for carpenters and the like, "measure twice cut once" comes to mind here. I procured all the necessary materials summoned some courage from the cowardly Lion and dove in! Well not too deep, somehow I misread the calipers I was using to measure the OD of the rail tubing. What i read was 0.872. 7/8 rail base would measure 0.875 so.. perfect slide it on. Well not so fast. the base would not slide on nor could i "make it fit". SO of course I had taken the calipers back home, what would I need them for during the install? The following week I returned with them to prove the rail base was undersized. Well it was not. The rail had grown to 0.992 That will not fit inside a hole that is only .875 least not this time.:banghead: Maybe i should get new glasses. I contacted the supplier where I ordered the Rail bases and got 1" bases on the way. Thank goodness for retail suppliers who want to retain my bussiness! It was totally my fault for being half blind and partially dumb. Please do not debate or refute the last part. Ego could not stand it right now. Maybe later when I am finished with the repairs.
Labor Day Weekend is upon us! Safe Holiday for those who participate. See you on the water!:speed boat:
Dave
 

Latest posts

Back
Top Bottom