Rebuilding a Teak lazarette hatch

The friendliest place on the web for anyone who enjoys boating.
If you have answers, please help by responding to the unanswered posts.

DHeckrotte

Guru
Joined
Nov 1, 2015
Messages
1,024
Location
USA
Vessel Name
Revel
Vessel Make
1984 Fu Hwa 39
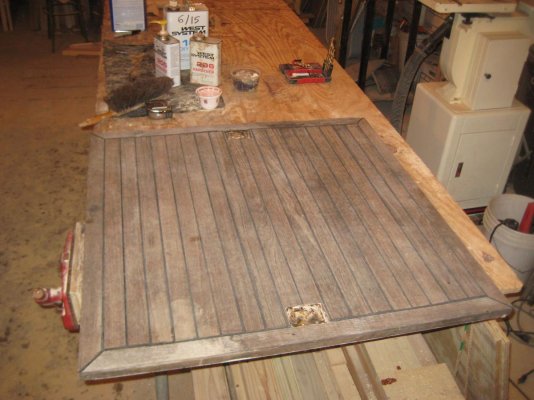
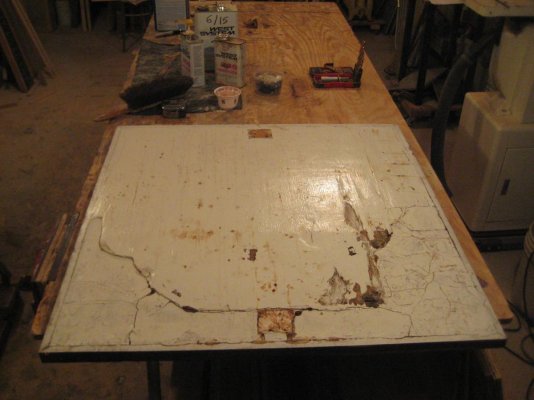
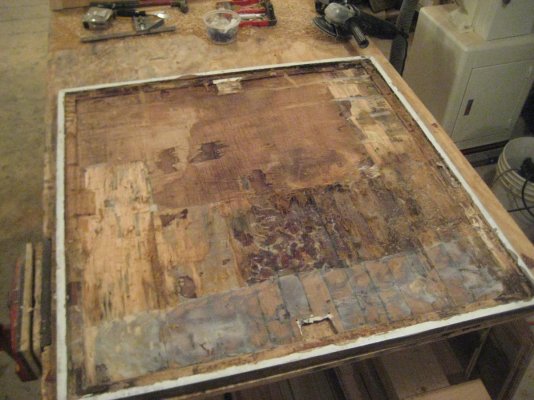
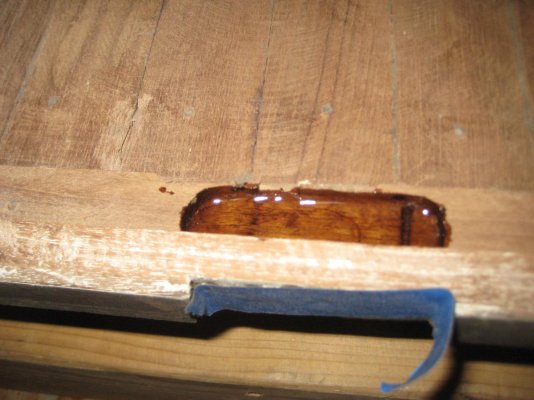
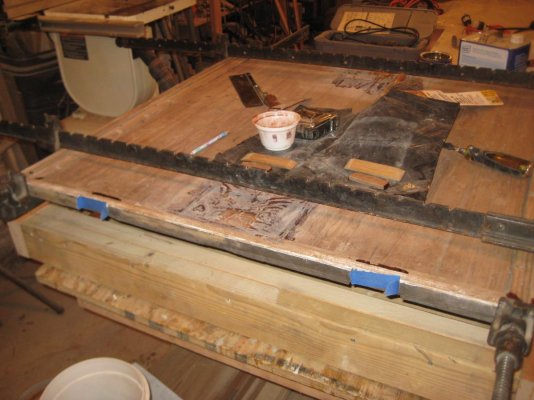
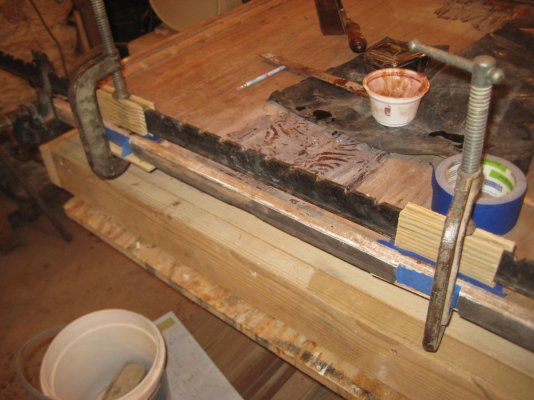
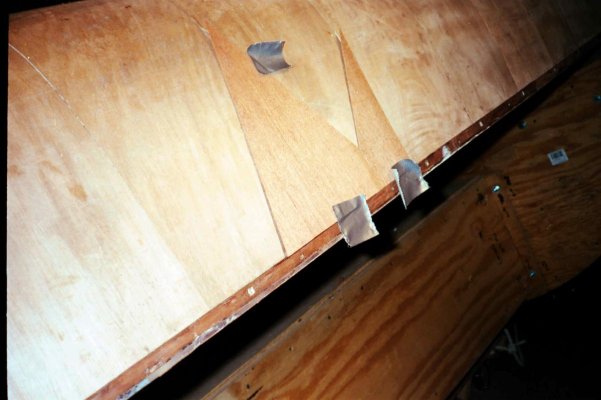
Our new-to-us '84 Fu Hwa has Teak decks, but I do not recall whether it's screwed and bunged. I'm rebuilding the lazarette hatch which was Teak glued down to 3/8" scraps of wood and that glued to 3/8" of fir plywood which was visible when the hatch was open. There were steel staples applied for clamping. There were no screws. The glue was polyester resin.

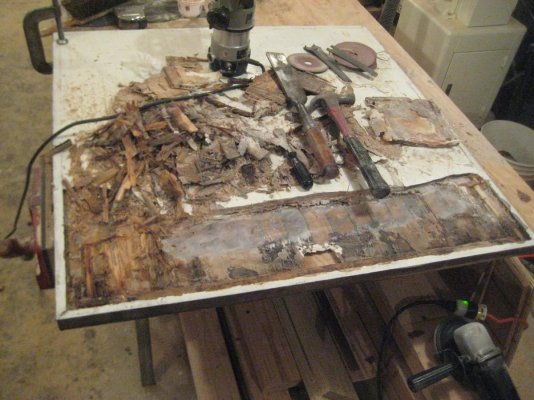
Since the 32-year-old Teak is in good shape and matches the rest of the boat, I demolished the rotted and ill-repaired plywood while retaining the Teak glued together with the seam sealant.

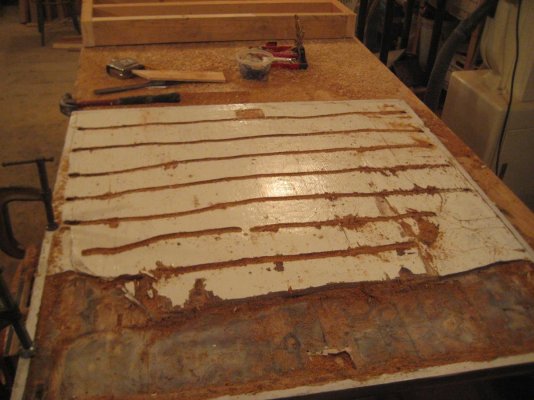
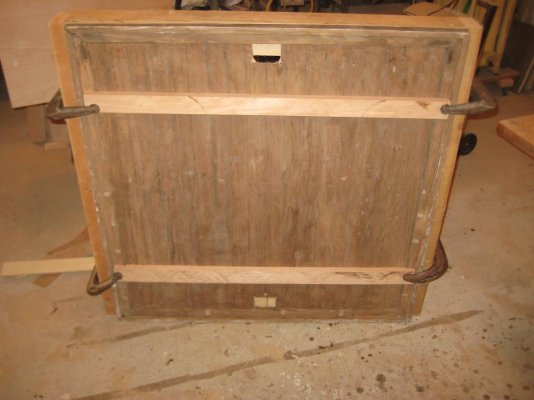
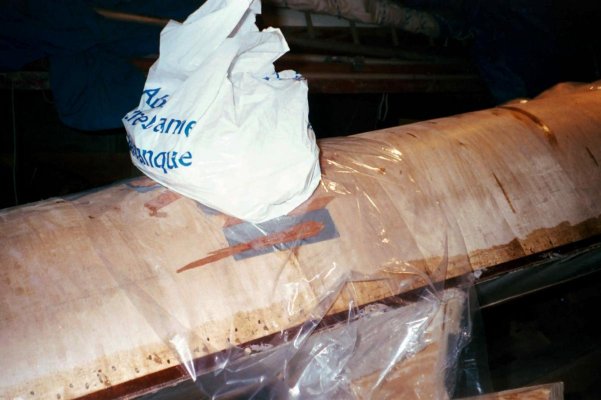
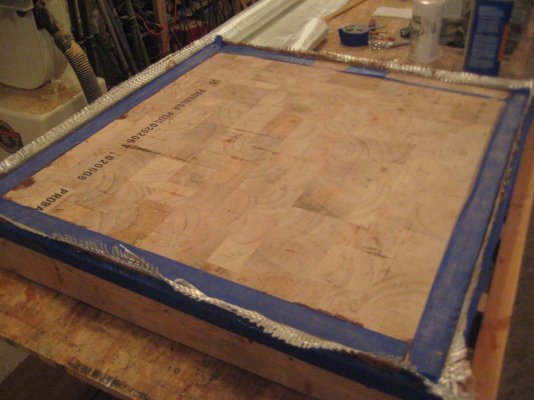
The remaining Teak is now 'perfectly' clean and ready for whatever I finally choose to replace the 3/4" of rotted plywood. I'm trying to be patient and give the Teak some time to thoroughly dry.

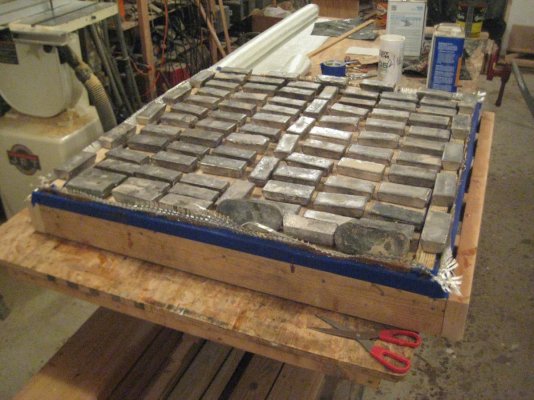
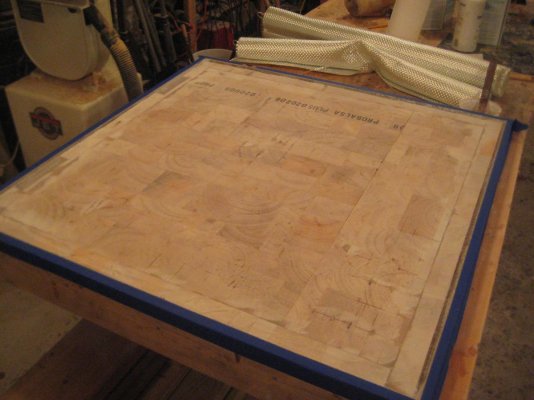
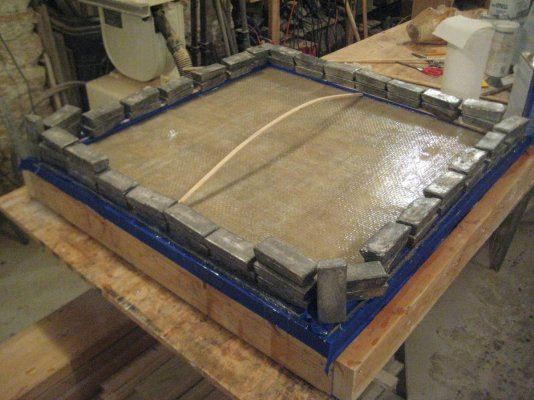
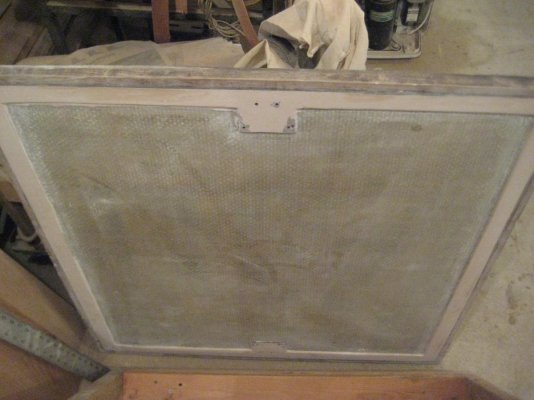
Pictures thus far are below. Before, top; before, bottom; starting demolition of the patches and wondering if the whole thing will simply fall apart; routing the remaining plywood so that it will split out, beginning to grind down (up!) to the Teak; built a platform to hold the potentially loose planks in place; the bottom of the top clean and drying:
 

Attachments

  • 2016-02-25 LazaretteHatch 001.jpg
    2016-02-25 LazaretteHatch 001.jpg
    126.8 KB · Views: 80
  • 2016-02-25 LazaretteHatch 002.jpg
    2016-02-25 LazaretteHatch 002.jpg
    112.5 KB · Views: 85
  • 2016-02-25 LazaretteHatch 003.jpg
    2016-02-25 LazaretteHatch 003.jpg
    159.7 KB · Views: 86
  • IMG_2123.jpg
    IMG_2123.jpg
    133.2 KB · Views: 81
  • IMG_2125.jpg
    IMG_2125.jpg
    152.3 KB · Views: 88
  • IMG_2152.jpg
    IMG_2152.jpg
    108.2 KB · Views: 86
  • IMG_2153.jpg
    IMG_2153.jpg
    98 KB · Views: 89
Great job salvaging the old teak.We built a new hatch this time last as well.Ours was to far gone to salvage . It was fiberglass coated plywood and it was made flush to the deck . I built a teak frame,teak hatch and raised it up.I couldn't figure out how to make the gutter work and keep the water out.Stays nice and dry in the lazarette now .
 
Last edited:
Pack, I'll look at the gutters on our Fu Hwa. I imagine that there are hoses affixed to the gutter directing water down to the bilge, or better, to a hull discharge. Otherwise, what's the point of a gutter?

Our now-listed-for-sale LeComte Northeast 38 has copper tubing glassed into the gutters and discharging into the cockpit. You can see my admirable admiral lying in comfort in the lazarette awaiting nuts to affix to the winch base. Above her is one of the copper tube gutter drains.
 

Attachments

  • 2012-05-27 Quetzal spring.jpg
    2012-05-27 Quetzal spring.jpg
    111.9 KB · Views: 84
Yeah ours is kind of a toe stumper now but we have learned to work around it . Our gutters and drain hose kept getting stopped up. Our gutter had rotted out and it was just to much for me to figure out a new one so we raised it up .
 

Attachments

  • image.jpg
    image.jpg
    136.4 KB · Views: 75
Make sure you use marine plywood as it has no few voids. I expoxied 3/4 ply to the bottom of the hacht as the epoxy thickened with filler will fill the voids between teak and ply. I use#4 filler.
 
Pack, I'm 'way too clumsy to accept another 'toe target' and our back porch appears to be much smaller than yours. Not all that hard to make wooden troughs to serve as gutters. Coat all the pieces in epoxy. You used to be able to buy Cedar guttering for your house(!).

Phil, I agree w.r.t. marine plywood. However, it'll rot quite cheerfully if not kept dry. Coat it out in epoxy. I've made a number of utility shelves, and mounting panels in the bilge, using Home Despot's 'Sandeply' - cheap Red Chinese plywood. I coated the panels with epoxy and epoxied on any mounting cleats before assembly. Ten years and counting; they look new. I presume you finished your plywood edges and bottom with the epoxy, in which case you can expect excellent service.
 
Next couple of steps are done. I sealed the old Perko Finger Lift fitting holes so that subsequent slopping of epoxy would not mess up the patinated Teak I've worked to save. A thickness of 'glass applied from underneath. You can see those two patches in pics two and three.

Then, working from the back, I routed the failed screw holes away and have prepared 'dutchmen to replace the wood. In this case, both interestingly and annoyingly, the hinges were installed in two positions resulting in two sets of screw holes, both failed. One, normal, location would have had the barrel above the Teak surface ready to take a divot out of one's foot. The second position made the hinge barrel flush but of course the hatch cannot open but a little past vertical. Not a problem since the back bulkhead of the salon is there.

First pic.: routed place wet out with epoxy; you can see the path of one screw. Second, the dutchmen. Third, corners epoxied and clamped. Fourth, dutchmen clamped.
 

Attachments

  • 2016-03-03 LazaretteHatch 001.jpg
    2016-03-03 LazaretteHatch 001.jpg
    117.4 KB · Views: 67
  • 2016-03-03 LazaretteHatch 002.jpg
    2016-03-03 LazaretteHatch 002.jpg
    97.4 KB · Views: 69
  • 2016-03-03 LazaretteHatch 003.jpg
    2016-03-03 LazaretteHatch 003.jpg
    122.3 KB · Views: 69
  • 2016-03-03 LazaretteHatch 004.jpg
    2016-03-03 LazaretteHatch 004.jpg
    120.7 KB · Views: 79
Ambitious and nice work, DHeck
 
I laminated two thicknesses of woven roving 'glass to the underside of the Teak. Then I laminated 1/2" end grain Balsa to the 'glass. You can see the roving since I forced it to bend up inside the blue-taped perimeter trim.

I never throw anything good away. That's my lifetime collection of scrap lead - piping from our old house, from leaded joints, player piano tubing, tire weights, overage solder, plumber's ingots, scrounged bits. I bought a crucible on eBay and melted the scrap using the backyard propane cooker. Very handy!
 

Attachments

  • 2016-03-04 LazaretteHatch 002.jpg
    2016-03-04 LazaretteHatch 002.jpg
    166.4 KB · Views: 72
I like the lead, beats the crap outa my concrete. I have used reclaimed lead shot for that. Hard to get now but 3 inches of 9 shot lead is very heavy. Wet sand works to and slows epoxy nicely.
 
Kulas, I started repairs to my late '50s Mahogany Flying Dutchman using marble chips in a bag for ballast. I thought lead shot was too expensive. I tried casting lead strips (like those old drafting 'Flexicurves' -fail!) I ended up using the traditional stapling to hold veneers.
 

Attachments

  • AA_0773_008.jpg
    AA_0773_008.jpg
    93.3 KB · Views: 73
  • AA_0773_021.jpg
    AA_0773_021.jpg
    88.2 KB · Views: 64
  • 00440008.jpg
    00440008.jpg
    88.7 KB · Views: 79
  • AA_1807_009.bmp.jpg
    AA_1807_009.bmp.jpg
    107.9 KB · Views: 77
Last edited:
I've used the plastic staples. Easy to sand, work good. Then started vacuum bagging, no comparison. Cold molding I still use plastic staples but vacuum where possible.
 
If you want it to be rot proof and a bit lighter than plywood, glue the teak to 3/4" bluewater 26 Coosa board. I would glue it down with thickened epoxy spread with a notched trowel. You can apply weights to the teak to hold it down while it cures or you can get fancy and vacuum bag it down (if you have a vacuum pump handy).
 
TDunn,

What a lovely boat!

You still need a top and bottom structural skin, presumably in addition to the Teak decking, with the coosa.

Below, pics show: One, the mess after removing the ballast. Two, the underside ready for the bottom skin of fiberglass. Three, the finished layup; that arched thingy is a spring stick pushing the edge-clamping sticks into place.

When cured, it's structurally complete.
 

Attachments

  • 2016-03-05 LazaretteHatch 001.jpg
    2016-03-05 LazaretteHatch 001.jpg
    127.3 KB · Views: 73
  • 2016-03-05 LazaretteHatch 002.jpg
    2016-03-05 LazaretteHatch 002.jpg
    115.3 KB · Views: 68
  • 2016-03-05 LazaretteHatch 003.jpg
    2016-03-05 LazaretteHatch 003.jpg
    160.3 KB · Views: 63
Finished and installed:

Top: made SS backup plates, tapped for 8-32 machine screws in lieu of nuts - less to take divots out of my delicate person.

Middle: cleaned up and ready for hardware installation.

Bottom: installed. The rest of the boat is dusty thus the mismatched color.
 

Attachments

  • 2016-03-08 LazaretteHatch 001.jpg
    2016-03-08 LazaretteHatch 001.jpg
    135.2 KB · Views: 60
  • 2016-03-08 LazaretteHatch 002.jpg
    2016-03-08 LazaretteHatch 002.jpg
    121.3 KB · Views: 67
  • 2016-03-15 LazaretteHatch 001.jpg
    2016-03-15 LazaretteHatch 001.jpg
    118.4 KB · Views: 54
Back
Top Bottom