Blind Stanchion Base Repair

The friendliest place on the web for anyone who enjoys boating.
If you have answers, please help by responding to the unanswered posts.

sbu22

Guru
Joined
Mar 16, 2011
Messages
1,253
Location
US
Vessel Name
Panache
Vessel Make
Viking 43 Double Cabin '76
OK – have my flak jacket on, head and vision protection in place – so here we go. In another thread, I sought advice regarding several rail stanchion base replacement/installation questions. As usual, I got rock solid advice and suggestions from TFers that I put to good use.

However, I have several leaking stanchion bases where I simply cannot access the lower surface of the deck to install proper (or any) backing plates. To be clear – yep, I have a sawzall and a fiberglass boat, so nothing is absolutely inaccessible. And I appreciate the fact that the correct means of fixing the problem is to remove a bunch of architectural surfacing and (in one case) a 6,000 BTU evaporating unit, obtain workable access to the position, install proper backing material underneath, and rebed the base. Then, put all the interior ripout back together.

I’m at the point where “mission creep” has sufficiently extended and complicated my original project to the point where I need to start putting stuff back together rather than conducting more ripout. With this background in mind, I’ve consulted several print, Inet, and personal sources and obtained several general schemes for conducting the more temporary, less rigorous repair. In general, it goes like this:
1. Remove the existing base and fasteners.
2. Drill out the old fastener penetrations to at least 2X the diameter of the fastener.
3. Using exotic tools like a bent nail chucked into a hand drill, muck out the drilled holes’ surrounding wood core material to insure all moisture damaged material is removed as well as establishing a “key” for the epoxy fill between the inner and outer fiberglass skin.
4. Saturate the exposed core with straight epoxy to seal and provide a competent bonding surface.

This is where things get really interesting. The condensed versions of “what to do next suggestions” are:
A. Fill the holes with thickened epoxy. After curing, drill the new fastener pilot hole and install new self-tapping screws with appropriate sealant.
B. Use thickened epoxy to fill the holes, butter the base, and install the base and fasteners onto/into the wet epoxy, somehow brace/clamp until cured. This essentially glues the base to the deck with the fastener threads embedded in the epoxy matrix.
C. Use thickened epoxy to fill the holes. After curing, create and tap the fastener holes in the epoxy. The theory is that a ¼-20 machine screw in tapped epoxy provides significantly more grip than a self-tapper. Variant is to use JB Weld to fill and drill/tap that.
D. Same as C, except install a correctly sized helicoil at each position. Then bolt the base down to the helicoil. The theory is that the size up of the helicoil threads give greater load capacity than the machine screw alone.
E. Same as C, except embed correctly sized coupling nuts in the thickened epoxy to serve as threaded receivers for the mounting bolts. Use hairspray as a release agent on the fastener threads for subsequent disassembly.

Any advice or informed opinion would be appreciated.
 
Some inventive ideas there.
The simple expedient of over-drilling the failed screw hole and epoxying in a wooden plug you later drill with a pilot hole and screw into doesn`t work?
Or in a worse case, chiseling out a square area and epoxying a matching square of timber into it.
 
Such a simple expedient that it didn't occur to me. Thanks, Bruce.
 
Same as patching a hole in drywall.
remove the stanchion, cut a slot big enough to push a piece of backing material through. observe the limiting conditions through the slot. cut a piece of backing material of sufficient size to adequately back the stanchion. butter it with thickened epoxy and having secured it by drilling one or more holes in the accessible middle of it, work it in place, pull it up against the underside of the deck and let the epoxy set. Remove the temporary fastenings, drill for permanent fastenings and put it all back together.
Easier if you have any access to the underside.

Good luck!
 
A slight variation of C. Use a molly like used on sheetrock to hang a picture with a stainless screw. If you coat the molly and screw with a release compound (like used on screws when bedding a rifle stock). You can fill the oversized hole with thickened epoxy and then when cured tighten the screw up through the base of the stanchion. You would have to use longer than necessary screws so you could push the molly through and have space to work under the stanchion base but there should be clearance in the hole. You can always check the clearance with a piece of wire. Not as good as a backing plate but if it pulled out it would take a lot of force and leave a big hole.

Tom
 
E

But put the nut in the hole, then put a washer on top of it (use a fender washer if you can), put a lubed bolt into the nut, pour in the epoxy then back out the bolt after the epoxy hardens. Or you could use JB Weld as suggested.

Make an alignment jig that reproduces the bolt hole pattern in your stanchion base to hold the bolts/nuts in proper alignment as the epoxy hardens.
 
Embedded T nuts maybe ? I think you have pretty much thought this to death. Sometimes just doing it a little better than it was done befor will last another 30 years.
 
"install a correctly sized helicoil at each position. Then bolt the base down to the helicoil. The theory is that the size up of the helicoil threads give greater load capacity than the machine screw alone."

This works best if you can find a SS or bronze helicoil.

Biggest contact area with the goop used to fill the holes.

I would raise the bolt down location 1/2 or more with a flat piece of GRP epoxied to the deck . This will help with leaks when there is less than 1/2 inch of water going by.

If all that held it in place was a nut and flat washer , your repair would be a great repair.
 
A couple of comments. I would do the core removal and epoxy fill, but only to seal the core. I would fill the hole with layers of fiberglass fabric set in epoxy. After the epoxy cured I would drill and tap for the fasteners. The fabric fill would make a stronger repair than simply using thickened epoxy. If you use fine thread fasteners the tapped epoxy-fiberglass will be plenty strong.

If you want to get fancy, you could cut the old base area out including the bottom glass skin and dig out wet core around the opening. Seal the core with thickened epoxy, then slide a piece of 1/4" stainless steel through the hole and draw it up against the bottom of the repair. Build the hole up with layers of glass in epoxy. Drill and tap through the bottom steel plate and screw the stanchion back down using 3M 4,000 as caulk.
 
Not loving the thickened epoxy on its own. JBWeld has something additional. Would really like to get something with at least minimal structural properties in there to prevent cracking.


Keith
 
WEST offers a number of fill materials of different density.

CSM or glass in the hole offers nothing in increased pull out ability, except the chance of an air void.

One thought might be to drill out the base plate to use bolts with larger diameter threads , either for the helicoil or a simple bolt.

With the helicoil I would use either tefflon tape or a good grade of bolt release to assure EZ removal for the next rebedding .

Measure the depth of the threaded hole , as it would be a shame to insert a too long bolt and jack the repair apart.
 
Last edited:
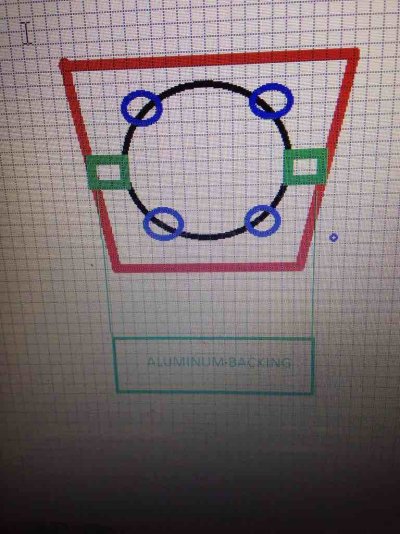
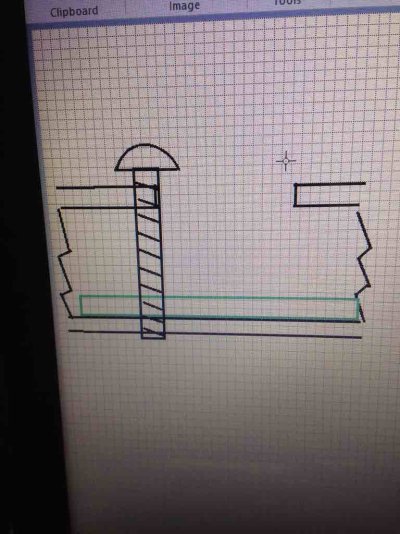
I would think a hole saw just to the inside of the mounting bolt holes, and do the bent nail gouge chucked in a drill to clean out the rotten wood core. Then make a thin epoxy with glass strand. Put in a disposable caulking tube. Injection that all the way to the outsides of the cavity to fill from the outside to the inside. Level the top off just proud of the gel coat. Sand flush, Redrill and remount when cured. This is assuming you can reach the back side to put nuts and washers on. How about putting two pieces of aluminum in bottom of gouged out area before filling with epoxy. Then drill and tap into the aluminum plates. It's not ideal using two plates, but probably better than just depending on epoxy to hold machine screws.

Keep the deck access UNDER the stantion base so you don't have to do gel coat matching.
 
ImageUploadedByTrawler Forum1452741739.996150.jpgImageUploadedByTrawler Forum1452741760.330044.jpg

Using a holesaw makes easier access into scoop out the wet rotten core. And gives you wiggle room to slide a backing plate in. Even a piece of 1/8" (but 1/4" would be better) aluminum would work.

Make two slots on the widest axis of the stantion base to get as long a piece as you can get into the hole. Then 5 minute epoxy the aluminum to the inner glass ceiling. That way the injection of epoxy doesn't slide them around. Drill and tap the entire way through the epoxy AND the aluminum. That way the backing plate uses the entire epoxy slab as reinforcement.

The good thing about this is next time the Stantion will break the welds! Been there done that. But you will have built in backing plates to fasten the thing to next time.
 
You guys are great! Really appreciate it.

The ground truth regarding the location in question turns out to be different than what I initially thought and presented in the OP. I finally got the time to start ripping and tearing and discovered that, in the specific location, I have 9/16" of solid glass. The wood I encountered was, in fact, the original %$#@!!! wood backing plate sitting beneath the solid glass layer. How'd I misread that? Amateur night ....

I'm going to try the helicoil route for this specific location. I made a test run with a helicoil in a piece of comparable FG scrap I got from my friendly local boat yard. The helicoils are for 1/4 20 bolts. Holed out a spot to about 1/2", filled with West epoxy thickened with 404, drilled, threaded, and inserted helicoil and bolt. Pull tested by various means. Finally got the bolt, helicoil, and a ragged 1 1/4" dia or so of surrounding glass/epoxy material (the epoxy did not separate from the FG bond) to pull out using a 36" wrecking bar. Not too shabby.

Cappy - I'm going to put your excellent ideas to work in other, more amenable locations (I have several, unfortunately).

One bit of info that was new to me and may be of use to other amateurs - I expect that this is old news to most who so kindly answered my OP, but - there are an amazing number of commercial/industrial grade "threaded inserts" on the market for various materials and applications. I stayed with helicoil just because it was familiar from my old (very old) hot rod gearhead days.
 
Yep.
 
Another usefull insert is the stainless steel expanding nut. Mostly for blind holes. Drive them in and tighten the bolt. They have counter rotation ridges on the top side that bite into the fiberglass. As you tighten the bolt the nut collapses and expands, pulling the threaded base up. Simple and really handy sometimes.
 
I have discovered an interesting repair for stripped holes that use screws.
Bamboo, the chopsticks variety. Come in 1/4 and also 1/8. Mostly the kind used for food, like small shish kabobs, had many left over from a wedding.

I have pounded them into enlarged and stripped out holes with various glues. Just keep pounding in more saturated with glue, snap them off, pound in with a hammer till you cant fit anymore in the holes.
They hold amazingly well. I would dry out the hole and get rid of any rotted wood using a bent nail in a drill first, if you have rotten wood in there, sometimes the holes are just stripped out..
If you got a cavity, fill it first with epoxy or the PL and sawdust. I have done these bamboo sticks with both PL Premium polyurethane construction adhesive and epoxy and both glues work equally well.

And I mean they hold amazingly well, you will be very surprised, seriously.
It may sound crazy, but it really works.
 
Last edited:
Finally got back to the project (on Mardis Gras Day, no less) and installed the first stanchion using helicoils. In a word - easy. Using 1/4 - 20 bolts and helicoils: marked holes, drilled out with 17/64 bit, threaded in the insert, knocked off the helicoil tang with a slightly smaller bolt, and installed stanchion and fasteners. Used butyl to seal.

FF - good call, but Viking took care of that in the initial design - stanchions are "perched" about 3/4" above deck level.

Kulas - thanks for the tip on the expanding SS nut - checking that out now.

Again - sincerely appreciate all of the input - this thread goes in the boat file for current/future reference.
 
Back
Top Bottom