Rail Stanchion Backing Plate

The friendliest place on the web for anyone who enjoys boating.
If you have answers, please help by responding to the unanswered posts.

sbu22

Guru
Joined
Mar 16, 2011
Messages
1,253
Location
US
Vessel Name
Panache
Vessel Make
Viking 43 Double Cabin '76
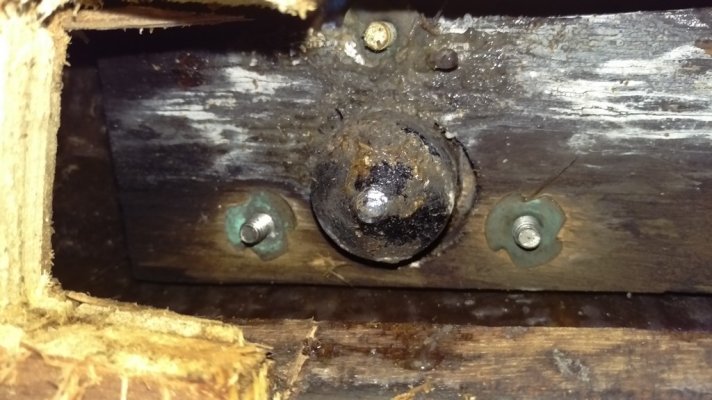
Chasing deck fitting leaks, I discovered the condition of several original rail stanchion bases as shown. I plan to remove and repair the mess and bring it up to a new rot free deck surface. Even though the old girl is pushing 40, I am extremely disappointed in Viking for the “backing boards” they used. I haven’t pulled any yet, but by the looks, I think they are just 1 x 4 stock. Maybe treated, I don’t know. In any case, and given the general hell for stout construction of the rest of the boat, I’m extremely disappointed that Viking cheaped out on this item. Really inconsistent.

Using the “Capital Marine” butyl tape bedding method, I intend to install new 316 cast bases. Here’s a concern: In an ideal world, I’d go back with maximum area ¼” 316 plate for the replacements. Since it’s not an ideal world, what’s my intelligent second choice? 6000 series aluminum? FR4/G10? My local boat yard has started fabbing their own backing plates out of laminated Kevlar or ballistic nylon for the blow boat racers standing rigging. Claims it’s strong and light. Then, once the material is chosen, what thickness? Everything I read uses qualitative descriptors like strong, stiff, etc. Any TFs have some advice?

As a “by the way” – I’ve not seen a rail stanchion base that has the center protrusion that these do. Is there a reason for that? Looks to me like just another opportunity for a leak.
 

Attachments

  • IMAG0063.jpg
    IMAG0063.jpg
    174.3 KB · Views: 111
  • IMAG0064.jpg
    IMAG0064.jpg
    171.6 KB · Views: 92
I've been procrastinating with the stanchion bases and have sealed the leaky ones with butyl tape long ago, but it has to be done this winter and I'm leaning toward mounting the bases on blocks of G-10 Fiberglass sheet, probably 3/8" thick, epoxied to the deck, then using 3/8 or maybe 1/2" starboard with fender washers for backing plates. I've got enough issues on the boat....don't need more with mismatched metals on the stanchions, and the extra bit of lift above the deck will keep the water from pooling around the stanchion base.
 
Last edited:
I think what your experiencing is a method that a relatively still young builder would use of the day. My 1987 44 which is the next generation of what you have does not have that type of installation. However I'm sure I could also point out a couple of bone head things done then that they wouldn't be caught dead doing today.
Every year is an improvement if they are a quality builder.


As to the backing plates, it doesn't matter whether you use Aluminum or Stainless as long as there's no water penetration. Just make sure you use nuts and don't tap the backing plate.
 
While I'm at it, what is the purpose of the rivets in the rail? Is that the junction of two straight runs, with a joining insert held in place by the rivets? The nominal 1" od ss rail tubing seems (round numbers) to generally have a 0.049 wall, giving a rough 0.9" id. So a nominal 7/8" od (0.875") would fit pretty close.

Is that what I'm seeing?
 

Attachments

  • IMAG0070.jpg
    IMAG0070.jpg
    108.4 KB · Views: 98
My guess would be yes, either smaller OD slip joint or reinforcement. Mine has similer, but threaded SS screws to do the same.
 
One trick is to place some quality thin 1/16 to 1/8 neoprene under the stanchion base on the deck.

GRP is never "flat" ,at least compared to a metal plate so this spreads the point loads as you tighten down.

Thicker can be used on the metal plate below decks as this is seldom flat.

The hardest service is docking when some helper uses the railing to push the boat off.
 
In an ideal world, I’d go back with maximum area ¼” 316 plate for the replacements.
Why not use SS? I would think the costs to purchase/cut/pattern drill would not be prohibitive compared to other corrosion/rot resistant materials

6000 series aluminum? FR4/G10?

I would not use 6000 series if using aluminum; I would use 508X.

Material cost between 'marine grade' aluminum and stainless steel would not likely be a deal breaker. The costs to cut the blanks and drill the base pattern is likely to exceed the material cost...under normal circumstances...but, you live in a state with many machine shops that will take on a small job at a reasonable cost as many machines/machinists at a idle with the current oil prices.
 
The OP shows a deck underside that is very rough.

A wrapping of aluminum foil on the hard metal backing plate will allow you to use a layer of reinforced epoxy goop to level the underside , making the assembly far stronger.
 
Appreciate the ideas. I marvel at the practical knowledge base here.
 
The OP shows a deck underside that is very rough.

A wrapping of aluminum foil on the hard metal backing plate will allow you to use a layer of reinforced epoxy goop to level the underside , making the assembly far stronger.

Fred.....that sounds like a great idea. Could you expound a bit. Are you talking about mixing the foil with the epoxy and then compressing into the area to level the surface?
 
I think the aluminum foil would serve as a release material to prevent the filled epoxy bedding from permanently adhering to the backing plate.
 
Fred.....that sounds like a great idea. Could you expound a bit. Are you talking about mixing the foil with the epoxy and then compressing into the area to level the surface?

I'm pretty new here, so I typed this, then deleted it, then decided maybe I should share it after all. I know squat about power boats, having owned one all of about a week, but I've done several refits of sailing vessels (one pretty much from the ground up), so hopefully some of what follows is relevant...

A trick I've used on my cruising sailboat was to make "plinths" out of 1/4" G10 epoxied to the deck. It raised the level of the holes so that standing water doesn't sit on the sealant, and flattens out the deck. Glue down with thickened epoxy. Mind the drainage path, though, so you don't dam it up and make standing water where there wasn't any before. Someone above already mentioned this.

You can use the same idea for under the deck as well (a G10 backing plate), and use a thickened epoxy in between to fair out between the plate and the hull. Leave the stantion off, wrap bolts with peel ply and drop them through the holes. Then goop up the G10 backing plate, leaving a 1/4" or so around the holes bare, and stick it up against the hull. Tighten the nuts until no more thickened epoxy squeezes out, then fillet the G10 to the hull with the extra. Wait for it to fully cure, then remove the bolts and redrill the holes. I did this with a bunch of running rigging gear, and so far I haven't had any leaks (and I've taken lots of green water over it.)

Since I'm volunteering all this extra work for you, it's a good time to overdrill the holes and fill them with thickened epoxy, and then redrill. It seals the core so that if the fitting does leak, no water can get in there and rot. It also creates a solid ring that won't crush (like the core can) if (when) I overtighten the nuts. I overdrill them, give the exposed core a coating with neat epoxy, then thicken and fill the hole. Cheap plastic syringes are great for this. You can duct tape squares of peel ply to the underside of the deck to seal the bottom of the hole.
 
The aluminum foil simply a really easy to use separation method.Less messy than wax,

Shmeer filled epoxy on the backing plate and use sharpened dowels pushed in from bottom to hold the plate in the proper position.

Drilling down from the deck will remove the locating dowels and any filler that got shmeered into the holes.

Using scrap to raise the location of every deck penetration is a worthwhile effort , we use 1 inch ., longer bolts are cheap.A larger pad spreads the loads.

Our technique for bolting a new item , like a set of davits to a cored deck is fairly simple.

First the location is drilled for the bolt pattern thru the deck pad and thru the deck.

The deck is drilled with a 3/4 or so hole drill thru the deck and core , But NOT thru the inner surface.
The top surface and core is gently pried out.

A bit of masking tape covers the location holes inside and the 3/4 holes are filled with filled epoxy .

When hard the tape is pulled and the holes re-drilled up to the deck.

Then when assembled the deck core is not being crushed , the poured in bushings take the compression load .

Wear gloves epoxy is hard on humans.
 
Last edited:
I've been tied up with life this week and haven't had time to do all of this info justice - but I will. I sure thank you for the time and effort in these postings. Now all I have to do is do it!
 
Well. I finally got this done. With the able assistance of you guys, I was able to rip out the old and install the new in a dog's breakfast of the ideas/guidance presented here. The final configuration wound up being 1/2" G10 backing plates faired out to the deck with thickened West epoxy. Until FF brought it up and I took a closer look, I did not appreciate the relief in the deck interior surface - the whole idea of the backer is to distribute load - without fairing, it would have been transferring loads from from the fasteners to scattered point bearing sites. Excellent call FF! G10 because I didn't want to fool with field fitting/drilling ss plate and didn't want the bimetal issues with aluminum. Thanks ?mark - never heard of the stuff before you mentioned it.

I used Compass' butyl tape for the bedding compound. Why? Mostly because it doesn't come in a tube. Also because a number of working watermen I know swear by it. We'll see.

We have a minor monsoon that started today - first rain since the work was done - going to head over to the boat and see if (fingers crossed) the leaks are cured.

Thanks again for the help.
 
Great news! How about a pic or two to show the results?
 
Pictures would be great. I have the same job ahead of me this Spring.
 

Latest posts

Back
Top Bottom