Keep the teak decks or spend more units

The friendliest place on the web for anyone who enjoys boating.
If you have answers, please help by responding to the unanswered posts.

winty

Senior Member
Joined
May 26, 2014
Messages
107
Location
CA
Vessel Make
'81 CHB34
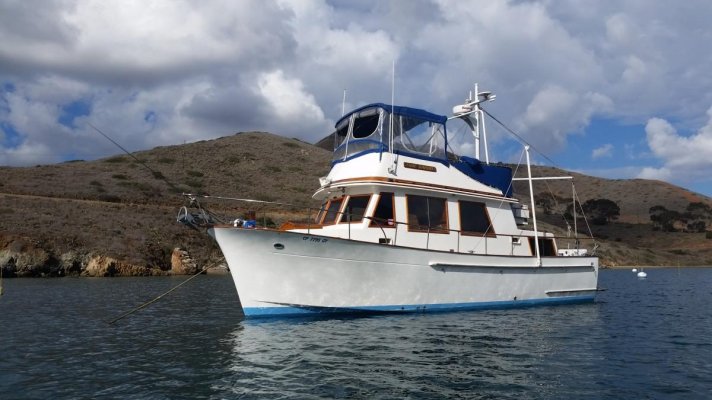
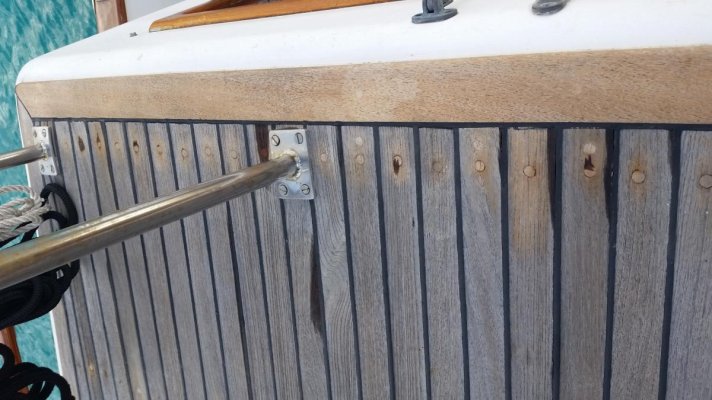
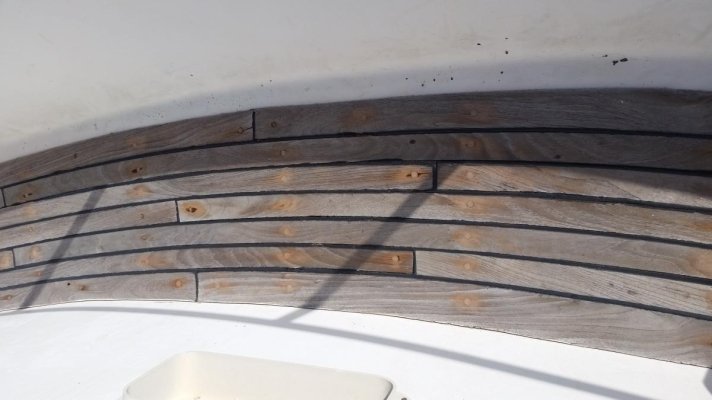
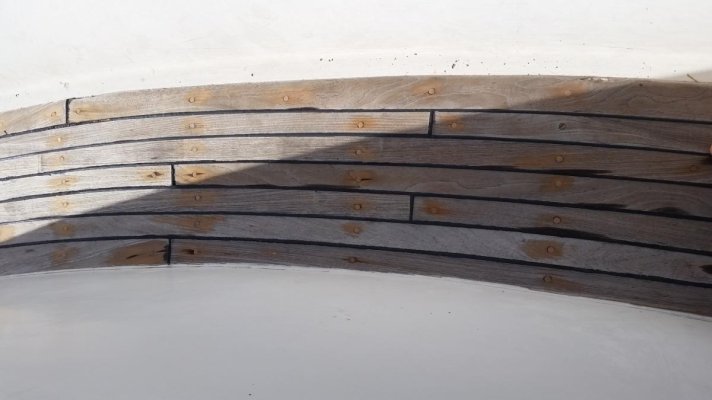
Decks are due for recondition, about $1,500. Or, rip them out and replace with non-skid, about $6,000 USD. I tried to strip and caulk a few boards myself, no thank you. I can heat gun, sand and varnish for days, but I just don't have the patience for maintaining the decks myself.

Planning to keep the boat for another 5+ years. Resale non-skid fiberglass is universally preferred correct? Should I just recondition now and reevaluate in a few years or go non-skid now?

The boat is in average cosmetic condition, mechanical and ER above average. We are a young family, using it on the weekends.

Curious to read what others have selected and why.

Thanks
 
I ordered a teak deck but then changed mind for non-skid and spent the thousands of dollars savings elsewhere.


In your case, I'd recondition the decks now and then redo them upon offering the boat for sale some five years from now if needed. That's $1500-$3000 versus $6000, no?
 
Last edited:
Greetings,
Mr. w. Exactly what does the $1500 "recondition" entail? Whatever you do, do NOT sand your teak decks! There are numerous threads dealing with teak decking on TF. MY personal feelings are to keep your teak decks as long as possible as I feel it is far superior to any plastic non skid in spite of the increased maintenance.
 
Without seeing the decks,I suspect repair is pursuing a lost cause. Do it once, do it right, go nonskid.
(Note: I did nonskid for the bow section forward of the covered decks, fresh teak for the covered side decks and cockpit. The nonskid works, is quick, and cost effective, the teak is pretty, original, and I love it, but it really cost, both $ and time.)
 
Just my personal opinion...When I went shopping for a boat, I was looking in the 30 year old range for budget reasons.....but at that age, I didn't want the hassle of a Teak deck that I knew I'd have to replace, either soon or late so one of my deal breaker criteria was a fiberglass deck...didn't matter if the boat came that way, or the previous owner replaced it. I just didn't want to deal with what could be major deck issues right off the bat.
 
The problem with the teak overlay decks is they can leak into the plywood deck below.

This compromises the deck structure.

A simple layer or 3 of GRP may or may not restore the rot.
 
Recondition now and save your money.

And there is no need to be universally afraid to sand teak decks. Unless they have been maintained perfectly for new at some point they are going to need sanding. And if they were properly made you should be able to lightly sand them at least a couple of times over their lifetime before you get into resetting screws and bungs. Or recutting seams.
 
1500 sounds cheap

I don't know size or condition of your decks but 1500 dollars for a pro doesn't go very far. Removing chalking is very slow work, even with a multitool. Fein makes a bit for the job in three sizes. I don't see any problem with sanding or scraping teak if you know what your doing. Some teak decks are made with wide planks with two dato grouves that can be sanded out when sanding . you have use caution to avoid doing this or be willing to cut new grouves with a router. Teak likes to be sanded, the heat and friction bring the teak oils to the surface . 1500$ sounds cheap.
 
We refasten and caulk the teak decks about 10+ years ago. We did a section at a time, over a 2 years. However, each year I do maintain and repair the teak deck about 4 hours. Each summer the deck dries out and shinks cause the caulk to pull away from the teak and bungs to push up indicating loose fastener under neath. Then reseal the entire deck with Daily Seafin that seeps down into the small cracks and absorbed by the wood.

Let us know if you decide to do it yourself and maintain them. Teak decks fail because the ower does not maintain them. Maintain them and they will last for the life of the boat.
 
The traditional tool for re calking teak decks is an old file.

The file is heated and the tang bent 90deg an then the tang is filed or ground narrower than the old seam.

The edge should be filed square and sharp.

The file is then reheated to red and quenched in old oil.

The file portion is then wrapped with tape to be easy on your hands.

With sharp edges the tool makes quick work of the failed deck seam goop.Same tool for wooden hulls and old calking.

On a typical TT deck the old seam goop must be removed to the plywood underlay as it too must seal to the teak , so water from failed screws or failed seams can not rot the entire underlay.

If it has a GRP layer under the teak, do not break thru the GRP.This usually means the boat was built , and a dealer talked the owner into the "teak deck" overlay.

BEWARE , on some early TT the deck teak strips are actually in wide teak planks with a shallow seam routed in and filled with black stuff.

Only the edge seams of the wide planks need to go deep enough to see the plywood deck and seal it..
 
Last edited:
The traditional tool for re calking teak decks is an old file...

:thumb: 
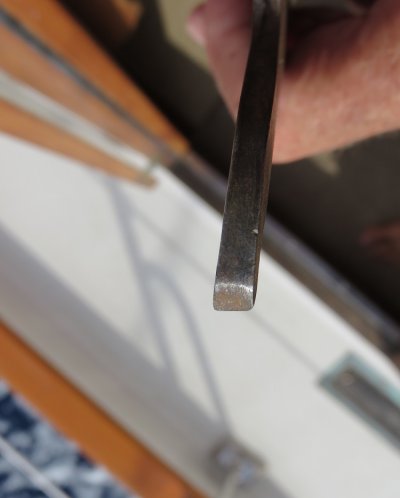
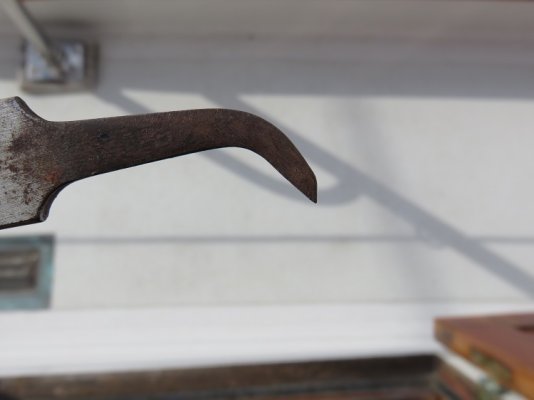
One of the best for teak deck seam repair. It keeps the edges of the seam sharp and easily removes the old caulk from the the bottom.
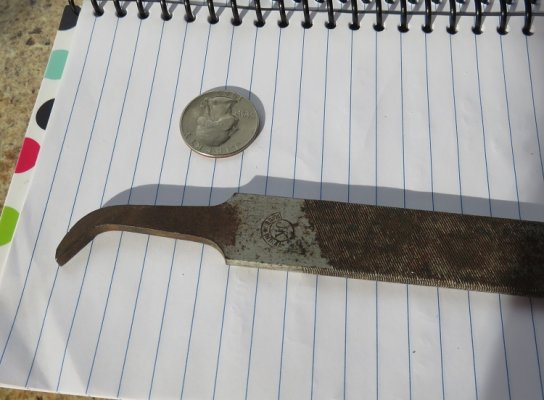
 

Attachments

  • 005.JPG
    005.JPG
    138.3 KB · Views: 134
  • 007.JPG
    007.JPG
    114.8 KB · Views: 148
  • 008.JPG
    008.JPG
    68.5 KB · Views: 146
Without trying to hi-jack wintys thread - the teak decks are on my "to do list" but I am a little confused as the gap between planks is barely 1mm wide. The caulking appears to be down in this narrow groove then in a wider strip down one plank but sitting on top - more for decoration than waterproofing. On first sight the gap looks about 5mm wide as you would expect but in reality there is only the 1mm gap. Is it pretend teak overlay? How do I redo the caulking?
 
Without trying to hi-jack wintys thread - the teak decks are on my "to do list" but I am a little confused as the gap between planks is barely 1mm wide. The caulking appears to be down in this narrow groove then in a wider strip down one plank but sitting on top - more for decoration than waterproofing. On first sight the gap looks about 5mm wide as you would expect but in reality there is only the 1mm gap. Is it pretend teak overlay? How do I redo the caulking?
1.Pictures please George? Hard to get a proper understanding otherwise.
2.What is under the teak? Typical fibreglass sandwich of teak blocks as Andy G`s Sarawanna had, or foam sandwich, as my boat has? You may be able to check and see at the edges of the aft lazarette.
 
1.Pictures please George? Hard to get a proper understanding otherwise.
2.What is under the teak? Typical fibreglass sandwich of teak blocks as Andy G`s Sarawanna had, or foam sandwich, as my boat has? You may be able to check and see at the edges of the aft lazarette.


Bruce,

Here is a photo as requested. I checked out the lazarette and surrounds and couldn't find any evidence re timber or foam sandwich
 

Attachments

  • Deck caulking.jpg
    Deck caulking.jpg
    183 KB · Views: 148
I use a regular flat screw driver with the edges sharpened. The screw driver can be held to fit the width of the groove. I use a carpet knife to slice along the edge to remove most of the old chalking. Then the screw driver to ream out the remaining.
 
Bruce,

Here is a photo as requested. I checked out the lazarette and surrounds and couldn't find any evidence re timber or foam sandwich

That is not an uncommon style of planking where the caulking groove is offset.
 
That is not an uncommon style of planking where the caulking groove is offset.
Thanks Capt.Bill11 - but I am still a little confused: the "groove" is only 1 or 2 mm thick (didn`t measure how deep) - the rest of the caulking just appears to sit on top of the board to imitate a wide groove.

Do I try and make a super narrow tool to dig the caulking out as per normal - its going to be tough to get the caulking into such a narrow groove.
 
...Do I try and make a super narrow tool to dig the caulking out as per normal - its going to be tough to get the caulking into such a narrow groove.

It looks like your decks are warn (been sanded?) and a groove to accept caulk needs to be re-cut. The original grooves are gone and the 1-2 mm groove in the picture is the butt edge of each deck plank?

How thick is the teak? I was taught that 3/8" of teak is considered serviceable for decks, ie: thick enough to accept screws/bungs and have enough thickness for caulking in the seams. Thinner than that, hope for the best or replace. :)
 
Could the present decks be cleaned degreased soaked in epoxy and glassed over. This is a common thing with ply. Would the planking expand and contract causing cracks? Planked boats are sometimes glassed with success. There are now flexible epoxy formulas would that work here and would West marine have an answer?
 
I think I get it now. LarryM raises good ideas about checking the remaining teak thickness, to see if it will accept reworking.The rework will be a quite a job, but can be done in sections, the worst area will likely be the unprotected bow section. The pic does not show screw plugs, their state is another indicator of deck condition.
It is 5 years since I inspected Malagari, but I don`t remember any signs of water intrusion, that`s an encouraging sign.
 
I have found the tool used does not have to be as wide as the groove, but small thin enough to fit into the groove. I also use different size screw drivers. For the small hair line crack, I use Daily Sea fin which is a sealer that goes one as a thin liquid to soak in to post teak and down into the tiny cracks. I repair and seal the deck each year.

For the really small groves I just run the carpet knife up and down the grove. The carpet knife I use the most to cut the old caulking out. also I find it best to do a small area at a time about the area I can reach across.
 
It looks like your decks are warn (been sanded?) and a groove to accept caulk needs to be re-cut. The original grooves are gone and the 1-2 mm groove in the picture is the butt edge of each deck plank?

How thick is the teak? I was taught that 3/8" of teak is considered serviceable for decks, ie: thick enough to accept screws/bungs and have enough thickness for caulking in the seams. Thinner than that, hope for the best or replace. :)

I have an area that looks like Brisyboy's photo in post #14, and its clear to me that Larry in on the money here.

In my case the teak was originally 1/2" thick with the caulking grooves likely to have been about 3/16" deep, although possibly 1/4". The PO had sanded repeatedly so now a lot of my deck is a little over 3/8" thick only. I had to remove slippery Cetol from my decking so I used 2 coats of paint stripper followed by a light sand to get rid of it. On the step from my Portuguese Bridge to the foredeck my sanding took the last of the caulking groove away in a few places. I am yet to router deeper groove - its a small area and doesn't really bother me the way it is.

But I do have the same issue as the OP for the deck around the Portuguese Bridge walkway. I soon need to decide whether to put teak back after repairing the wet core. I have just started to get a leak into the master cabin from it. On my foredeck I went with non-skid when replacing the wet balsa core, and like it there. But I am quite attached to teak in the walkways and cockpit.
 
Last edited:
I have an area that looks like Brisyboy's photo in post #14, and its clear to me that Larry in on the money here.

In my case the teak was originally 1/2" thick with the caulking grooves likely to have been about 3/16" deep, although possibly 1/4". The PO had sanded repeatedly so now a lot of my deck is a little over 3/8" thick only. I had to remove slippery Cetol from my decking so I used 2 coats of paint stripper followed by a light sand to get rid of it. On the step from my Portuguese Bridge to the foredeck my sanding took the last of the caulking groove away in a few places. I am yet to router deeper groove - its a small area and doesn't really bother me the way it is.

But I do have the same issue as the OP for the deck around the Portuguese Bridge walkway. I soon need to decide whether to put teak back after repairing the wet core. I have just started to get a leak into the master cabin from it. On my foredeck I went with non-skid when replacing the wet balsa core, and like it there. But I am quite attached to teak in the walkways and cockpit.

Howdy!

New member here. I have read every comment in this thread.

Noticed something in your comment that made me wonder if you or anyone here on TF has documented with photos, perhaps one personal blog, the replacement of the deck core as you described. Or perhaps a video of the process on YouTube. Anything like that?
 
George, are your decks glued down?

To the original poster, if you don't like maintaining teak, get rid of them!

A Swiss Army knife, the small blade, works great for teak deck seams.
 
Quick update from original post. This summer my wife spent a sunny afternoon on a friends nonskid deck, barefoot, and that was all it took to overrule my decision.

Found a guy that his been slowly repairing the deck, a few hours a week, which has been ideal to manage cash flow. We are about 85% done and I've spent about $2k USD.

The majority of the bungs and screws have been replaced. Many were missing, others loose. Each time a bung is replaced, first the old screw was removed, hole filled with epoxy and new screw installed. I'm leaving out a few steps, but that has been the basic process. If a screw head breaks, it is capped and a new hole and screw installed next to it. This has only happened a few times fortunately. We could have drilled the screw out, but I opted for the less labor option.

Caulking. Most of the existing material is in good condition, so he's been removing and replacing as needed. All new white installed around the house. I think 4200 was used for the white areas, but need to verify.

No sanding other then to flush each new bung.

Aft cabin, much of the teak surround at the edges was thin and lifting. Those areas have been removed and replaced with new teak.

Pending is to dig out the old rubber along the fly bridge seats and repair the lazurett cover.

Cheers from Catalina Harbor
 

Attachments

  • 20151127_121101.jpg
    20151127_121101.jpg
    112 KB · Views: 110
  • 20151127_120841.jpg
    20151127_120841.jpg
    112.9 KB · Views: 114
  • 20151127_120821.jpg
    20151127_120821.jpg
    127.3 KB · Views: 119
  • 20151127_120759.jpg
    20151127_120759.jpg
    81.5 KB · Views: 116
  • 20151127_120749.jpg
    20151127_120749.jpg
    139 KB · Views: 114
  • 20151127_120731.jpg
    20151127_120731.jpg
    76 KB · Views: 111
That looks really good! Inspiring:)
 
Feeling smart having dropped the teak deck option to spend a significant amount less on a very loud air horn.

But my boat's exterior is somewhat commercial in appearance. :socool:
 
Last edited:
Winty...

Have you heard about the get-together, anchoring at White Island on the afternoon of May 22nd, hosted by the folks from the yahoo chb group? I'm planning on attending. Perhaps you too... it would be appreciated that you take a look at my teak deck situation... if the get together wont work perhaps some other time... I am moored in Holiday Harbor in San Pedro.

Carl


QUOTE=winty;391318]Quick update from original post. This summer my wife spent a sunny afternoon on a friends nonskid deck, barefoot, and that was all it took to overrule my decision.

Found a guy that his been slowly repairing the deck, a few hours a week, which has been ideal to manage cash flow. We are about 85% done and I've spent about $2k USD.

Cheers from Catalina Harbor[/QUOTE]
 
Hi Carl

Just missed you by 12 hours. We were anchored in the Isthmus yesterday afternoon. Underway right now from White's to Long Beach. 50% chance I'll be at the island weekend of May 22, based on work travel. I haven't been monitoring the yahoo forum for a few years, so thanks for the heads up.

I have a guy based in Long Beach that did the deck work for me. Slow, affordable, quality, I'll pm you his info as well as mine.
He's a better set of eyes to look at your decks, even if you want to DIY most of the work.
 
Back
Top Bottom