nmuir
Senior Member
Having had enough of needing to re-do the teak every spring I wanted some protection for the cap rails, doors, etc. Our fly-bridge bimini cover is also getting a bit old so some extra waterproofing for the fly-bridge was also ‘on the list’– just avoids water getting on the seats etc. A boat-house is unaffordable (up here almost as much as the boat itself!) so this led us towards a large boat cover – large being a key word as our boat is 56’ with overhangs!
Managing the precious boat-bucks had us making our own. Postings online describe using tarp material as the pattern for a proper boat cover, but to be honest after spending the time and going through all that work I am going to use the tarp itself for a few years until it is worn out and then see!
I have an old Phaff 138 commercial sewing machine. It does not have a walking foot like a Sailrite but handled everything fine. The biggest challenge was a working area large enough to sew 40’ sections of tarp. I ended up making what amounted to a temporary sail loft in the car-port! We sewed a number of darts, tapers, and gussets (below).
To start we ran a rope ‘ridge-line’ from bow to stern with a few 2x4 posts to stop it sagging. Fast to put up, also pretty quick to remove and store.
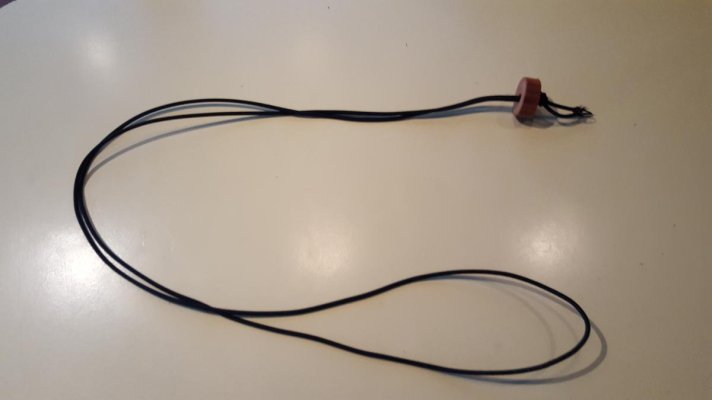
We wanted a cover that could be removed should we do some winter cruising, so for mounting I took the approach lifted from widely available car-covers - elastic straps and grommets. The cord easily available and purchased from a sewing supply store. Some wooden ‘buttons’ cut and drilled from an old dowel completed the ties. They work really well. They are fast to install and remove, and keep the cover snug.
For practicality of sewing, installing, and removing we made the cover in 4 sections with about 2’ overlap between each section. Even so they each were big enough to be a challenge to sew! The 4 sections are: bow to the top of the flybridge, front of fly bridge to rear of the bimini/mast, mast to end of back deck, and finally an almost vertical stern panel to close off the rear.
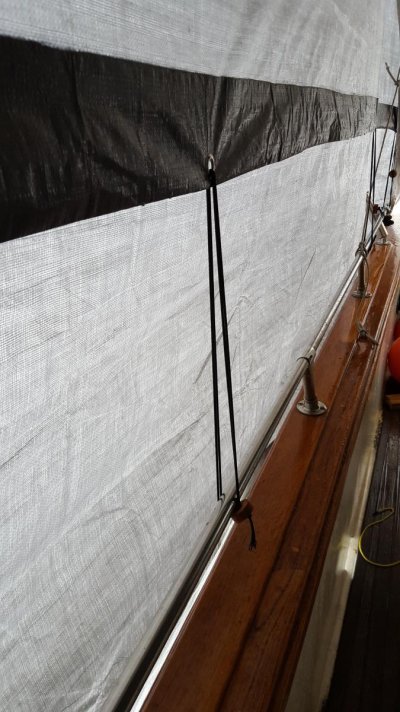
The rails make a great tie-down. We sewed a gusset all along the covers and inserted grommets every ~ 4’. The excess material hanging down below the gusset to provide protection to the cap rails have a simple rope to snug down around the hull. As the bottom rope is only stopping the bottom few feet of the cover from flapping in the wind (the main cover is attached to the rails by the gusset) it doesn’t have to be very robust.
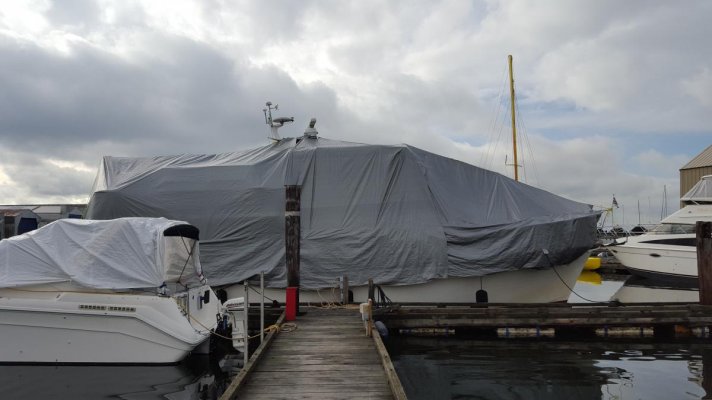
All in all we are very pleased. We think it is not a total marina eye-sore.") It has taken rain and wind in stride with no issues at all. It is completely dry inside and has enough clearance for some of the winter jobs I have planned. It even covers the dinghy on the back deck – so I don’t have my annual job of sorting out dinghy storage!
It has taken rain and wind in stride with no issues at all. It is completely dry inside and has enough clearance for some of the winter jobs I have planned. It even covers the dinghy on the back deck – so I don’t have my annual job of sorting out dinghy storage!
We will have to keep our eye open for snow and likely have to clear it by hand, but with El Nino this year we might be lucky and not have any!
Total cost is about $350.
Managing the precious boat-bucks had us making our own. Postings online describe using tarp material as the pattern for a proper boat cover, but to be honest after spending the time and going through all that work I am going to use the tarp itself for a few years until it is worn out and then see!
I have an old Phaff 138 commercial sewing machine. It does not have a walking foot like a Sailrite but handled everything fine. The biggest challenge was a working area large enough to sew 40’ sections of tarp. I ended up making what amounted to a temporary sail loft in the car-port! We sewed a number of darts, tapers, and gussets (below).
To start we ran a rope ‘ridge-line’ from bow to stern with a few 2x4 posts to stop it sagging. Fast to put up, also pretty quick to remove and store.
We wanted a cover that could be removed should we do some winter cruising, so for mounting I took the approach lifted from widely available car-covers - elastic straps and grommets. The cord easily available and purchased from a sewing supply store. Some wooden ‘buttons’ cut and drilled from an old dowel completed the ties. They work really well. They are fast to install and remove, and keep the cover snug.
For practicality of sewing, installing, and removing we made the cover in 4 sections with about 2’ overlap between each section. Even so they each were big enough to be a challenge to sew! The 4 sections are: bow to the top of the flybridge, front of fly bridge to rear of the bimini/mast, mast to end of back deck, and finally an almost vertical stern panel to close off the rear.
The rails make a great tie-down. We sewed a gusset all along the covers and inserted grommets every ~ 4’. The excess material hanging down below the gusset to provide protection to the cap rails have a simple rope to snug down around the hull. As the bottom rope is only stopping the bottom few feet of the cover from flapping in the wind (the main cover is attached to the rails by the gusset) it doesn’t have to be very robust.
All in all we are very pleased. We think it is not a total marina eye-sore.
It has taken rain and wind in stride with no issues at all. It is completely dry inside and has enough clearance for some of the winter jobs I have planned. It even covers the dinghy on the back deck – so I don’t have my annual job of sorting out dinghy storage!We will have to keep our eye open for snow and likely have to clear it by hand, but with El Nino this year we might be lucky and not have any!
Total cost is about $350.