If it's okay to destroy the hose then yes, it's easy to get off with a variety of tools. But if one wants to retain the hose--- say the project is replacing a sanitation valve, not the hose-- the heat makes it easy to get the hose off and back on without damage.
You are using an out of date browser. It may not display this or other websites correctly.
You should upgrade or use an alternative browser.
You should upgrade or use an alternative browser.
Your Best Technique or Invention
- Thread starter rclarke246
- Start date
The friendliest place on the web for anyone who enjoys boating.
If you have answers, please help by responding to the unanswered posts.
If you have answers, please help by responding to the unanswered posts.
Nothing beats Simple Green.
Spray the engine with it also lite spray of water mist vacuum the bilge.
Can also clean the bilge real good at the same time.
No damage to hoses or wiring.
Now the next thing you may first laugh at but it works great.
after everything is nice and dry get a a dozen Tampax maxi, (or ask your other half to actually get them) they have a pull strip to paste in place and hold in one spot.
used them under my engine & battery compartment
When our Boston Whaler tender gets dirty inside I put some water and soap into it, scrub it clean, then "vacuum" it out with a shop vac. Then rinse and repeat. Easy if you don't put in a lot of water.
- Joined
- Apr 15, 2008
- Messages
- 13,731
- Location
- California Delta
- Vessel Name
- FlyWright
- Vessel Make
- 1977 Marshall Californian 34 LRC

Forkliftt
Guru
- Joined
- Oct 6, 2007
- Messages
- 2,450
- Location
- USA
- Vessel Name
- KnotDoneYet
- Vessel Make
- 1983 42' Present Sundeck
Archie I sprang for the corded Fein tool 6 or 8 moths back along with a few of the high $$ tools- but wow. I love what this type tool can do. I cut a triangle plug out of the side of a 2x4- "just cause I could"'!!
Forky
1983 Present 42 Sundeck
Twin Lehman 135's

Forky
1983 Present 42 Sundeck
Twin Lehman 135's
Capt.Bill11
Guru
If it's okay to destroy the hose then yes, it's easy to get off with a variety of tools. But if one wants to retain the hose--- say the project is replacing a sanitation valve, not the hose-- the heat makes it easy to get the hose off and back on without damage.
Heat works great on sani hose and some others. Doesn't do much for exhaust hose and most thick walled hose that can't swell from the heat either due to it's make up, because of the wire reinforcing or both.
The cotter pin tool is of course non-destructive to hose.
caltexflanc
Guru
My problem with the bag is that oil leaks down the sides if loosened. Trying to turn it in a bag is greased pig wrestling.
Since the bag has no rigidity it cant be left alone while the oil drains.
Nobody beats me when it comes to making a mess.
The big 4mil really heavy duty contractor bags have lots of rigidity.You can make them into a little "pail" that will easily hold the less than a gallon contents of the filter. You don't unscrew the filter using the bag to hold it. You can prevent the filter from "seizing" by remembering to lightly oil the gasket and last two threads before installing, and do not over tighten them.. a good strong hand tightening is all that's need. Many filters have a diagram on the side as to how much farther to tighten it once you have initially snugged it up. And if for some reason the filter has "seized" drill another hole further up the body and ram a big screwdriver through it and use that to break the seal.
Last edited:
High Wire
Guru
Here here!One little sub-tip here....Before drilling, Break the filter loose a bit with your wrench so you know for sure you can get it off! Having a seized on filter already drilled with holes could be discouraging!
On my old Carver 30 years ago, I punched a hole in the side and drained the filter first, then tried to loosen it. Well the filter can tore open. I pulled back and saw my new, super soft leather glove had a slash right across the index finger. A split second later blood was pouring out the slash! After duct taping the wound, I improvised a spanner using 2 paddle bits and a pair of vise grips to remove the stuck base. More lessons learned the hard way.
So my advise is just because you don't have a particular tool to do a job doesn't mean you can't do it. Think about what you can do with what you have. And do not overstress anything when you are in improvise mode!!!
Forkliftt
Guru
- Joined
- Oct 6, 2007
- Messages
- 2,450
- Location
- USA
- Vessel Name
- KnotDoneYet
- Vessel Make
- 1983 42' Present Sundeck
If a mechanic is hired to do a major repair in YOUR engine room that involves internal engine parts..rocker arms, cylinder head, timing gears and such.. think about the last time you finally got that engine oil filter off and how the resulting leak on and around you that was as messy as it gets.
I suggest you provide 2 gallon Zip Loc and 13 gallon garbage bags for the tech. Lots of the square absorbent pads aren't a bad idea to have around either... So when they unbolt- then remove the rocker arm, cylinder head, oil pump etc. immediately have him/her slide it in a garbage bag and tie it up. Generally on gears, push rods and things like injector lines the tech doesn't need to clean the part to reinstall after pulling it out of the bag. Think $1.50 a minute/$90 an hour as a quick estimate. It adds up fast. And you stop the mess before it becomes a mess.
Cleaner engine room/ faster assembly- what could be better ??
Forky
1983 Present 42 Sundeck
Twin Lehman 135's
- Joined
- Apr 15, 2008
- Messages
- 13,731
- Location
- California Delta
- Vessel Name
- FlyWright
- Vessel Make
- 1977 Marshall Californian 34 LRC

Shoalwaters
Guru
- Joined
- Feb 24, 2008
- Messages
- 681
- Location
- St. Lucia, West Indies
- Vessel Name
- "Dragon Lady"
- Vessel Make
- DeFever 41
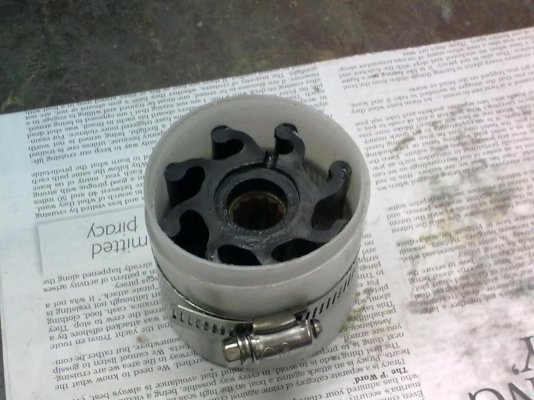
I know some have cut a section from the side of a milk gal jug and wrapped that around the larger impellers w zip ties outside the flexible plastic...does a better job of compressing evenly and easier to push the impeller into the cavity.
I know I've posted this before, but . . . I use a strip of plastic cut from the flat side of a gallon ice cream container (thicker material than milk jug). It works well on my smallish Yanmar impellers. A larger version with two hose clamps works fine for the impellers on 8V-92 Detroits too. IMHO the Jabsco pullers and a squirt of liquid soap are the best thing for getting the old ones off.
Attachments
Forkliftt
Guru
- Joined
- Oct 6, 2007
- Messages
- 2,450
- Location
- USA
- Vessel Name
- KnotDoneYet
- Vessel Make
- 1983 42' Present Sundeck
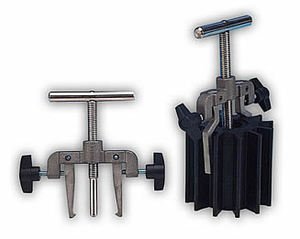
I have a picture somewhere of my using hose pliers to reach in halfway and grip the impeller to pull out. Best way ever for me on the smaller Johnson pumps. I found an example on Amazon and grabbed a screen shot.

Forky
1983 Present 42 Sundeck
Twin Lehman 135's
Forky
1983 Present 42 Sundeck
Twin Lehman 135's
Old deckhand
Guru
Whitewall tire cleaner works well for cleaning the inflatable and fenders. I also believe I just showed my age.
AusCan
Guru
- Joined
- Jul 15, 2012
- Messages
- 3,218
- Location
- Australia
- Vessel Name
- Kokanee
- Vessel Make
- Cuddles 30 Pilot House Motor Sailer
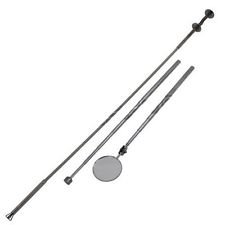
If you have tight access to your engine area (or anywhere on your boat) you will find these 3 tools very handy. Extendable claw grab, magnet & mirror.
I drop things so often that I keep these babies handy in the recessed trough around my engine hatch. It reduces the swearing on the boat considerably.
I drop things so often that I keep these babies handy in the recessed trough around my engine hatch. It reduces the swearing on the boat considerably.
Attachments
Last edited:
Old deckhand
Guru
What is a whitewall tire?
Youngster GFC
I my father mentioned them once.
- Joined
- Oct 6, 2007
- Messages
- 841
- Location
- Poulsbo, WA
- Vessel Name
- Dream Catcher
- Vessel Make
- Nordic Tug 37-065
At first, when I wanted to steer on something, I'd line my spot light or anchor up with it, thinking 'that makes sense, those things are on my centerline.' Of course they are, but the helm isn't. It's offset to starboard. So I was off 10 degrees all the time.
Realizing that from the helm seat it was hard for me to judge what was exactly straight ahead, I came up with this elaborate and costly solution:
With the boat held motionless (on the trailer) I sighted from the center of the windshield along the top of the anchor, and marked a fixed position on a surface ahead of the boat that this pointed to, knowing this was straight ahead.
Then I measured the offset distance from the center of the boat over to the center of the compass, which on my boat is centered in front of the helm seat. Made another mark on the surface ahead of the boat, offset the same distance to the right as the compass is offset from the boat's center.
With me sitting in the helm seat, looking over the top of the compass, a helper marked a position on the bow rail that lined up exactly with the compass lubber line and second mark on the surface ahead of the boat. Put a piece of black electrical tape around the bow rail in that spot.
Voila! I have an easy way to sight straight ahead from the helm: line up the compass lubber line with the electrical tape, and I'm looking straight ahead. (well, offset by a few feet)
Last edited:
- Joined
- Oct 6, 2007
- Messages
- 841
- Location
- Poulsbo, WA
- Vessel Name
- Dream Catcher
- Vessel Make
- Nordic Tug 37-065
Nope, it's useful. Especially when someone else who's not so used to the boat is steering.You are kidding, right?
Last edited:
Capt.Bill11
Guru
Do you have a piece of tape on the hood of your car as well? Or did you just go for a racing stripe? 
- Joined
- Oct 6, 2007
- Messages
- 841
- Location
- Poulsbo, WA
- Vessel Name
- Dream Catcher
- Vessel Make
- Nordic Tug 37-065
Ha! No need in the car, of course.
But our small boat (no keel, no autopilot) traveling at displacement speeds (most of the time) wanders a good bit. And the boat forward of the helm is all curved surfaces, with nothing to line up straight ahead.
When I was new to it, and for my guests who are still new to it, the tape sight has been handy. It makes it easy to line up a distant target correctly, and to quickly check and make corrections to stay on target.
Maybe not my BEST technique or invention, but I like it.
- Joined
- Apr 15, 2008
- Messages
- 13,731
- Location
- California Delta
- Vessel Name
- FlyWright
- Vessel Make
- 1977 Marshall Californian 34 LRC
Richard, I did the same thing with blue tape when I had a family with kids aboard. The kids were taking turns driving and they all tended to drift, aligning the burgee with their target instead of the spot in front of them. Once I placed the tape on the fwd rail for them to use as a sight, they did fine. (Yes, I removed the tape.)
Last edited:
When I was a teenager, I test drove a Pontiac Firebird. I thought that would be such a hot car to have. I couldn't see the front of the car. That drove me crazy in it. How to park when you were just guessing? As to perspective on the road, nothing there to use as a sight line. The salesman asked me what I thought and I said it was horrible. Then he asked what it would take to get me into it. I said there was nothing that would get me into it, didn't he understand me saying I hated driving it.
Sight lines on boats can be challenging and do whatever it takes. I think cameras on cars or boats are one of the greatest parking tools ever. Not sure I'm buying the duct tape story, but if it works I fully endorse it.
Sight lines on boats can be challenging and do whatever it takes. I think cameras on cars or boats are one of the greatest parking tools ever. Not sure I'm buying the duct tape story, but if it works I fully endorse it.
Maybe thats why my wife always tends to cross over to the left side of the channel.
Wifey B: That or she's British. Now, that brings up a question I'd never thought of. I mean we drive on the right side of the road and right side of the channel. I'd assumed this was a worldwide convention but now asking do those who drive on the left side of the road drive to the right or left in the channel?
Similar threads
- Replies
- 222
- Views
- 17K
- Replies
- 10
- Views
- 910