New Canvas

The friendliest place on the web for anyone who enjoys boating.
If you have answers, please help by responding to the unanswered posts.
Joined
Jul 25, 2014
Messages
1,967
Location
USA
Vessel Name
Pairadice
Vessel Make
Sold Selene 47
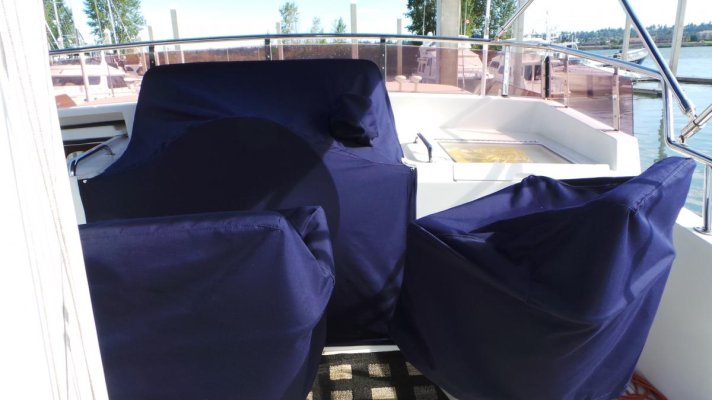
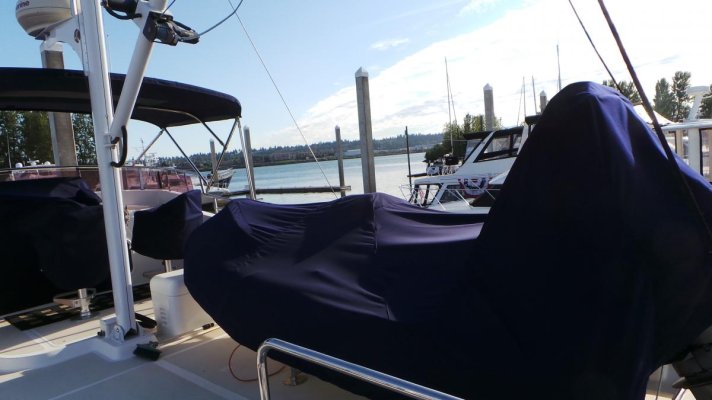
Spent a month on the boat and did a little canvas upgrade. I had a few local canvas shops quote out the job and was not surprised as the prices, 11K to 14 K. the big problem was when they could get to it. Late November and December or later.
So, I decided to do the job myself. I had done canvas work up on Whidbey Island many years ago while in the Navy. It was a great experiance and like riding a bike, you kind of get back into it fairly quickly.

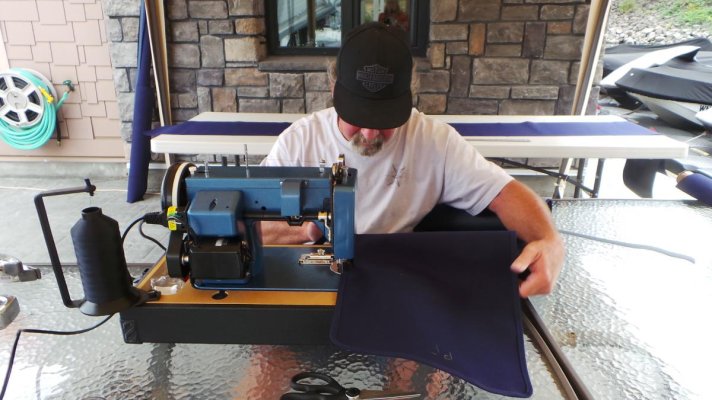
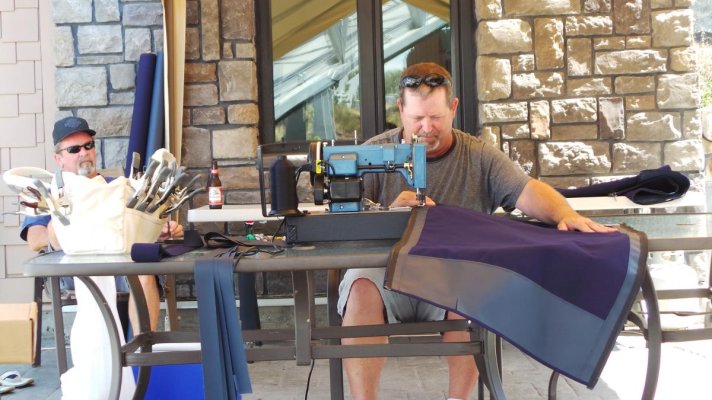
I bought a new Sailrite LZ1 from sailrite and a few attachments, had it shipped to my home here in Las Vegas. Contacted Vaugh bros. in Portland to negotiate pricing and headed North to start work on the Canvas along with other projects.
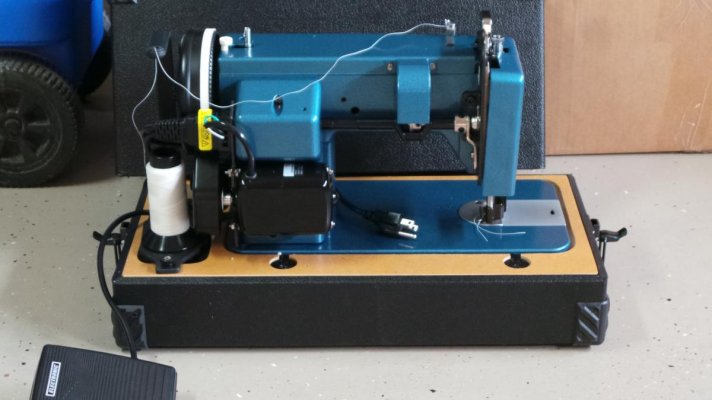
This is the machine.
 

Attachments

  • 20150717_095805.jpg
    20150717_095805.jpg
    79.1 KB · Views: 122
I made arrangements with the Harbor Master at our Marina to use the community Patio that is on the docks. Not the best facility to do a major sewing project but a heck of alot better than working in the sun all day, plus they had several large patio tables to make a usable space to work with.
 

Attachments

  • 20150810_041513.jpg
    20150810_041513.jpg
    119.5 KB · Views: 116
The old Canvas was over 10 years old and had many repairs. It was also dried up, moldy and pretty worn out. I wanted to make some design changes but had alot of canvas work to do. Picked up the material from my vendor and started the work. 55 yards of Capt Blue Sumbrella, 15 yards of reinforcement material, Snap setter tool, thread and much more. First project was the Bimini.
 

Attachments

  • 20150820_025119.jpg
    20150820_025119.jpg
    114.8 KB · Views: 133
I finished the bimini and here you can see the difference between the new and old. Big improvement, and all the neighbors thought so too! So now to the Cockpit cover and seat covers.
 

Attachments

  • New Bimini.jpg
    New Bimini.jpg
    117.2 KB · Views: 120
This is the cockpit panel and seat covers.
 

Attachments

  • 20150809_011120.jpg
    20150809_011120.jpg
    80.4 KB · Views: 121
  • 20150809_003107.jpg
    20150809_003107.jpg
    85.5 KB · Views: 112
I wanted to finish off the FlyBridge area and the next job was the Dingy Cover.
The previous cover wasent very well designed and it needed some improvements. Because the dingy has a stainless arch over the motor I wanted to have a better fitting cover. Also the previous owner liked to attach the winch line to the dingy. This required a long zipper and a hole for the line to enter the cover. The thing leaked pretty bad so I decided to bypass that.
Here is how it turned out. This cover took me 3 days and alot of cold refreshing adult beverages.
 

Attachments

  • 20150809_011146.jpg
    20150809_011146.jpg
    89.1 KB · Views: 121
  • 20150809_003023.jpg
    20150809_003023.jpg
    82.1 KB · Views: 114
So now I had to decide. work on all the small covers or tackle the aft enclosure. I knew I had another couple of weeks to work on this project, by my other projects were not getting done. So I took a few days to work on those, before tackling the aft enclosure. I had some help from my brother who lives just over the bridge in Vancouver. He still works, where as Im retired, so any day that he has off which is only on Mondays he comes down to the boat and drinks my beer. Was he in for a surprise this trip. I put him to work, and we got a pretty good chunk of the layout done. Several beers and a few days later and it was done.
 

Attachments

  • 20150810_051735.jpg
    20150810_051735.jpg
    128.3 KB · Views: 124
  • 20150818_041124.jpg
    20150818_041124.jpg
    79.5 KB · Views: 119
  • 20150816_235123.jpg
    20150816_235123.jpg
    107.4 KB · Views: 134
And the finished Aft Enclosure. Also got most of the Cap rails covers done. Back up next month to finish the one remaining cap rail cover, hatch covers, winch covers and Port and Starboard sign covers. Might even have enough material left to make a couple nice bags to put all the covers in for storing.
 

Attachments

  • 20150822_053421.jpg
    20150822_053421.jpg
    111 KB · Views: 120
  • 20150821_015708.jpg
    20150821_015708.jpg
    84.9 KB · Views: 128
Very impressive, I always admire folks with skills!
 
Thanks for posting that. Great job. I only wish that I had the skills to do something like that! My canvas is going to require replacement within the next couple or so years, and I have been dreading laying out all that money. Am mulling over whether or not to just have a hard top installed.
 
Nice!

What is funny about it is that or what good canvas people charge for doing these jobs, you could screw it up 5-10 times and still be under their quote (assuming you consider your labor free) We did our own FB surround 3 years ago... It was an okay job, but materials were less that $1100 and the lowest quote we got for the job was $6500. We were going to do it again, but now we have a different boat. That, you guessed it, needs a surround :)
 
Thank You Sir!

Back in the day, it was a great part time job. We operated out of a 40 foot bus and traveled to the jobs. Every Summer, would take 20-30 off from the Navy and travel the San Juan Islands. Made more money during that time than I did the entire year in the Navy.
 
Nice!

What is funny about it is that or what good canvas people charge for doing these jobs, you could screw it up 5-10 times and still be under their quote (assuming you consider your labor free) We did our own FB surround 3 years ago... It was an okay job, but materials were less that $1100 and the lowest quote we got for the job was $6500. We were going to do it again, but now we have a different boat. That, you guessed it, needs a surround :)

Thanks!
I'm into this project right at $3,400 including the machine. Think I'm gonna keep the machine as almost everyone asked if I could repair a " Small Tear" for them. Might just keep the cooler stocked, or a couple bottles of my favorite beverage.
Actually, most people can do the work with a little practice and lots of patience. Believe me, I made a few Boo Boos on this project.

Notable information... You forgot to mention that the cost of the new Sailrite LZ1 sewing machine is $900 (not including any attachments you may have purchased). Meaning you only spent just over $2000 in material. A bargain compared to the bids you received. I'd say absolutely yes, keep the machine and earn a bit of beer money. Sounds like a solid plan to me!
 
Last edited:
Looks fantastic. Say, I've got a couple of small tears over here. Would you mind taking a look?
 
Very nice work . I have the same machine but have only used it a couple times . I'm a woodworker and sewing has been intimidating to say the least . Thanks for posting . Did you have any former training or are you self taught ?
 
Last edited:
Very nice work . I have the same machine but have only used it a couple times . I'm a woodworker and sewing has intimidating to say the least . Thanks for posting . Did you have any former training or are you self taught ?

Thanks for the kind words. I was taught by the Navy and spent 3 years doing Canvas up on Whidbey Island, Wa.
I suppose sewing is a little intimidating, but really, the sewing part is just a part of the process. If you can figure out the process, IE laying out the job, and figuring out what the next step is, just about anyone can do it. Get one or two steps ahead of yourself and you get frustrated. I still do it the old school way, I use the fabric to make the template. Now a days, the newer breed use paper to make the templates. Seems like an additional step but it works for them.
 
Crusty...

Nice job! I'm impressed.
I bought one of the Sailrite straight stitch machines about 10 yrs ago and started doing my own canvas work as well. Well that started a number of folks in the marina wanting small jobs done. I have done a lot of small work over that time and learned a lot just by doing it. The ironic thing is we now own a Mainship Hardtop Trawler with NO CANVAS!?

You sparked an idea to start a canvas sewing tips thread - probably more than a few that have tackled similar projects and learned something - others that are considering it but maybe afraid to start.

My first reaction was to respond w/ a few I've learned but didn't want to hijack your posting. I'll start a new / related canvas thread... why not pass on any tips, tricks, worthwhile tools / attachment findings.

Hey if it helps some to save a few bucks, I'll lend a hand. The sewing thread is a great Idea. Think Matt on his Axe project would help also as I hear he's gonna give it a go himself.
As a side note if anyone wants to learn a little bit more about canvas projects, Sailrite has many video's on there web site.
 
Man- I'm all in on a canvas tips thread!!! I have purchased/ scrounged all the necessary materials, thread etc. and just need to replace the o ring belt to the electric motor on a 1911 Singer my German Grandmother brought to the states in the mid 50's. I bought a canvas how to book. I just haven't set the machine up- I gotta figure out the sewing machine. Threading it and other stuff... I need help ;)!!!


1983 Present 42 Sundeck
Twin Lehman 135's
✌️
 
Great work. I've got to do my veranda enclosure ....eisenglass and screens shot. Come on down! Plenty of beer here!
 
When I get back up on the Boat next month, I'll try to take pictures of a simple hatch cover step by step. It might help someone to show how a simple project is done and reduce the reluctance to try.
 
Great work. I've got to do my veranda enclosure ....eisenglass and screens shot. Come on down! Plenty of beer here!

Larry, this is why it took me longer than expected. A day didn't go by that at least 3 people needed help. They were mostly small projects, and they humped the beer down the ramp and stocked my cooler too.
 
When I get back up on the Boat next month, I'll try to take pictures of a simple hatch cover step by step. It might help someone to show how a simple project is done and reduce the reluctance to try.
Sounds good . I will look forward to that as well .
 
Man- I'm all in on a canvas tips thread!!! I have purchased/ scrounged all the necessary materials, thread etc. and just need to replace the o ring belt to the electric motor on a 1911 Singer my German Grandmother brought to the states in the mid 50's. I bought a canvas how to book. I just haven't set the machine up- I gotta figure out the sewing machine. Threading it and other stuff... I need help.

Steve if that 1911 Singer has walking dog for feed drive your in like flint. If not, you'll struggle big time. Also, smaller machines usually don't have the UMPH to get thru several layers of canvas. Even the Sailrite struggled at times for me. But by rotating the wheel by hand I got thru everything.
 
When I get back up on the Boat next month, I'll try to take pictures of a simple hatch cover step by step. It might help someone to show how a simple project is done and reduce the reluctance to try.


Perfect! I had a pair of Sunbrella hatch covers made several months back. They are set up with draw strings and one has already blown away. I look forward to Lesson 1 :)


1983 Present 42 Sundeck
Twin Lehman 135's
✌️
 
Back
Top Bottom