Kevins new watermaker

The friendliest place on the web for anyone who enjoys boating.
If you have answers, please help by responding to the unanswered posts.

ksanders

Moderator Emeritus
Joined
Feb 24, 2011
Messages
6,284
Location
USA
Vessel Name
DOS PECES
Vessel Make
BAYLINER 4788
Well, got the new watermaker installed. :)

I am too happy with how it came out.

Rich at Cruise RO was a GREAT help with my questions, even responding back late Saturday night via Email!

Total labor time was about 25 hours. Here's some photos!
 

Attachments

  • panel 3.jpg
    panel 3.jpg
    100.7 KB · Views: 183
  • panel 1.jpg
    panel 1.jpg
    89.6 KB · Views: 180
  • high pressure pump.jpg
    high pressure pump.jpg
    144.3 KB · Views: 167
  • DSCN0989.jpg
    DSCN0989.jpg
    124.8 KB · Views: 174
  • filters and boost pump.jpg
    filters and boost pump.jpg
    117.7 KB · Views: 162
  • valving and cleaning.jpg
    valving and cleaning.jpg
    112.1 KB · Views: 178
Looks great, must be nice to have all that room for all that big "stuff"
 
Great job and not to bad 25 hours
 
Have you run it yet?

Those high pressure pumps make a lot of noise and transmit a fair amount of vibration. You might want to put it on good isolation mounts, if you haven't already, and perhaps make a sound box for it.
 
I ran it today for a couple hours.

Very little noise, no vibration. Quieter than the Katadyne it replaced

40 gph is GREAT!
 
Nice job Kevin!


1983 Present 42 Sundeck
Twin Lehman 135's
✌️
 
Nice install. You got skillz.
 
The instructions said hook it to a through hull...

I just teed into the macerator hose. Thats OK, isint it? :eek:

Can hardly wait to see the "Head Mistress's response to that one!:thumb:
 
The instructions said hook it to a through hull...

I just teed into the macerator hose. Thats OK, isint it? :eek:

LOL!! That's thinking outside the box, Kevin!

Seriously, it looks great! Did you do all the work yourself?
 
Hi Ksanders,

Nice install! Glad it worked out, and is happily making H2O. Life is good!

I'm just about to pull the pin on the 30GPH version of your watermaker, from the same vendor. In looking through some of your pictures, I notice you have used the "Pex" (not sure exactly what to call it, but it's the semi-rigid plastic pipe with the push-on connectors) for your low-pressure side of your installation. Seems like that's the "stock" LP plumbing from the vendor.

Now that it's in, was that part of the install satisfactory? By that, I mean was it easy to do, did you have ample access to tubing and fittings? Did you have to use a special tubing cutter? Was the LP supply system straight-forward to make leak-tight? I know you haven't gotten many hours on your watermaker yet, but does the LP side remain leak tight?

My previous watermaker was plumbed on the LP side with conventional bronze barb fittings, flexible reinforced vinyl hose, and hose clamps. Worked good, lasted long time, easy to remove/repair, leak tight, yada yada.

Glad to hear the vendor was responsive. I've had a similar comment from a close friend with the same system, so my confidence is high. But would like to get this tiddly detail put to bed before I tear up my boat for my install. I'd be REALLY pissed to have to do it twice because of a mistake in my plumbing!

Regards,

Pete
 
LOL!! That's thinking outside the box, Kevin!

Seriously, it looks great! Did you do all the work yourself?

Thanks!!!

Yes I do all my own work. To me that is really part of the fun of boating. :)

I love crawling into small places, reaching well beyond my natural distance to attempt to put in a screw... Then dropping said screw and trying to find it. :blush:
 
Hi Ksanders,

Nice install! Glad it worked out, and is happily making H2O. Life is good!

I'm just about to pull the pin on the 30GPH version of your watermaker, from the same vendor. In looking through some of your pictures, I notice you have used the "Pex" (not sure exactly what to call it, but it's the semi-rigid plastic pipe with the push-on connectors) for your low-pressure side of your installation. Seems like that's the "stock" LP plumbing from the vendor.

Now that it's in, was that part of the install satisfactory? By that, I mean was it easy to do, did you have ample access to tubing and fittings? Did you have to use a special tubing cutter? Was the LP supply system straight-forward to make leak-tight? I know you haven't gotten many hours on your watermaker yet, but does the LP side remain leak tight?

My previous watermaker was plumbed on the LP side with conventional bronze barb fittings, flexible reinforced vinyl hose, and hose clamps. Worked good, lasted long time, easy to remove/repair, leak tight, yada yada.

Glad to hear the vendor was responsive. I've had a similar comment from a close friend with the same system, so my confidence is high. But would like to get this tiddly detail put to bed before I tear up my boat for my install. I'd be REALLY pissed to have to do it twice because of a mistake in my plumbing!

Regards,

Pete

The plumbing is not PEX, its some kind of tubing, you'll have to ask Rich at Cruise RO exactlly what it is.

The fittings were all push on, with a littlle clip to hold the tube. Kinda like a Whale fitting (if you are familiar with Whale).

I found the fittings easy to use, and the tubing easy to cut with the little cutter they send with the kit. I also found that the tubing is very flexable more so than pex, more like reinforced vinyl as far as bend radius. I liked no barb fittings and no hose clamps.

I only had one leaker with all the connections. Fixed that by pushing in the connector all the way.

I found the kit to be very easy to understand. I think that while time consuming, the average boater could probably do it themselves. That is the value. If you bought the components separately you couuld build it yourself and probably save a thousand dollars, if you made zero mistakes and did not have to re-buy anything. To me that is good money spent because they have figured it out for you.

BTW, everything you need is in the kit except how to connect to your potable water tank, potable water supply (for cleaning), and seawater inlet. The interface to your potable water tank is a 3/8" male NPT, and the fitting to your sea water inlet, and potable water supply is a 1/2" male NPT. Be prepared for that and you'll be good to go.

If I had any words of caution, it would be to plan your panel location before hand. The panel is 11" square and will require about 5" behind it. There are allot of hoses and wires that go to the panel so make sure ytou have the ability to pull all of them in. You will need to know the distance from the panel to the RO membranes prior to ordering because thhere is a high pressure hose that needs to be run, annd this is a built to order item. The kit comes with a 5' hose. I bought a 10' hose with the kit,and it was perfect.
 
Last edited:
Thanks!!!

Yes I do all my own work. To me that is really part of the fun of boating. :)

I love crawling into small places, reaching well beyond my natural distance to attempt to put in a screw... Then dropping said screw and trying to find it. :blush:

Ill make a point of taking a picture of the big ole rusty cresent wrench thats sitting in the bilge under the main stateroom before I dig it out.
 
Kevin, nice job. That install looks like it was professionally done. Funny, when I do something it LOOKS like I did it. Hmmmm.


Now go take a long shower or something!
 
Looks great! What kinda pump is the HP never seen one of those.

You'll be thanking yourself for going with the autoflush!
 
Thanks guys, the pump is a general I think. Standard off the shelf item, except this one has stainless liquid contact components.

The pump is fully serviceable as well, or you can buy a brand new one should he need arise from a variety of vendors.

Every part is off the shelf stuff available from any source you want. These guys hide nothing from you.
 
Looks great! What kinda pump is the HP never seen one of those.

You'll be thanking yourself for going with the autoflush!

I already am, it's in and set...but what people do not realize is that pickeling a watermaker only takes a few minutes. Just mix the powder in a gallon or two of clean water, turn a valve and run the thing.
 
I already am, it's in and set...but what people do not realize is that pickeling a watermaker only takes a few minutes. Just mix the powder in a gallon or two of clean water, turn a valve and run the thing.


Also the stuff isn't the best for components. Some N owners were having problems with the pickling solution effecting valves.
 
Clean work. Use a couple a weeks then let us all know how it works for ya.
 
How is the watermaker working out?
Still all good?
Turn it on, turn it off get water type of simple?

Ken
 
We are currently installing the same unit on our boat, about half way done. Hope to be finished in a few days. When we finish, I'll try to post a few pics.
Happy New Year Gang!
 
Will be water maker shopping in Seattle in a few days. How is this one working out? Seems like one of the most cost effective solutions to lots of water.

Thanks
Ken
 
Hi Kevin and all... posters...

I'm late to the gate on this thread. Scaned posts this morn; didn't notice Water Maker brand or model. Also, can you provide approx cost for the WM and sundry parts/special-tools needed for self-installation? What number of amps does it take to run it and amp hours used for a full day's production... believe I read that 24 hr run = 40 gal fresh water?

Your "quick" install job looks great - Congrats!!
 
Last edited:
The watermaker came from Cruise RO water and power

Cruise RO Water & Power: Watermakers for Boats & Yachts

The one I bought is the 40 gallon per hour unit which cost $5600. I also bought the fresh water flush option kit for $595

The only things I had to buy to make this unit work was a seawater strainer and nipples to get from the seawater strainer to the 1/2" inlet to the watermaker.

Oh, I also uses some screws from my stash to bolt the parts to the boat.

Everything else came with it, including easy to follow DIY instructions, and VERY fast email and phone support for the few questions I had.

The unit works great and changed the way we boat. Long showers, no problem. Doing laundry, sure. Need to wash the salt off of the windows to get a clearer view, why not.

I even completely removed the salt water washdown from the boat. Gone and I love it. Just connected a potable water line to my old salt water pump plumbing and was good to go.

Thanks!
 
Hate to post a discouraging word regarding the Cruise RO Watermaker, but in my opinion, it has a few warts. I bought one of their 30GPH kits two months ago, and am in mid-install as we speak.

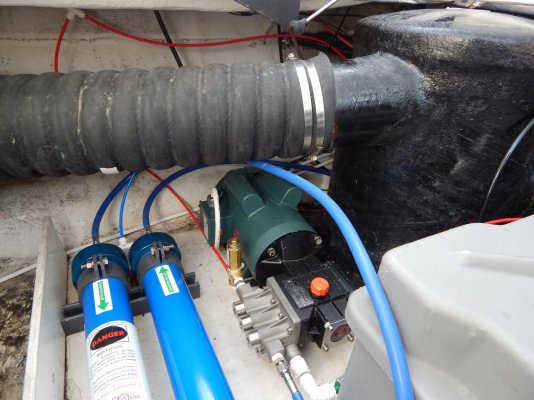
a. Regarding the system design, the provided boost pump is a constant displacement pump. The Shurflo pump supplied requires a bypass to prevent damage to the pump in the event >10psi head is applied to the discharge. In other words, should the operator either over-clamp the discharge, or the down-stream filters become plugged, this pump must vent excess pressure back to the intake side of the pump. This is accomplished in the provided hardware with a check valve between the discharge and intake of the pump, with a cracking pressure of 11psi. It is plumbed with the Mur-Lok fittings Cruise RO is so fond of, and is (again IMHO) not very professionally done. Several very competent boatwrights have looked at the pump and piping and agreed it was not to their liking.
b. The supplied Shurflo pump is NOT rated continuous duty as supplied by Shurflow. It comes from Cruise RO with an acrylic mounted fan to supply cooling air, to help it live. Not impressed.
c. The common solution by most other watermaker vendors is to use a centrifugal pump, installed below the waterline, and rated continuous duty. There are LOTS of these, which easily supply the flow and pressure at the high pressure pump required to prevent HP pump damage. They are self-regulating regarding both pressure and volume. Given a centrifugal with sufficient capacity, when over-clamped, they hum along nicely, even with no flow. Cruise RO's response to this issue is to claim they have at least 20 pumps lying in their shop that have failed this application, and their's is the only solution that works. Huh.
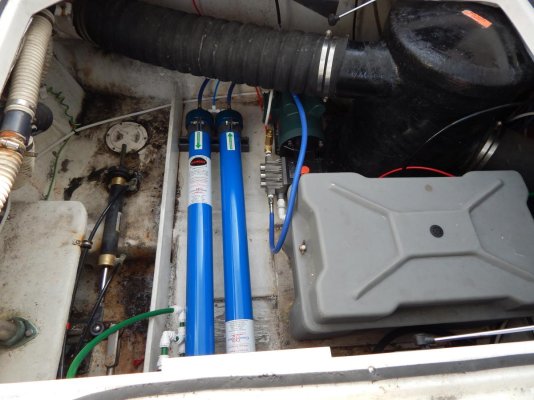
d. The as-supplied design does NOT meet ABYC recommendations for below-the-waterline connections to through-hulls. ABYC recommends vinyl or rubber fiber-reinforced hose, double-clamped to a barbed fitting on the through-hull, for all components below the waterline. ABYC specifically discourages (and, for USCG classification, the CFRs ban) plastic fittings in this application. As most of us do not operate classed vessels, the CG won't care during a routine safety inspection. However, should the vessel suffer water intrusion caused by a plastic fitting (other than Marelon) below the waterline, you betcha your insurance surveyor will care, and possibly deny your claim if so equipped.
e. GA Murdock Inc, the supplier of the Mur-Lok fittings used in the Cruise RO watermaker kit, will NOT sell retail. The only retail vendor they provided to me over the phone does not stock a particular fitting I need to finish my install, nor did Cruise RO. Cruise RO offered to special order this fitting from GA Murdock, with a minimum order of 10 units. Not sure what to do with 9 spares... My pre-purchase inquiry to Cruise RO, asking about the availability of aftermarket Mur-Lok fittings should an issue occur during the install, or later somewhere in the boonies for a repair, was met with the response that they provided "everything" needed make the original install, and some spares as well. Maybe, if you're willing to accept a butch job.
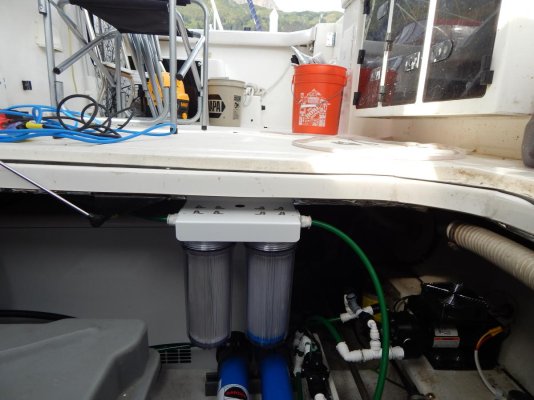
f. Modular watermakers are, by definition, custom installations. Yet this one comes pre-plumbed with these Mur-Lok fittings, with some limited spares provided. Attempts to re-plumb to fit my particular installation required removal of many of the pre-plumbed fittings, salvaging the needed fittings from other parts of the kit, and (in the case of the below-the-waterline fittings) re-plumbing with conventional bronze pipe fittings and reinforced hose. It would be MUCH less time consuming to install this thing if the major components were supplied bare, so the existing plumbing doesn't have to be removed prior to plumbing it to fit each install.

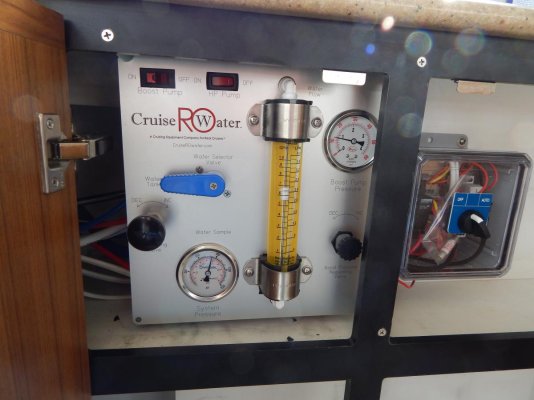
The basic parts (osmotic membranes and housings, HP pump, panels, etc.) are fine. "Some assembly required" is an understatement, but that's installation-specific. The cost of the kit is competitive, but no screaming bargain, given the re-work required to make the thing fit and work. And I'm not real impressed with the whole Mur-Lok fitting gig. Every marine supply house ON THE PLANET stocks barbs, hose, and hose clamps. Mur-Lok? Not.

All of this is, of course, my opinion. I'm not one to butch up an install of anything, simply for expedience. I've been at this yachting hobby many, many years, and have a pretty good professional background in this hydraulics stuff as well. Would I recommend this company to others? Yes, with MANY caveats. Would I buy another from Cruise RO? Nope, I'd simply multiple-source the components, and build my own. YMMV.

Regards,

Pete
 

Latest posts

Back
Top Bottom