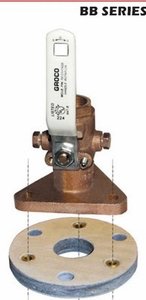
Thru hulls and seacocks

The friendliest place on the web for anyone who enjoys boating.
If you have answers, please help by responding to the unanswered posts.

Pack Mule

TF Site Team
Joined
Jan 24, 2013
Messages
3,749
Location
USA
Vessel Name
Slo-Poke
Vessel Make
Jorgensen custom 44
I'm planning on bottom job this year and would also like to replace thru hulls and seacocks . Has anyone done this latley? What would be a good round $ to use for 3/4" and 1-1/2" having the yard do it . I know the price could be all over the place . I would like to use bronze and also have a backing plate . I would do the job myself but I don't think the yard I'm using for bottom job will let me . I did mine on sailboat many years ago but the boat was in the back yard . Just looking for $ number for budget right now .
 
To hard to predict without knowing other factors. Like the yards hourly labor rate, it's parts mark up, how hard it is to reach and remove the thru hulls etc.

Why not ask the yard.
 
To hard to predict without knowing other factors. Like the yards hourly labor rate, it's parts mark up, how hard it is to reach and remove the thru hulls etc.

Why not ask the yard.
Talked with yard mgr . "It's a grey area to talk to give a price on" but around 500$ on
1-1/2" and 350$ on 3/4" would cover it for sure using all bronze with labor included .
 
Last edited:
Quality 3/4" seacocks will run about $75 each for 3/4" and About $150 each for 1-1/2" plus $5-6 for 3/4" hose barbs and $15-$17 for 1.5" hose barbs. I usually figure one hour per seacock for removing the old one an installing a new one. Add 1 hour per plate if you want backing plates installed plus the cost of the backing plates. So say 2 hours labor per seacock for backing plate install and seacock install plus materials cost.

Assuming $75 per hour labor rates I would put the cost at about $150 in labor plus $20 for the backing plate and resin to bond it to the hull, $3 for sealant (yard charge), $15 each for new 3/4" thru-hulls and $40 each for new 1.5" thruhulls plus the cost of the seacock. So about $290 each for 3/4" and $360 each for 1.5". For budgeting purposes I would figure $375 each on average to allow for surprises. Labor costs will be higher if your thru-hulls are flush mount.
 
I just finished installing new through hulls, backing plates, adapters, valves (seacocks) and fittings. Thirteen sets in total, not all of which are pictured below. I included fresh water flush fittings on the engines, genset and AC intakes. The yard removed the old through hulls and I did the rest, epoxying the backing plates to the hull. So I can't give you much on prices. I went with Groco, except for a few misc. pieces and bought all my materials from our own Hopcar. I checked all over and he had the best prices and proved to have excellent service.


I'm planning on bottom job this year and would also like to replace thru hulls and seacocks . Has anyone done this latley? What would be a good round $ to use for 3/4" and 1-1/2" having the yard do it . I know the price could be all over the place . I would like to use bronze and also have a backing plate . I would do the job myself but I don't think the yard I'm using for bottom job will let me . I did mine on sailboat many years ago but the boat was in the back yard . Just looking for $ number for budget right now .


FWIW, after a near-sinking in our marina yesterday, I'd suggest you consider Groco crash valves. (SBV full-flow flanged safety seacocks.) We were assembling hoses and I was working out how to use our engines from a couple slips away... but they got it moved to the travel lift in time...

Anyway, it should be easy enough to get individual component prices in advance, so labor is the only huge variable.

-Chris
 
Last edited:
Quality 3/4" seacocks will run about $75 each for 3/4" and About $150 each for 1-1/2" plus $5-6 for 3/4" hose barbs and $15-$17 for 1.5" hose barbs. I usually figure one hour per seacock for removing the old one an installing a new one. Add 1 hour per plate if you want backing plates installed plus the cost of the backing plates. So say 2 hours labor per seacock for backing plate install and seacock install plus materials cost.

Assuming $75 per hour labor rates I would put the cost at about $150 in labor plus $20 for the backing plate and resin to bond it to the hull, $3 for sealant (yard charge), $15 each for new 3/4" thru-hulls and $40 each for new 1.5" thruhulls plus the cost of the seacock. So about $290 each for 3/4" and $360 each for 1.5". For budgeting purposes I would figure $375 each on average to allow for surprises. Labor costs will be higher if your thru-hulls are flush mount.
Thanks TDunn good info and I guess my guy is not too far off .
 
I just finished installing new through hulls, backing plates, adapters, valves (seacocks) and fittings. Thirteen sets in total, not all of which are pictured below. I included fresh water flush fittings on the engines, genset and AC intakes. The yard removed the old through hulls and I did the rest, epoxying the backing plates to the hull. So I can't give you much on prices. I went with Groco, except for a few misc. pieces and bought all my materials from our own Hopcar. I checked all over and he had the best prices and proved to have excellent service.


Nice work angus99 . I like those threaded backing plates . What kind of caulk did you use under the seacock . I may try to find another yard to do the bottom that will let me do some of the work . I would like to do this part myself .
 
I hope you don't laugh at me to hard but could someone explain why bronze instead of let's say plastic. And what led you to replace them. Mine are real stiff is their a maintanace on them I could do, do they make one that can be lubricated. I close mine when I leave the boat unattended. Does crude grow on them?
Gregg
 
Nice work angus99 . I like those threaded backing plates . What kind of caulk did you use under the seacock . I may try to find another yard to do the bottom that will let me do some of the work . I would like to do this part myself .

Thanks, Pack Mule. I used 5200 on the bonds between the flange adapters and backing plates. Since the backing plates are epoxied to the hull/sea chest and the bolts are epoxied to the plates as well, I consider those bonds permanent. I used 4200 for the through hulls.

This is one of a few excellent articles on replacing through hulls/seacocks from compass marine. Seacock Backing Plates / Alternate Method / No Through Bolts Photo Gallery by Compass Marine How To at pbase.com. (The new bolt-in Groco backing plates are actually much easier to install than the threaded rods used in the article.)

Wataworld, I used bronze because I wanted the toughest material I could find below the waterline. I replaced the original Groco rubber plug seacocks because they were prone to stick and parts haven't been available for them for years.
 
???

-Chris


Groco makes threaded backing plates.
ImageUploadedByTrawler Forum1439294471.965009.jpg
 
I would only use a seacock , the old style tapered bronze unit, never a ball valve , even a bronze one from a good US mfg.

Tapered units can be rebuilt if needed easily.

They also have the advantage that by loosening the retaining nut they can be freed after a decade of non use.

They are also full flow , some ball valves are not.

Epoxy ( thickened) the flange to the hull and be sure the thru hull is installed with sealant (like Dolphinite) and never a glue like 5200.

A special tool will allow you to pull the thru hull, to examine it for electrolisis , and replace it in 10 min.
 
Ah. Got it! Thought those were just built-up backers for some reason, didn't realize they're threaded like that. Nice!


Angus, are those on the other side (inside) of the sea chest, for each fitting, too?


-Chris
 
Next time I pull my boat I am replacing 3 this is a helpful thread looking for a youtube video of the removal and installation of the new


Can some of the more knowledgable veterans here comment on this series thanks in advance
 
Last edited:
I notice several things that are different from some of the things said in this thread it also looks to me like his plate in on the thin side
 
Ah. Got it! Thought those were just built-up backers for some reason, didn't realize they're threaded like that. Nice!


Angus, are those on the other side (inside) of the sea chest, for each fitting, too?


-Chris

Hey, Chris; not sure I understand. In my original post, the second photo from the top is the exterior of the seachest with the old equipment removed. The third shot shows the same area with new backing plates and adapter flanges installed. The valves (seacocks) thread onto the adapters.

Maybe these will help.

This shows two fully installed valves and two doped up, ready for the valves.


This is looking down through the inside (actually outside) of the seachest at the through hulls. (The top one is a drain.)


This is a 1.25-inch install in the forward head.


Let me know if I failed to answer your question.

A nice thing about this setup is that the valves and through hulls can easily be replaced if that's ever necessary. The backing plates are also MUCH stronger than the original plywood plates on my boat, some of which I could peel off by hand. They also don't absorb moisture like the plywood plates.
 
I notice several things that are different from some of the things said in this thread it also looks to me like his plate in on the thin side

I looked over these vids as well and learned from them. I just thought the Compass Marine instructions were a closer fit for what I wanted to do.
 
Got nothing to add to the thread but the threads title would make a good title for a book of salty stories.

"Thru Hulls and Seacocks"

Arrr Matey.
 
I looked over these vids as well and learned from them. I just thought the Compass Marine instructions were a closer fit for what I wanted to do.

the plates on yours look more substantial
 
Thickness of the backing plate I think would depend on the thickness of the hull. Thinner hull, thicker, larger backing plate to spread loads out. But on my sailboat, when I replaced my thru hulls (original bronze "volcanoes"), the hull was ~3/4" thick in these areas. . .the 1/4" G-10 backing plates I used were more so to provide an even bearing/sealing area for the flanged adapters than stiffening up the area :thumb:
 
The key to remember is when properly installed you should be able to JUMP on the seacock with no problems.
 
Maybe these will help.

This is looking down through the inside (actually outside) of the seachest at the through hulls. (The top one is a drain.)

A nice thing about this setup is that the valves and through hulls can easily be replaced if that's ever necessary. The backing plates are also MUCH stronger than the original plywood plates on my boat, some of which I could peel off by hand. They also don't absorb moisture like the plywood plates.


Thanks, the inside shot does indeed clarify. Must be the adapter plates (with the 6 holes) on the outside of the sea chest, and I was thinking those were the backers that could have been on the inside. Or maybe I was thinking the backer plates were about holding the seacock flange tight, when it's maybe really also about holding the thrull-hull part tight as it leads from the inside.

Either way to think about it, nice installation!

-Chris
 
Last edited:
Epoxy ( thickened) the flange to the hull and be sure the thru hull is installed with sealant (like Dolphinite) and never a glue like 5200.

Please expand on this if you don't mind
 
There are 2 seperate items , the seacock and the thru hull that serves it.
i
The seacock is usually bolted in place with 3/8 bolts thru the hull, or today's method by gluing a mount pad inside the hull.And bolting to it.

Either way the unit is at least semi perminiant as it does not have to be removed for service , just perhaps replacement after a decade or 5.

5200 is OK as removal is seldom if ever required

The threaded thru hull screws into the sea cock from outside the boat.

It may need to be inspected at times (normal on Pax for hire boats) or when it turns pink from some electric source.

A tool stuck in and turned with a wrench will remove it quickly and a quick clean up with a wire brush will show if its fit to be reinstalled.

The thru hull reinstall uses a sealant NOT A GLUE! to make the process easy the next time.
 
Last edited:
There are 2 seperate items , the seacock and the thru hull that serves it.
i
The seacock is usually bolted in place with 3/8 bolts thru the hull, or today's method by gluing a mount pad inside the hull.And bolting to it.

Either way the unit is at least semi perminiant as it does not have to be removed for service , just perhaps replacement after a decade or 5.

5200 is OK as removal is seldom if ever required

The threaded thru hull screws into the sea cock from outside the boat.

It may need to be inspected at times (normal on Pax for hire boats) or when it turns pink from some electric source.

A tool stuck in and turned with a wrench will remove it quickly and a quick clean up with a wire brush will show if its fit to be reinstalled.

The thru hull reinstall uses a sealant NOT A GLUE! to make the process easy the next time.

Fred is spot on. I'd only add that Groco now gives the option of a "two-piece seacock." The base (they call it a flanged adapter) is bolted (and inevitably epoxied) to the round backing plate. The backing plate in turn is epoxied to the hull and this makes for a very robust connection. The valve, or operating part of this assembly, then threads to the flanged adapter. If you use the right sealant, as Fred notes, both the valve and through hull can be removed or replaced if necessary without disturbing the backing plate or flanged adapter.

Also, the flanged adaptor has the correct threads to accept both the through hull (NPS threads) and the valve (NPT threads). Lots of warnings out there about trying to marry through hulls into old style seacocks or valves with mismatched threads.
 
Back
Top Bottom