Radical Manatee Transom door mod

The friendliest place on the web for anyone who enjoys boating.
If you have answers, please help by responding to the unanswered posts.
Joined
Oct 2, 2009
Messages
5,198
Location
USA
Vessel Name
Bucky
Vessel Make
Krogen Manatee 36 North Sea
A swim platform might be a great design, but how easy is it to access. Access might be great, but maybe the platform sucks.

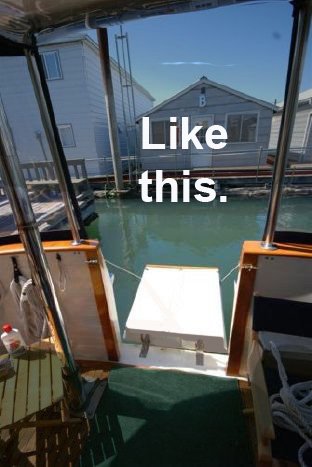
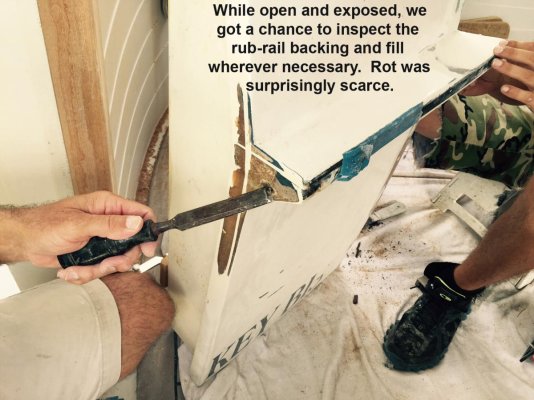
Anyway, my own boat is not an easy boat to fit with a platform. The original tailgate door on the transom is a decent idea, but access isn't so easy. Ladders "work", but that's about all you can say for us seniors. With high bulwerks and skinny-ass steps, climbing back into the boat can be painful. We realized that if water access were easy, our usage of the boat would probably triple. After making sure we had a really substantial platform, we played with the ideas of making the access just as convenient. The tailgate style of transom door didn't work with the plan. It was risky to do something radical, but we had to make sure that whatever we ended up with didn't alter the way the original transom design absorbed stresses. Additionally, the alteration had to ease entry and exit to and from the boat whether on the water or docking. Lastly, it had to become serve as the recovery area for our MOB plan. After a lot of thought, this is the best we could come up with.

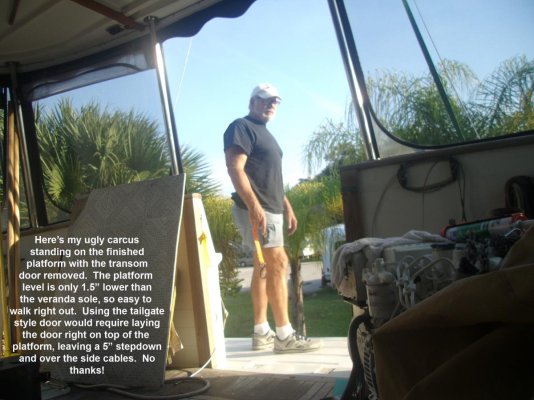
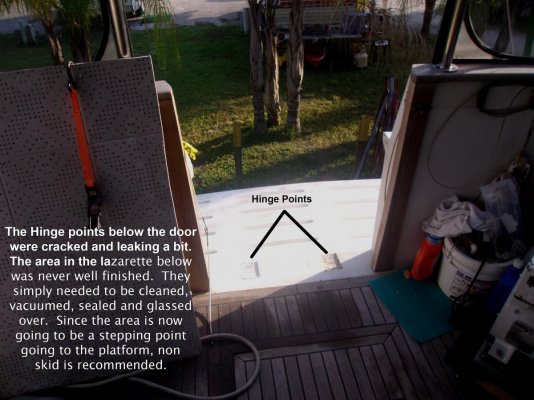
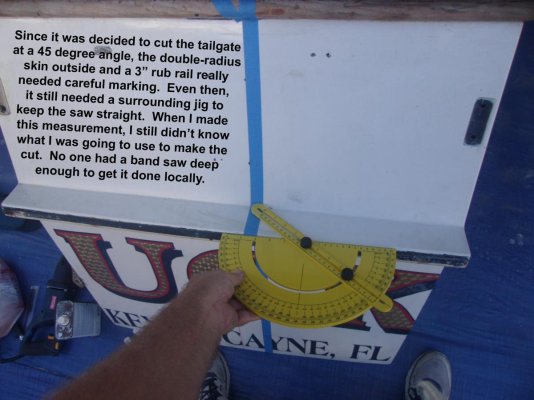
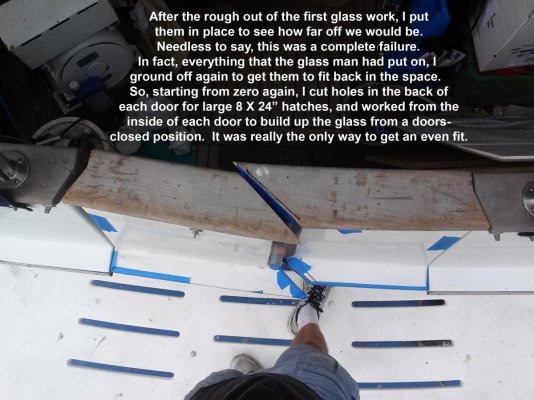
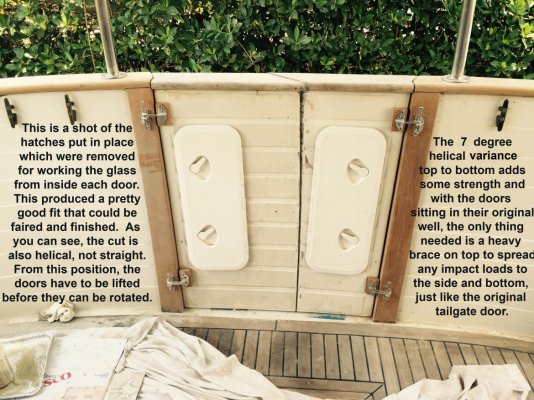
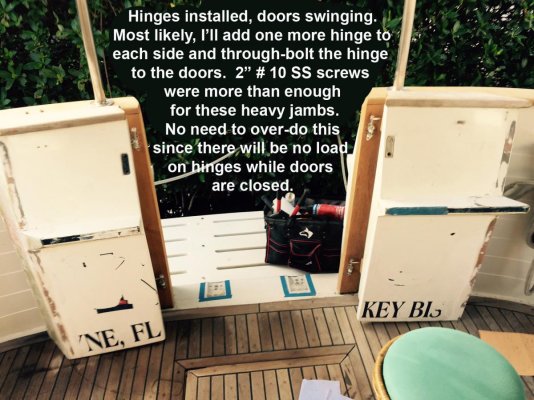
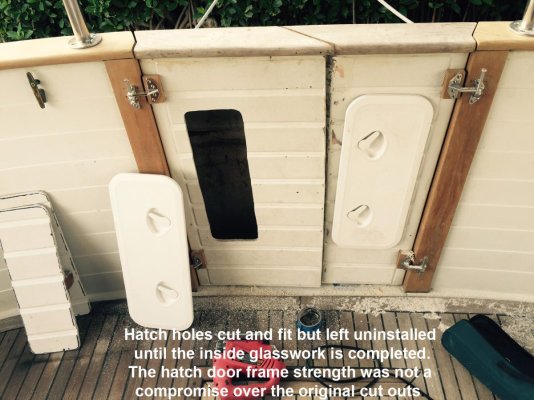
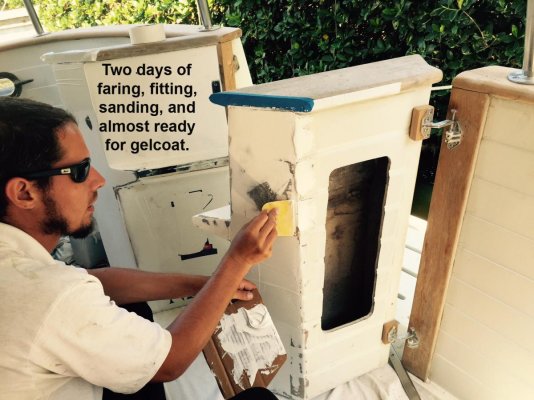
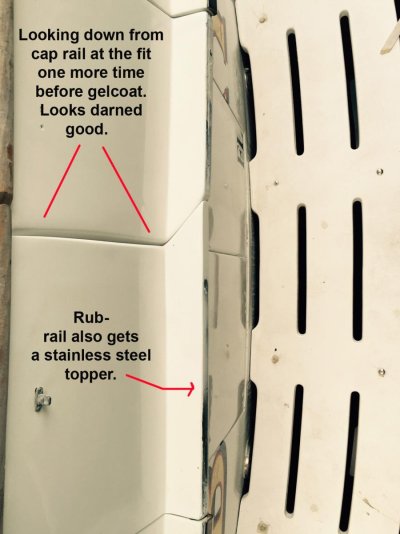
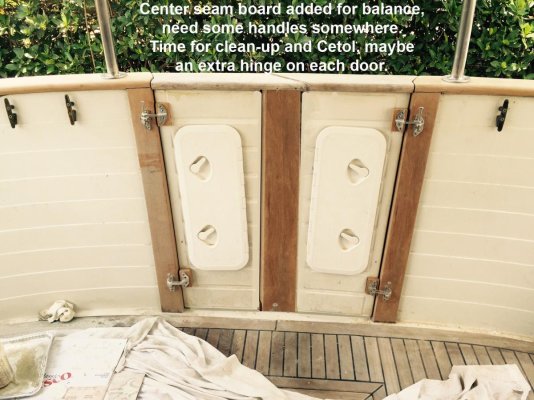
The transom tailgate was removed and rebuilt. I couldn't find a band saw with a large enough throat to make the whole cut in one pass, so I built a jig around it so a saw could be utilized to make a 45 degree vertical (slightly helical) cut. This all sounds very smart, but the cut was made with a saws-all and didn't come out perfect. There was plenty of extra work created to smooth-out the mistakes. Each half of the door was fitted in the position of the original door, then hinged to lift first, then pivot 180 degrees inward. This takes some space from the veranda, but we were surprised how little the swing of each door needs. It only slightly altered the original position of the veranda furniture. Access to and from the swim platform is a dream, as if it is now just an extension of the veranda. Eight 3/8" stainless plate brackets make it feel as though it is part of the veranda floor. It fits perfectly with our MOB plan and has changed the way we will use and think about our boat. Dinghy access has also been completely facilitated, as has access to the boat from floating docks. We still need to build a wide-step ladder and finalize a position for it. Each door now has a hatch compartment built in to store masks, fins, or whatever. The way the doors fit together in the original wedged position direct the stresses exactly as before in the case of a direct hit on the transom. Although I'll probably add another hinge to each door, they play little part in keeping the doors in place and swing the 35 lb. doors easily. Photos to follow in the next post.
 
Here's the first six photos with text in the photo. Click on photo to enlarge.
 

Attachments

  • transom door 1.jpg
    transom door 1.jpg
    140.2 KB · Views: 179
  • transom door 2.jpg
    transom door 2.jpg
    80 KB · Views: 187
  • Transom door 3.jpg
    Transom door 3.jpg
    132.9 KB · Views: 217
  • transom door 4.jpg
    transom door 4.jpg
    145.7 KB · Views: 196
  • transom door 5.jpg
    transom door 5.jpg
    112.3 KB · Views: 202
  • transom door 6.jpg
    transom door 6.jpg
    160.4 KB · Views: 201
Great idea . Beautifully executed as always . Larry you are da man .
 
Very clever and smart design. The next step is to change your avatar photo....
 
Wow I love it run it over to Marina Jack to show it off
 
Larry, we talked about this at Indian Town last fall. They were supposed to be pocket doors, wtf? :rolleyes:

Ted
 
Larry, we talked about this at Indian Town last fall. They were supposed to be pocket doors, wtf? :rolleyes:

Ted

Can't figure it, Ted. It worked fine on Photoshop, but the real thing left the transom too weak. WTF?
 
That's a great mod, HH! Looks like you thought it all out well in advance and planned well for the big cut. But starting that big cut still must have been nerve wracking.

Very nice work!!
 
That's a great mod, HH! Looks like you thought it all out well in advance and planned well for the big cut. But starting that big cut still must have been nerve wracking.

Very nice work!!

Exactly, and like I said, the cut wasn't without error. Hours and hours and hours of adjusting. While I was messing about in the archives, I came across this photo of Kassie, one of the best conditioned Manatees out there. For their solution, they made two separate platforms on either side of the tailgate so that when the tailgate was let down, there was a level area on both sides, voila...a swim platform. Trouble is, there are still the tailgate retainer cables to step over, and the platform ends up very high above the water. I don't know about you, but getting older, I don't need something else to trip over. Not much improvement in boat or water access over the tailgate alone.
 

Attachments

  • transom door 7.jpg
    transom door 7.jpg
    119.8 KB · Views: 224
To continue, here are some shots and descriptions after the cut. The top rail cap was cut with a table saw, and the rest was done with a saws-all. There was no progress until I actually hinged and mounted the doors as they would be, and then cut the 8 X 24 holes for separate access hatches in each door. Finally with the easy access to the inside, the glassing could be done from the inside while the doors were in the closed position, providing for a pretty good roughed-out fit. We used wax paper and waxed formica as a barrier to keep from glassing the doors together, but there were still a few places that adhered, and we had to saw the doors loose again with a hacksaw blade.
 

Attachments

  • transom door 8.jpg
    transom door 8.jpg
    145.4 KB · Views: 143
  • transom door 9.jpg
    transom door 9.jpg
    138.5 KB · Views: 164
  • transom door 10.jpg
    transom door 10.jpg
    200.5 KB · Views: 177
Last edited:
Da-um, Larry. What a great mod. Truly a craftsman like job. You have been improving Bucky without affecting the original design look of the boat. I am feeling very unworthy.:thumb::thumb::thumb:

Don't forget about cruising!:hide:
 
Masterful job, Larry. Reality really can be better than Photoshop!
 
Oh yeah, I've been reading boating ads, and almost forgot a boat's real purpose.:banghead:

That's Manatee, not porpoise. ;)

Very nicely done, Larry. That tailgate setup was a bit goofy.
 
To continue, as mentioned, the attempt to glass the open ends really failed miserably. There was no choice but to mount and hinge the door halves in place to see where and how to add or subtract glass. In the mounting process, there were other issues to resolve. Here's how we addressed them. Click to enlarge.
 

Attachments

  • transom door 11.jpg
    transom door 11.jpg
    198.4 KB · Views: 139
  • transom door 12.jpg
    transom door 12.jpg
    150.4 KB · Views: 133
  • transom door 13.jpg
    transom door 13.jpg
    169.6 KB · Views: 144
  • transom door 14.jpg
    transom door 14.jpg
    133 KB · Views: 134
  • transom door 15.jpg
    transom door 15.jpg
    158.3 KB · Views: 136
  • transom door 16.jpg
    transom door 16.jpg
    137.4 KB · Views: 129
  • transom door 17.jpg
    transom door 17.jpg
    145.5 KB · Views: 142
Pretty Spiffaly, nice improvement. But where is the shower gonna go?
 
Pretty Spiffaly, nice improvement. But where is the shower gonna go?

Yeah , I know this might be a lot more detail than most guys want here but it's in the Krogen catagory. If any of our Manatee guys want to attempt something like this in the future, they can save some money and trouble by not making my mistakes. A shower is assured, right there over the swim platform.
 
Last edited:
Awesome looking project! You will be proud when it's done!
 
A couple more steps.
 

Attachments

  • transom door 18.jpg
    transom door 18.jpg
    172.8 KB · Views: 103
  • transom door 19.jpg
    transom door 19.jpg
    140.5 KB · Views: 110
  • transom door 20.jpg
    transom door 20.jpg
    134.5 KB · Views: 110
  • transom door 21.jpg
    transom door 21.jpg
    168.1 KB · Views: 121
Home stretch now. The door ends were done with mat, roving, 1708 and 3610 with polyester resin. Halved and sealed up, they really became much more solid than the original door felt. Here's some other shots of the progress.
 

Attachments

  • transom door 22.jpg
    transom door 22.jpg
    128.6 KB · Views: 117
  • transom door 23.jpg
    transom door 23.jpg
    138.4 KB · Views: 95
  • transom door 25.jpg
    transom door 25.jpg
    86.2 KB · Views: 111
  • transom door 26.jpg
    transom door 26.jpg
    128 KB · Views: 108
  • transom door 27.jpg
    transom door 27.jpg
    120 KB · Views: 105
The threshold was solid, but getting underneath it down in the lazarette, it's hard to figure out what kind of structure it used to be. There's what looks like a mahogany or teak beam below inside some shredded mess of a fiberglass box. Anyway there was no moisture left, so I simply drove some dried and resin soaked dowels down into the old hinge screw holes, let them seal overnight and cut them off flush in the morning. More mat, roving and 1708 with poly resin filled the voids. I suppose if you go with epoxy resin here, just thickened epoxy would do the holes just fine, but the holes were more than 2.5" deep. Dripping epoxy might have left some air space, and we were already using polyester resin, so....

Now that the threshold was actually your walkway to the platform, some non-skid surface like the platform itself would be a good idea.
 

Attachments

  • transom door 28.jpg
    transom door 28.jpg
    115 KB · Views: 88
  • transom door 29.jpg
    transom door 29.jpg
    114.3 KB · Views: 109
  • transom door 30.jpg
    transom door 30.jpg
    155.5 KB · Views: 110
Clean-up time.

Doors looked, fit, and operated great. I'll be looking for the right springs to add to the hinge bolts so the Admiral can lift the doors easily, and since the doors fit into the original threshold well just like the original, they are really supported against wave hits, but now I need to figure out something to brace the top of the doors at the cap rail. I thought of a huge, like 3/8 thick SS padlock affair that would fit flat on the cap rail of one side and swing over to a brace on the other side. Maybe a huge door bolt. Any ideas?

Now, to add the SS rub-rail topper and the new lettering.
 

Attachments

  • transom door 33.jpg
    transom door 33.jpg
    154.7 KB · Views: 107
  • transom door 34.jpg
    transom door 34.jpg
    118.5 KB · Views: 115
Wow! Looks great, HH. You set the gold standard for practical, professional mods.

So tell us.....when exactly did you become 'radicalized'? :eek: :socool: :oops:
 
Brilliant Larry! That will make a world of difference.
 
Some mighty professional work, sir.
 
Looks like the original factory fit out. In fact, it`s probably better.
 

Latest posts

Back
Top Bottom