Fuel tank dilemma, help please

The friendliest place on the web for anyone who enjoys boating.
If you have answers, please help by responding to the unanswered posts.
Marin`s post reminds me of a certain "subcontinent" airline, keen to depart Sydney, unable to close a door, pushed it shut with a forklift tine, "repairing" the resulting punched hole with a pop riveted patch.
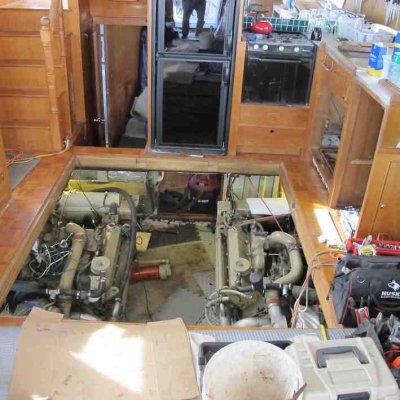
Personally I`d avoid cutting holes in sides of boats unless unavoidable. (Should builders include removable side panels to accommodate inevitable tank replacements?)
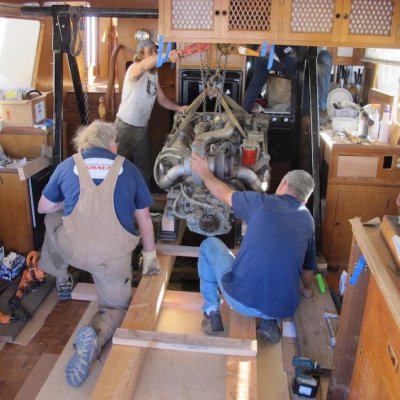
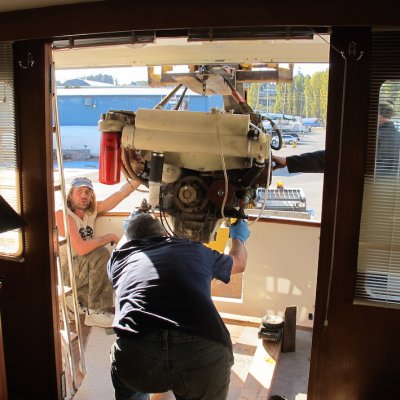
Anyone doing it ought disclose to their insurer, if the work failed and a claim resulted the insurer could (here at least) rightly deny for non disclosure. Providing a survey certificate when disclosing would help, all the more if the surveyor checked the work at multiple stages, not just the faired painted polished stage.
 
I've got to admit the "cutting a hole in the side of the boat" made me pause. But building a flange on the inside, as some have suggested, and bonding the cutout to the flange shouldn't be a big deal.

This also made me think about visiting a naval yard with my brother-in-law, a submariner. The sub went in for a major refit, which required removal of components that had been built-in to the sub. At the refit, the yard cut big holes in the side of the sub so that the components could be accessed.

As I remember, replacement of each patch panel required nearly 2 weeks of specialized welding.

Compared to a nuclear sub hull, your patches should be a piece of cake!

Seriously, I doubt that the boat hull is very highly engineered. The safety factor is probably very high- that is, the boat is much stronger than necessary for the expected loads. Repair by a competent glass shop should not be a big deal.

Bad boat builders may not be engineer conscious. Good boat builders are.

Cut a major hole in any piece of support structure (all portions of boat hulls are at a sort of cooperative support structure)... especially a flexing support structure (all boat hulls are flexing support structures) and you have a BIG problem for trying to reinstall the same structural integrity as was previously in place.

YRMV :popcorn:
 
On the other hand, Vestas Wind, the around the world Volvo 65 racing yacht, wrecked & severly gutted on a reef near Madagascar, has now been repaired and is back in the race. It had a huge chuck of rear hull and stern replaced, yet they are allowing it to go and re-enter an ocean race when it will be pounded much more than a GB cruiser. So if it comes to that, I think it will be ok, although peronally I would exhaust all other possibilities, like others have said.
I would still have gone for cutting out the old tanks and replacing with several interlinked & smaller fuel grade plastic ones, that could have been got around the engines without their being moved at all, myself.
 
Smaller and multiple tanks, in my opinion is a very poor option. Less fuel capacity is never good for resale value. Bladders are considered temporary only. Personally, I would pull the engines if at all possible. But cutting a big hole in the hull wouldnt bother me at all. I would do it myself, it aint rocket science. A 1/2 inch by 6 inch inner flange to reset the removed cutout on, glued and screwed in place then the aforementioned peice glued and screwed to that. Remove the screws after the goop has set. Use at least a 12 to 1 scarf completely thru to the flange and layup the new 'glass. Another point mentioned was foaming in tanks. Its not unusuall on big boats. In this case I would use a 4lb foam between the tank and hull. And normal mounting methods, straps, neoprene, etc. Absolutey coat the tanks with a good epoxy, I prefer coal tar epoxy.
 
Smaller and multiple tanks, in my opinion is a very poor option. Less fuel capacity is never good for resale value. Bladders are considered temporary only. Personally, I would pull the engines if at all possible. But cutting a big hole in the hull wouldnt bother me at all. I would do it myself, it aint rocket science. A 1/2 inch by 6 inch inner flange to reset the removed cutout on, glued and screwed in place then the aforementioned peice glued and screwed to that. Remove the screws after the goop has set. Use at least a 12 to 1 scarf completely thru to the flange and layup the new 'glass. Another point mentioned was foaming in tanks. Its not unusuall on big boats. In this case I would use a 4lb foam between the tank and hull. And normal mounting methods, straps, neoprene, etc. Absolutey coat the tanks with a good epoxy, I prefer coal tar epoxy.

If it is a fact that a large cut-out hole in FRP pleasure boats can be fully re placed (repaired) back into the same structural integrity as the original hull section (your description does sound convincing for a layman in major FRP repair... such as myself). Then, it seems to reason that replacing engines in good ol" FRP pleasure cruisers could (maybe should) mostly be accomplished in the same manner. Especially in twin screw models and with alongside the motor tanks next to the hull it could be a double x 2 whammy for decades worth of valuable improvements! By cutting a hole in one side it would be tank/engine/engine/tank removal and exact same in reverse for installing the four new units. Besides, what a great access hole to reconfigure all items in bilge and repaint!
Sounds like a virtual slam-dunk to me... :popcorn:

I've got to wonder why we don't hear more of this apparently simple and cost effective method for tank and engine replacements. Is it simply because there are not enough FRP specialists available that understand how to correctly refasten the cut out back into/onto the hull??
 
Last edited:
I'm not going to question the integrity or methodology of replacing tanks via the side of a boat but after the tank(s) have been replaced and the side patched, you still have the finish the hull. What's the cost of a quality paint job? $15K for a 40 footer? vs what's the cost of removing and reinstalling 1 or 2 engines? Maybe the boat needed a paint job anyway? :)
 
I'm not going to question the integrity or methodology of replacing tanks via the side of a boat but after the tank(s) have been replaced and the side patched, you still have the finish the hull. What's the cost of a quality paint job? $15K for a 40 footer? vs what's the cost of removing and reinstalling 1 or 2 engines? Maybe the boat needed a paint job anyway? :)

How about cutting hole in roof, open up salon sole and using boom lift? :popcorn:

"Simple is as Simple Does! :D
 
Generally, painting below the rub rail is not the big expense that painting above it is. And, gel coat is not that difficult to match if the rest of the hull is gel coated. Same with paint, so unless you just want to or need to a total repaint/gel coat is not neccessary. As for removing machinery from the side, same procedure. Non of this is "new". Its been done for years and is accepted "best practice" in a lot of situations. Its common place. Its kinda like years ago if you needed major engine work done on you ford truck the mechanic leaned, crawled, contorted himself to do it, now they just pull the cab. Its faster, easier and better.
 
Generally, painting below the rub rail is not the big expense that painting above it is. And, gel coat is not that difficult to match if the rest of the hull is gel coated. Same with paint, so unless you just want to or need to a total repaint/gel coat is not neccessary. As for removing machinery from the side, same procedure. Non of this is "new". Its been done for years and is accepted "best practice" in a lot of situations. Its common place. Its kinda like years ago if you needed major engine work done on you ford truck the mechanic leaned, crawled, contorted himself to do it, now they just pull the cab. Its faster, easier and better.

:thumb: absolutely the red...and the rest too...

The info is out there...just not all that much in small boat circles.

Funny some accept the Grand Banks video where they cut the bottom out and yet above the waterline except for cosmetics is worse?
 
Our boat has a rectangular section of the flying bridge sole "pre-cut" to allow it to be removed for full direct-down access to the engine space for removing/replacing engines. The manufacturer did this on the original wood versions of the boat and continued the practice for a few years after the line was switched to fiberglass before eliminating this feature. Hopefully we'll never need to use it....
 
Although I've continued to discuss the thought of cutting out huge holes in hull, bottom, or top of a boat for major apparatus removal (particularly fuel tanks as what the OP began this thread for)...

Luckily our Tolly was designed so that with both salon sole engine hatches removed, also with port and/or starboard large salon window removed, it is capable to remove either engine via through boat overhead I-Beam wheel tracks and come-alongs. The problem still remains regarding getting out either of our side of engine 100 gallon fuel tanks (if ever needed - God forbid) without major reshuffle of the engines or worse yet cutting up the rest of salon sole with full-on cabinet/appliance removals. Or of course... lifting an engine out first.

Happy Boat-Shuffle Daze! - Art :speed boat:
 
Last edited:
On the basis that without pics it never happened, here is the story.
1. Remove island bench in galley to reveal a 6' x 6' opening in the salon floor.
2. Lift engine up using A-frame
3. Slide engine out rear doors along a couple of planks using rollers
4. lift engine over transom

The old fuel tanks came out in one piece the same way. Side tanks were 275 G each, rear tanks were 225 G each. The old tanks were used as templates although the rear tanks were made deeper to increase capacity.

The bilge was scrubbed and painted before new tanks, engines and reconditioned gears went back in.

Quite straightforward, but it does take a bit of time to do.
 

Attachments

  • ER 555 hatches open fwd view sml.jpg
    ER 555 hatches open fwd view sml.jpg
    46.6 KB · Views: 90
  • 555 removal 1 sml.jpg
    555 removal 1 sml.jpg
    81.1 KB · Views: 95
  • 555 removal 5 sml.jpg
    555 removal 5 sml.jpg
    180.8 KB · Views: 88
I noticed items surrounding galley sink changed... 2nd pict even shows a plate standing in drainer! Having dinner while this was evolving?? Only kidding - sort of :D

How long did all this take? :popcorn:
 
I noticed items surrounding galley sink changed... 2nd pict even shows a plate standing in drainer! Having dinner while this was evolving?? Only kidding - sort of :D

How long did all this take? :popcorn:
During that phase I was actually living aboard while on the hard, so breakfast dishes in drainer, not dinner!

For the new tank replacement, and repower part of the refit I'm not too sure of time required. It all started with fitting Naiad stabilisers, and just as that was being completed we discovered a leaky fuel tank. Ended up with pretty much everything new in the ER and 10 months all up.

The expanded fuel capacity and scope of the refit was in response to a shipping quote to Australia of about $100k plus $25k for cradle and assorted charges at both ends. I figured I would make the trip on my own bottom - spend money on fuel and refit instead of freight. But after some cruising in the PNW I did ship home as freight rates had halved in the interim.
 
Here is a video on engine replacement through the side of a Hatteras 53 MY. I was looking at possibly purchasing one so I wanted to understand all I could about them. I was told by a number of yards and fiberglass guys that this was the standard procedure on these boats for an engine replacement. It is long but gives you a good idea.
 
And then there is this method which I was also told was standard operation on some...
 
Here is a video on engine replacement through the side of a Hatteras 53 MY. I was looking at possibly purchasing one so I wanted to understand all I could about them. I was told by a number of yards and fiberglass guys that this was the standard procedure on these boats for an engine replacement. It is long but gives you a good idea.

Hell of a nice restoration video. Music was spot on! Wonder what fuel usage she gets at WOT? Fast pleasure yacht - for Sure!
 
"In their view a patch of this size compromises the integrity of the hull, and while it may be fine for years of service, the hull strength is still compromised."

Hmmm..it may be fine for years of service but the hull strength is compromised?

If done right, I don't buy it. I've seen massive fiberglass repairs done and they go through complete surveys and pass with flying colors. In many cases they have to pass class surveys.

We had a 42' GB that a charter ran up on the breakwater into Keywest. The only thing that kept it from sinking was that it was to well hung up on the rocks. Once the hull was repaired it was stronger than new due to the fact they added stringers during the repair. It passed an after the fact insurance survey no problem. This was like 30 years ago. And it's still out there running around.
i use to deliver vikins yrs ago and the 50 ft motor yacht was a 44 ft hull with 6 ft added on never a problem, and the 44 motor byacht was a 41 ft hull with a add on, and so was the 46 sport fishermin
 
Another point mentioned was foaming in tanks. Its not unusuall on big boats. In this case I would use a 4lb foam between the tank and hull. And normal mounting methods, straps, neoprene, etc. Absolutey coat the tanks with a good epoxy, I prefer coal tar epoxy.

As they say, YMMV, but I don't think I've ever seen a large boat with foamed in tanks. And I can't imagine why you want to. You just end up with a ready made water/moisture trap. I'd think keeping as much of the sides and bottom of the tank away from direct contact with any surface would be the best way to go.

I'd want air to be able to circulate around my tanks. And hopefully allow me to inspect as much of them as possible. Even if it's only with mirrors or a fiber optic camera.

If they are foamed in you lose most if not all of that.
 
Plastic tanks are usually foamed in .

But with out baffles they are limited to 60 Gallon or so each.

Not bad if there is at least one genuine marine tank, and the rest are plastic boxes for fuel.

Unless you need 2000G per side.
 
Plastic tanks are usually foamed in .

But with out baffles they are limited to 60 Gallon or so each.

Not bad if there is at least one genuine marine tank, and the rest are plastic boxes for fuel.

Unless you need 2000G per side.

Yeah, foamed in under the floor of a center console maybe. But a 2-300 gallon plus tank foamed in place to the the side wall of a trawlers engine room!? I don't think so. :D
 
my 58 gallon plastic tanks have a baffle in each...it is a 10 inch hole or so molded fight through the middle of the tank...maybe that's how they are doing larger tanks too....
 
Last edited:
Rajun,
I apologize, I'm late to the party here, did you contact your insurance company regarding this issue? Could you claim this as an insurance event?
 
I have a 250 gallon aluminum tank on the bed of my F550. No baffles. The rear axle is rated to carry 17,500 lbs but I can feel the diesel sloshing around in there if its half full. I would not want a tank of any decent size on a boat that was not baffled. Free surface affect and all :)
 
Rajun,
I apologize, I'm late to the party here, did you contact your insurance company regarding this issue? Could you claim this as an insurance event?

Insurance pays for "sudden and accidental damage". This is niether.
 
I've not seen any kind of "baffle" in a roto molded tank, interesting. How is it done ?

My 58 gallon has a hole molded through the center...

It does affect the sloshing back and forth but a true baffle I cant say it is and though I read it someplace that it was...couldn't just find where I had read it...not in the brochure.

That would be one way even though a waste of space.
 
Another solution would be to cut the top off the fuel tank and put a fuel bladder in the tank, ie use it to contain the bladder. If and when the other side goes you will know how to do the fix.

Hope this helps

Robin
 

Latest posts

Back
Top Bottom