My Short Haul Refit

The friendliest place on the web for anyone who enjoys boating.
If you have answers, please help by responding to the unanswered posts.
Must be little demand for the lift if it is available to be idle for hours for one to do repairs while hanging. Frankly, I want my boat to be secured (not hanging) as soon as possible.

Mark, when a boat is short hauled, it's keel blocked so that the weight of the boat is resting on the keel with very little weight on the slings. Policy varies depending on marina. The one I use in Ocean City hauls, pressure washes, relocates in the yard, and blocks one boat an hour. Their idea of a short haul is 50 minutes to do a repair (such as swap a prop) and then it goes back over. Scott's Cove will only short haul if they have no other boats waiting. Their hauling work is much more seasonal as waterman haul between oystering and crabbing, and again between crabbing and oystering. The charter fleet hauls in the winter and splashes in the spring. Same for the recreational crowd. Short hauling is a courtesy for the watermen so that they can get back to work the next day.

Ted
 
Last edited:
You had me up to fiber-glassing over the teak cap rail, I know your reasoning, just feels like the boat was violated....
 
Ted- regarding fuel burn, don't expect a huge improvement with the Deere. The 450C is one of the best high output diesels when running down in the 1000-1200rpm range, down there it still produces 18-19hp per gph along the prop load curve. Way better than most. The Deere will be better as it will be in the meat of it's power curve, and has to have less parasitic losses, but the difference may not be huge.

2gal/hr at 7.5kts is great for a 38' boat with 450hp.:)
Just wondering what are the specs and weight of your custom boat?
 
You had me up to fiber-glassing over the teak cap rail, I know your reasoning, just feels like the boat was violated....

You're not going to like what I did to the teak deck.:nonono:

Ted
 
2gal/hr at 7.5kts is great for a 38' boat with 450hp.:)
Just wondering what are the specs and weight of your custom boat?
Specs for the Cherubini 45'

LOA 45'
LWL 42'
Beam 14' 6"
Draft 4' 6"
Displacement 32K to 36K depending on the source.

Ted
 
2gal/hr at 7.5kts is great for a 38' boat with 450hp.:)
Just wondering what are the specs and weight of your custom boat?

Mine is LIGHT, 14000lb, 38x12' planing capable. Different category from the OP's vessel.
 
Ted is the Hans Christian model the same hull ?
 
Ted is the Hans Christian model the same hull ?
I believe it is the same hull and molds but not positive. The Hans Christian were built in Taiwan and the Cherubini were built in New Jersey.

Ted
 
Great job, Ted. The yard is doing really quality work, but the value of a knowledgeable owner cannot be discounted. Your knowledge is as important as the yard in getting a great job. Whoever gets that boat next will be a beneficiary.:thumb::thumb:
 
Great job, Ted. The yard is doing really quality work, but the value of a knowledgeable owner cannot be discounted. Your knowledge is as important as the yard in getting a great job. Whoever gets that boat next will be a beneficiary.:thumb::thumb:
Thanks! Hope the next owner won't be for 10 or 15 years.

Ted
 
Specs for the Cherubini 45'

LOA 45'
LWL 42'
Beam 14' 6"
Draft 4' 6"
Displacement 32K to 36K depending on the source.

Ted

Looking at the specs for the GB42 it's almost identical:

Loa 45' 4"
Beam: 13'7"
Draft 4'2"
Displ: 16 tons
Twin cat 3208 at 375 hp

And the performance figures: (cover your eyes)

1500. 8kts 59ltr. 0.68 mpg (uk gals)
2400. 15kts 126ltr. 0.55 mpg
2600. 17kts. 147 ltr. 0.54mpg

In fact nearly a straight line on the graph from 8kts to 17kts . :blush:

No wonder you were going nowhere on a single 450hp!
 
One of the nice things about doing a major project like this is that you get to change things to the way that you want them. So I have my man Sean.

Sean is doing 99% of the jobs on this project that I'm not doing. He does all the fiberglass / West system fabrication and repair. All the sanding and painting is his department. He's a better welder, fabricator, and is far stronger than I am.
Ted


All the easier when you get around to your new Fly-Bridge and Oxygen Tent project, Ted. :whistling::hide:

Sure would like to have a guy like Sean around here. I'm still finishing projects left undone by the last glass guys I contracted.:rolleyes:
 

Attachments

  • Ted's boat with FB.jpg
    Ted's boat with FB.jpg
    127.4 KB · Views: 156
All the easier when you get around to your new Fly-Bridge and Oxygen Tent project, Ted. :whistling::hide:

Sure would like to have a guy like Sean around here. I'm still finishing projects left undone by the last glass guys I contracted.:rolleyes:
Keep waiting to see pics of your transom pocket doors that we talked about when you were in Indian Town. ;)

Ted
 
haha, I truly understand. By the way are you fiberglassing right over the teak like the cap rail or are they putting down a sub floor first?

Enjoying the progress reporting, will certainly be tricked out the right way.

You're not going to like what I did to the teak deck.:nonono:

Ted
 
Caution: Viewer Warning!

The following images and descriptions may be considered offensive and sacrilegious. For those who worship teak decks and hold them in almost mystical adoration, you should probably just hit the back key at this point. You have been warned!

MC31.jpg

For those of you brave enough to have ventured forward, the above pic is / was the back deck of my trawler. The teak deck looked to have worn down between 1/3 and 1/2 from it's original thickness. I don't want any exterior wood to maintain and I really don't like walking on teak decks especially with bare feet. So the back deck needed to be converted to fiberglass. Hey Sean, "can we just glass over the teak?" Not really a good idea (that's as close to "no" as he gets with me). The teak overlaps the gutter around the perimeter and delamination issues over such a large area using polyester concerned him. Sean's answer, "why don't you just peel up the teak from the deck" (think I detected a slight smile).

Ok, so how tough can this be. The teak deck covering looked to have been assembled off the boat, glued on the deck, and screwed / plugged around the perimeter, around the hatch opening, and on the hatch. Job 1 pull all the screws. So first you gouge out the wood plug. The hole has epoxy covering the screw head that held the plug in. With a center punch and hammer I chip as much out as possible. The screw heads take a square drive. So I beat with a hammer a square driver into the screw head. Then remove the driver blow out the shards of epoxy. Keep repeating the process until the driver engages the screw, it can be turned with a tee handle, and removed. It took 3 to 5 minutes per screw for 60 screws. To peel up the teak, I took a flat bar with a sharpened edge and tried to chisel up the teak. The teak would shatter a little, but held firm. Hey Sean, "what do I do now?" Sean's response, "have you ever used a hand held electric planer?"

DSCN0879.jpg

So the planer shaves about 1/8" with each pass. Have to wear a mask for all the air borne teak dust. After 20 passes blow the dust and shavings out of the planer to keep it from over heating. Was getting pretty good at it till I found the 1 screw I had missed......and cut the power cord in half. :oops:

DSCN0883.jpg

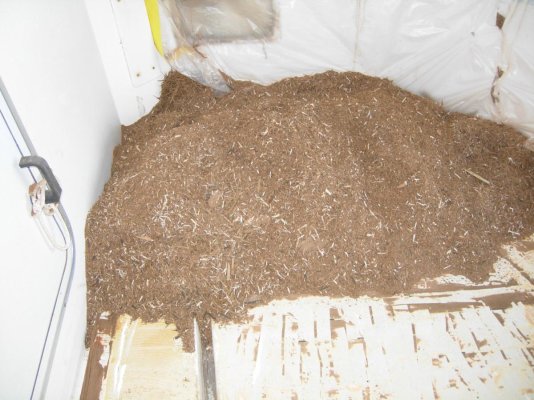
A day and a half, 2 sets of planner blades, and the power cord later, the teak was gone. 2 1/2 thirty gallon trash cans of teak shavings went into the dumpster. :hide:

DSCN0882.jpg

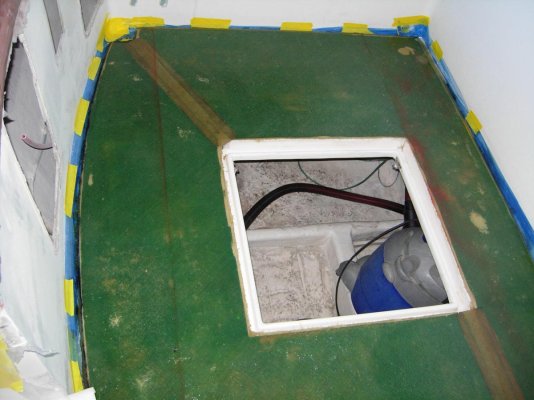
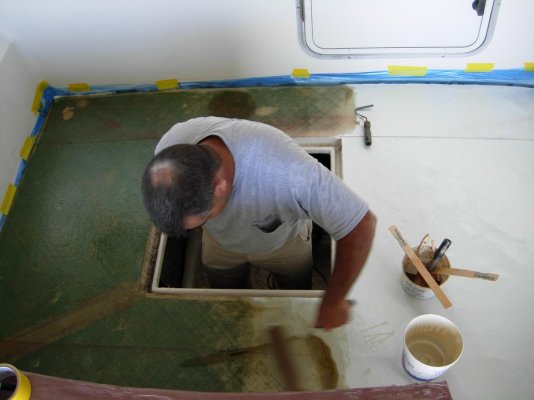
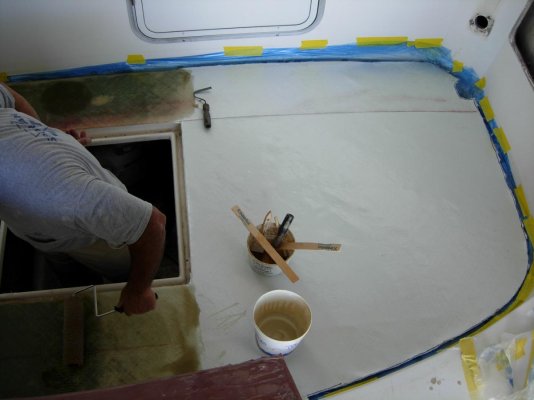
Next Sean sanded off the remaining adhesive, drilled and filled the screw holes, and did a little leveling to prepare the deck for 2 layers of bi-axial cloth and polyester. Since he was glassing down, he was able to lay out both layers of cloth with offsetting seams and wet them both out at the same time.
DSCN0933.jpg

DSCN0934.jpg

The deck is raised with guttering going around the perimeter. In 2 opposite corners there are drains in the gutter that remove water regardless of the pitch of the deck. The deck hatch also has gutters. You can see brown strips that cover the channels going from the hatch guttering to the deck guttering. This is a really nice setup that sheds water from the deck quickly. :thumb:

DSCN0936.jpg

DSCN0945.jpg

After lightly sanding, the deck received several coats of gel coat as fairing coating.

Ted
 
Last edited:
Amazing! The planer idea worked great. What are you planning for the top coat??


1983 Present 42 Sundeck
Twin Lehman 135's
✌️
 
Amazing! The planer idea worked great. What are you planning for the top coat??
All three decks will get a bare foot friendly non skid that I think is top coated with Awlgrip.

Ted
 
Ted: How close was the final thickness to what you started with?

In my situation it really didn't matter as there is a gutter all the way around the deck. Since it doesn't touch a wall, you don't perceive any height change. The teak was something like 1/4 to 3/8" thick including the adhesive. I think the 2 layers of bi-axial add between 1/8 and 3/16". So maybe I lost 1/4". The deck is curved front to back and side to side. After removing the teak, the deck seemed to flex a little when you walked on it. Adding 2 layers of bi-axial cloth to the compound curve of the deck made a big difference in rigidity, or so it seems to me.

Ted
 
Greetings,
Mr. OC. Have you considered Kiwi-Grip as a non skid?

Was not aware or it. Will run it by Sean and see if he has any experience with it.

Ted
 
In my situation it really didn't matter as there is a gutter all the way around the deck. Since it doesn't touch a wall, you don't perceive any height change. The teak was something like 1/4 to 3/8" thick including the adhesive. I think the 2 layers of bi-axial add between 1/8 and 3/16". So maybe I lost 1/4". The deck is curved front to back and side to side. After removing the teak, the deck seemed to flex a little when you walked on it. Adding 2 layers of bi-axial cloth to the compound curve of the deck made a big difference in rigidity, or so it seems to me.

Ted

Thanks. I'm contemplating doing the same thing. I do not have the gutters so I have to bring the new surface up to at least the existing height. With your less than 3/8" of teak remaining, your timing was perfect.
 
Thanks. I'm contemplating doing the same thing. I do not have the gutters so I have to bring the new surface up to at least the existing height. With your less than 3/8" of teak remaining, your timing was perfect.

Might be a good application for Coosa board. It comes in several thickness and could be laminated to the deck (after removing teak) with polyester bonding paste and some stainless screws. Fill the gaps to level with same paste and then put a couple layers of bi-axial cloth with polyester on top. Coosa is really nice stuff to work with; stronger than plywood, water impervious, but not cheap.

Ted
 
Last edited:
Might be a good application for Coosa board. It comes in several thickness and could be laminated to the deck (after removing teak) with polyester bonding paste and some stainless screws. Fill the gaps to level with same paste and then put a couple layers of bi-axial with polyester on top. Coosa is really nice stuff to work with; stronger than plywood, water impervious, but not cheap.

Ted

If you would like a natural product to replace teak maybe cork/resin decks might be worth considering; has to much nicer than plastic fake PVC teak.

Here: Home

How it's made to fit: http://www.marinedeck.net/images/installation/marinedeck 2000 the oem concept europa.pdf
 
Last edited:
Ted , this thread is a blast . You never know what to expect . I would have never thought of a power plan . It really got after it . Can't wait to see what's next .
 

Latest posts

Back
Top Bottom