My Short Haul Refit

The friendliest place on the web for anyone who enjoys boating.
If you have answers, please help by responding to the unanswered posts.

O C Diver

Guru
Joined
Dec 16, 2010
Messages
12,865
Location
USA
Vessel Name
Slow Hand
Vessel Make
Cherubini Independence 45
For those who aren't familiar with the term "Short Haul", it basically means your boat is being lifted out of the water (usually by a travel lift) for a short period of time to do a repair, and then put back in. The boat isn't removed from the travel lift slings. As my boat enters the 9th month of my refit project, there are a few in the yard who have been asking how the short haul is going. To which I respond, "probably copper the bottom and splash her tomorrow". Hence the name of the thread.

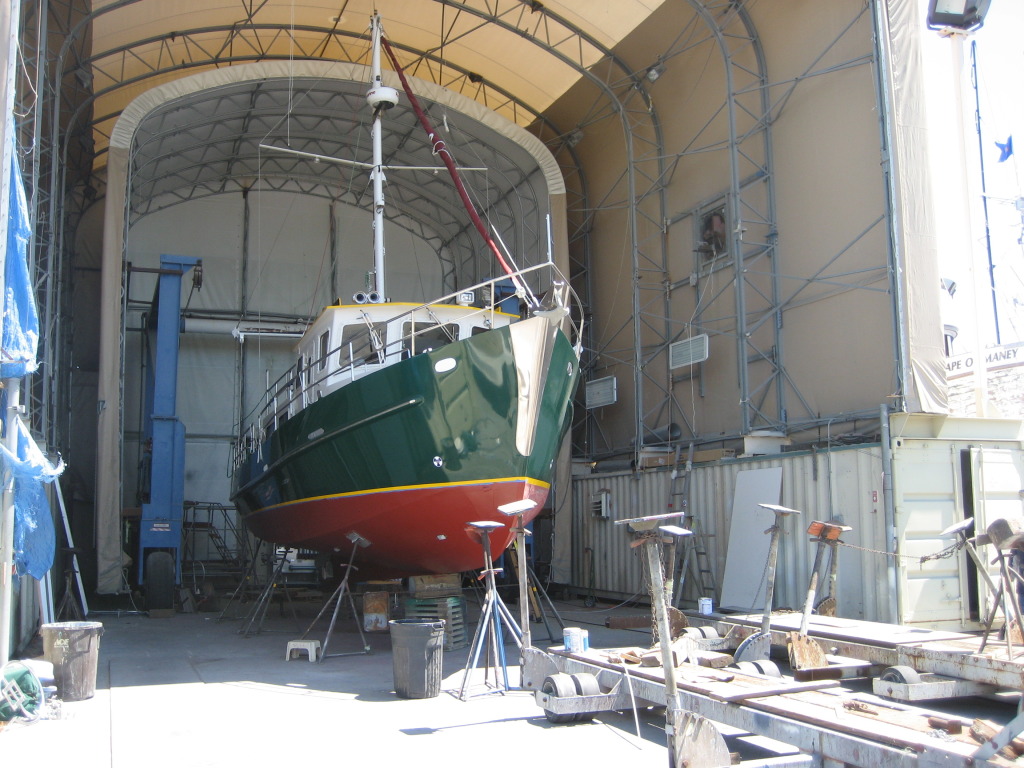
I'm down in Fort Myers, FL now as the boat is going through the painting process and is all sealed up. So I thought it was time to show you what Sean and I have been doing for the last 8 months.

First on my list was repowering. The engine, genset, and a bunch of stuff need to be removed. First you need to remove part of the galley and floor.

MC5.jpg

DSCN0760.jpg

Need to remove the exhaust system, 4 8D batteries and the genset. Then remove the heat exchanger, alternator, transmission mount, and front motor hangar so that the motor would fit through the salon door and then the transom door (even smaller).

DSCN0761.jpg

DSCN0762.jpg

After all that stuff is out, you need to pull the engine. The boom truck was originally for setting telephone poles. It has a telescoping boom that wasn't long enough in the traditional manner. So, we picked the boat up in the travel lift and inserted the boom into the boat by backing up the travel lift. :eek:

engine pull 2 (2).jpg

Next we hooked the engine to the boom truck...........stopped and went to lunch. No point having a panic attack on an empty stomach. Don't have pics of the motor coming out, I was a little busy. Simply, we drug it out from under the refrigerator, lifted it up, retracted the boom, and drove the travel lift forward to extract the motor with 2 coats of paint to spare on either side as it went through the transom door. What I described in the last sentence took 2 hour to do.

DSCN0782.jpg


More to Come......

Ted
 
The boat is next blocked on land as we wait for Sean to finish putting 2 layers of bi-axial cloth and West System epoxy on the bottom of the Helen Virginia, a 66 year old Skipjack that is getting rebuilt. 1/3rd of the remaining working Chesapeake Bay Skipjacks will come through the yard in July and August to haul, paint, and repair in preparation for the fall oyster season. Finally in late June the Helen Virginia comes out of the building. Time to take stuff off the boat. Sean is going to fair and paint the boat, so he wants everything off. Here is a partial list of everything: Anchors, chain, windlass, cleats, hawser pipes, vent covers, windshield wipers, antennas, spot light, dingy crane, dingy cradle, all the railings, all the stainless rub rail, running lights, the mast, chrome vent covers, hinges latches hardware, swim platform, etc. All that's left right now are the windows and entry doors.

The hull has a couple of small voids where the 2 halfs were glassed together. A decision is made to sand blast the hull to the jell coat so that there will be no hidden surprises.

DSCN0816.jpg

Half a pallet of sand later, she has a clean bottom and some poor glassing work is revealed.

DSCN0828.jpg

Time to head into the building.

DSCN0830.jpg

The little shed to the right of the door is a wood fired boiler. The building and adjoining work shop are heated through plastic pipes in the concrete floor. It's a very nice place to work when it's 5 degrees F outside. :smitten:

DSCN0832.jpg

DSCN0833.jpg

DSCN0837.jpg

Now the work begins.


Ted
 
WOW!!
What a beautiful ship too! OC, I must have missed a prior post. What is the reason for removing the engine??


1983 Present 42 Sundeck
Twin Lehman 135's
✌️
 
I lusted after this boat when she was on YW. You're doing a fantastic job with her, Ted.
 
Ted, I'll bet things look a little different at Scotts today. Its 25F out with a lite rain that is freezing when it hits. Here are shots of Somers Cove from two days ago.
 

Attachments

  • somers cove.jpg
    somers cove.jpg
    48.1 KB · Views: 329
  • 11022558_346218238913754_5226387608371942924_o.jpg
    11022558_346218238913754_5226387608371942924_o.jpg
    56.7 KB · Views: 326
  • 10386961_346218115580433_7171830174831313911_o.jpg
    10386961_346218115580433_7171830174831313911_o.jpg
    83.4 KB · Views: 321
Ted, I'll bet things look a little different at Scotts today. Its 25F out with a lite rain that is freezing when it hits. Here are shots of Somers Cove from two days ago.
Was up there last Saturday (02/21). Scott's Cove was frozen in solid with 12" of snow and single digit temps. Was still 72 degrees in the boat building. :) My slip for this summer is on the floating dock at Somers Cove.

Ted
 
What was wrong with that 450C? That's the same motor that is in my boat, usually a pretty good machine.
 
WOW!!
What a beautiful ship too! OC, I must have missed a prior post. What is the reason for removing the engine??

The case for repowering:

The Cherubini Independence 45 has a semi planning or semi displacement hull depending on your opinion. It came with a Cummins 6CTA M3 450 HP engine.

DSCN0821.jpg

At WOT with nothing on board, it's supposed to do 16-17 knots at 23+ GPH. :eek: Loaded for cruising if you can get it on top, 14 knots at 21 GPH, or so I have been told. I guess when diesel was $1 per gallon at the turn of the century, that was ok. The boat cruises very nicely up to 7 knots. At 8 knots there is a significant bow wave and the fuel burn has likely doubled. At 9 knots children with boogey boards can surf the bow wave and the swim platform has water coming through the slots. Your burning near 1 gallon per mile. At 10 knots the boat more resembles a jet climbing for altitude. It doesn't go past 10 knots till the boat gets on top. The way I see it, I'm not going to double or quadruple the fuel burn to gain a knot or 2. So it's either 7 or 14 knots......and I can't afford 14 knots. :blush:

To cruise the boat at 7 knots the engine runs at 1,200 rpm. 6 knots is 1,000 rpm. Less than 6 knots your taking in and out of gear. The engine doesn't run efficiently at 7 knots, less than 2 mpg. Spent a lot of time running HP requirements on software programs such as you find on boatdiesel.com. You can come up with all sorts of numbers depending on how you classify the hull shape etc. (garbage in, garbage out). The realistic range for HP needed for 7 knots is somewhere between 25 and 45 HP with 35 being a pretty realistic number. So, assuming 35 HP, the 450 HP Cummins is running at 8% of it's capacity and generating roughly 10 HP for every gallon it's burning. Simply, this engine is designed to run at 1,600+ rpm and generate hundreds of HP. The good news is that this engine has a big following with Chesapeake Bay waterman and mine had less than 1,000 hours on it.

Need to find an engine around 100 HP with the same WOT rpm that I can bolt my ZF 280.1 transmission to. Then I only need to change to a flatter pitch prop. Logical choice was the John Deere 4045TFM75 M1. The engine is 107 HP at 2,400 rpm M1 rating (continuous duty). The Cummins is 450 HP at 2,600 rpm. My ZF 280.1 gear bolted right up, albeit substantial over kill.

DSCN0817.jpg
DSCN0969.jpg

Only problem was that the tier 2 emission engines were discontinued in early 2014. Searched high and wide all over the USA for one. Found a keel cooled one in Washington state that could be converted for around $25K. Finally got in touch with the national John Deere sales rep who said he would check dealer inventories for me. There is one left in the USA; it's exactly what you want; it's located in Crisfield, MD. Crisfield is about 15 miles as the crow flies, 20 miles by water, and 40 miles by car from Scott's Cove marina in Chance,MD. :thumb: Went down and saw Mark Milbourne (had done business with him before). Things are really slow in December and he just wanted to get rid of it, $17,800. :thumb::D

So here are the numbers: Sold the Cummins sight unseen to a waterman of the marina for $15K before I brought the boat to Maryland. Bought the new engine for $17.8K. Add another +/- $4.2K in materials (custom stainless exhaust riser, lift muffler, exhaust pipe, engine mounts, transmission cooler, transmission service, and a bunch of misc. Add +/- $3K for Sean labor (and 100+ hours of my labor). That brings me to around $10K. Still need to buy a new prop, but will run the old one to generate some numbers to work from. Expect the boat to cruise at 1,600 to 1,800 rpm at 7 knots. Peak torque (full efficiency) is reached at 1,400 rpm. WOT (2,400 rpm) should be somewhere near 8.5 knots.

So you probably want to know what I think I will get for fuel consumption. The closest production boat with the same motor was the Kadey Krogen 39 (discontinued). The KK39 is a little shorter LWL (about 4'). The listed displacements and drafts are almost exactly the same. Hull shapes are different as the KK39 is full displacement. So it's roughly comparible. The question is, do you believe Kadey Krogen's advertised numbers? ;) KK claims the 39 burns 1.3 GPH at 7 knots with the JD 4045T. That's a little over 5 MPG. I'm hoping to do at least 3 MPG which is 2.3 GPH. I will be ecstatic if I hit 4 MPG / 1.75 GPH.

Planning on doing the loop in 2016 or 2017. Will have a new Motor running in optimal parameters. Feel that the investment will pay for itself in less than 10 years in fuel savings. Wait till you see the all the extra space in the engine room! :dance:

DSCN0825.jpg
DSCN0827.jpg

Ted
 
Sounds like extremely sound logic and an economical one to boot. The additional ER space is going to be a very nice bonus. :thumb:
 
Yep, that was a mismatch between boat and 450C. Logic going to the smaller Deere looks good. My boat is different as it is thin and light, 2000rpm is 19-20kts. 7.5kt is 1.9gph, I know the engine is not that efficient there, but not too bad considering I still occasionally get up and go.

I bought my 450c used for the same $15k!!
 
Nice job Ted . Beautiful boat .
 
Ted, you obviously have a great plan that is being well executed. You have my vote-carry on and please keep us posted.


1983 Present 42 Sundeck
Twin Lehman 135's
✌️
 
Ted- regarding fuel burn, don't expect a huge improvement with the Deere. The 450C is one of the best high output diesels when running down in the 1000-1200rpm range, down there it still produces 18-19hp per gph along the prop load curve. Way better than most. The Deere will be better as it will be in the meat of it's power curve, and has to have less parasitic losses, but the difference may not be huge.
 
My boat was finished on Friday afternoon at 4:30.

When I bought the boat, I had planned to paint it. There were a number of places where the paint had cracked and other spots where the paint was peeling because of poor prep work. Best as we can figure, the boat is built in a number of mold pieces. The molds are gel coated and then the glass is laid up. The pieces are pulled out of the molds and glassed together. After all the glass work and fairing is done, the entire boat gets sanded and tack prepped to be final painted or gel coated. The hull is 2 pieces, a port and a starboard side. It looks to be glassed down the leading edge of the bow, down the keel and up the transom. While the glass work is very solid and the hull is incredible strong, they didn't glass to a level surface. Instead they filled the voids with bondo (body filler). A little (1/16") fairing compound is fine. 1/2" think bondo is going to crack; it's only a matter of time. There was a spot just forward of the prop, that dripped for days because there was a cavity under the bondo that filled with water. The correct way to address the problem is to grind the bondo out and glass it to a level surface. Should have taken more pics.

The red area on the transom had significant bondo in it. All was ground out, reglassed, and the red stuff is West system with fairing additive for the final fairing.
DSCN1084.jpg

These cracks are next to the pilot house door.
DSCN0912.jpg

This is what it looked like after the gel coat and most of the bondo was sanded off. Grey stuff is bondo that was left. This area recieved 2 layers of bi-axial cloth to bridge the gap where the glass didn't meet. :nonono:
DSCN0961.jpg

DSCN0965.jpg

This is the back of the pilot house where it meets the upper deck. The whole joint had to be ground out. 2 layers of bi-axial cloth have been tabbed in. Next it will be sanded and faired.
DSCN0887.jpg

Then there are some things that just piss you off. :banghead::banghead::banghead:

This is where the teak steps were that went from outside the pilot house door to the upper deck. Below each step there are vents that were covered with stainless louvers. The vents provide fresh air to the engine room. The water trap and drain weren't constructed properly in the hollow wall on this side. On a snotty ride across Chesapeake Bay water came in and wasn't diverted by the trap. The built in stereo is toast and some very nice wood work has water stains. :banghead:

DSCN0891.jpg


Here the vent openings have been covered and new steps out of Coosa board and fiberglass have been constructed.
DSCN0911.jpg


The Steps have been faired with gel coat. Under the bottom step is a vent with a proper water trap. Vents were added elsewhere in the bow to make up for the lost volume.
DSCN0968.jpg


This is the bow where the windlass station is. There are hatch covers on the steps to the left and right of the station.
DSCN0909.jpg


This section is balsa cored. Because the cutout and the screw holes for the hatch weren't properly sealed, all the coring rotted away. Both sides had to be reconstructed. :banghead:
DSCN0908.jpg

I don't know why my boat was finished this way. The other 45 Cherubinis I looked at didn't appear to have these issues, or I may not have noticed. Don't know if business was slowing down and they were cutting corners to reduce costs. Maybe they were over budget on this build. This boat was built in 2001 and may have been finished after 9/11 while the country was collapsing into the recession. Who knows?

The entire top coat of paint or gel coat had to be sanded off the boat as there were so many places where you could flake it off with the tip of a knife because of poor prep work. Sean would sand areas and then clear the dust with a blow gun. Occasionally chucks of bondo would pop out when the air stream hit them. Then he would have to go back and fix those areas. Sometimes the fun never ends. :banghead:

Coming next: "Hey Sean can we......


Ted
 
When I first saw the picture of pulling the cummins I was "what???", but you explained it very well, plus the added resale at the end will certainly be recouped. All the best with the refit, seems like really good progress.
 
When you first started talking about a repower I have to admit I was skeptical...

Now that I understand what you have done, it makes perfect sense. When we repowered our boat we thought seriously about changing out to small engines, but in the end made the "easy" (meaning no homework) decision to stay the same.

Your engine room will probably be much more accessible and you'll have a great trawler when you are done!
 
One of the most confusing and frustrating things for me since coming to trawlers is how most of the production boats of the era seem to vary in design quality, but even more so in shop to shop and daily build.

Most of these hulls from the 70's and 80's are still pretty sea worthy, but then were finished off with things like scrap wood under the teak decks, screwed down and not adequately sealed. Or, in your case, venting without proper water traps and an engine totally mis-matched for a trawler. Though, granted, I guess it could have been the idiocy of the original buyer. I have seen this sort of thing in varying degrees of thoughtlessness on numerous boats that I have looked at as well as my own.

Just cannot get over how they got so many things right and then blew it with some of the finer details.
 
Change Orders:

One of the nice things about doing a major project like this is that you get to change things to the way that you want them. I know that sounds obvious, but most of us see things we would like to change on our boats but just don't get around to starting the project. When your already working with the Coosa, fiberglass, West system, etc. it's really easy to say, "while we're (you ;)) at it, how about we (you :D) do this. So I have my man Sean.

Sean is doing 99% of the jobs on this project that I'm not doing. He does all the fiberglass / West system fabrication and repair. All the sanding and painting is his department. He's a better welder, fabricator, and is far stronger than I am. So when there is a project I want to add to his list or want him to help me with something, it usually starts with, "Hey Sean, when you reach a stopping point....". The job is time and materials, so I know it adds to the cost. Here are some of those things that most would say, "yea that would nice, but..." and never get around to doing it:


The outboard motor on the dingy had been hitting the stern light. the PO had added a bracket that clearly had gotten hit and the bracket holding the light had been bent. The power cable had even been cut by the skeg. The side lights had been nicely recessed in the roof line without compromising the lights display angle. Can we do that for the stern light without compromising the structural integrity of the roof? No Problem.
MC36.jpg

Side light cut out is above the side window.
DSCN1088.jpg

Light fits in cut out and will be protected by a 1" thick Starboard plate.
DSCN0905.jpg
DSCN0889.jpg

Dingy crane was banging against the railing because nothing held it fast. Can we add some glass to reinforce the deck for a 3" square pad eye to attach the winch cable hook to? Sometimes he goes above and beyond, but I like how it turned out.
DSCN0890.jpg

Would really like the engine side exhaust and engine room ventilation exhaust run out the transom.

Vents and Exhaust are below the salon rear sliding window.
DSCN0828.jpg

New exhaust beautifully installed! Old holes properly filled, glassed, and faired.
DSCN1083.jpg

That F*cking dorado vent leaked water and stained my cedar lined closet in the master stateroom. Who runs that kind of a vent into a clothes closet anyway? :banghead:
MC35.jpg

So much for that leak. :)
DSCN1102.jpg

Bigger projects coming next.....


Ted
 
Nice!


1983 Present 42 Sundeck
Twin Lehman 135's
✌️
 
Nice work Ted . Looks like a nice shop to get some work done . If you decide to get rid of those old f#%#ing dorado vents let me know , I think I could make good use of them . Maybe I'd get a better price while you're still pissed about them:D
 
West System ? You mean to tell me Sean is not using polyester ? OMG!

We use both; it depends on the project. The pics that are green were done with polyester. I can say we because I've played mixing boy on a lot of the larger projects.

Ted
 
No exterior wood to maintain:

If I had wanted to spend my spare time varnishing, I would have bought a wood boat. I like all the interior wood, but prefer relatively low maintenance on the exterior. I want to use my boat, wash it, and twice a year wax it. So the exterior wood either needed to go or be covered. The teak steps going to the upper deck were replaced with coosa wrapped in fiberglass. They are far stronger than the teak and only need to be boat washed.

The cap rail and the rub rail took a lot more work.

MC4.jpg

The rub rail goes down both sides of the boat and across the stern. Half the outward thickness is fiberglass laid up in the molding process. The other half is teak that is through bolted to the hull. Outward of the teak in 1" tall stainless steel solid rub rail. The rub rail tapers from maybe 3" at the hull to 1.25" at the stainless strip. To eliminate the need to maintain the teak, we encapsulated it. Wish it had been that simple. First the stainless guard was removed. Then all the gel coat was sanded off the fiberglass portion back to the hull. Next the teak was sanded and planed down so that after it was glass covered it would have it's original dimensions. Now comes the fun part. 33' x 8" strips of bi-axial cloth were cut, 2 for each side. All the teak from the front to the corner where the side turns into the transom was wetted with West system with slow hardener. When the West system started to get tacky we applied the cloth. Starting at the front, I would roll out the first 3' of cloth on the top of the chine and hold the remaining roll. Sean would wet out the cloth on the top of the chine, position it so the edge was against the hull, and roll out the air bubbles in the cloth. After he had done this for about 6', he went back, wetted out the rest of the cloth and wrapped it down the face of the chine, underneath back to the hull where he would trim it to just meet the hull, and then roll out all the bubbles. Down the hull we went only stopping long enough for me to mix up another 20 pumps of West system. It took about 2 hours to apply that 33' piece of cloth. We cleaned up tools, had lunch and then applied the second layer same as the first. After the second layer, I would mix up 20 pumps of west system and add the red fairing power till it reached the consistency of peanut butter. Sean would paint (thickness of frosting on a cake) and cover all the cloth.

The object was to bond the cloth to the teak and fiberglass with 2 layers (this is an impact area) and then the fairing putty on top, all to chemically cure together over night. It took about 2 gallons of West system to do each side.

In this pic, you can see the top and face of the rub rail already sanded but not the bottom. Better pics to come on the cap rail.
DSCN1013.jpg

The cap rail was a little different. It sits on top of the sides of the hull, but doesn't touch the sides. There is a bead of caulk that sealed the cap rail to the gel coat. Preperation was to sand down the cap rails, remove the caulk, and enlarge the slot so that the cloth could be tucked in side. After the gass was applied and tucked into the slot, West system with bodding additive was used to fill the slot, and then a small fillet was applied between the cloth and the fiberglass. Finally West system with red fairing powder was put on top.

Sean prepping the cap rail.
DSCN0849.jpg

Aft cap rail ready to be covered.
DSCN0865.jpg

Wetting out the teak.
DSCN0864.jpg

Laying out the bi-axial cloth.
DSCN0867.jpg

Wetting out the cloth.
DSCN0866.jpg

Only one seam in the corner.
DSCN0871.jpg

Applying the fairing frosting.
DSCN0873.jpg

Lots of sanding ahead.
DSCN0877.jpg

Coming next, my teak deck. :eek:

Ted
 
Must be little demand for the lift if it is available to be idle for hours for one to do repairs while hanging. Frankly, I want my boat to be secured (not hanging) as soon as possible.


img_313379_0_ce47aabde6f6b94e10f85e5cbc670fed.jpg
 
Last edited:
Great work Ted!


1983 Present 42 Sundeck
Twin Lehman 135's
✌️
 
Really nice Ted . That is a lot of work . Looks like you have one heck of a fiberglass man .
 

Latest posts

Back
Top Bottom