Your best ever DIY maintenance idea

The friendliest place on the web for anyone who enjoys boating.
If you have answers, please help by responding to the unanswered posts.
I don't know about extending oil change intervals. I do know I use a filter that is about 1/3 to 1/2 larger than the stock filter. I still change at 200 hours and it does seem like the oil stays cleaner (less black) longer, and that's got to be a good thing for the engine.
Bill
 
I got the idea from here..

http://cleanairflo.com/specifications/caf-100x-specifications/

But I'm to cheap for that kind of cost. :D


Yes at $595 that gets pretty far out of my budget?. I don't want to side track a great thread- so if you feel the urge and want to offer a little more info on your ventilation system on a new thread fire away Scott. I'm certainly interested and have been wanting to set up a 110 volt ~ continuous duty bilge blower.
Interestingly- I found out about a month ago the the only engine room supply vents that our boat has (SS grill on the steps each side going to the sundeck) don't actually have access to the engine room/ bilge. Later Present 42's had large vents on the side of the boats best that I can tell.


1983 Present 42 Sundeck
Twin Lehman 135's
✌️
 
Brace and Bit , everyone has seen them at flea markets , and if you need a hole with a perfect diameter they are the way to go.

But the brace , the crank part, does a great job of turning stuck screws , as you can push your entire weight against it and the crank is large enough to give meaningful force.

For big screw heads places like Jamestown sell bits that fit large screws and are robust enough not to shatter.

It used to be that house electricians had their own style screwdriver that had multiople used.

These have been >discovered< and are now sold everywhere.

http://www.homedepot.com/b/Electric...l-Tools-Screwdrivers-Nut-Drivers/N-5yc1vZbma8

The delight with these is with the screwdriver bit removed , the holder is a nut wrench.

It fits (2 sizes per tool) many of the clamping screws on SS hose clamps , where it is far easier to get a tight close than poking and twisting with a screw driver.

Under $5.00 with no light.
 
Last edited:
Multi Tool

Made this up to clear out minor Vacuflush clogs and other things that need blowing out.
 

Attachments

  • Unplugger.JPG
    Unplugger.JPG
    89.9 KB · Views: 153
Brace and Bit , everyone has seen them at flea markets , and if you need a hole with a perfect diameter they are the way to go.

But the brace , the crank part, does a great job of turning stuck screws , as you can push your entire weight against it and the crank is large enough to give meaningful force..

This is a tool and technique that has been promoted for years on the Grand Banks owners forum. Based on the recommendation from the shipwrights on that forum, I bought a high-quality brace many years ago and a scrounged up every driver bit I could find from the hardware stores in the Puget Sound area that still carry old-style tools.

The brace and driver bit is outstanding for removing and replacing deck screws, handrail screws, and as FF says, stuck or tight screws.
 
HiDHo,

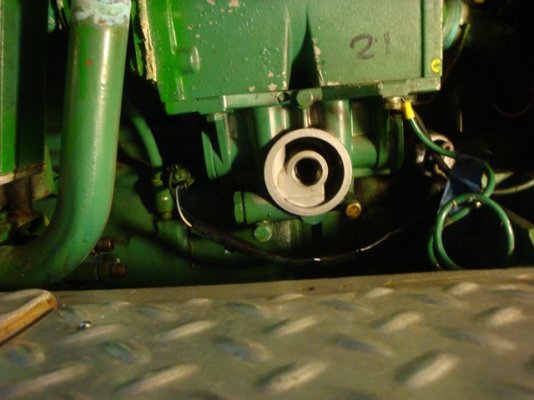
Is that a Volvo TAMD that you have that oil filter adapter connected to?
I have been looking to pick one of those up, but all I saw were for Fords and GM. Maybe one would work, but maybe not.

I have at least as difficult an access as you did and always make a spill when changing the filter, not to mention the difficulty of getting at the darn thing in the first place.

Any chance you can share the info with me? What manufacturer, distributor, part # ?

Thanks in advance.
 

Attachments

  • Oil Filter Mount.JPG
    Oil Filter Mount.JPG
    124.9 KB · Views: 162
For a newbie boat owner this is the best thread ever.

?????
 
JimS,

If your filter is a spin-on( I can't tell for sure in the picture) this company makes universal kits, you need to know what size nipple your filter fits.

Relocation Kits

Hope it helps, I am planning this for my Yanmars.

Rafe
 
Thanks much Rafe,

I did not run across these guys in my search.
One of their products looks just like the one from HiDHo.

Hopefully, my next filter change will be the last from under the engine.
 
Great stuff. This is a great resource. Thanks everybody.
 
IMO the clogs in Vacuflush toilets often happen from people of the fairer sex who feel it's necessary to wrap toilet paper at least 20 times around their fingers before they feel safe using it.

That lump of wet toilet paper hits the small opening at the bottom of the chamber beneath the toilet bowl and plugs that opening.

It's relatively easy to unclog if you can get to it. I found an easy and cheap way to get the 'water' out of that area between the toilet bowl and the small opening. I use a small "water blaster" squirt gun, similar to this one on Oriental Trading....
Soaker Guns, Water Toys, Games & Activities, Toys, Games & Novelties - Oriental Trading

I suck the 'water' out of that area of the toilet until I can see the clog. As I suck the 'water' up into the squirt gun I empty it into a small pail I keep on board. Then I use my "mechanical fingers" (the kind you use to pick up things you've dropped in the bilge) and pick up the clog. It usually takes only 2 minutes to get the water out of that area of the toilet and another minute or two to remove the clog.
 
Why not install the single sheet toilet paper dispenser as found in gas stations in the guest head??

Keep the roll of TP in a drawer for your own use.
 
GFC,

I like your method for sucking the water out of the area between the bottom of the bowl and the small opening and plucking out the clog with your fingers. My little tool (pictured above) is for use when you can't see the blockage because it is farther down stream.

What I do after the water is removed is turn the water off, turn the pump on, hold the pedal down with my knee, place the red part over the opening and blast the hell out of it until the water starts passing thru the system.

I have done this numerous times and it works. I am on my third boat with Vacuflush.
 
I had a nephew that plugged our Vacuflush 3 times in the first three days of a week trip. I gave the talk about the head when they first came onboard, After the third plugging I made it clear he has going to be responsible to deal with it from then on...

Miraculously he never plugged it again...
Should of told him that on the first round...

HOLLYWOOD


Now that is the approach I'm fond of!!


1983 Present 42 Sundeck
Twin Lehman 135's
✌️
 
If you don't have a ring compressor to install impellers you can use a plastic zip type cable tie, just orient the impeller fins and tighten the tie close to one end of the impeller start it into the housing and slide the zip tie back as the impeller slides into the pump.

That's what I do. I only have one and it's easy to get to.
 
HiDHo,

Is that a Volvo TAMD that you have that oil filter adapter connected to?
I have been looking to pick one of those up, but all I saw were for Fords and GM. Maybe one would work, but maybe not...

I believe Volvo markets a filter relocation kit but it's not inexpensive.
 
I can clear almost any visible clog in a Vacuflush in seconds. Must have done this a dozen times. Shut the water, step on the pedal, hold it down and poke the clog a couple of times with a broomstick. Fast, flawless, and no mess. Then swirl the end of the broom stick over the side and put it in the lazarette for next time. There's always a next time. Took me longer to write this than to clear a clog. Howard
 
HiDHo,

Looks like Derale is the way to go. Griffen's is my local supplier, and they have been very helpful in the past. I got my last oil filter from them at 1/2 the cost, so they should be able to fit the nipple and seal ring.

Thanks again for bringing this back to my attention as it had slipped down the list recently.
 
I can clear almost any visible clog in a Vacuflush in seconds. Must have done this a dozen times. Shut the water, step on the pedal, hold it down and poke the clog a couple of times with a broomstick. Fast, flawless, and no mess. Then swirl the end of the broom stick over the side and put it in the lazarette for next time. There's always a next time. Took me longer to write this than to clear a clog. Howard

Do exactly the same thing with 1/4"x12" plastic rod. The clog is always in the restriction under the ball valve.........:thumb:
 
Print West Marine on the side of the plastic rod and you can sell it for at least $12.99 as a Vacuflush Clog Clearing Tool.
 
Print West Marine on the side of the plastic rod and you can sell it for at least $12.99 as a Vacuflush Clog Clearing Tool.

Not up here in Canada, they are closing their stores as the leases expire this coming year........:facepalm:
 
Last edited:
Greetings,
Speaking of WM...I bought some heavy duty heat shrink tubing, the kind you use on large battery cables (about 1" or so ID) and put them on the ends of my storm lines. Sort of a quick and dirty poor man's whipping. Just in case the melted ends ever let go, it's a back up.
 
A tape measure makes a great tank dip. We have the appropriate measurements relating fuel depth to contents written in the log.
On our steel boat, five minute Araldite makes a quick cover for chipped paint pending recoating.
 
Last edited by a moderator:
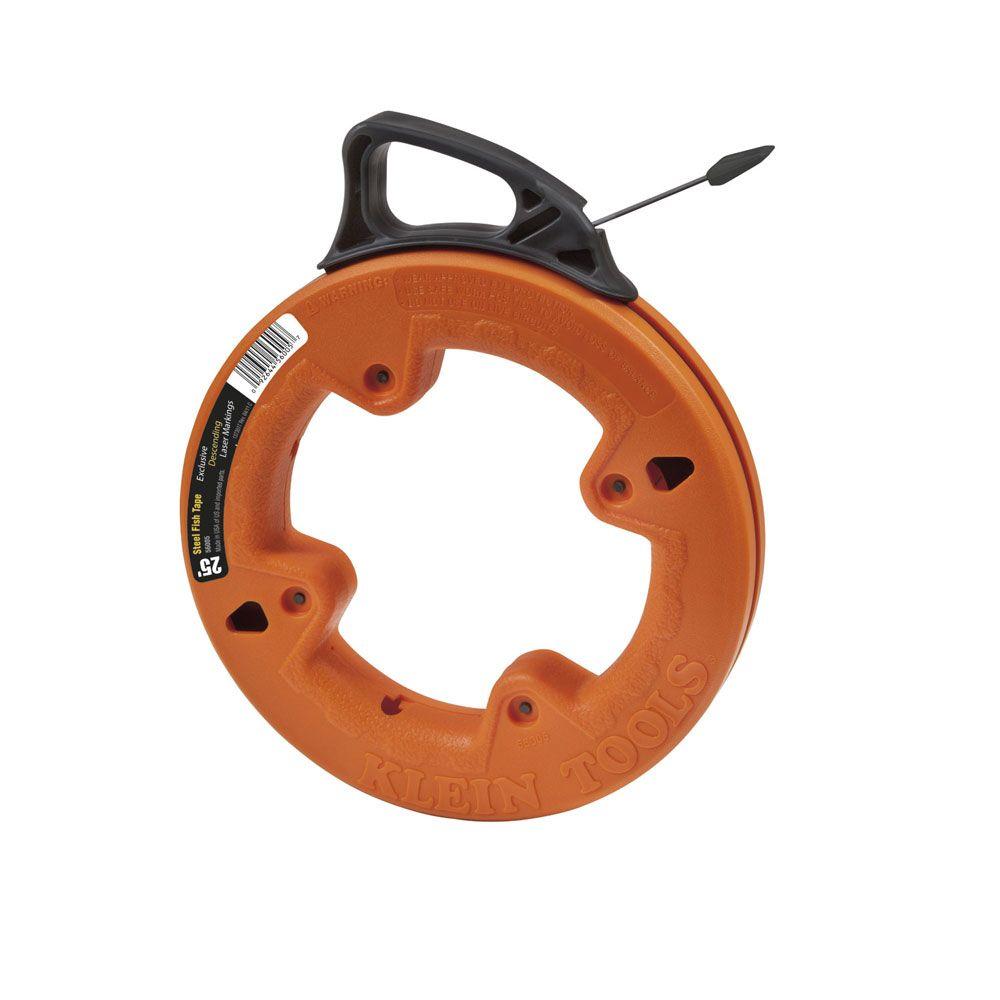
While we're talking about sticking tanks, mine have at least two bends between the fill and the tank, so a straight stick is out of the question. PO used a length of 12-2 electrical Romex cable, which worked but was a bit of a challenge. I ended up using an electrican's steel fish tape, which I filed marks on ever 1".
klein-tools-fish-tape-poles-56005-64_1000.jpg


I just noticed when I went to look for the picture is that it's advertised as a "Depthfinder fish tape." It does have markings every 1'. Too bad they didn't go every inch.
 
Last edited:
Back
Top Bottom