Lucky find on swim platform

The friendliest place on the web for anyone who enjoys boating.
If you have answers, please help by responding to the unanswered posts.
Joined
Oct 2, 2009
Messages
5,198
Location
USA
Vessel Name
Bucky
Vessel Make
Krogen Manatee 36 North Sea
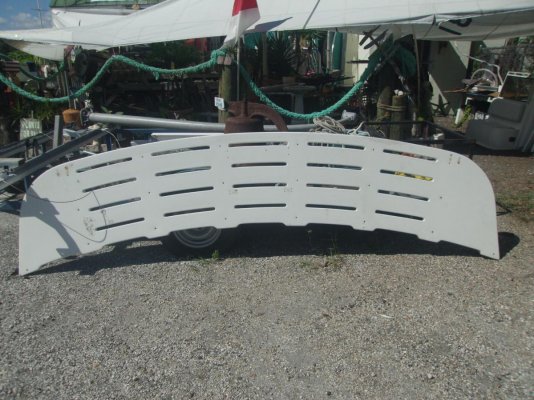
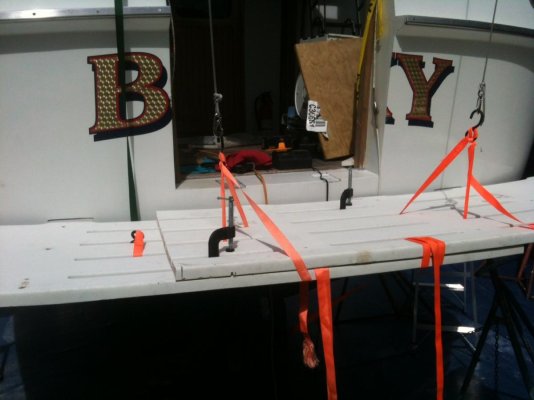
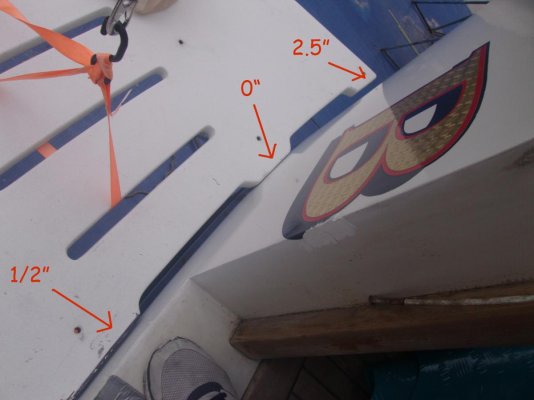
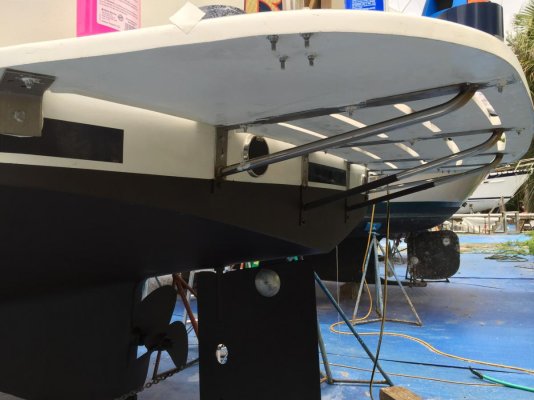
After years of getting quotes on new swim platform construction (4000-4500 bucks), I might have lucked-out on a used one. No, as far as I know there are no used Manatee swim platforms, but I kept looking at good take-offs at FL marine salvage places. It took three years, but I stumbled upon this one in Stuart and thought its radius might be very close. After measuring, it looked even closer, but it was way too big overall. I have to trim both ends but the radius was within 3/8" on four of the six inside touch points. The outside two I have to build up 2.5". The platform was 500. With any luck, I should be able to get this completed for 1 to 1.5 K including brackets. The source hasn't been able to learn what kind of boat it came off of, but condition is excellent.

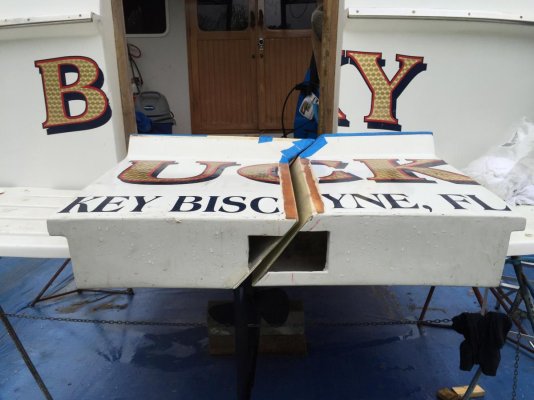
This is a major part of our MOB rescue plan which included hand winches to replace blocks and tackle on davits, a pivoting dinghy crane, and another winch above the rear deck to attach and pull in someone like me, assuming my Admiral would stop to pick me up. The last step will be dividing the rear tailgate and hinging each half to swing inward.
 

Attachments

  • GEDC0083.jpg
    GEDC0083.jpg
    182.4 KB · Views: 194
  • GEDC0101.jpg
    GEDC0101.jpg
    89.4 KB · Views: 193
Greetings,
Mr. hh. Good find and a question. Rather tan trimming the ends, have you considered taking a piece out of the middle and placing, say, a wider bracket in the middle to reenforce the joint?
 
Nice! What's it made of?
 
Greetings,
Mr. hh. Good find and a question. Rather tan trimming the ends, have you considered taking a piece out of the middle and placing, say, a wider bracket in the middle to reenforce the joint?

Hmmm. You may have something there, RTF. I hadn't considered cutting the platform in half, but the addition of an extra wide support in the center could work. What I could do is to swing the platform off center and see how far I can go without messing up the current fit. Very interesting idea. Why didn't I think of the center support?! I'll let you know how it works out, but some movement would help with the amount I need to trim off the ends. As is, I'll have to fill in some of the drain slot length after the cut to make the border solid. Thanks for the help.

Parks: As far as I can tell, it's mostly glass but it's only 125 lbs. or so, so it must have some core. It's 13' X 29" X 1.5". Looking through some drilled holes, there's no wood...maybe some foam.. If I do what RT suggests, there is a 1/8" raised perimeter around the bottom which I could use to fill in some more glass.
 
Greetings,
Mr hh. Another thought. IF, rather than cutting the platform directly in half, you cut a pie shape out of the middle and did the join, you might not have to build up that 2 1/2''. Just throwing ideas out there.
 
Greetings,
Mr hh. Another thought. IF, rather than cutting the platform directly in half, you cut a pie shape out of the middle and did the join, you might not have to build up that 2 1/2''. Just throwing ideas out there.

The way this is fitting now, it seems to me if I move the ends in about 6-8", the outside touch points would contact the boat, perhaps needing a bit of angle adjustment (grinding), but I can't be sure what that would do to the four touch points that are pretty good right now. The pie cut may pull away the center-most touch points, but could be a great finishing idea if I grind the center touch point on each side just a bit. Good thinking.:thumb:
 
Larry, before you cut the fiberglass, what do you think of making a cardboard or cheap plywood pattern to practice the cuts on?
 
Larry, before you cut the fiberglass, what do you think of making a cardboard or cheap plywood pattern to practice the cuts on?

Now that I have the platform hanging in place on the stern, alterations will be a lot easier to see. I'll try using luan strips to pattern the changes, just like doing a window form. You know, what they say about every boat is a little different? As far as I can tell, there's either a 2.5" difference in the platform or the boat cuz the gap is that much different port to starboard.
 
What RTF said.
Cut out that small center section, then fit the 2 remaining sections together.
 
Last edited:
Larry my rule for this type of work is measure twice, cut once, throw it away, repeat, give up, fix it with putty.
 
Greetings,
Mr. hh. Good find and a question. Rather tan trimming the ends, have you considered taking a piece out of the middle and placing, say, a wider bracket in the middle to reenforce the joint?
That sounsd like a great idea. :thumb:
 
Update! After taking RTF's suggestion of cutting the platform in the middle, I stacked the halves of the platform on each other and kept moving them inward until I reached the optimum fit of the radius it came with. It left me with a 1/2" void on the inside touch points, zero on the next two and about 2.5" on the outside two, all in all, leaving a minimum amount of glass building for a perfect fit. The platform began at over 13 ft. wide and is now just under 9 ft.. Another foot left on either side and there would be a huge amount of reconstruction necessary to fit the curvy transom. Here are some pic's.
 

Attachments

  • stacking halves of platform.jpg
    stacking halves of platform.jpg
    83.4 KB · Views: 152
  • touch points fitting.jpg
    touch points fitting.jpg
    71.4 KB · Views: 153
  • shaping end touch points.jpg
    shaping end touch points.jpg
    59.1 KB · Views: 140
  • cutout sections.jpg
    cutout sections.jpg
    127.2 KB · Views: 133
  • final shape.jpg
    final shape.jpg
    108.3 KB · Views: 148
Good job Larry. It looks almost perfect.:thumb::thumb::thumb:
 
Good job Larry. It looks almost perfect.:thumb::thumb::thumb:

Don: I was over at Liquidators in Ft Pierce today and noticed their 80", 9 ft, and 13 ft. stock swim platforms with darned good solid inboard areas, enough to cut and shape to many transoms. In addition, they had two other gorgeous Rivera units that were nearly as close in radius as the one I'm working with now. I've been going over there for years......never saw something close enough to work with. Go figure.
 
Larry, I'm very impressed. I don't think I would have wanted to try that. Nice Job!
 
Shamwow!! Looks great Larry.
 
Nice job Larry!
 
Larry, I'm very impressed. I don't think I would have wanted to try that. Nice Job!

It ain't over yet, Parks. Still have to bevel and fill the center, and do the glass buildup on the outside touch points. I measured and protracted for the under support angles, but the transom actually lifts out of the water at the ends (full displacement, you know) and tomorrow I'll fashion some kind of mock support for the ends, which will go from the outside edge of the platform up to some point on the transom.
 
Really a beautiful job Larry! I'm following this closely. We are headed South, just got in to Deltaville this afternoon. Very curious to see how you hinge the transom door.
Regards
Bob
KASSIE
Manatee #93
 
Greetings,
Mr. hh. Atta boy. Glad I could help. Now, about that boat ride and all the free beer I can drink...
 
Looks nice Larry. Very detailed as always. I'm thinking on a platform myself . This will be a very useful thread .
 
Finally completed the swim platform installation with an unexpected amount of leveling inside the transom before the backing plates for the platform brackets and new main & Genset exhausts could be properly mounted and sealed. Mating of the platform halves was the easy part. Now comes the job of fitting the two halves of the tailgate which were bologna sliced from the original, and have to be hinged before final fit can be done.
 

Attachments

  • image.jpg
    image.jpg
    107 KB · Views: 104
For some reason, I don't seem to be able to load more than one photo from my I-phone.
 

Attachments

  • image.jpg
    image.jpg
    113.7 KB · Views: 111
Shot of under supports with new exhaust outlets. Bottom paint covers the lower part of transom bracket connection.
 

Attachments

  • image.jpg
    image.jpg
    104.1 KB · Views: 101
For some reason, I don't seem to be able to load more than one photo from my I-phone.
Looks good Larry. Man you do some nice work .I can only load one pic at a time as well.
 
For some reason, I don't seem to be able to load more than one photo from my I-phone.

I cannot either from my iPad using Safari Larry. I can upload multiple photos from both iPad and iPhone through the TF App though. I find the App to be a far more convenient way to upload pictures from a device.
 
Dang, Larry. I don't care if it is PhotoShopped, it's still nice work.:thumb::socool:
 
Larry, you are sure getting that boat dialed in! Love your work.
 
Looks really nice. That's slick how you sawed through your door.
 
Back
Top Bottom