Evans Head NSW to Port Albert Vic in a 49ft McLaren Timber trawler

The friendliest place on the web for anyone who enjoys boating.
If you have answers, please help by responding to the unanswered posts.
Troy,
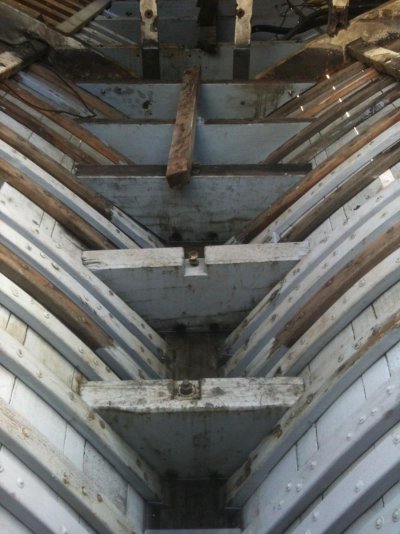
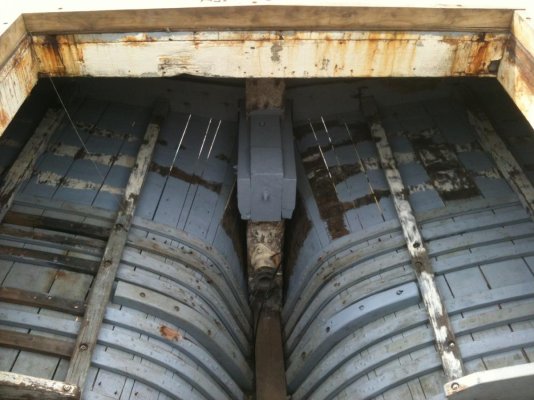
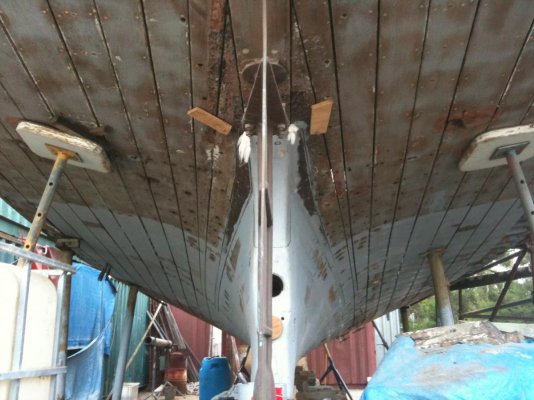
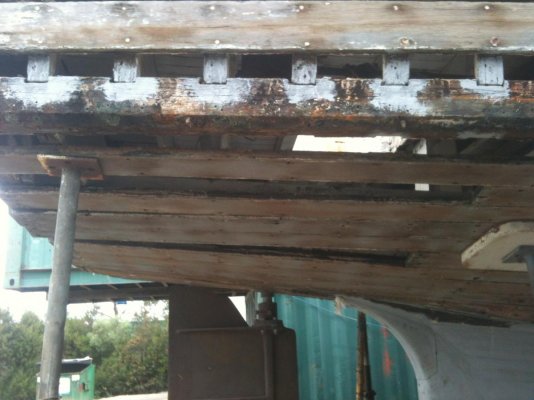
If you look in the top picture, bottom centre, the flat plank that is about 250 mm wide running fore and aft is the dead wood. Starts at the fore foot and ends rebated in the bottom of the transom.
Those running athwart ships are frames and ribs.
Don't mean to be pedantic but that is the way I see it.
Cheers
Benn
 
Last edited:
Gidday All
Thanks to Hendo and Benn for there input to the engine beds will touch on this later with photos have been down at the boat this last week chipping away at her, fitting new check plates and new bolts to the frame mitre shown in photos also made the fuel tank support template in readiness to be made out of stainless steel.
She is slowly taking up as we put water into her to swell her up again we are caulking as the planks gaps decrease but this colder and wet conditions are defiantly helping achieve this have also knocked out the bulk head not much holding that, so new ply ones will be installed one on both sides and insulation in between the two for a bit of noise reduction so still moving forward gave the old Gardner a kick in the guts the batteries where down a bit so lifted the decompression leavers only run her for a short while as no water connected, had previously ran her before filming
 

IMG_1539.jpg (110.5 KB)

IMG_1547.jpg (113.2 KB)

IMG_1548.jpg (101.0 KB)

IMG_1531.jpg (88.5 KB)

IMG_1538.jpg (113.2 KB)

IMG_1543.jpg (127.6 KB) 3.jpg


Benn and Hendo how are you boys the first pic has the 5 deadwoods that I was talking about and where the engine goes this is where I want to build the engine mounts across the back two and next two deadwoods and up out to the sides where they will be through bolted across the ribs hope this helps explain the reason for wanting to do this as the engine sits quite low and the timber beams where 200x200mm with no access under the engine anyway hope you all enjoy the pictures will post again with more progress
Troy
 

Attachments

  • IMG_1543.jpg
    IMG_1543.jpg
    127.6 KB · Views: 178
  • IMG_1539.jpg
    IMG_1539.jpg
    110.5 KB · Views: 160
  • IMG_1547.jpg
    IMG_1547.jpg
    113.2 KB · Views: 145
  • IMG_1548.jpg
    IMG_1548.jpg
    101 KB · Views: 140
  • IMG_1531.jpg
    IMG_1531.jpg
    88.5 KB · Views: 154
  • IMG_1538.jpg
    IMG_1538.jpg
    113.2 KB · Views: 141
Troy,
They are called floors. The deadwood runs fore and aft.
Those floors are bolted thru the deadwood.
I assume the engine beds will be bolted on to the floors using Bronze or possibly s/s bolts with frogs (well sized bolt heads) on the outside of the planks. My frogs are approx. 150 x 75 mm, just as an example.
Personally I would still use timber beds and then use a steel plate on top for the engine mounts.
Cheers
Benn
 
Hi Benn,
Yes you are right l was using the wrong terminology
Troy
 
Hello Everyone
Well have been to the boat the later part of this week removed some planks that had patches in them to find a few surprises nothing bad, but more work to say the least. Have to lift the chine stringer up 10 mm and in 25 mm to put her back tight into the mitre's again, have some pictures but not of good quality, will go easy enough with a endless chain and a couple of slings then new check plates and through bolts to be made then she should be back to new again and also have to make a new frame for the lazerette bulk head area but not a real problem either more work but easier to do it now the late slowly getting rid of the little jobs one major job remains to do when we get to it is the king post which l think is the big piece of timbers behind the bow, it has some fresh water damage the will need some attention in the very near future but in the meanwhile we will concentrate on the caulking and the stern area as we head up and outwards we have about 20 short ribs to be installed in the lazerette. That will mean that we have re-ribbed over half the length of the boat. She will be like new again and can and will be enjoyed for many many years to come. Feel free to ask any questions l have nothing to hide unlike the previous owner.

Regards
Troy
IMG_1552.jpg
IMG_1554.jpg
IMG_1565.jpg
IMG_1568.jpg
 

Attachments

  • IMG_1552.jpg
    IMG_1552.jpg
    137 KB · Views: 164
  • IMG_1554.jpg
    IMG_1554.jpg
    132.4 KB · Views: 141
  • IMG_1565.jpg
    IMG_1565.jpg
    107.7 KB · Views: 140
  • IMG_1568.jpg
    IMG_1568.jpg
    123.3 KB · Views: 137
Hi Ben2go,
No this is the only site l am on. Why is that mate?
Troy
 
Hi Ben2go,
No this is the only site l am on. Why is that mate?
Troy

I was curious, as that's where most wood boat builds and rebuilds are.It's great that you're here.I'm enjoying your progress and learning more. :thumb:
 
hi to all,
Directed to all the Gardner Engine Boys/girls out there, Tracey Lea has a 6LXCT(turbo) model in her and was checking on what other people are using for there gardner engine oil or what l should be using in mine. currently using Castrol RX super 15w-40. Any information and reason for that particular oil will be greatly appreciated.
Troy
 
hi the last owner used fuchs titan HD40 but the manual states sae 30 so will use HD30 next time 6lw
 
Yep, I use Castrol SAE 30 as recommended by the Gardner people and the same in my gearbox and gen set.

Cheers
Benn
 
I use 30 sae for my 6lxb as per the manual, and for the twin disc box and Kabota generators because it's simpler to keep the same oil.

Similar to Crashley, the previous owner swore by 40 sae, but he could never explain (in terms simple enough for me to understand) why I shouldn't go with manufacturer's specs.

Maybe it's a FNQ thing.
 
eagle419,
Was looking through my new manual for the lxc models that was given to me by a friendly TF member.
And maybe the sae 40 is a FNQ thing for the temperature as its said for use above 32 deg.
Troy
 
Tidahapah,
lm using the Castrol (15w 40). But was wondering what product name in the 30 SAE your using and would it be suited to turbo models read that some oils for NA models and other oils for turbo models or does it not mater with todays oils also want to use in Twin Disc 509 so only one oil on-board also, makes perfect sense to me.
Troy
 
crashley ,
Thanks mate for your reply and heads up on the oil Q
Troy
 
Troy,
I am using Castrol RX Mono 30.
Not sure on the Gardner turbo but would imagine it will be good.
Cheers
Benn
 
its been a while since i last updated my post.
The last month or so have been concentrating on all the frames as the boat had spread apart side ways and the main chin stringer had also dropped because of poor bolts or no bolts at all mostly around the mitres where the cheek plate bolts have rusted away so have been busy making bolts and new bigger plates to go over the now pulled in tight mitres. I managed to pull in all the mitres back to original positions or as close as possible then remade bigger cheek plates and bolts to replace old ones pictures to follow. also discover a broken frame in between the engine room and lazzerete starboard side so have made and replaced and refastened also removed port side frame and reshaped to fit better and have also refastened l am going to replace all bulkheads withe 18 mm structural ply wood as the timber has become a bit soft and doey. Lippy returned and we managed to put in the two planks in the tuck and more caulking in seams puttyed up and painted. Tracey Lea has about 200 mm of water in her bilge going to work for the next three weeks so not much will happen but may get a couple of days hear and there as we don't wont her to start drying out again so enjoy the pictures and will get back to you when we progress further down the road.
Cheers
Troy
 

Attachments

  • IMG_1531.jpg
    IMG_1531.jpg
    88.5 KB · Views: 109
  • IMG_1540.jpg
    IMG_1540.jpg
    79.6 KB · Views: 110
  • IMG_1533.jpg
    IMG_1533.jpg
    113.5 KB · Views: 101
  • IMG_1534.jpg
    IMG_1534.jpg
    100.6 KB · Views: 106
Great work, sorry you keep finding things needing work. I call it "the strawberry punnet syndrome", the deeper you go the worse they get.
I only ever heard one older boatbuilder refer to "the tuck". I thought it meant transom, but was never sure.
 
yes we are still finding little problem areas but better now then later she will be a lot better for the work being done, over 60 new ribs installed 3000+ nails and roves roved up, 200 odd hand made copper bolts made and installed 10 new cheek plates with 2 more to make, 4 new floors (across top of keel) 2 new frames and by the end 20 odd new spotted gum planks. new stern to go and a look in the bow area and replace anything in need of replacing all work but am still enjoying the challenge.
Cheers
Troy
 
Troy
Looks like it is all coming together very nicely.
Better spending the time and money now and get the hull right than worry about this later on.
Sure will give you peace of mind knowing the hull is as good as new.
Cheers
Benn
 
Yes Benn,
you are right on the money with a bit more of it to go,
hope to be home with her sooner then later budget blown to pieces but can see the light at the end of the tunnel.
Troy
 
hello,
work keeps getting in the way of this project but its an evil necessity l guess.
We where back down the boat last week roved off all the nails that where not done removed 8 ribs four either side of the stern post, these should go in pretty
quickly as only steaming required is one or two on both sides spotted gum planking has been ordered and ready to pickup on Tuesday many many timber plugs
I've made and glued in and filled up around pictures will explain.

We are being very careful at this stage not to over look anything and painting as we go then we know we are not going back over the same area,
the first three planks are done on both sides so now its just one plank at a time and not missing anything once done paint it and forget it there are planks to replace underneath chine
and up the hull above waterline. we put the through fitting back in sounder block remade and fitted what be long and shaft and prop can go in with new cutlass bearing its got a poured white metel bearing in it with a bit of slop/play that hade to be greased so any thoughts on new bearing type was thinking the water lubricated ones.

Stern and bow are still jobs to do looking forward to the stern job will be good, total rebuild new frame and ribs and planks will be way better then its current condition.
Until next time,
Troy
 
Nice work mate, slowly , slowly catchee monkey.
All looking good.
 
Hello,
well back down the boat again to tackle the ribs in the lazerette and the last few in the engine-room. chiselling out the old ribs revealed how good the timber in this boat ,
taking a large part of the day to get them ready for the new ribs punching out old nails sanding and undercoating with timber primer. In between helping lippy l was sanding off plugs
and other points on interest l finished painting the unpainted patches. Its looking great.

A new day brings new challenges, we made the new ribs cleaned out and undercoated the rebates in the chine stringer ready for the new ribs.. we started on the port side leaving the most
aft rib still in place to help planks stay in place. putting nails in where we can, planks to be removed and replaced with the spotted gum planks we went to pick yesterday but it looked to be a bigger
job then we expected so I organized transport to get it home for machining ready to take down on Tuesday next week where we will be making new planks and finishing the ribbing off with nailing
and roving them up we have put down carpet underlay, over the ribs and planks on the inside to help soak up the planks by wetting this down with sea water also put another 800 lts of water in her bilge to help
with soaking her up she would have about 300 mm of sea water along her keel now. IMG_1681.jpgIMG_1685.jpgIMG_1680.jpgIMG_1682.jpgIMG_1692.jpgIMG_1694.jpg
Until next time
Troy
 

Attachments

  • IMG_1681.jpg
    IMG_1681.jpg
    89.4 KB · Views: 124
  • IMG_1685.jpg
    IMG_1685.jpg
    97.2 KB · Views: 125
  • IMG_1680.jpg
    IMG_1680.jpg
    103.6 KB · Views: 111
  • IMG_1682.jpg
    IMG_1682.jpg
    102.8 KB · Views: 114
  • IMG_1692.jpg
    IMG_1692.jpg
    122 KB · Views: 130
  • IMG_1694.jpg
    IMG_1694.jpg
    111.2 KB · Views: 107
Progress , ain't it grand.
keep at it Troy it is looking good.
cheers
Benn
 
Thanks Benn,
yes its starting to come together now will get the planks machined and head down next week, going to try and keep the thread up to date every week fingers are
crossed for launch before chrissy
Troy
 
Relating a caulking option:
Sometime back a builder ground a circle saw blade to a 15 deg kerf and fashioned a guide to run the plank seams. This clearing the seams to a 15 deg V shape. He then cut long 15 deg wedges via ripping the material on a table saw. Then applied epoxy to the seam/wedge and gently tapped the wedge into place. Sated results is a very tight dry seam.
Anyone have experience with this techinic of closing seams?
 

Latest posts

Back
Top Bottom