10 Minute Boat Project

The friendliest place on the web for anyone who enjoys boating.
If you have answers, please help by responding to the unanswered posts.

seasalt007

Guru
Joined
Jun 27, 2014
Messages
628
Location
U.S.
Vessel Name
Aweigh
Vessel Make
Nordic Tug 42
I acquired this Blue Sea USB charger from Amazon ($12.25) with the intention of replacing an unused Perko two prong 12 v plug on my bridge console. The top port is for my iPhone and the bottom one for my Samsung Android Tablet that contains my back up navigation app.

When I removed the Perko plug I noticed that the hole in the console needs to be much bigger for the new gadget. That means a trip to the hardware store to get a 1 3/16" hole saw and taking a vac to the bridge to clean up the mess.

It proves to once again that there is no 10 minute boat project that doesn't take all day.

8899-albums297-picture1686.jpg
 
I recently installed a Whale Gulper shower drain pump. I estimated 1 hour for the job. It took me 2.5 days. However the 1 hour I estimated was on the end of the job.

Howard
 
I acquired this Blue Sea USB charger from Amazon ($12.25) with the intention of replacing an unused Perko two prong 12 v plug on my bridge console. The top port is for my iPhone and the bottom one for my Samsung Android Tablet that contains my back up navigation app.

When I removed the Perko plug I noticed that the hole in the console needs to be much bigger for the new gadget. That means a trip to the hardware store to get a 1 3/16" hole saw and taking a vac to the bridge to clean up the mess.

It proves to once again that there is no 10 minute boat project that doesn't take all day.

8899-albums297-picture1686.jpg

Yep, have you cut the bigger hole yet???

If not, you are going to learn very quickly that drilling a larger hole is going to be no fun at all. That's because you have no guide hole for your hole saw.

If I can suggest, if you take a piece of scrap stock, and attach or place it over the existing hole you'lll end up with a much happier experience.

Another method that saves allot of frustration is to draw the new hole over the old one and use your dremel to grind away material to fit.

If you are REALLY good with a hole saw you MIGHT be able to run the saw in reverse to make the cut, but that is for the highly experienced person, on soft material.

If you just go for it, chances are the saw will wanter, or catch, scratching up the surface.
 
Last edited:
This is a trawler forum...

Minutes don't exist...hours are rare, days are common, months are popular and years tend to scare some of the older trawler owners as they are too easy to count and go by too fast.
 
Thanks Ksanders. Good advice. I was wondering how to go about it without it looking like "I did it" like the rest of my projects.
 
Would now be a good time to let you know there are 12-volt cigarette lighter adapters? Some with one USB and some with two? For less than $5... try eBay or Amazon for a knock-off Chinese version. I've had mine (three of them) and all still work perfectly. The double I've only owned for a few months. The other two for over a year without issue.

I like 'em.
 
Janice 142,

No, now would not be a good time to let me know since I own the one pictured above. I have two 12 volt plugs on the bridge...one two prong Perko and one cigarette lighter plug. All my Q Beam spot lights fit the cigarette lighter plug. I don't own anything that has a two pronged end that would work on the Perko so I wanted to get rid of it. Little did I know that the hole would have to be enlarged.

On that subject, I don't have the right Dremel tool (Harbor Freight version) to do this but I do have some assorted grinder bits for my old Makita battery drill. The only worry that I have using these bits is chipping the gelcoat. Any ideas on how to be really careful?

Coarse mini sanding drum. Dremel makes little kits you can buy
 
No, now would not be a good time to let me know since I own the one pictured above. I have two 12 volt plugs on the bridge...one two prong Perko and one cigarette lighter plug. All my Q Beam spot lights fit the cigarette lighter plug.

Gotcha, and thank you for the clarification. I have considered something similar to yours however in reflection decided an adapter and multiple cig-outlets allowed me more options. I do have cigarette-lighter-itis however with 8 on Seaweed. And all are useful/used.

Proof on this page: Janice142 article What Used Boat?

Good luck with your project.
 
It's actually easy to drill a bigger hole. A second hole saw will spin on to the arbor so you end up with a hole saw within a hole saw. The inner one is the diameter of the existing hole and the outer one is the diameter of your intended hole. Done it many times and works like a champ.
 
Patemey,

So, if the existing hole is 3/4" and I need to go to 1 3/16" just get a hole saw for each size and assemble as a unit?

Will that work? Will they fit together?
 
It's actually easy to drill a bigger hole. A second hole saw will spin on to the arbor so you end up with a hole saw within a hole saw. The inner one is the diameter of the existing hole and the outer one is the diameter of your intended hole. Done it many times and works like a champ.

Thats a GREAT idea.

I never thought of that, and i've been in the "make a bigger hole" mode many many times
 
That's a good one!
 
There is no such thing as a ten minute boat project. Trust me on this..!
 
Boats use the 90/90 Rule.

90% of the job takes 90% of the time,

The remaining 10% also takes 90% of your time
 
It's actually easy to drill a bigger hole. A second hole saw will spin on to the arbor so you end up with a hole saw within a hole saw. The inner one is the diameter of the existing hole and the outer one is the diameter of your intended hole. Done it many times and works like a champ.

Yes, it works very well. The other trick is to fasten a piece of wood to the back side of a hole with screws or clamps. This allows you to offset the hole or make a round hole out of a cutout area.

Ted
 
It's actually easy to drill a bigger hole. A second hole saw will spin on to the arbor so you end up with a hole saw within a hole saw. The inner one is the diameter of the existing hole and the outer one is the diameter of your intended hole. Done it many times and works like a champ.


That is some GREAT information ?


1983 Present 42 Sundeck
Twin Lehman 135's
✌️
 
Kudos to Patemey for the ingenious idea for making big holes out of little holes. Kudos also to Janice 142 for suggesting that I buy a cigarette lighter adapter USB charger and forget drilling a bigger hole in my boat.

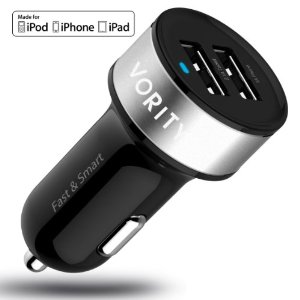
Both are great ideas but rather than spending more money than the plug cost on hole saws and mandrills, I am going to Walmart and buying the $2.97 version that also has two power outputs.

8899-albums297-picture1695.jpg
 
Last edited:
The Walmart plug is only available online and would take a several days in transit so I ordered this one for $11.99 from Amazon Prime for Tuesday delivery. Even though I like the flush mounted Blue Sea plug better, I am returning it tomorrow.

8899-albums297-picture1696.jpg
 
Ha, this reminds me of a time when we were in the islands and the sump box decided to stop working. 10 minutes I said, 4 hours later.
 
I do like the USB cig adapter!
The only 10 minute project I can remember is changing cabin bulbs over to LED replacements.
 
I think the two saw idea is great but you will probably need to add a washer to make the smaller saw stand higher than the big one.
 
Use a hole saw

Janice 142,

No, now would not be a good time to let me know since I own the one pictured above. I have two 12 volt plugs on the bridge...one two prong Perko and one cigarette lighter plug. All my Q Beam spot lights fit the cigarette lighter plug. I don't own anything that has a two pronged end that would work on the Perko so I wanted to get rid of it. Little did I know that the hole would have to be enlarged.

On that subject, I don't have the right Dremel tool (Harbor Freight version) to do this but I do have some assorted grinder bits for my old Makita battery drill. The only worry that I have using these bits is chipping the gelcoat. Any ideas on how to be really careful?
Grab apiece of scrap plywood that you can clamp or hold firmly over the existing hole. Using a hole saw the proper size for your new outlet , drill a hole in the plywood with the hole saw. To drill the new hole for your outlet, remove the pilot drill from the hole saw and use the drilled hole in the plywood scrap for a guide for the hole saw as you drill the new outlet hole. it would be nice if you could clamp the plywood hole guide in place, but a couple of spare hands will work. If you can clamp the plywood scrap you'll find very little chipping on the rim of the new hole.
 
Taping the surface reduces chipping to regardless of new hole or enlarging an old one. My favorite trick is using old, well worn hole saws for cutting into a finish such as fiberglass. Worn out teeth are not near as "grabby" and prone to chipping. Scary's idea for a template is one I've used with good results before.
 
Taping the surface reduces chipping to regardless of new hole or enlarging an old one. My favorite trick is using old, well worn hole saws for cutting into a finish such as fiberglass. Worn out teeth are not near as "grabby" and prone to chipping. Scary's idea for a template is one I've used with good results before.


You can also run the teeth backwards to wear through the gel first before forward into the laminates.
 
You can also run the teeth backwards to wear through the gel first before forward into the laminates.


:thumb:
That works well too but as I cannot seem to throw any tool blade or bit away it's nice to find ways to justify keeping them :)
 
I've inserted wooden plugs into existing holes just tight enough to jam in there fairly tight. Then start drilling the larger hole size running the hole saw backwards. Bonus is you can center the hole differently with this technique too. This is how I did it when installing a new helm on my 16' Glasply runabout, as I previously posted on the Glasply forum:


Here's the original hole from the Morse steering setup (with a wooden block I jammed in there):


That hole is 2.25" in diameter, but the ROTECH setup requires a 3.25" hole. It also takes three mounting bolts in different positions than the existing three. So what I did was I cut that block of wood and jammed it into the old hole so my hole saw had something for the mandrel bit to go through.


I stopped after I'd cut through the fiberglass covering the plywood dash to take that picture. I wanted the new wheel to be slightly inboard (to better align with the seat--still not perfect, but closer) and a bit higher than the old one.

Worked like a charm. Here's the hole with a hole:

 
Last edited:

Latest posts

Back
Top Bottom