Monk 36 Refit Update

The friendliest place on the web for anyone who enjoys boating.
If you have answers, please help by responding to the unanswered posts.

Woodsong

Guru
Joined
Oct 7, 2007
Messages
1,630
Location
USA
Vessel Make
Bayliner 4550 Pilothouse
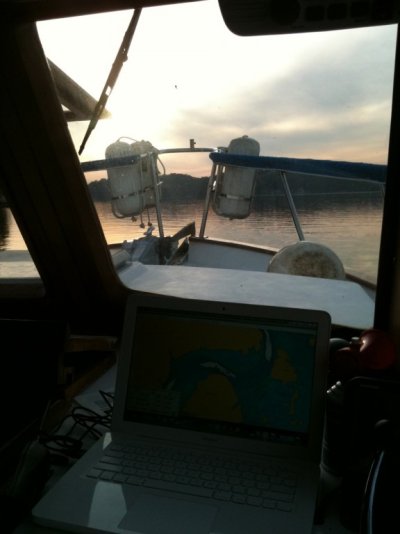
I thought you all might be interested in hear how the refit process is going on our "new" trawler.* We closed on her about 8 weeks about and we hauled the boat out right at about 30 days ago.* bottom was sanded down, blisters ground out/opened up, epoxy filled, ready now for new paint.*
We had a soft spot on the foredeck that wasn't super noticeable was was definitely there.* As well, the bridge deck had a sizeable soft spot on the aft portion of it behind the helm seating.* The foredeck was opened up last week, old coring removed, and new synthetic coring installed along with new fiberglass.* We thought about going back with marine plywood or something for the coring but synthetic is so much better and a lasting fix so we went that route.

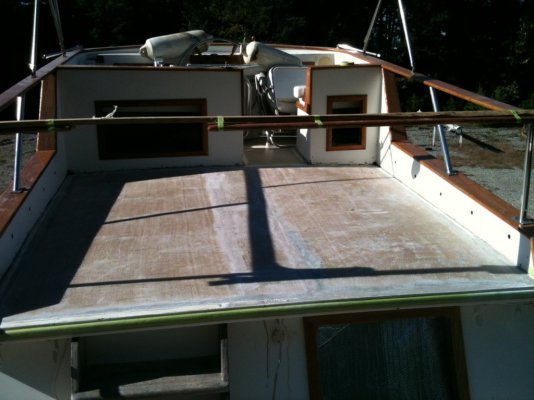
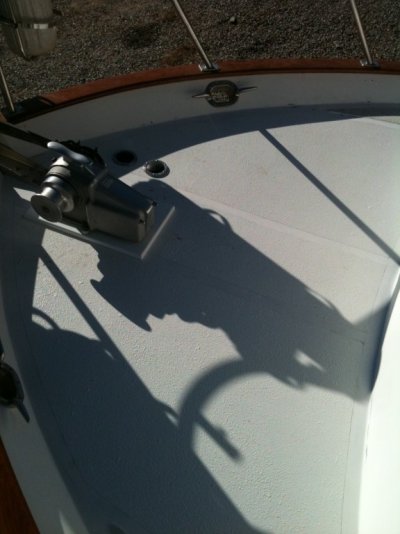
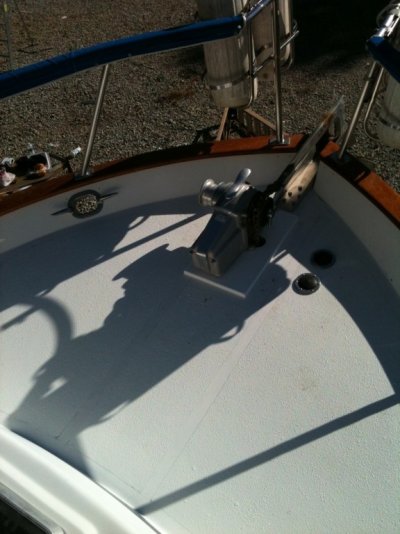
Picture from the other week when they first cut open part of the foredeck:
img_2351_0_f6a5e47c045ca30cd39e1bee74d7a722.jpg


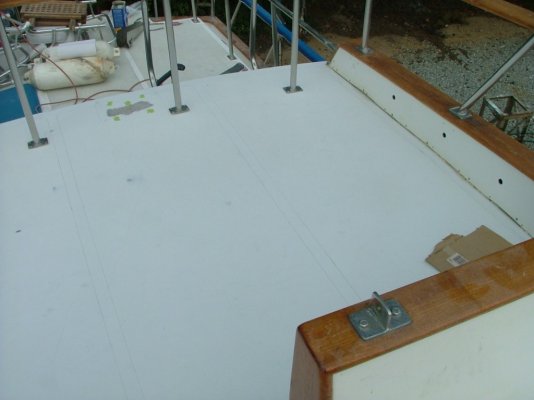
Pictures of the foredeck after a few layers of new glass:
img_2351_1_8e53ebd8608786dd91b4059840d9e9ad.jpg


img_2351_2_063e92e3643cc450081b9016fc22a471.jpg


img_2351_3_5ca4948fba8c17fb09c61419c8c3b0a5.jpg


img_2351_4_07bb434dfd2e68316e10aa39107b664d.jpg


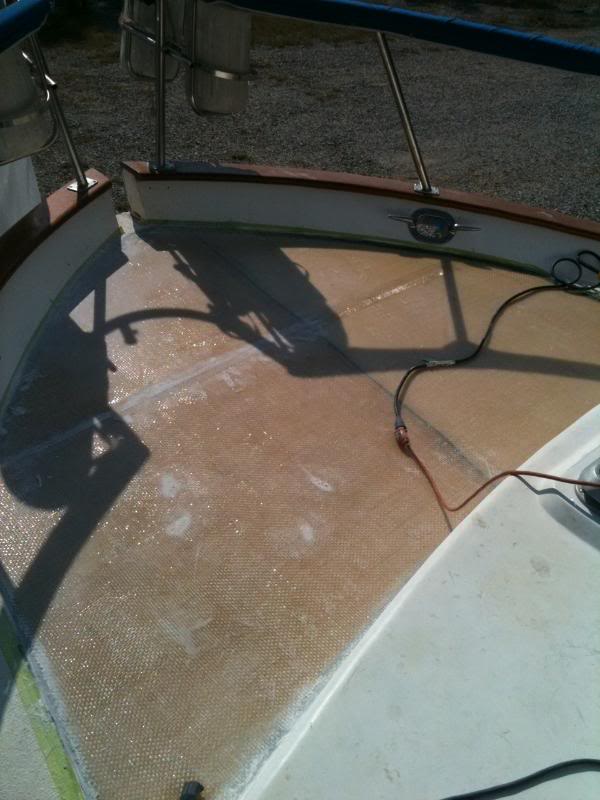
The coring in the foredeck was highly delaminated in the center section just behind the windlass.* Outside that area it was probably ok but we had ordered enough synthetic coring to do the entire aft bridge and entire foredeck and I didn't want to do it half way so we opened up the entire foredeck to make sure we got it all.* The pics above are from last week- they've added a few more layers of fiberglass since then and about ready for the last steps.

The foredeck was ripped open yesterday, about 2/3 of the aft portion.* The remaining 1/3 will be opened up after the first 2/3 is recored and some glass down so that there is someplace to stand while working!* :)
The bridge coring was pretty shot...from what we can tell it appears to have been due to poor sealing where the mast ties into the aftmost portion of the bridge deck.* This was mostly, it seems, due to poor sealing at some wiring some previous owner had drilled through the deck.* Luckily from the built in seating forward the coring is good and solid and dry and no delamination at all so we did not (thus far at least!!) have to remove the flybridge.* I went up today to check in the progress.* At noon they were just about to start installing the new coring.*
Some pictures....
Aft bridge, port side:
img_2351_5_e908cebc2aa574654e2cac7e03141d99.jpg


Standing on the trunk deck over aft stateroom, facing forward towards bridge.* Holes in foreground are where the mast goes.*
img_2351_6_0e27be581ab61a612fc401b9149094c8.jpg


On bridge, facing aft, standing next to built in seating.* Piece of the new coring visible in foreground.
img_2351_7_20ee3b93c0dfc2f59602ebe1b6a4957f.jpg


img_2351_8_cdad80ad9e4614dc81ed400a1cc8d519.jpg


This is the underside of the aft bridge fiberglass skin that was cut out to get to the coring.* The old coring, as you can see, consisted of small 4x4 squares of 5/8" plywood.* The square hole in the center area of that deck was test hole that was cut to confirm thickness of the coring, etc.
img_2351_9_a4758b6556ebaf5a0096a9d28353bfbd.jpg


So far no real surprises which is good.* We should be ready to splash her again in about 2 weeks.* Between now and then all the fiberglass and non skid should be finished, bottom with 2 coats of paint (going back with the blue like she used to have which I think looks good on her instead of black), hull buffed from caprail to waterline, and topsides fully prepped for painting (actual painting we'll do in the covered slip as a roll/tip job since NO WHERE on lake lanier allows spray!!).

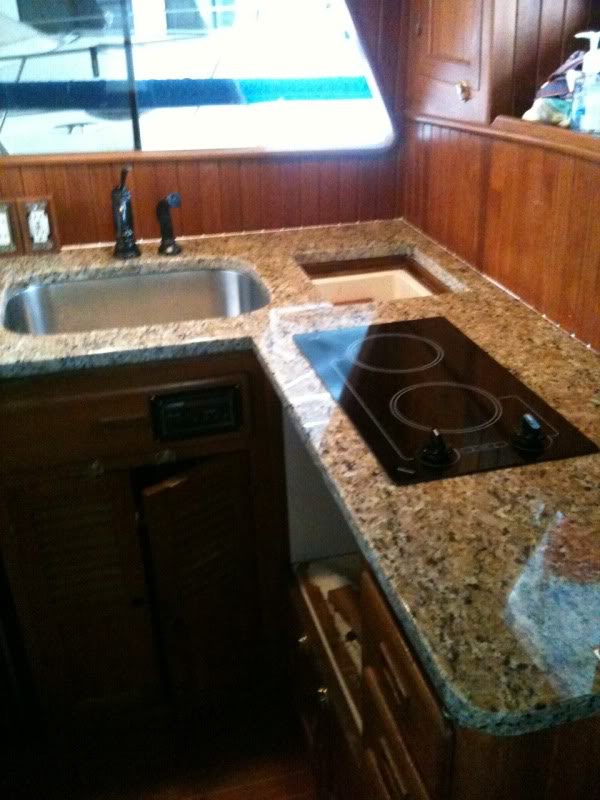
We're also doing some electrical work and will be installing the granite countertops after we resplash, along with doing new canvas/eisenglass to enclose the bridge.*

oh, I think we may be changing her name too but we are not 100% decided on that yet.

Stay tuned!

*
 
I too bought an old Monk (hull 48) in June. *Was the core in your deck rotten or just wet?* Was it due to improper holes being drilled into the core?* Since you don't have teak decks I'm wondering how water got into the coring in the first place.

Have you discovered any other problems the surveyor didn't find?*
 
Hi Woody!!!

My boat has been kept under covered slip for about the last 10 years. The soft spot was not bad on the foredeck and guests probably would not have noticed it but i could feel it and wanted to correct it. I think it was due to improper installation of the windlass. The windlass was not the original model...not sure when it was installed, but definitely not original. When we pulled up the current windlass we found the old holes from the original windlass. They looked like someone had tried to seal them at some point in time but the caulk had given way so I think it came from there.
Regarding the bridge deck....I think it was the penetrations at the mast, causing water to seep in and migrate up to the middle of the brige deck over the years. This too, I think, was due to additional penetrations by a previous owner trying to install some more wiring to run up the mast for some lights or something. I don't think it was something from the helm area b/c the coring and decks from the back of the built in bridge seating forward feels solid as could be and edge where we cut revealed very good and solid coring there. In otherwords, we slightly overcut the area so that we were sure to get all the trash out. Also, on the bridge over the galley area, they had installed a 12V vent fan. i don't think that is standard on the monk and I certainly don't understand the point of it b/c you can just open the window at the galley (we're not in the PNW so it's not raining 24/7). We've not cut that part of the aft bridge deck up yet though I am sure that also played a part in it. When we recore we will remove that vent and eleminate that penetration.
Here is a picture of that vent- you can see it coming through the bridge deck on starboard side just behind the folding chair you see in the picture:
img_27264_0_f52c263394c430787ffee4440d6dfa73.jpg


Also, no other issues found after the survey.* We knew the decks had the issues when I bought the boat about 8 weeks ago so this is all part of our planned refit process, albeit the first major step in it.*

-- Edited by Woodsong on Wednesday 29th of September 2010 09:48:18 PM
 
If it's not too improper a question - can you give us an idea of the magnitude of the cost for having this work done?* I know there are a zillion variables and YMMV, but I'm trying to get some reference points to use to make the decision on trying to do the work myself, writing the check or just living with soft decks.

Currently, I'm doing what I do best - nothing!
 
Lurker,
No problem sharing info. We are doing a fair amount of work to our new ride. I got several quotes to do the fiberglass work. We are on a large inland lake outside of Atlanta, GA...reasonably qualified workers available as long as you stay in the box. This boat is a bit out of the box for them (mostly sea ray express cruisers, carvers, etc.). I got quotes from several yards over on the TN River that have a solid reputation and contemplated having her hauled to the River (about 2 hours away over land) and have the work done there. Luckily though, we have a fiberglass guy here locally that is truly excellent. I have never heard a single boater say a bad thing about him and they have all been very pleased. Just to do the fiberglass work which consists of removing old coring, recoring, and putting humpty dumpty back together again for both the bridge deck and foredeck, the quotes i was getting from the firms on the TN River were for around $11,000 to $12,000. Our local guy, who again is really extremely skilled but works with low overhead (van and an assistant really), gave me a bid of $5,000 to do the foredeck and bridge deck repairs. I thought that was a heck of a good deal, given his strong reputation and quality of work and he is right on the lake. He also is doing the blister repair and bottom paint for me, buffing the exterior hull from caprail down to waterline, and is prepping the topsides for painting in the yard. We will paint her in the covered slip after I resplash...he may possibly due the actual painting (which he is also great at IF a spray job but I've not seen a roll/tip job of his yet). If he doesn't paint I've got another guy that i can get to paint the topsides that has done quite a few roll and tip jobs on the lake. I've looked at several of those boats....one was acceptable but not great, the other was amazing- absolutely looked like a factory spray job. He admitted before hand that the one job that was so-so was their worse job they ever did but they did it uncovered and had to deal with the weather, dew, etc.

Needless to say I am going to be spending some money to get this old beauty back to her glory but it will be worth it! *


P.S. almost forgot to add- the yards on the TN River were quoting those prices using cheaper marine grade plywood and the price and guy I went with here locally is using synthetic coring so no more issues with coring regardless if there is ever a leak again or not- it simply will not rot at all. *This is the product we are using for the new coring: http://www.defender.com/product.jsp?path=-1|10918|16458|309319&id=21995


-- Edited by Woodsong on Thursday 30th of September 2010 07:55:10 AM

-- Edited by Woodsong on Thursday 30th of September 2010 07:56:20 AM
 
Thanks, Tony.* That's all good data to help me figure out my options.
 
Woodsong wrote:

Needless to say I am going to be spending some money to get this old beauty back to her glory but it will be worth it!**
One reason the Marine survey business is so difficult. Your boat will be as new when you're finished.
She is going to be around longer than you. *

Sometimes you have to draw*the line on how much is enough. I feel extremely fortunate when my repairs allow me a season without repairs. Or a season when every system works as intended.

In the same regard I do all of my repairs or refits myself.** As I have now acquired the skills needed to work with the main component of my vessel i.e. polyester resin and fiber glass.

There is a great sense of satisfaction to fix something on something that consumes my life. Like my boat.

SD

As an afterthought I did the same as you on my boat. Once the glassing was done rather than risk any penetration of the new deck I fabricated a pulpit of marine grade plywood and glassed it onto the surface of the new deck. I embedded ss nuts between two layers of the 3/4" plywood to bolt my bow roller to in this way avoiding any penetration of the new deck it will never leak again.
* Any tiny place. Water gets in . The universal solvent. I have applied this principal to any attachments to my deck or hull. From rail bases to stanchion supports.

SD


-- Edited by skipperdude on Thursday 30th of September 2010 10:06:43 AM
 
I too had the galley vent added.* Ours is more like a clamshell facing downwards.

I'm going to hit the hip for some repairs as well, but I planned on a certain amount.

Enjoy your boat!* We're heading off for a week with a hopefully rebuilt tranny.
 

Attachments

  • scoop.jpg
    scoop.jpg
    60.8 KB · Views: 94
Woody, that is a MUCH more intelligent place to put a vent for the galley than where mine was located and a lot more water tight! Now that I am removing mine though I will have a 4" hole in the headliner. This is causing me to debate whether to just replace that one panel with headliner material or perhaps swap the salon headliner panels out with wooden beadboard panels stained to match the interior teak! :) I think that would look great but I am a little worried it may be too much wood in the salon as well as possibly making the salon echo too much.

Do you carry a dingy and motor on yours? I have weaver snap davits and have to figure out where/how to mount a plate to put the motor on. They make prefab plastic ones or I can easily make one out of wood but the place I would really like to mount it is on the aft portion of the bridge handrail just to port of the steps up to the bridge. THat portion of the handrail is a wooden cap which makes fitting a mounting plate difficult. I may have to adjust my location to one of the rails at the trunk deck that are 100% metal.
 
Woodsong, seeing you already have a 4 inch hole in your galley head-liner, why not put one of those Nicro solar vents into it. They are about that diameter (the part that sleeves into the roof - easily enlarged if necessary), and once properly fitted they don't leak at all. Ours has handled absolute deluges and water never comes in. They actively pull fumes, steam etc out, and they have a battery powered version which last all night as well, quietly ventilating.
For my outboard I have one of those plastic mounts which clamps onto the standard stainless rail support of the stern rail, and it works well, and can swivel out of the way to in-line with and under the rail when not in use. Works well.
 
Woodsong wrote:
Do you carry a dingy and motor on yours?

Funny you should ask.* I have davits, but one of the winches is rusted out and needs to be replaced.* I still need the engine mount that allows it to pivot when the dinghy is lifted sideways.* My dinghy is inflatable and has a fold down transom, so when not in use I deflate it and put it into a handy storage bag, and the motor goes into a garage near the marina.
 

Attachments

  • dscf1721.jpg
    dscf1721.jpg
    165.8 KB · Views: 97
Woodsong, I too like the idea of synthetic coring and would appreciate some information on who makes it and who sells it.
Mike
 
Synthetic coring is the only way to go in my opinion...you pay more up front but in the long run, MUCH better. I posted the link to what we used earlier in this thread but here is that same link again with the product name and pricing:

This is the product we are using for the new coring: http://www.defender.com/product.jsp?path=-1|10918|16458|309319&id=21995


And a few more pics for enquiring minds.....
foredeck glass work is getting near done. *All the glass is in and they put down the first 2 coats of new gelcoat down. *As well,*the new synthetic coring on the bridge has been put down, along with a bunch of layers of glass, and while I forgot to take a picture of it before I left, they got down one coat of gelcoat up there as well.
Some pictures attached.


As well, got the shaft reset from where it had walked back about an inch or so just before haul out, bought a "new" gas tank and fuel line for the dingy (stolen off our dock just before haul out!!), as well as ordering a new bow roller to fit an adequately sized CQR that I just bought off craigslist, not to mention ordering a new swim ladder since old one only went into water about 6 inches, and a mounting bracket to mount the dingy motor on the trunk deck! *:)


-- Edited by Woodsong on Wednesday 6th of October 2010 05:34:00 PM

-- Edited by Woodsong on Wednesday 6th of October 2010 05:36:15 PM
 

Attachments

  • gelcoat 2.jpg
    gelcoat 2.jpg
    99.3 KB · Views: 98
  • gelcoat 1.jpg
    gelcoat 1.jpg
    92 KB · Views: 120
  • bridge glass 4.jpg
    bridge glass 4.jpg
    210.7 KB · Views: 104
  • bridge glass 3.jpg
    bridge glass 3.jpg
    150.6 KB · Views: 106
Woodsong:* She's looking good.* The decks are beautiful.* What are you going to do for non-skid.

Larry/Lena
Hobo KK42
La paz, BCS
 
Another update:
Major fiberglass work was completed last week. Prep to paint topsides is about 95% done...sanded, etc. Bottom paint all done. We were supposed to splash back in Lake Lanier last Friday to move her to the marina we were going to keep her. if you are not familiar with Lake Lanier, it is a very large inland lake outside of Atlanta, GA. Great place to boat with the only drawback that the lake is land locked! :(
Things work in a funny way though. We have been on a waiting list at a marina we liked on the Tennessee River in Chattanooga for the last 2 years. I stayed in touch with them regularly but there was never a slip open. So last Thursday I get a call from them saying they now have a slip available for us, literally the day before I was going to resplash our boat back in the lack. I put everything on hold to see what we wanted to do. I have been growing frustrated by the lack of capable technicians to help with some of the work, no spray booth to paint the topsides, etc. etc. So, basically.....

Hauler is scheduled for tomorrow to take our boat up to Chattanooga to her new slip! The drive time from our house is only about 10 more minutes to Chattanooga vs. Lake Lanier, although the mileage is about twice as far to chattanooga (difference being all highway to chattanooga and windy backroads to Lanier). We will be able to finish our refit work there with better mechanics/yards. We will now be poised to cruise anywhere we want through the locks and can take her to the gulf, great lakes, etc. etc. It's been a dream of mine to have a cruising trawler on the river system that we can access easily from our land home and yet still be able to cruise extended distances. We are VERY excited about this move!
Here are some pics from last week....the nonskid has been put down already but haven't gotten pics of it. *The dots/discolored area on the aft bridge deck is where the mast goes.
 

Attachments

  • dscf3321.jpg
    dscf3321.jpg
    229.9 KB · Views: 98
  • dscf3314.jpg
    dscf3314.jpg
    110.1 KB · Views: 97
  • dscf3313.jpg
    dscf3313.jpg
    111.7 KB · Views: 103
Well, a lot has been happening the last few weeks! As you may have seen in my other thread, we had our boat hauled to the TN River from Lake Lanier (Atlanta) on october 22nd. This is a big move for us as we are now in navigable waters and constrained only by time and money. Since we had our Monk hauled up there, we have been going through her mechanicals. Full service on engine and generator...oil, impeller, coolant, etc. checked shaft alignment, all clamps/hoses checked, fuel tanks pressure tested to confirm NO LEAKS, etc. The previous owner had told me he was afraid the port fuel tank was leaking since there was what appeared to be about 15-20 gallons of diesel sitting in the bilge. However, only evidence I saw of any "leaks" were some staining around the inspection ports. His many gallons of diesel fuel I quickly determined to be 99.99% water with just a sheen of diesel on the top of it. During sea trial, I found a diesel leak at one of the injectors and one fuel line which was an easy fix. Also found a leaking fresh water system fitting so that was fixed. Now- no diesel in bilge and no water in bilge for a long time. However, I was concerned enough that I did not want to fill the tanks without testing them. So- we took the tanks offline over the last week and pressure tested both after doing a new gasket at the leaking inspection ports. NO LEAKS! Can I get an AMEN??!! :)
Talk about a major cost savings!!!
My wife and I brought the kids up to chattanooga yesterday to see the replicas of the Nina and Pinta docked in downtown on the waterfront. After that, we hopped over to the boat and could not resist going for an evening cruise. It was a short little cruise of only 45 minutes or so since it was getting late and sun was setting and didn't want to be in new waters at night just yet! :) It was great to take the family out for a few minutes and watch the sunset. *It was also my first time using my macbook for GPS via our new GPS USB puck and the MacENC software. *It worked great!
Attached are some pics of the finished foredeck with the new non-skid that we had done before leaving lake lanier and a few pics from our little cruise yesterday. * *


-- Edited by Woodsong on Tuesday 2nd of November 2010 11:32:30 AM
 

Attachments

  • sunset wake.jpg
    sunset wake.jpg
    65 KB · Views: 100
  • underway 1.jpg
    underway 1.jpg
    79.5 KB · Views: 104
  • bow sunset.jpg
    bow sunset.jpg
    59.6 KB · Views: 89
  • bow.jpg
    bow.jpg
    44.9 KB · Views: 100
  • nonskid 2.jpg
    nonskid 2.jpg
    91.7 KB · Views: 88
  • nonskid 1.jpg
    nonskid 1.jpg
    108.6 KB · Views: 102
Hey Woodie,
That last picture is WONDERFUL! Do you recall how fast you were going when you took it? It's always great to get a difficult job done. Still looking at that 36 Monk but I'm getting my feet cold. It's a good time to buy a boat but I'll need to sell the Willy and that may be hard to do so the advantage is very small. It's fun to go along w you on your project. Keep us "posted". ha ha
 
I was going slow....about 1,000 to 1,100 RPMS so 5 knots? Just putzing around for the evening, not that our trawler goes much faster than "putzing"!! :)

Nomad, the monk 36 has a great layout and good systems access and a solid boat- we are loving ours.
 
Granite tops are now installed in the galley!! Still a few things to do to wrap it up...install microwave below the cooktop, put switch plates back on the outlets (had to move them to get granite in), and get the granite cover piece that goes over the storage/garbage can spot in the corner that is open in the pic (they brought it but did not polish the edges so they had to take it back to the shop). I think it looks a LOT better and getting rid of the fiddles around the edge of the old countertops and creating a solid counter all the way across has given us a lot more counterspace and it looks better I think.
Pics attached!
img_32835_0_f186a344576f371ea67cf068aaa89736.jpg


img_32835_1_e4d5ea64be62bcf3a9f9ff373863ea25.jpg
 
Wow! Does that ever pop!
Was that a single piece? If so, how did you manage getting it through the door?
How are you supporting the lid for the little cabinet in the corner?
I am redoing my own countertop with granite and I asked the supplier to bevel the edges of the lid in the corner, so that it would fit flush. the guy wouldn't cut it without having me come down to the shop and go over that part. I have the pieces now, but I haven't started putting it all together just yet. This is part of a much bigger order of granite and I need to get the bathrooms at home done before I can tackle the boat.
Your choice of granite is very similar to what I and my wife chose for 2 of our bathrooms at home. The boat gets a nearly white countertop.
 
Looks really great Woodsong! Did you have to compensate for the extra weight? Was 2m an option vs the 3m? I wonder if cracking would be a problem with the flexing of the boat if one used the 2m? Could you compensate with more rods epoxied in?
 
Woodsong,
I see you have two sets of outlets there.* If it is like mine, one is 120V AC, and the other 12V DC.* Do you use your DC outlets for anything?* I'm thinking of getting 5 amp inverter for laptops etc and maybe a small flatscreen TV.*

Woody
 
Glad you all like it! We're excited. Removing the fiddles around the old formica tops and the old stove so that we could create continuous and uninterrupted countertops made BIG difference in our tiny little galley! Most of the Monk 36's either have an undermount fridge just forward of the sink or a full size fridge far to starboard of the cooktop location. Both those configurations have decent counter space. Ours has a a full size fridge just forward of the sink....great for fridge/freezer space which we love, but bad for counter space! :) So these tops converted our very chopped up galley with virtually no counter space to being able to function much, much better. We struggled over the propane/electric debate but in the end I think this configuration will really meet our needs better as well as our cruising style. We have a very large 8KW generator (well, large for a 36' trawler anyway) so we have plenty of generator power to run everything and I like how much it opened up the galley, created the most counterspace, and I think it gives a nice classy yet modern look.

Keith, countertop was made in 2 pieces. There is a seam between the sink and the stove.

Daddyo, we went with the thicker 1.25" material. I was a little concerned about the weight causing a list to starboard where the galley is but reality is that after the cut outs for sink, etc. we are only talking around 200 lbs. Not light per say, but definitely not an excessive load for the boat. I checked the boat from a nearby 80' slip and it appears to not have created any list at all. The Monk 36 tends to actually list to port due to all the huge storage lockers in the aft stateroom on the port side unless an owner is conscious of how much junk they put in those storage lockers, so if anything and as luck would have it, the weight of these tops should help counteract that attribute on our Monk.
I am not too worried about the tops cracking...they are 1.25" thick and fully supported entire span as I left the old 1/2" plywood base/formica covered tops in place due to them being glued in too good to remove. They should help support it and reality is that they cover a very small area. I figure the marble slabs in both heads at the vanity sinks haven't cracked in all these years so hopefully we'll be ok...I hope to not test them anytime soon in 10' seas!! ;)

WOODY- good eye- yes....outlet to left is 12V, outlet on right is 110V. *The 12V outlet is not working...gotta trouble shoot it.

We're pretty happy with the new countertops- glad you all like them!!

I would be remiss if I did not mention that Trawler Forum member MOONSTRUCK helped me procure the granite folks since I am new to the Chattanooga area and he's got contacts! :)

Stay tuned...next big project...remodeling the kid's stateroom from a double bed to bunk beds or really, a pseudo-vberth. :) After that- taking her down the river to get topsides painted in January (was going to do this month but got too busy at work).


-- Edited by Woodsong on Friday 10th of December 2010 10:59:51 PM
 
Back
Top Bottom