New hatch

The friendliest place on the web for anyone who enjoys boating.
If you have answers, please help by responding to the unanswered posts.

Lollygag

Senior Member
Joined
Jan 4, 2012
Messages
259
Location
USA
Vessel Name
Lollygag
Vessel Make
1979 42' CHB Europa
Well, I finally did it. I waited as long as I could and then procrastinated for a week and then I cut a hole in my boat. A lot of people weighed in with opinions and suggestions and good wishes and I thank all of you. I attached a few pictures to document the project so far.


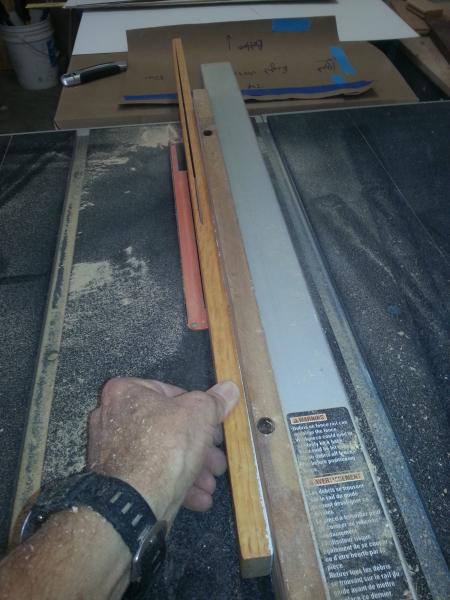
This is the guide block on the right side. I put them down with 1" pin nails through 3/4 wood. This let them stick in the cabin sole just enough to resist side pressure and still pull out easily.

2466-albums286-picture1590.jpg


This shows the guide block on the other side. By now I'm sweating. Gone too far to stop but really wondering what's wrong with my thinking.
2466-albums286-picture1591.jpg


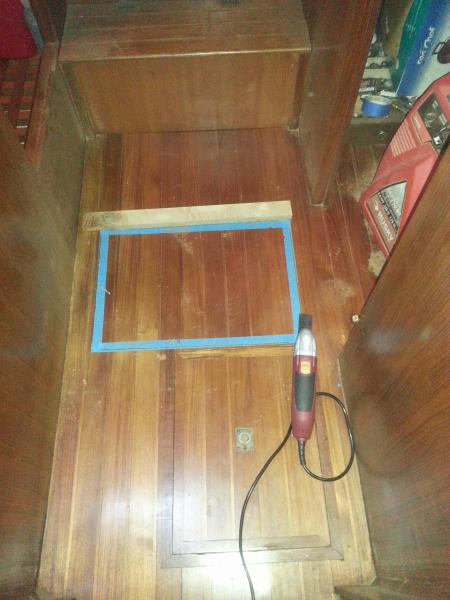
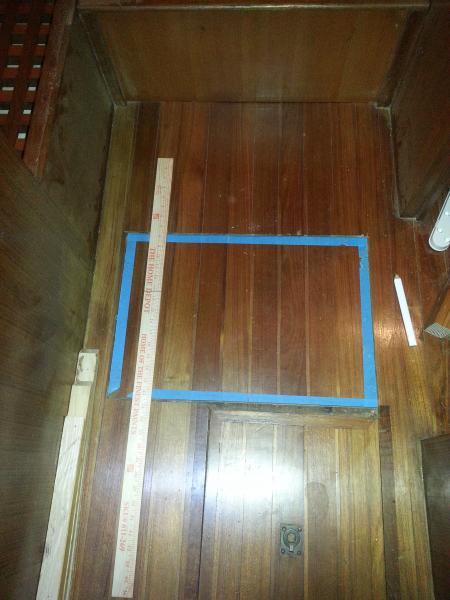
Then it's across the passageway. I set the blade about 1/6 above the beam. (used the smaller hatch as a guide) I knew I might have to finish it with the vibrating tool
2466-albums286-picture1592.jpg


This is the vibrating tool. I'm sure it has a real name but it's a vibrating tool. I used it to finish the corners where the circular saw couldn't go. And I used it to cut the final 1/16" the circular saw didn't get. Well, almost.
2466-albums286-picture1593.jpg


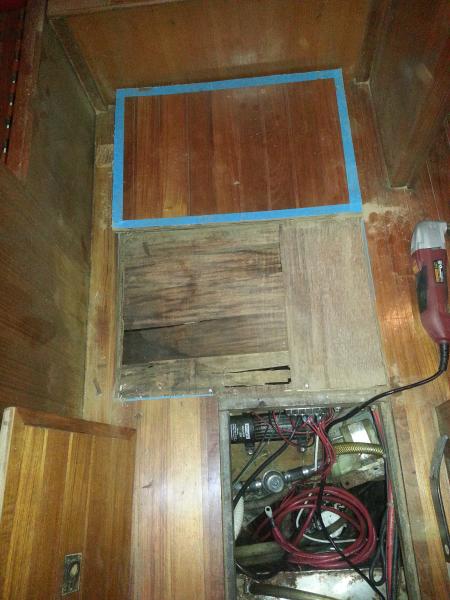
This is the new hatch reluctantly coming up. It took another couple of minutes with the vibrator (oh baby) and a couple of whacks with the deadblow hammer and I could pull it all up. Almost.
2466-albums286-picture1594.jpg


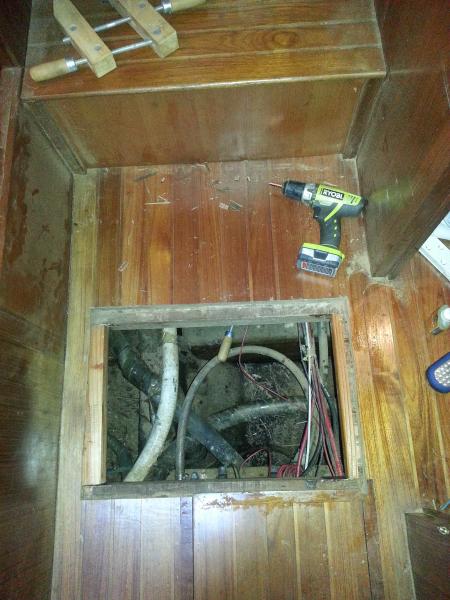
When I got it up I had a pad of delaminated plywood. One 1/16" layer and about a half cross layer. Another couple of minutes with the vibrator and I had a hole in the boat. If I had lived a better life this would have been neater and I wouldn't feel guilty about cutting up my boat.

2466-albums286-picture1595.jpg


Oh god, now that I have access I wish I didn't
2466-albums286-picture1596.jpg


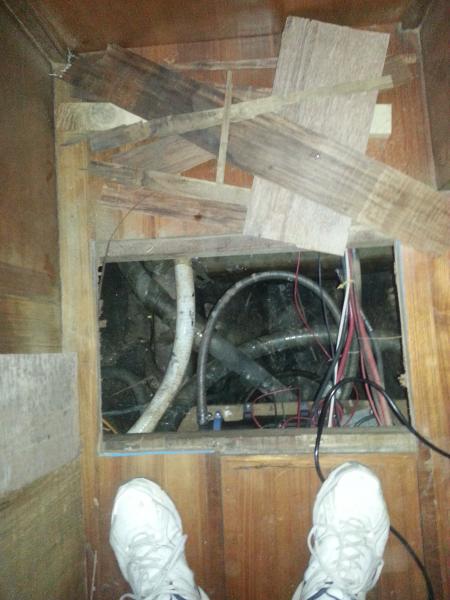
Is this Calcutta? It's sure as hell a black hole.
2466-albums286-picture1597.jpg


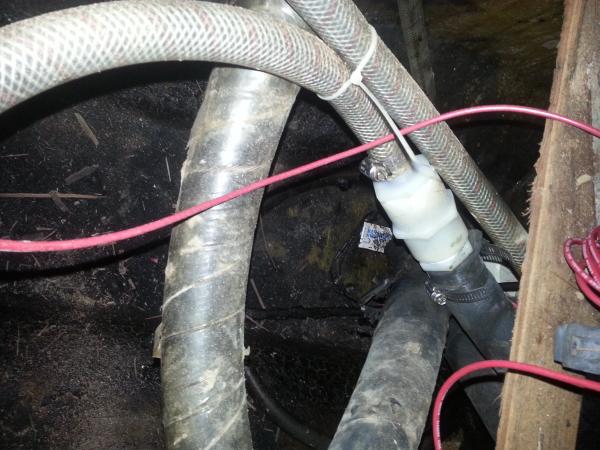
Full of interesting plumbing. Like this reduction from 1 1/2" sanitation hose to 1" water hose to a pump to drain the tub. I'm going to install a 20gal grey water holding tank and have the showers and tub drain to it. Then everything will drain by gravity and the tank can be pumped overboard. I think overflows from the shower caused the delam. I'll know more when I get there

2466-albums286-picture1598.jpg


This is looking straight back at the lectra-san system lurking under the passageway steps. How did they get that in there? The godless heathens must have used a child. It's still 18" to that fitting!


2466-albums286-picture1599.jpg


You can see the delaminated plywood under the guest head. The one where the shower leaked through. I'll have to get back there and check for rot but so far the boat is remarkably dry. Any suggestions on how to deal with the delamination are welcome
2466-albums286-picture1601.jpg


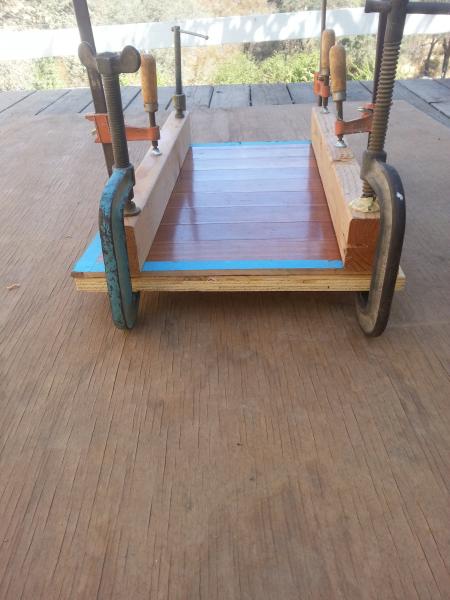
This is the hatch plug. As you can see, it's really delaminated. I'm going to strip off the plywood and leave just the top 1/16 layer to hold the teak and holly together. Then I'll bond it to a piece of 3/4 plywood that I sand the top 1/16th" off. I'll square it up and band the edge with a wear layer. I'll find a hatch pull and route out a space in the center.
2466-albums286-picture1602.jpg


Once I have the hatch finished I'll use it to square the hole and make a good fit. I'll route out a 3/4 X 1/8" lip and finish it with hardwood to match the existing hatch. More later.
 
Last edited:
Well begun is half done ~ Mary Poppins :)

The hardest thing to do is bringing yourself to make the cut. It'd be the same for me. Was that Electra San possibly installed through a hatch under a berth?
 
Thanks for sharing Apophyge. I have a similar project on the to-do list. We have a down galley and the area under the floor in that area could be a huge convenient storage area. Good luck completing your project.
 
I have crawled all over this boat and cannot, for the life of me, find out how they got in to install that thing. It may be possible for an anorexic midget to crawl down the hatch under the v-berth, slide alongside the water tanks, crawl over the stringer and be in a very dark place. I'm not fat but I'm not anorexic or a midget and I can't get in there. This will work out better in the long run but, yeah, making that first cut was painful!
 
That hurt just looking at the pics.I'm not sure I could o that job myself.
 
new process details

I brought the hatch plug home to work on it. I needed to square it up and cut some edge banding. Tomorrow I'll take it back to the boat and line the teak and holly up with the cabin sole where I cut it out. Then I'll use the edge banding to determine where to cut the plug and the hole so I have 1" between them. When I add the edge banding it should all fit like a glove and look good.


This is the hatch plug, stripped of the delaminated plywood and glued to a piece of 3/4 ply.
2466-albums286-picture1603.jpg


Just an end view showing the new thickness.
2466-albums286-picture1604.jpg


This is a picture of the plug being squared. I'm not a cabinetmaker so first cuts are close but not spot on. A tablesaw makes this easy for the plug. Tomorrow I have to square the hole and that will be tougher.
2466-albums286-picture1605.jpg


Trimming some white oak to band the edges of the hatch. I used oak because it's a hardwood and will not tear up to much with continued use of the hatch. And because I had it. Saving another $10 is always good.
2466-albums286-picture1606.jpg


Here are a bunch of edge banding pieces I'll use to make the final measurements.

2466-albums286-picture1607.jpg


I'm trying not to rush this because the cosmetics mean as much to me as the access. I plan on having this boat for a long time and really don't want to have to explain a bad looking job for the next 20 years. I'll try to post more tomorrow.
 
There's a certain combination of fortitude and faith that one must have for hatch cutting. When you get the hatch cut, there's an equal amount of "Oh God, I can't go back now" motivation that will lead you to a very good result. Once the hatch is done right, you'll be forever glad you did it.
 
this thing, tf, is driving me nuts. I lost my message twice so far. time for some adult recreational beverage, or whatever.
 
Nice progress. Keep us updated. I like the story/ picture approach. Very informative!


1983 Present 42 Sundeck
Twin Lehman 135's
✌️
 
Great Work Keep the pics flowing as you progress
 
Hatch

I'll let the pictures do the talking:


With the plug back in the hole, I lined up the teak and holly. Since I squared the plug it didn't line up with the sides of the hole so lined up it looked cockeyed.
2466-albums286-picture1611.jpg


Using the plug sides as a guide, I marked the new cut lines for the hole. Since i got it mostly right the first time, the new cuts were very small and couldn't be done by hand. I used the square to double check my guides.
2466-albums286-picture1614.jpg


I nailed down small pieces of wood to guide the edge of the vibrator. Then I sanded it with my small belt sander but try to get a picture of that.
2466-albums286-picture1615.jpg


Then it was done, except for cutting the plug to size and banding it, I'll cut the frame when I finish the plug and install it with thickened epoxy to fill the gaps.
2466-albums286-picture1616.jpg


This is the plug, cut down to the marks made earlier, banded with the white oak I cut the other day and clamped tight.
2466-albums286-picture1618.jpg
 
What you don't see in these pictures is the cross bracing between the beams. I need to put these in to support the flooring at the edges of the passageway. Since the plywood under it is delaminated it's a little spongy. I cut two pieces to fit, drilled pocket holes to hold them while the glue dries and brought the wrong clamps. Dammit! The plan (unless someone has a better one) is spray water into the delaminated wood, brush in gorilla glue and glue and clamp the braces to the sole. Then I'll screw in a couple of pocket screws on each side while the glue sets. With gorilla glue on three sides of these braces it will take a sawzall to get it apart again. And it will be more solid than when I started.
 
That's a good plan. It's good to see you are moving forward with the project quickly. Nice work.


1983 Present 42 Sundeck
Twin Lehman 135's
✌️
 
Hatch

Finally! Getting close to finishing this project! I'm down to the detail work and it's hard to show. After this post I'll upload one final picture when I have it stained, sanded and varnished and hopefully just an unnoticed piece of woodwork in the passageway.


This is a picture of the cross braces I put in to support the hatch and the flooring at the edges of the passageway. I was going to put them in vertically but flipped them on their sides and screwed them in from the bottom. The plan was to clamp them but the delaminated plywood would not cooperate. The new plan is to fill what I can with thickened epoxy when I put the frame pieces in.
2466-albums286-picture1619.jpg


OK, this is what the hatch looks like with the frame in place. I'm pretty happy with the way it turned out. I'll epoxy in the frame and then sand it down to flush and stain it. Since the teak and holly line up and the frame and banding will be very muted, I'm thinking of not putting a pull ring in it. Once that bilge is cleaned up and the plumbing is done I shouldn't have to go down there very often. I can reach through the small hatch and push it out. I don't think most people would even notice that hatch without a pull ring.
2466-albums286-picture1620.jpg


So, that's my story. One more picture just to show it completed. Then it's on to the bilge, where I wanted to go in the first place. I don't think I'm going to show pictures of that.
 
Great work and thanks for sharing I see you have one of the harbor freight blue lights to the side
 
Thoughts on the pull ring....while you have a good idea that would be my first thought too....if the hatch is snug at all...remember temp and moisture may eventually make it very snug...add a little dirt and grime too that works it's way into the cracks.

As long as you can get under it for a good push/whack...I'd leave them off too.
 
Clean work - I'm very interested in your project, my boat is very similar to yours with the same access ensue. The shower drains into the bilge & I want to change that. Thank you for sharing the project.
 
Thanks for the comments. When I cut the frame pieces I slipped a piece of veneer between the plug and the frame to give me 1/16" wiggle room. I think it might get tight anyway if it stays closed too long. I hope so! That means nothing went wrong down there.

I'll show pictures of how I put in the grey water tank when I get there. I think I have a plan but things tend to get re-engineered all the way up to when I do it.
 
Nicely done. I'm envious of people who have the skills and the tools to do a job like that. I have some of the tools, but not a table saw or a place to put one. Now I would only need to acquire the necessary skills!

Good on ya for a job well done.
 
very nicely done, but I will admit I was sweating along with you on the initial cuts and then when you open the floor it looked like a scene out of Indiana Jones and the Temple of Doom!
 
Yeah, it still does. That's going to take a lot of elbow grease. I think 35 years of showers draining to the bilge caused a lot of it. Soap and shampoo and conditioner and body oils and whatever else goes down the drain. The PO didn't use the boat that much but I think they stayed on it sometimes.
 
Hatch

Things went slower than I wanted yesterday so here is the penultimate picture, still one more to come.


Here is a picture of the hatch with the spacer pieces, frame and hatch all in place, waiting for the glue and epoxy to set. You can see the waxed paper barrier to prevent glue or epoxy migration from locking the whole mess in place. You can also see pieces of laminate (yeah, working that too) inserted betweeen the frame and plug to ensure enough room for moisture swelling and dirt. (Thanks psneeld for reminding me!)
2466-albums286-picture1633.jpg
 
Looks fan freakintastic.
 
Great thread and nice work. Wish I had followed it earlier.
 
No, I had to put in the new hatch so I could get to the old lectra-san system to remove it. In the end I had to cut a bigger hole in the deck around the lectra-san to get it out. I also couldn't stand the nasty looking bilge! There is still a lot of cleanup to do down there but at least now I can see everything and was able to re-route the wiring and hoses to a manageable system. I was also able to route the new toilet discharge hoses to the previously unused holding tank. Still working on adding a waste pump and routing it to a through hull. While at it, I'm re doing the bilge pump with 2 new float switches, a bilge pump switch and high water alarm. Previously it only had a circuit breaker for the bilge pump.
 

Latest posts

Back
Top Bottom