Help! Plumbing and wiring re-route

The friendliest place on the web for anyone who enjoys boating.
If you have answers, please help by responding to the unanswered posts.

Lollygag

Senior Member
Joined
Jan 4, 2012
Messages
259
Location
USA
Vessel Name
Lollygag
Vessel Make
1979 42' CHB Europa
Do any of you owners of older 42' CHBs have any idea how to get into the bilge forward of the engines? There is a small (smaller than me) hatch between the guest cabin and heads in the passageway and a couple of small hatches under the bed. I can't get into any of them. I am removing the lectra-san system and re-connecting new toilets to the holding tank. About the only way to do this is get in the bilge. Anybody found a way?
 
Do you just have to get in there to run the new hose? If so is the old hose tied off to anything as it runs through those areas?
 
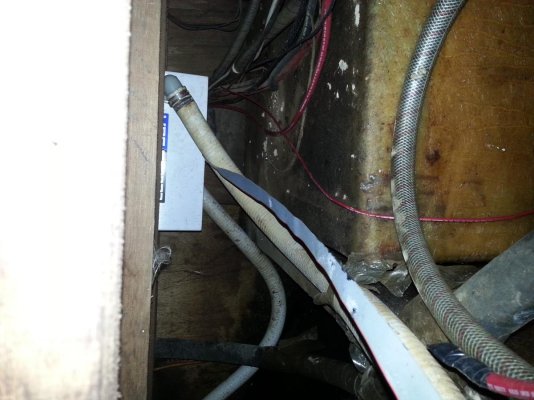
Unfortunately, that seems to be what happened when the lecrtra-san was installed. Now there are hoses laying on each other, kinking the fill hose to the water tank. And there is a ton of wire, unmarked, running all over. Some of that I have removed but some goes god knows where. It's gotta go. I tried to get the grandkid to go down but the wife gave me the "look". Need another answer.
 
I tried to get the grandkid to go down but the wife gave me the "look". Need another answer.

Right approach, but too close family connection. Just hire a small person (male or female).
 
What I'm thinking is if it's an issue of running the new hose and wires is as long as the old hose and wires are not tied down to can attach the new hose and wires to the old and pull them through. You might have to do it in stages with splices and hose to hose connections along the way where you can get to them but at least it could be done.
 
That's a good thought but... I'm not sure if any hoses are attached to the holding tank, since they put new hoses in for the lectra-san. I can't see them from the hatch and they are not visible where the old toilets were. I even bought an inspection camera to try and see what's what and that didn't show me what I needed to see. The only hose from the tank is at the bottom and goes to a disconnected macerator. I assume the waste pumpout hoses are connected but I can't see them either! It's a black hole full of hoses and wires and everything seems to be around a corner. I really need to find a way in. Fortunately, they pumped the tank out, there is no odor. (Except when I move the lectra-san, it stinks!)
 
Don't you love how they build the boat around the hoses and tank. I ran into the same issue. I had to cut another hatch into the floor. Fortunately it is under the washer/dryer, to gain access. All the hoses were tie wrapped together. I hope I dont need to cut any more hatches. I hate cutting over something that I can't see. The hatch helped a lot. Good luck.
 
the same is true w/our 44 c&l. i looked at the construction along the bulkhead to see how firmly the floor married up to it (bulkhead), not chance. however, what i am going to do, when i return to the boat is run a plummers snake thru the pipe frm the holding tank & listen for noise along the route to see where it runs thru. maybe not a great idea, it is a place to start. my c/l is an exact copy of your chb. tonto
 
Maint sadly is never a one time job.

Think about having the hatch enlarged so you can have easy access .
 
My experience is that the "wallpapering the hallway through the letterbox" approach takes longer and often leads to work I don't really trust. A new person-sized hatch, or enlarging the existing one, is really the only way to go if you want peace of mind. It will probably save time in the long run and you will then "own" that space. Under the bed may be the best choice if access is good, because it is not normally in plain sight and doesn't get the full weight of a person walking on it. Get a Dremel oscillating saw and cut an 18" x 18" hatch using a straight edge. With a little ingenuity you can even use the cut piece as the hatch cover.
 
Thanks for all the input. I think I'm going to install a new hatch, probably aluminum, flush and I'll route out the bed so it's all flush with the cabin sole. A carpet runner will cover it all. The more I thought about it, the more I need access. When stuff needs to get done and there isn't a small person around...

Have you installed a hatch? What kind? Did you have it made or where did you buy it? Appreciate all the help.
 
This is the way that I have done it.Try to see below where you are going to cut. If you can't then determine the thickness of the wood by seeing it somewhere else, maybe at the existing hatch that you have. Set your circular saw to the depth of the wood, no deeper. The idea is to cut through the floor just barely so that you don't damage any hoses, wires etc that may be ran below where you are cutting. Layout exactly where you are cutting and go for it. Obviously make sure you are cutting a subfloor and not the hull. When you get to the corners you will need to use a saber saw set up so that it's blade does not go any deeper than the floor depth. you can do this with a block of wood or brake the blade off at the right depth. You can also use a multi tool to do this instead of the saber saw. If you are careful you can use the same piece you cut out as the hatch cover. Just epoxy some 1 X 2 in around the bottom edge. The old piece will sit nicely into the hole on top of the 1 X 2's. If it is teak floor you can even get small edge teak to put around the hole and the new hatch. Good luck. REMEMBER before cutting make sure you are not going to cut into the hull. :)
 
Rodgerh is on the money. I might add once you decide the exact size & layout, use a straight edge to score the the cut-out line with a stiff razor knife. Doing so will prevent chatter marks on both sides the circle saw cut.
 
Thanks to all. Can a 180lb man fit in a 15X24 hatch? I think so but will have to check it out. I'll post pictures as soon as I get everything together. The admiral is anxious to take the boat out but I have to get the heads working first. Somehow a 42' boat with a bucket for a head just doesn't sound right.
 
If it makes you feel any better, I noticed a hydraulic return line was weeping this winter. I had one hatch I could poke my head into and with a flashlight view the entire line, but I could only reach the first 18 inches of a ten foot line. I spent a few weeks trying to figure out how I could re-routethe line, etc. When all else failed, I realized that there were 5 other lines running down this bit of corridor and some day, some day. So, I spend two full days in the aft cabin of my 48 Tolly removing an entire bed frame, then down to the floor beneath where I cut long narrow access panels. After all that, I took 45 minutes to re-run a new line. and about an hour to screw the bed frame back together. It was a hellacious job, but now if something fails while I'm "out there", I can get to that part of the boat in an hour, with basic tools, not cutting saws.

That really is what you just have to do, if the builder did not do it for you. You can't be operating a boat more than 60 minutes from home without being able to access everything that might need futzing with. So...pay the piper and get busy!

Oh...and if it makes you feel better, that same hydraulic line passed 20 inches under a floorboard in my lazarette. I had to dislodge the entire generator to access that last 20 inches. Imagine doing that in an unprotected bay while rolling rolling rolling. Access panels are not a luxury, they are a necessity!
 
Sounds like the same story, Ghost. It seems every hose and wire in the boat crosses in this bilge and they are mostly 35 years old. Access is a necessity.
 
pics

I'm trying to upload pics but apparently need re-education. Soon to come, I hope.:facepalm:
 

Attachments

  • 20140818_122920.jpg
    20140818_122920.jpg
    180.5 KB · Views: 118
  • 20140818_122929.jpg
    20140818_122929.jpg
    199.6 KB · Views: 126
  • 20140818_122944.jpg
    20140818_122944.jpg
    127.6 KB · Views: 115
Someday I'll figure this out.

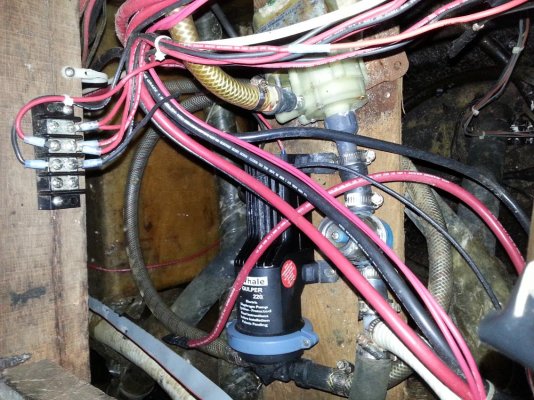
The first picture is the current hatch looking into the bilge. There is a board running across the stringers that has two pumps on it that have to be relocated.

The second picture is looking down the hatch showing the spaghetti bowl of wires and hoses.

The last picture is laying on it's left side, showing the tank of the lectra-san system that needs to be removed. The white hose needs to be removed first and it's about 4' from the hatch. Just can't get to it.
 
Yep, that looks familiar. No way to get to it. Good luck with the hatch. After you put it in you will feel much better about it. Now that I have done it a couple of times I feel much better because I can get to things.
 
Well, that plan went down in flames as soon as I laid it out. I stuck my head way down in the bilge and got a light down there and found two beams running athwartships at each end of the hatch. I'd have to cut a support beam to install a larger hatch and that ain't gonna happen.

So on to plan "B". I removed both toilets and the platforms they were on. Tossed the toilets and took the platforms home to replace the formica. If I cut out the plywood under the platform (there is about a 6" void) it would give me access to the bilge alonside the hull. I still have to determine if I can get over the huge stringer to get access to the holding tank and all the wiring. This is plan b because I really wanted a quick and easy access to the bilge and removing a toilet is not my idea of easy. Anybody with a taiwan built 42' boat have any ideas? A lot of us have the same hull, just a different superstucture.
 
Access hatches are becoming a priority for me too. My bilge monkey is 13 years old and though he saved the weekend for us recently pulling a new bilge pump wire the fact remains he eventually won't be there when I need him.

Captain Bill, is the access any better on the large yachts you've ran?
 
In most cases yes. But depending on the builder they can still put stuff in stupidly small or inaccessible locations. And if there are access plates or hatches still manage to make them barely large enough to be use full.

But at least you can stand up and walk around the engines. :)
 
Oh, how I wish that were true.
 
On my 40, many things come up and over the stringers where little access is, occasionally through a sill plate like piece of wood where floor boards are like in the engine room.

On my Albin...most things ... wiring, plumbing steering lines are routed along the outside of the hull. drain lines for showers, toilets (which I have rerouted), and bilge pumps are down the center.

Suggestions...totally reroute to easier locations, use long stiff conduit to route plunbing, wires that you can't get in to run/support any other way, and/or mount pumps/accessories on plates of aluminum or other non-rotting material that can be slid into place and then the plate fastened somehow.
 
Another idea

So, on to plan "C". Going in through the head sucks. I could probably do it but I wouldn't have easy access and every change or repair would be a nightmare. So I took another look and decided to put in a second hatch, right above the existing one, resting on the same cross beam and extending across the passageway. This will leave me with a 15X21 hatch I can fit in (if I don't gain weight.)
2466-albums277-picture1579.jpg


The ouside of the tape is the inside of the new hatch. I'll route out the edges and trim it the same as the existing hatch.

I didn't want to do this because it won't look as good as a single hatch and it's right outside the guest berth door, but doing it this way let's me use the plug as the hatch and match the teak and holly. Maybe. Hope I'm that good.

This is a look at the passageway with the existing hatch open, showing the nightmare on E dock, and the location of the new hatch that should give me access to clean it up.

Anybody see any roadblocks?

2466-albums277-picture1578.jpg


If you look in there you can see the board that goes from one stringer to the other with two pumps and a Rue Goldberg hose setup. Hey, it works but I'm pretty sure I can make it look good too by removing the board, mounting the pumps ON the stringers and routing the hoses and wires in a little more organized manner. You know, shipshape.
 
Weird that we have EXACTLY the same boat (year & model) and yet so different. :)

Mine has parquet flooring and TWO hatches. One about where you are, and another at the foot of the master bunk. I can get my 6' 1" 230# bulk into both and close the hatch. It looks like your bilge is much shallower (if that's the right word) than mine. I'll have to take some pictures for ya.
 
Really! I know they used to give a hull to a family to build but usually they followed a general plan and looked the same with dimensions sort of variable. I think I need to get on a lot more 42' taiwan boats and see what else there is.

Did you see anything that looks like a dealbreaker?
 

Latest posts

Back
Top Bottom