- Joined
- Apr 15, 2008
- Messages
- 13,731
- Location
- California Delta
- Vessel Name
- FlyWright
- Vessel Make
- 1977 Marshall Californian 34 LRC
I've been looking at purchasing a RIB and may do it in the future, but I needed a better solution to hoisting my 9.5 ft Achilles non-RIB inflatable. During the fall-winter-spring fishing months, I keep my dink mounted upside-down on the foredeck on foam cradles. My 27 lb Honda 2 HP motor sits on an engine mount on the aft rail of my flybridge. (It can be seen in the pics below.)
My problem arises during my summer cruising months when the dink resides on the swimstep. It lies with the stbd pontoon resting on the step and the port pontoon pulled near vertical toward the aft rail. All was well for a couple of years until two of the canvas straps that hold the D-rings in place on top of the port pontoon ripped out. I needed a better way to hoist and secure the dink on the aft rail without stressing the inflatable's components.
I found this heavy duty cargo net for $60 on eBay.
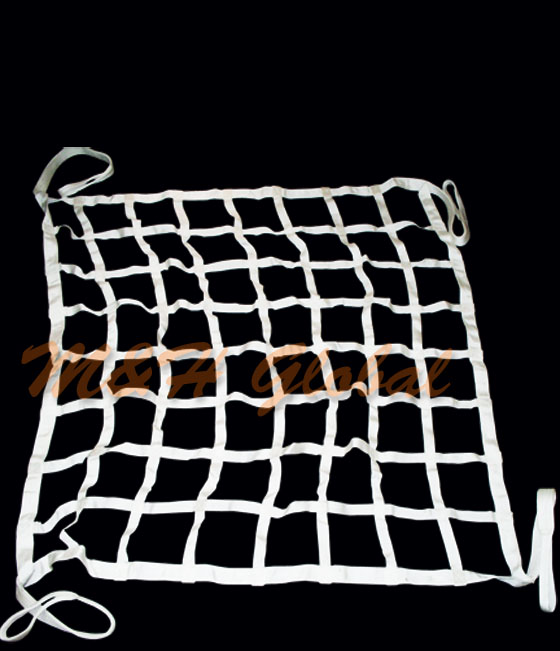
It's 6 ft x 6 ft with 3 ft loop strap extensions on all 4 corners. Since my boat is a 12.5 ft beam, I figured it was just about right. It came the other day and I was impressed with the weight and strength of the product. It weighs about 10 lbs and comes in a very stout storage bag.
At the boat, I have two attach points located just above the swimstep and about 6 inches inboard from the outer edges of the transom. These made perfect attach points for the carabiners on the lower corner loops.
To load the dink into the net, I attached 20 ft lines to the upper corners and laid the net on the swimstep. With the dingy secured loosely along the transom (stbd to), I let the net fall into the water while holding the corner line. I eased the line around the bow and pulled the net up along the port pontoon. I did the same at the dink's transom and pulled the slack out of the net. Once I was done on the swimstep, I lifted the stbd tube onto the swimstep and entered the cockpit.
Once in the cockpit, it was an easy task to tighten the net until the dink rode level with the water and swimstep. The 3 ft loop extensions in the corners aligned perfectly with a couple of my stainless posts between my caprail and my handrail.
Here's a look at the first attempted rigging with the Honda in place:
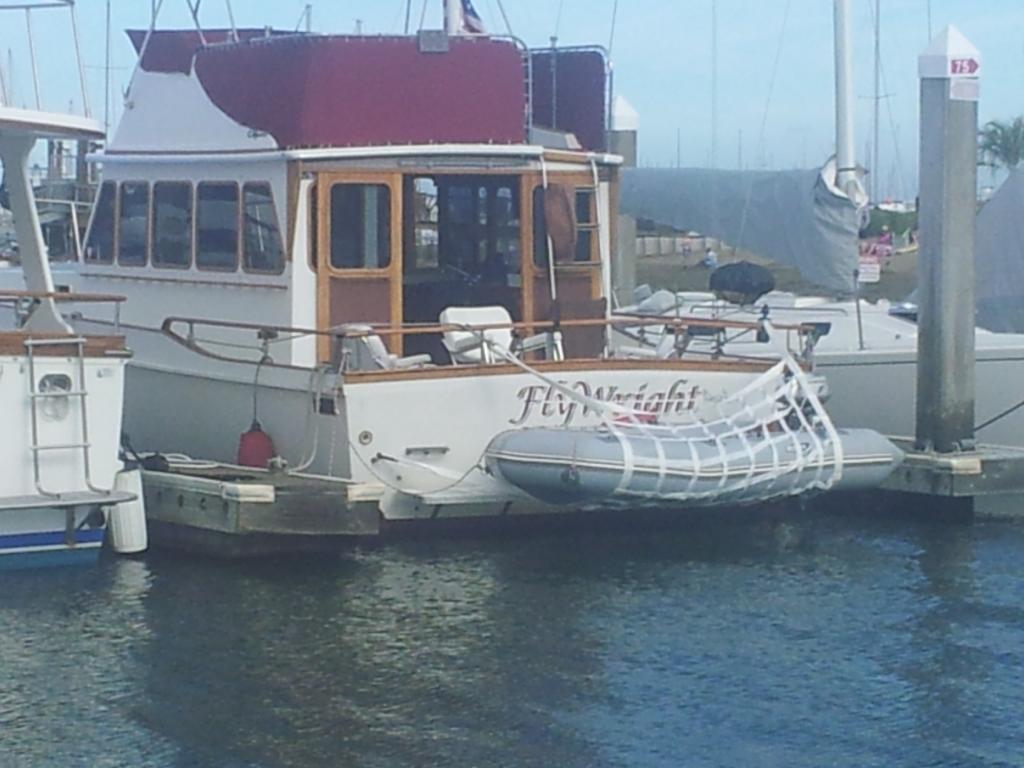


After I took these pics, I added two more lines to the middle of the upper net to even the pull across the length of the net and dink.
It rode fine for the 30 minute trip from Sausalito, CA to Angel Island where it was launched with great ease. For the 2+ hr ride back to our home marina, I removed the Honda and secured the net without lines over the aft rails. I shifted the dink slightly to stbd allowing better access to the gate at the port corner of my aft rail. It rode perfectly in that position.
In a refinement of the cockpit attachments, I purchased 4 more carabiners to simplify the 4 attach points on the upper edge of the net. These should fit on the vertical post on the stbd corner and to the post aligned with the port side loop end in the pics...outboard of the rod holder above the "F" in FlyWright.
In general, dinghies riding on transoms are not the most attractive part of the boat. I especially dislike blocking the transom name while enroute. While this net does nothing to improve the look of a dink on the transom, it does allow a filtered view of the boat's name.
So for the cost of a $60 net and $30 in carabiners, we've got a functional davit alternative for use next week for our week-long Delta adventure!
My problem arises during my summer cruising months when the dink resides on the swimstep. It lies with the stbd pontoon resting on the step and the port pontoon pulled near vertical toward the aft rail. All was well for a couple of years until two of the canvas straps that hold the D-rings in place on top of the port pontoon ripped out. I needed a better way to hoist and secure the dink on the aft rail without stressing the inflatable's components.
I found this heavy duty cargo net for $60 on eBay.
It's 6 ft x 6 ft with 3 ft loop strap extensions on all 4 corners. Since my boat is a 12.5 ft beam, I figured it was just about right. It came the other day and I was impressed with the weight and strength of the product. It weighs about 10 lbs and comes in a very stout storage bag.
At the boat, I have two attach points located just above the swimstep and about 6 inches inboard from the outer edges of the transom. These made perfect attach points for the carabiners on the lower corner loops.
To load the dink into the net, I attached 20 ft lines to the upper corners and laid the net on the swimstep. With the dingy secured loosely along the transom (stbd to), I let the net fall into the water while holding the corner line. I eased the line around the bow and pulled the net up along the port pontoon. I did the same at the dink's transom and pulled the slack out of the net. Once I was done on the swimstep, I lifted the stbd tube onto the swimstep and entered the cockpit.
Once in the cockpit, it was an easy task to tighten the net until the dink rode level with the water and swimstep. The 3 ft loop extensions in the corners aligned perfectly with a couple of my stainless posts between my caprail and my handrail.
Here's a look at the first attempted rigging with the Honda in place:
After I took these pics, I added two more lines to the middle of the upper net to even the pull across the length of the net and dink.
It rode fine for the 30 minute trip from Sausalito, CA to Angel Island where it was launched with great ease. For the 2+ hr ride back to our home marina, I removed the Honda and secured the net without lines over the aft rails. I shifted the dink slightly to stbd allowing better access to the gate at the port corner of my aft rail. It rode perfectly in that position.
In a refinement of the cockpit attachments, I purchased 4 more carabiners to simplify the 4 attach points on the upper edge of the net. These should fit on the vertical post on the stbd corner and to the post aligned with the port side loop end in the pics...outboard of the rod holder above the "F" in FlyWright.
In general, dinghies riding on transoms are not the most attractive part of the boat. I especially dislike blocking the transom name while enroute. While this net does nothing to improve the look of a dink on the transom, it does allow a filtered view of the boat's name.
So for the cost of a $60 net and $30 in carabiners, we've got a functional davit alternative for use next week for our week-long Delta adventure!