Fuel tank patching

The friendliest place on the web for anyone who enjoys boating.
If you have answers, please help by responding to the unanswered posts.

ozjason

Newbie
Joined
Jul 19, 2014
Messages
2
Location
Australia
Vessel Name
Lyndall
Vessel Make
44 foot Tradewinds Aft Cabin
Hi all,

I have been following the trail of soft timber to uncover the top of the starboard fuel tank; no surprise it was very rusty and has some holes, the biggest of which is about 200mmx100mm and is on the edge.

Does anyone have a repair suggestion? Small holes I think I can just patch; should I cut the large hole out and have a patch installed or does someone have a better idea?

Appreciate your thoughts
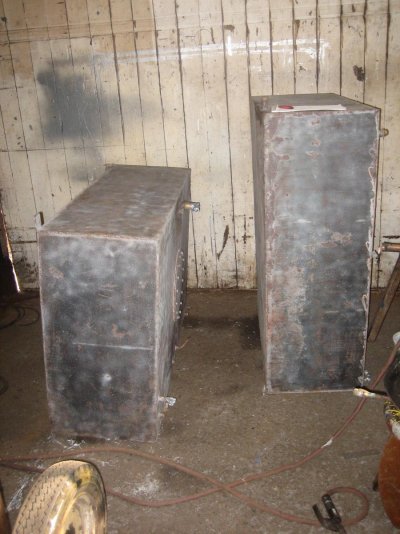
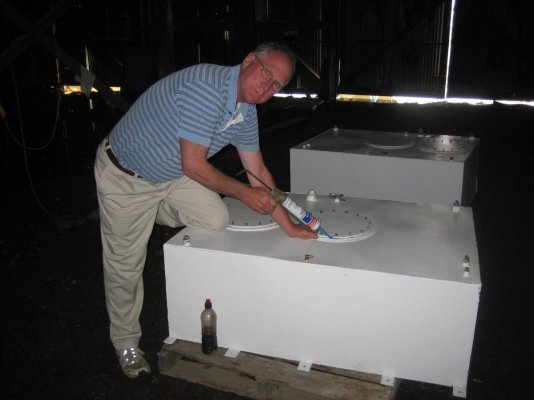
 
How is the rest of the tank for rust, especially the bottom? Open it up and have a look when empty, a small hole or two and bore scope will suffice.
 
I think you are doomed.

9" 18 TPI Thin Kerf SAWZALL® Blades (Bulk - 100 Pk)
48-01-7188
 
Epoxy and glass cloth. Possibly an over sized patch glued down with epoxy or JB Weld.
 
I wouldn't recommend this, but I chartered a 36 Grand Banks that had holes in the top of one of its tanks. The owners took insulation spray foam and filled in the area between the tank top and the deck. They gave us a dip stick for filling the tanks so we didn't fill them the whole way up. Sorry no help but silly story.
 
My tanks I didn't trust and they were 10X better than what you describe.

Sure...patching is always a solution, but my solution was easy too...didn't need 400 gallons of fuel when 100 was more than enough for my cruising...had the room to cut and take out the old, 2 new 50 gallon poly tanks and a week later I was in business with new tanks that I could see the level and to a degree the quality of the fuel.

I would be constantly worried about more rust in the fuel and patches failing...unless there was little or no choice and then epoxy the small holes, cut and patch with plate and gasket the larger ones that are to big for just gluing.
 
Marinetex is Excellent and there is an aircraft putty that is comparable that also resist petroleums but I can't remember the name at the moment! It cures hard but can be easily sanded!
 
You didn't note if it was diesel or gasoline in the tank

If gasoline is your fuel I would be very careful about patching the fuel tank. If the repair fails you have a potentially deadly condition. If you fuel is diesel any patch is a way to buy time but you will probably need to replace this tank soon. If you can access the tank sides removing the fuel and installing an access plate to inspect your tank would be a possible solution. However to really inspect the tank you should remove it and inspect for out side corrosion.
 
Marine tex and West systems for diesel tank

Both companies technicians said their products will with stand diesel IF the tank (black iron) is medically clean. Our tanks were fine on the outside. The leak we had was from the bottom seeping diesel via pitting inside the tanks. We did open the top of each tank and then patched the opening with a plate of steel using the marine tex and west systems on the outside. No problems so far.

See @ TheOffice: A little bit of Diesel makes a big mess

Hope this helps with your repairs.
Sonny
 
See if you can get a product called POR-15 ... There is nothing else like it for rusty steel. It can be applied over tight rust and will stop further rusting. No resin, even epoxy will do this. It comes in liquid and paste form get both for your job. You can use it with fiberglass for reniforcement if you need to.
 
Tanks

Thanks for the ideas; they are diesel tanks.

I wii post some photos when I work out how. At this point I am investigating cutting out the damaged section and having a plate welded on or possibly having a frame welded in allowing for an inspection panel to be screwed down. This panel should allow for the inside of the tank to be inspected as well. Failing that it looks like rust treatment, epoxy patch and not filling tanks might be the go

Thoughts?
 
Your correct to the last sentence. If the tank is deemed toast following a good internal inspection it needs to be replaced. Partial filling as the tank slowly disintegrates has only downside.
 
Thanks for the ideas; they are diesel tanks.

I wii post some photos when I work out how. At this point I am investigating cutting out the damaged section and having a plate welded on or possibly having a frame welded in allowing for an inspection panel to be screwed down. This panel should allow for the inside of the tank to be inspected as well. Failing that it looks like rust treatment, epoxy patch and not filling tanks might be the go

Thoughts?


Long shot,but would it be possible and cheaper to replace the tanks with alloy or composite (plastic)? I'm not sure what prices are in Aus nor do I know labor cost to repair the current tanks.
smiley-confused013.gif
 
Do it yourself. It's a piece of p!ss to do. Below is one I did. 2 x 500mm x 500mm inspection ports Cost me $90.00 and is bigger and better than anything available. ImageUploadedByTrawler Forum1406095767.423188.jpg


Sent from my iPad using Trawler Forum
 
Ozjason,
Mate, everything else aside I would attempt to do a complete repair, anything else is half arsed.
Empty the tank , gas free it, wash and ventilate, get a das detector so that you can ensure the atmosphere is safe.
If you don't have one cut an inspection door in the side of the tank,.
Check the inside of the tank for corrosion , most probably it is only the top of the tank that is thin.
If all else is good repair the top of the tank with a welded patch, fully coat it on completion.
Put in a door where you have cut the access, similar to what Hendo has done.
At least that way you know your tank is clean and tight.
Fuel up and head north.

Cheers
Benn
 
If the patching works... great. My opinion is you will revisit this rusty tank issue. My 30 ft Lein Hwa started leaking on the top of the starboard tank. I bit the bullet and ordered two 52 gallon poly tanks from Moeller (PN:FT5218S), 100 gallons less than original tanks. They fit in through the cabin engine access hatch with taking off alternator and thermostat housing, and moving around house batteries. The have cross feed fittings to keep tanks level. 2 Tanks combined were appx $900.00 US. New fittings, lines, fuel gauge was an additional $600.00 US. It took me part time 3 weeks to complete the job on my own... no labor fee but beer :) . I cut eh old tanks out piece by piece with a sawzall and demo blades (expensive blades appx $7 a blade... used 20 blades in total for the whole job). I took the time to completely re-do my engine compartment along with asbestos removal and re-insulation. My engine room looks new! I crawl down into it and come up with no grease! It is so nice. The old tanks I cut out were full of rust and sediment down in the bottoms appx 1 1/2 thick. After long exhaustive talk over cocktails with my fellow Captains and Maintainers, calls to American Marine, Bomac, and Lancing Marine... I decided taking out those old rusty tanks would be the best for the heart of my boat...the engine. Otherwise they become a lingering nightmare. I also figured if I ever sale my beauty... the next guy will get a solid boat (increases re-sale when surveyor looks at the new system)! Good luck!
 
Last edited:
One of my 125 gallon tanks on the old boat sprung a leak. They were in the lazaret and fairly easy to take out. Brought them to the fabricator to use as patterns. After looking at them he suggested a complete sandblast and cut out the bad and weld in new. While they were in the shop I had Brian cut an additional large cleanout on the top of each tank. Also had new pick ups made for each tank and for the generator and a fuel polishing system.

After the repairs each tank was cleaned up with a wirebrush on my angle grinder then wiped down with acetone until the rags were clean. Next three coats of mil spec epoxy primer then three coats of gloss white epoxy paint. I also did the now empty lazaret in the same white epoxy after improving the tank support and ventilation.

Total cost for tank removal after I drained and disconnected, sandblasting, repair, epoxy paint and primer, new pick ups and some new fuel line was just shy of $800.00. I think it was a great deal but I did not keep track of the hours I put in

Photo 1 old tanks in place, 2 and 3. after sandblasting, before repair, 4 and 5 ready to go back in. Disclaimer, my wife workes for Loctite and wanted some shots for the guys who keep giving me the free samples and advise!
 

Attachments

  • IMG_0183.jpg
    IMG_0183.jpg
    115.7 KB · Views: 127
  • Stringers 2008 010.jpg
    Stringers 2008 010.jpg
    68.5 KB · Views: 108
  • Stringers 2008 012.jpg
    Stringers 2008 012.jpg
    157.5 KB · Views: 122
  • IMG_0133.jpg
    IMG_0133.jpg
    84.7 KB · Views: 112
  • IMG_0134.jpg
    IMG_0134.jpg
    77.4 KB · Views: 127
Last edited:

Latest posts

Back
Top Bottom