I replaced the five original incandescent bulbs in our engine room with bright (cool) white T15 wedges: 15w equivalent, 36 LEDs on each. That brought power consumption on the 15-amp circuit down to 1 amp. It was a good improvement, but now I'm getting ready to finish the lighting project.
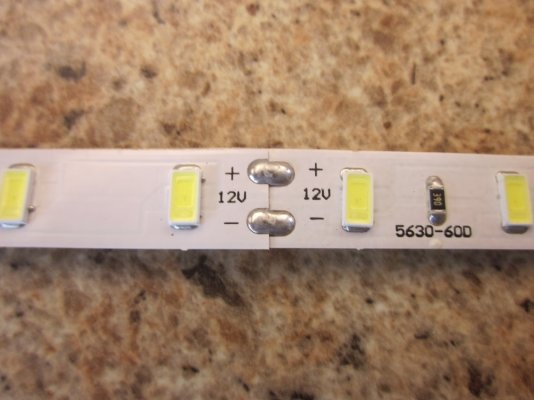
I've gotten in a 5m flexible rope of "natural" white (4000K) weatherproof LEDs, and I'm going to tie that into the same circuit. Boatloads of lumens at only 4.5 amps. See
Search Results For "wfls-nw300x3-wht" | LED Products | Super Bright LEDs for details. (I think I would have slightly preferred products from marinebeam.com, but couldn't find a semi-equivalent from them that suited my plan.)
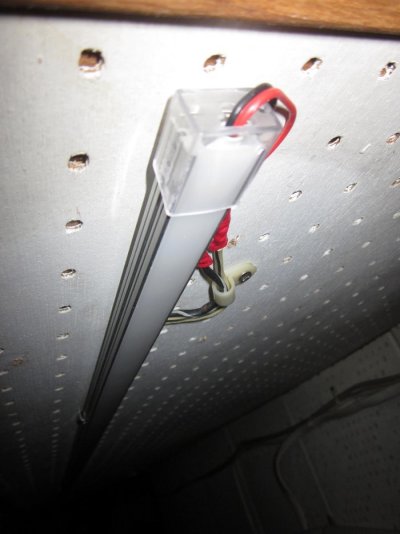
I'm probably intending to install with simple "mounting" zip ties and stainless screws every X inches or so, since the underside (i.e., engine room side) of the saloon sole is wood framing and easily accessible. It looks like it's actually possible to screw right through the connecting fabric between the two power wires, but I'm not sure that fabric might not tear through. Final action TBD.
I don't have the physical lay-out of the "snake" cast in concrete yet, but I'm hoping to use this first rope as an experiment, covering only one side of the engine room. If the amp meter proves I've still got headroom on the 15-amp circuit, then I hope to add yet another rope to cover the other side of the engine room.
-Chris
So now I've just added a 5m (16.4') "rope" of high-lumen LEDs. The product is
http://www.superbrightleds.com/morei...s-x3-wht/1622/. Weatherproof, flexible, 6300 lumens, Natural White (aka bright, 5600°K.), nominally 4.5 amps for the complete rope. I would normally have ordered something like this from marinebeam.com, but didn't recognize a good choice there.
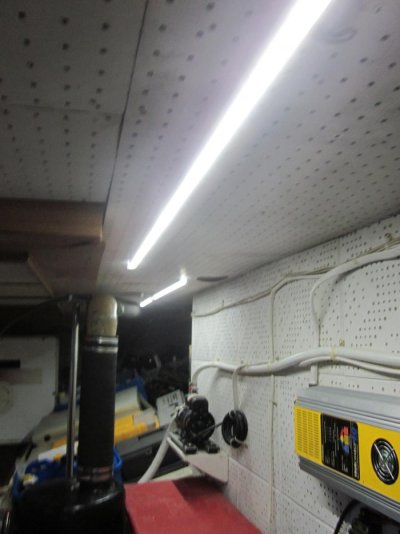
A couple BEFORE and AFTER photos:
The pics were all taken with the port engine room hatch open, cockpit day hatch open,
no flash. The BEFORE pics were taken yesterday, bright and sunny in the saloon overhead and cockpit. The AFTER pics were taken this morning, dull and overcast in the saloon and cockpit.
I spliced into the existing 10-amp circuit between the 4th and 5th fixtures, and then routed the rope to match the engine room's asymmetry in the forward section. I hung the rope with screw-mount zip-ties spaced about 1' apart using #8 x 5/8" self-tapping screws. The rope comes with adhesive backing, but I just don't think that would last long in this kind of environment. The last foot or so of the LED rope, on the starboard side ahead of the engine, is only temporarily hung; I can't reach that very well from the front (stuff gets in the way of the drill), but I'll re-visit that next time I have the starboard engine room hatch lifted.
The connectors were simple appropriately-sized heat-shrink ring terminals (sized for #8 studs) added to the existing 12 AWG boat wiring (where I made the cuts) and to the 20 AWG leads from the new light rope... and then all three positives were screwed together using #8 x 1/2" screws/two flat washers/Nylock nuts, all three negatives screwed together ditto,
Voila!
My intent now is to see how this product works, especially in the engine room environment... and then if it's still good early next year, I'll look to add another whole LED rope further toward the stern. The nominal 4.5 amp consumption with this first rope leaves me a little leeway... and it happens in the analog ammeter on that battery bank, it actually only looks like 4 amps added on the circuit. Anyway, future planning will have to take T15s in the original fixtures and this new 4.5 amp load into account, along with some reserve on the circuit for safety's sake.
Lighting is MUCH better. In fact, we just replaced some engine hoses on Monday (from strainers to water pumps) and I'm getting ready to clean up after that... and the new lighting makes it MUCH easier to see where I need to put most of my attention for that.
-Chris

")
 Thanks for posting.
 You could easily cut the channels to 1/2 meter but you would need to order more end caps and mounting clips. Less than $20/light mounted.