Project: KK Manatee Gen relocation

The friendliest place on the web for anyone who enjoys boating.
If you have answers, please help by responding to the unanswered posts.
Joined
Oct 2, 2009
Messages
5,198
Location
USA
Vessel Name
Bucky
Vessel Make
Krogen Manatee 36 North Sea
Disclaimer: The following project is to enhance the repair, convenience, maintenance and accessibility on a Kadey Krogen Manatee only. It deals with the modification of materials and construction methods that may be specific to this boat. These procedures may not apply (or even make sense) for designs other than the KK Manatee, and there may even be exceptions within the 99 unit Manatee build run where bulkhead locations have been altered by the builder or subsequent owners.

Krogen Manatees are great boats and respond well to modifications that enhance its live-ability and convenience. If you are an owner under 5' 6" or are a part-time contortionist, there is probably nothing you would change about the boat. But if you are over 6 ft. and big and old and stiff like I am, you need help. This project share is about how to relocate a standard Northern Lights 4.5 or 5.0 Genset to a new location under the veranda. It isn't cheap to do, but if you're like I am and love the boat's many advantages, spending the money for this improvement may be the singular reason to "keep" the boat instead of looking for something with the proverbial "stand-up" engine and machinery space.

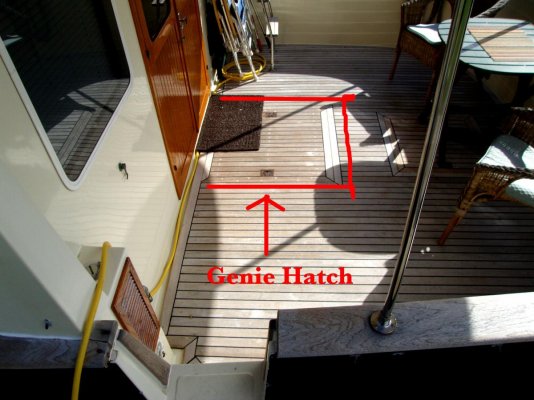
A year ago another Manatee owner brought his boat into the Krogen Brokerage to sell. When I saw the second hatch in the veranda, the owner told me it was where he had his generator. I nearly fell overboard. For the first time, could there possibly be a below-deck alternative for mounting a Genset??!!

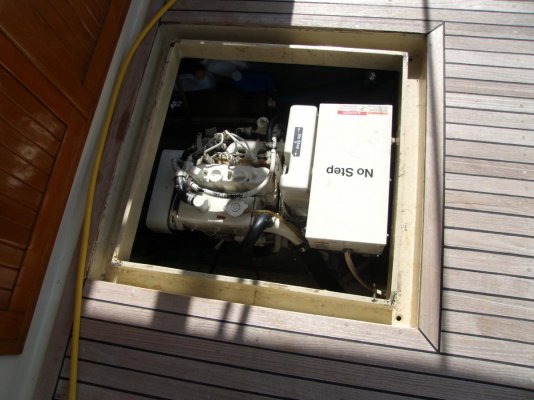
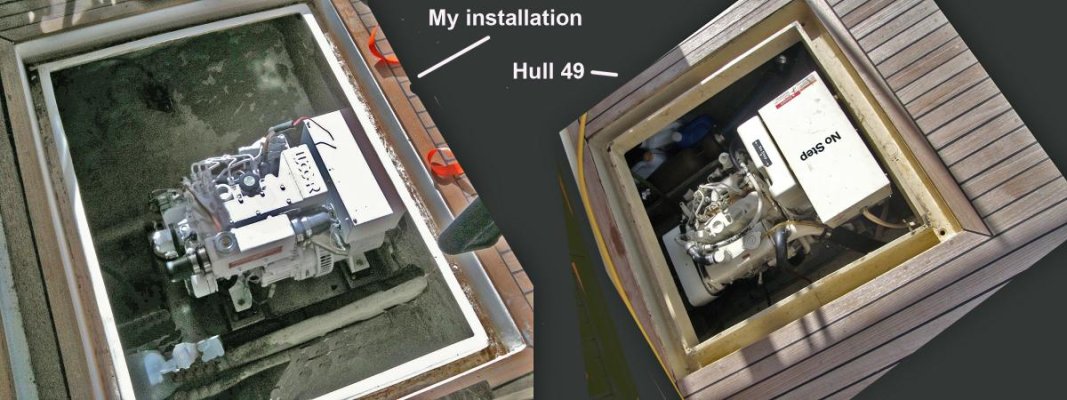
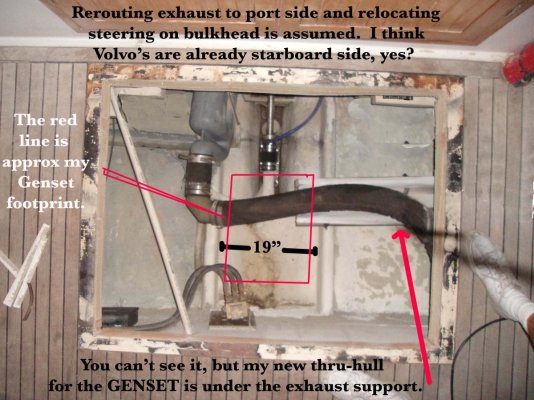
The unit was a 5.0 Onan. After some quick measuring, I learned that it was about 1.5" longer and 1.5" taller than my own Northern Lights unit. Drain pan width was the same 17", and fit snugly between the stringers (19" apart). According to the Manatee database, the boat was hull # 49, and that the 2nd owner (there were four listed) had installed a 2nd lazarette hatch (no mention of a genset). My guess is that the hatch was done for storage only, and a subsequent owner probably looked at it and figured he could throw a genset in there, which he did. BUT, it's a pretty tight hatch.

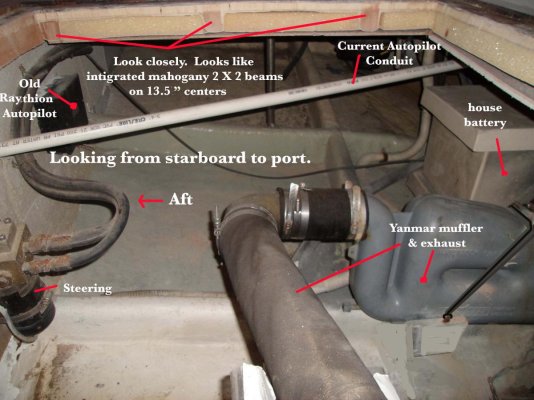
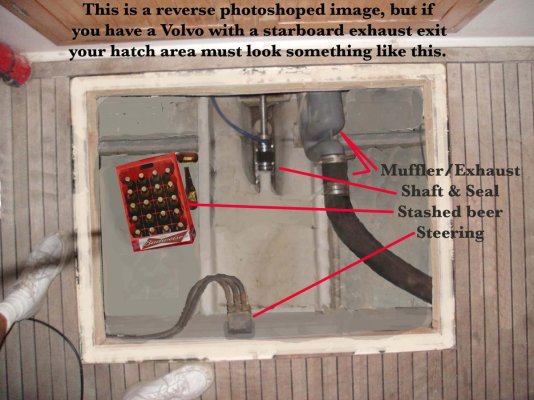
My first thought was "could we make it bigger". Yeah, we can, and I'm going to show you how to make your own generator space that you can stand on either side (yes, even the non service side) and work on the unit. The project is nearing completion and looks good. Location of the water-lift muffler is a little more difficult on my boat due to the Yanmar refit (both lift mufflers on port side) but those with original Volvos or even Perkins should have an easier routing. There were some problems with the Onan installation that I've figured a way around. For the life of me, I can't figure out why Krogen didn't offer this location or at least the 2nd hatch option for storage (lots of new, accessible space). Given the immersion data on the boat, the extra 375 lbs. located aft is no issue, especially since batteries and other devices now have new space below the galley to offset any CG change.

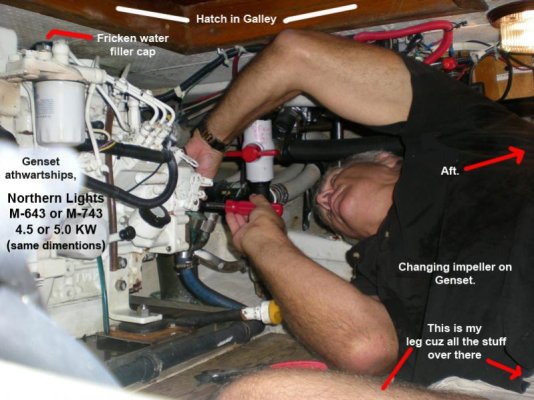
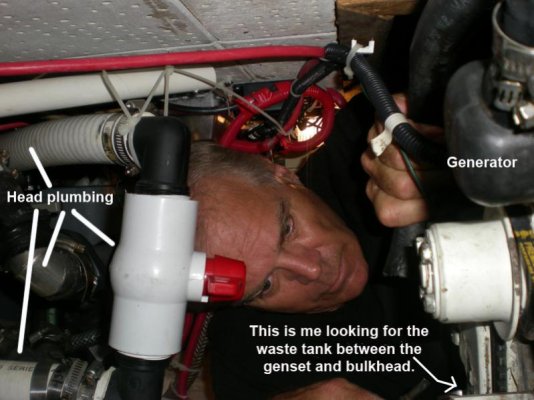
Relocating the genset from below the galley is like moving every system in that machinery space. Immediately, head systems and plumbing, fresh water pump and plumbing, charger/inverter, hot water heater, waste holding tank and vent, and various electrical & fuel tank access becomes so much simpler. Plop down a decent sized piece of plywood and go to work cleaning up things that you couldn't even see before. I can actually change-out my holding tank vent with ease. Before, I couldn't even see my holding tank.

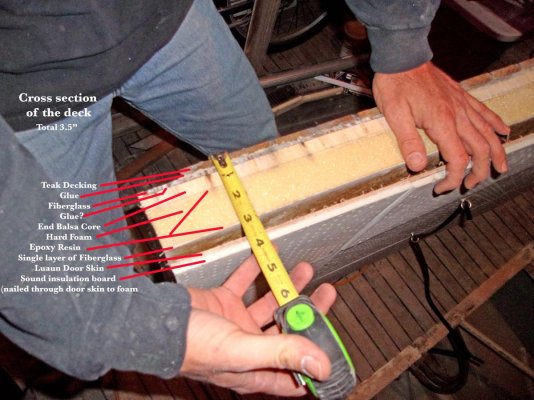
More to follow, but below are the photos of why I started the project and two shots of the tight Onan installation on Hull # 49.
 

Attachments

  • genset access.jpg
    genset access.jpg
    73.7 KB · Views: 146
  • looking for waste tank #1.jpg
    looking for waste tank #1.jpg
    62.6 KB · Views: 143
  • veranda mounted genie location.jpg
    veranda mounted genie location.jpg
    142 KB · Views: 151
  • GEDC0075.jpg
    GEDC0075.jpg
    127.7 KB · Views: 139
Looking forward to this project thread, Larry. You've been putting a lot of thought, time, money and energy into this modification. Hope the results are everything you were hoping for.

:thumb:
 
So far, so good, Al. I've had the reconditioned genset in place with the new custom stringer mounts in place. The sea cock is installed. Remote panel and controls are plug-in and put where you want. Since both the main Yanmar and Genset exhaust to port, I'll have to have two lift mufflers on that side, but there's still plenty of room. Trying to do something like this while considering every consequence created a lot of delay. Being confident as to if and how I could make such a large hatch without compromising the strength of the entire veranda sole was most worrisome. Making the hatch look original was another.
 
Part One: Know what you're getting into.

Thankfully, the Manatee has gobs of storage, but there's never enough storage, right? So, if you decide to cut a hole and make a new hatch in your veranda, you have to be committed to, at least, spending the money and time to increase your storage space. The limited hatch you see in the above photos is about 26 X 26 inches square (the same as your lazarette hatch). The hatch I've completed is about 36 X 46 inches, making it possible to reach pretty much everything concerned with the genset, control box, through hull, exhaust, battery, strainer, anti-syphon, or whatever support accessories exist.

Since building the hatch is, in itself, a viable project with practical value, I completed the cut, frame, deck reinforcement, hatch cover and the finishing teak before I yanked the genset from under the galley for reconditioning. This way if anything along the way changed my mind, I'd still have a great new place for storage and even more wonderful access to auto-pilot and steering components as well as direct access to main engine lift muffler, exhaust tubing, shaft seal and log. Some might consider that enough reason for the project.

COST: Depends on how much you do and how you do it.

I found a glass guy that loved doing molds and glass work (something I'm not good with). I did the engineering, helped with the cutting, woodwork and caulking, and he did the frame, installation of the frame, and conversion of the cut-out deck to the hatch cover itself. Cost in dollars was about $3000 including the cost of the new teak slats that were needed to fill the routed areas to make the cut (see photo below). If you take it to a shop and have a pro do it, look for an outfit that has done plenty of hatches. Remember, you're cutting out a big hunk of deck here, and the result is a weak deck. The hatch frame needs to be of equal or greater thickness than your lazarette hatch and additional glass reinforcement is necessary. This was nothing strange or new to Teak Vinson, my glass guy. He had done it before, he knew what it needed, and the result is a huge hatch and even stronger finished deck.

Mistake: According to Teak Vinson, it would have been less work to build a new hatch cover than it was to "convert" the deck cut-out to the new hatch. True, it worked out beautifully, it's a heavy SOB, and stronger than I need it to be. Decide now which thing you want to do (convert the deck cut-out or build a new hatch cover) because building a new one will likely be lighter and easier to hinge or lift. I decided to glass-in some heavy wood at the aft end of the hatch cover and more behind the aft end of the hatch frame so I could hinge it to pull away from the salon doors and lie flat on the deck. The most recent KK's are hinging them on the side to pull up and toward port. Of course, assist cylinders are cheap and simple to install, but you have to plan for them in the construction, maybe adding another layer of glass or two to the mounting points and having something behind it to retain screws firmly.

So here we go:

1. Decide how large you want the hatch.
2. Do you want to hinge it? To what direction?
3. Do you want an assist cylinder as on SUV tailgates. How far do you want it to open? Do you want to be able to disconnect the cylinder so you can lay the hatch back.
4. Do you want to use the deck cut-out to convert to the hatch cover (also has the original teak attached), or do you want a new hatch (lighter, but you'll have to do the whole area with new teak or what you can get off the old cut-out.
5. Mark the position of the deck cut-out, and check below to see if any unplanned obstruction exists....wiring, tubing, exhaust, whatever, so you don't cut into anything you didn't plan to.

Assuming you still have the teak veranda decking, study how your lazarette hatch is framed, and measure to include enough cutting space, something like the width of two slats plus caulking. Plan your teak re-framing installation before you make the cut. Route the teak bordering the area you want to cut.
 

Attachments

  • jig 1.jpg
    jig 1.jpg
    137.2 KB · Views: 156
  • first cut 2.jpg
    first cut 2.jpg
    145.5 KB · Views: 144
  • After first pass.jpg
    After first pass.jpg
    129.9 KB · Views: 144
  • after 2nd cut.jpg
    after 2nd cut.jpg
    173.8 KB · Views: 155
  • first aft cut.jpg
    first aft cut.jpg
    140.9 KB · Views: 134
  • aft edge complete.jpg
    aft edge complete.jpg
    162.7 KB · Views: 143
  • other side slats.jpg
    other side slats.jpg
    173.7 KB · Views: 142
  • slat removal.jpg
    slat removal.jpg
    156.2 KB · Views: 140
  • teak cut, ready for glass.jpg
    teak cut, ready for glass.jpg
    168.3 KB · Views: 148
Already, I've had some e-mails and one PM on the photos above. To clarify, the finished hatch you see above in photo #4 of the first post is the installation I saw on hull # 49, the boat that inspired the project. Here is a photo of my larger hatch as it appears now, side by side with the the one in hull # 49. The installation on hull 49 is through a 26 X 26 hatch, do-able. My hatch is approx. 36 X 46, allowing you to stand on either side for maintenance. Please read the text. Click on the photo for enlargement. The larger hatch is what I have installed on my own boat.
 

Attachments

  • hatch comparison.jpg
    hatch comparison.jpg
    103.6 KB · Views: 164
Larry, awesome job! Are you putting air vents to feed the genny in the side of the hull or is the lazarette connected to the main engine room?
 
Great thread Larry. Looks good ,nice neat work on the hatch . All the natural light will make huge difference also . Mine is under my aft deck in the old fish hold but not good access from above . My hatch is decent size but too far aft . It's right over top of rudder post . I need to rebuilt it the framework has deteriorated . Your giving me some good ideas.
 
The Cut:

After contemplation on the steps above, you've now decided on your hatch size. I decided on approx 36 X 46", but depending on the exact size of your teak slats and caulking, even an exact desire may need to be altered just a bit to make sure your cut is where the but joint is for the border of the hatch. Here's a shot of my hatch right after I finished the teak frame and caulking. The smaller hatch aft is the 26 X 26" lazarette hatch that is the same size as the genset hatch on hull 49. You can see the big difference. Are you ready to cut?
 

Attachments

  • hatch completed.jpg
    hatch completed.jpg
    124.6 KB · Views: 130
Wow Larry you did a great job on that generator location. You got skills !!
 
Wow Larry you did a great job on that generator location. You got skills !!

And FAST too!! An entire new hatch in what, 30hrs that this thread has lived??:D

One tip- Make sure you can access back of genny, there are brushes back there on the NL 4.5/5/6kW.
 
Hey...waitaminute? Is this Mechanical Shop or is it Photoshop? :socool:
 
And FAST too!! An entire new hatch in what, 30hrs that this thread has lived??:D

One tip- Make sure you can access back of genny, there are brushes back there on the NL 4.5/5/6kW.

30 hours. ..I wish! After the e-mails I got this AM I realized I had to show some of the finished results to even keep interest. In the thread. Didn't plan on that.
 
OK, back to the Cut:

Included here are the cuts necessary to pull out the deck cut-out which was converted to the hatch cover. I never removed the teak from the top of the deck cut through the entire conversion process. Any and all glass work and wood reinforcement was done with the teak slats still attached. This way, I was assured that the position the slats were in would line up exactly when the converted hatch cover was returned and installed. If you ever wanted to know what's in your deck, you'll see it below. The last shot shows the overhead view of what I was looking at. The exhaust, of course, needs to be routed to the port side instead of using the original Volvo exit on Starboard. Steering and autopilot need to be moved....otherwise, clear. The original Volvo units will find their exhaust on the Starboard side.....even easier. Click photos to enlarge.
 

Attachments

  • Starting the cut copy.jpg
    Starting the cut copy.jpg
    170.4 KB · Views: 142
  • completing cut copy.jpg
    completing cut copy.jpg
    160.4 KB · Views: 122
  • cross section of deck copy.jpg
    cross section of deck copy.jpg
    159.1 KB · Views: 137
  • looking to port.jpg
    looking to port.jpg
    133.3 KB · Views: 133
  • overhead view copy.jpg
    overhead view copy.jpg
    160 KB · Views: 143
WOW, keep the photos coming. I new the interior decking is 4" thick but had no idea it extended to the after teak deck area. Teak Vinson did an amazing job on the hatch, I was thinking of a trip South next Winter and may need Teak Vinson's skills.
Bill
 
Strangely, Teak Vinson doesn't do woodwork like his Dad did, but he named him Teak anyway. His brother in law did some woodwork for me, but in the end, my boat marina was too far to come and I had to scrape by on my own. I can say that the woodwork itself wasn't bad at all, but that black caulking......what a pain....gets on everything and ya gotta tape anything you don't want it on. Anyway, back to the project.

If you have your original Volvo main engine, I did a photoshop mock up of how your hatch space should appear. Here it is:
 

Attachments

  • volvo.jpg
    volvo.jpg
    141.8 KB · Views: 148
Last edited:

Latest posts

Back
Top Bottom