Hendo's Randall 35 Cray Boat complete rebuild, Perth, Western Australia

The friendliest place on the web for anyone who enjoys boating.
If you have answers, please help by responding to the unanswered posts.
Wow mate, time to go to work. :)

Thanks a bunch :thumb:

Heyyy my present made it to you safely :dance: ... That was pretty quick!

Well now you have no excuses for dodgy wiring and getting sunburnt on the owens :lol:

If I have another brain fade when buying gear, i'll be sure to let you know :ermm:... :rofl::lol:
 
[FONT=Arial, Helvetica, sans-serif]
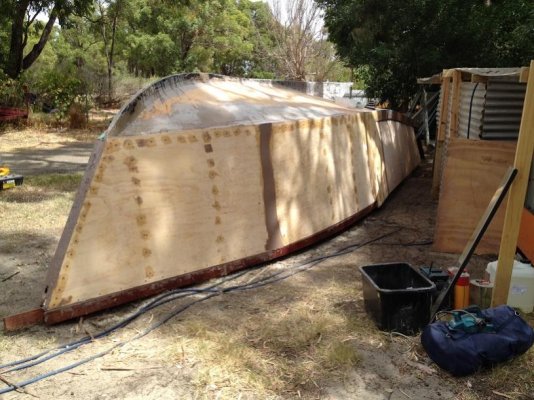
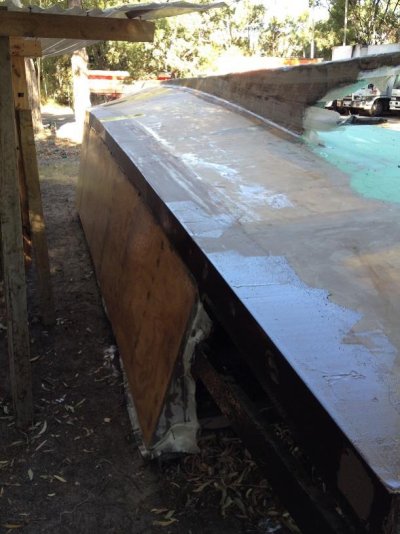
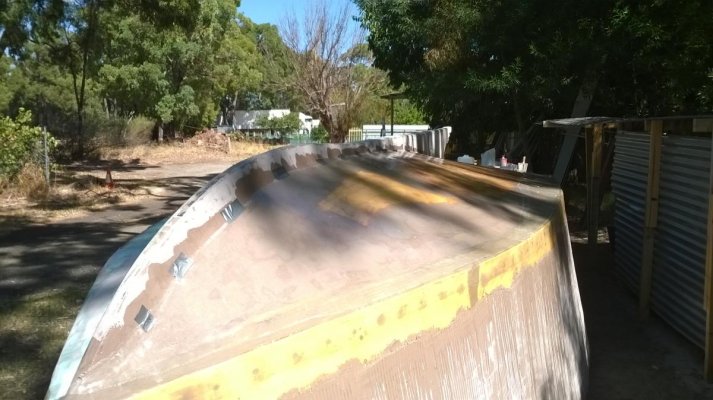
Hendo, your boat is still belly up and its been over a year...geez.....yur poor yacht is gonna get used to being belly up and that may cause issues when you turn her upside down and launch her.

To avoid problems I suspect you better make sure before she hits the water you give her a good cleaning and armor by performing all the proper rituals as per the old ones before water touches her sunny side < bottom, keel >. Oh, after and before the rituals begin we all will send our good will to maximize her fortitude, strength, insuring her a long and happy life. Our good wishes and power will arrive from all corners of the globe via the old ones to protect her and her crew, forever!.
Would be nice if we all could be there in person......
Aborigines know the old ones intimately but may have another name for them. They would likely be able to direct you to the proper rituals to insure the protection of the old ones.

B
[/FONT]

Ummmm Hey Brit ... HAHA ... :lol:

Dude Im confused ... :rofl:... :blush:
 

Attachments

  • 3598759-2365987535-g1337.jpg
    3598759-2365987535-g1337.jpg
    38.2 KB · Views: 79
Last edited:
Hey All ... :hello:
Not a lot of new stuff to talk about at the moment. We are still sanding and fairing and sanding etc etc etc. :blush: there's only so many pictures i can take at different times to show you but all end up looking the same :blush:

My new Hutchins Hustler Air Sander arrived and is a Weapon!!! ... She is making light work of flat sanding and is a pleasure to use ... :thumb:

I order another 20 @ 2400mm x 1200mm x 18mm ply sheets. Hopefully they will rock up this week so I can finish off the hull.

Away from AXE, Flic and I took our kayaks out and went and swung off our mooring last night to watch the sunset and have a glass of wine. It was so pretty. Neither of us can wait to do it in AXE. Im stoked with the view out at our mooring.

I can see us spending hundreds and thousands of hours just swinging off the hook drinking the sunset away

Well that's all for now folks ...:hello:

:Thanx: for following ...

Cheers
Hendo
 

Attachments

  • 1-2.jpg
    1-2.jpg
    59.3 KB · Views: 78
  • 2-7.jpg
    2-7.jpg
    44.7 KB · Views: 89
  • 3-5.jpg
    3-5.jpg
    58.3 KB · Views: 72
Last edited:
Hi Folks :hello:
My Bulkheads, flooring and cabin arrived today :dance:

I am pre-coating them with epoxy before taking them to site.

I am going to take a break from sanding for a couple of days so i can finish off building the hull. I envisage having it sheeted, filled and glassed by Sunday.

I have to fly over to the Gold Coast on Monday for a few days and apparently rain is coming when im gone so I need to hook in this weekend and get it waterproof :thumb:

I have been toying with different ideas for spreading the fine fairing filler. I tried a straight edge which worked well be once I tilted it back a little, it flexed and gave a concave shape. Ive used all sorts of gadgets and when I was in the shower it dawned on me, GLASS ... Why not use a piece of glass:facepalm: 
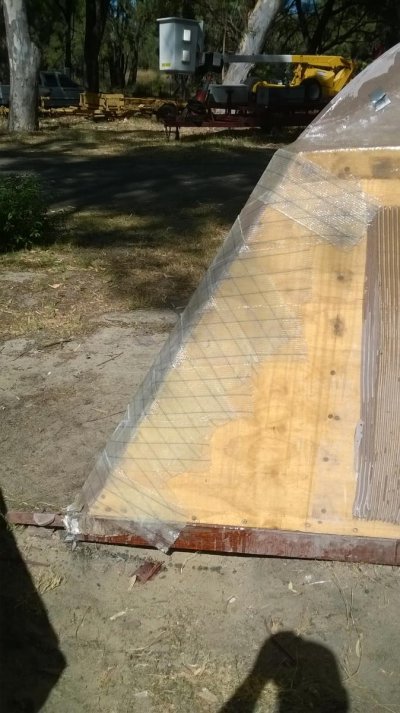
... I went down to the glass shop and grabbed a piece of safety glass 1000mm x 150mm x 6mm. No matter which way I roll it or twist it, it remains straight! :dance: ...

ok well that's all for the moment. Will post more pics in the coming days!
 

Attachments

  • WP_20140305_001.jpg
    WP_20140305_001.jpg
    118.5 KB · Views: 91
  • WP_20140305_002.jpg
    WP_20140305_002.jpg
    118.2 KB · Views: 78
  • WP_20140305_003.jpg
    WP_20140305_003.jpg
    112.7 KB · Views: 98
  • IMG_1014.JPG
    IMG_1014.JPG
    190.5 KB · Views: 93
  • IMG_1013.JPG
    IMG_1013.JPG
    190 KB · Views: 87
  • IMG_1012.JPG
    IMG_1012.JPG
    172.4 KB · Views: 97
Hendo, That's a cool tool wagon you have. I would duct tape that piece of glass up so it's easier to handle.
 
Hendo, That's a cool tool wagon you have. I would duct tape that piece of glass up so it's easier to handle.

Thanks mate. That's my Ute. She is an Australian made HOLDEN VZ One Tonner with a HSV 6.0L V8 :smitten:

Good idea Re: glass mate. Will do that for sure :thumb:
 
I went down to the glass shop and grabbed a piece of safety glass 1000mm x 150mm x 6mm. No matter which way I roll it or twist it, it remains straight!

50 meter and larger boats are faired by a few guys who use trowels of the same sort used to smooth cement or plaster. They load a pile of fairing on a "hod" sort of board and use the trowel to apply it and smooth it as well as possible.

It's all in the technique and you will learn it by doing it. That glass thing looks pretty scary and I don't see it lasting long.

As an aside, you might get better faster results by having the hull finished before fairing as it will let you make long runs or sweeps and avoid what will show through as a patchwork of seams. There are no shortcuts to fairing and sanding. Trowels and longboards are going to be part of your life for a while if you are looking for a yacht finish.

The pics show how larger boats are done, yours is the same job, just on a smaller scale but the same process and techniques apply.
 

Attachments

  • Aft-deck-fairing.png
    Aft-deck-fairing.png
    188.1 KB · Views: 397
  • fairing.jpg
    fairing.jpg
    17.4 KB · Views: 329
  • Fairing final.jpg
    Fairing final.jpg
    35.4 KB · Views: 100
  • longboarding.jpg
    longboarding.jpg
    46.3 KB · Views: 95
Thanks Rick,
Appreciate your advice but c'mon now, when have I ever done the "Norm" or do what everyone else does ??? ... :whistling: ... :rofl: ... Im Always looking for new ways or to improve ways to do things mate. You're probably right about the glass but its worth a shot IMHO :thumb:

I have finished the construction on the side I am fairing :ermm:. One side at a time for me. I don't have the pleasure of multiple guys or slow drying epoxy :rofl: ... I probably should have explained my process and rationale better. I am applying the Jotun with the trowel and hawk and will be getting it smooth and level like I do when I am plastering houses and ceilings. The glass will be a final wipe over taking off a small skim. I will do it horizontally a couple of times, then vertically a couple of times. In saying that tho, this will only work on the aft sections upto the mid sections. When I move fwd to the bow, the hull flares come in to play so the glass will be no good, in either direction. Come to think of it, my you beaut straight air sander wont work their either :facepalm: ... :cry:

Kind of like the last video (bottom right)
http://www.flexicat-tools.com/en/flexicat-video-gallery.php
 
Last edited:
Matt Me Aussie Bud! Besides giving you full standing applause for all you and Flic are accomplishing on AXE.... such as I stand and provide upon each of your posts – lol :thumb:

My hint to you when applying surface product to match bow flare: Small (6” to 8” long X 3” to 4” wide) radius ends "pool trowel" of light weight (flexible) steel material for product application off hawk. When you have surface just about perfect take a BIG construction sponge saturated (damp but not dripping) with kerosene (diesel fuel might do too) and gently work out any small remaining ridges. Then, as you know... sand till your undies get in a wad... to reach a finely faired surface finish. :popcorn:

Take two aspirin and contact me in the morning if problems persist! LMAO :rofl:

Happy Boat Building Daze! - Art :D


Thanks Mate! ... Appreciate your tips, advice and support :thumb:
 
Ok well I completed what I set out to achieve. It was hard going but I got it done.

Now off to QLD for the week :blush:
 

Attachments

  • IMG_1016.jpg
    IMG_1016.jpg
    99.4 KB · Views: 110
  • IMG_1028.jpg
    IMG_1028.jpg
    101.8 KB · Views: 113
  • IMG_1032.jpg
    IMG_1032.jpg
    109.5 KB · Views: 108
  • IMG_1036.jpg
    IMG_1036.jpg
    90.6 KB · Views: 100
  • IMG_1038.JPG
    IMG_1038.JPG
    193.4 KB · Views: 111
  • IMG_1048.jpg
    IMG_1048.jpg
    91.7 KB · Views: 100
  • IMG_1049.JPG
    IMG_1049.JPG
    162.1 KB · Views: 116
  • IMG_1051.jpg
    IMG_1051.jpg
    96.2 KB · Views: 101
  • IMG_1052.JPG
    IMG_1052.JPG
    185.3 KB · Views: 102
  • IMG_1057.jpg
    IMG_1057.jpg
    73.4 KB · Views: 110
'Onya mate. I would never have had the guts to take on what you took on. Lookin' good so far. Just don't blink now, ok..?
 
Gday Eric. Shes 11.8m mate.


By Golly!! Matt

In these here U.S. states... ya could call her a 39 footer, by my calcs. :popcorn:

With anchor on her nose she'll be 40' + LOA :thumb: :D
 
By Golly!! Matt In these here U.S. states... ya could call her a 39 footer, by my calcs. :popcorn: With anchor on her nose she'll be 40' + LOA :thumb: :D

Yeah she'll be around 40' when I'm done :)

Sent from iPad using Trawler App
 
Hi all,
Just checking in to say I'm still making progress.

Bit of exciting news, Felicity passed her Rec Ship Masters license yesterday. I'm Very proud of my girl for doing that on her first go. Now there'll be two able and willing Captains at AXE's helm, which will be great in an emergency if one of us is injured or I have a diving accident etc, or if either of us have a few to many drinks and get pickled :) lol.

At the boat, I Applied the epoxy filler to fill in the trowel gaps today. Its been raining here tonight so it won't be dry tomorrow (dry enough to sand) so I plan on glassing the chine rail and finish off glassing the hull bottom (2hrs) and then Flic and I are off to the caravan and camping expo to get some ideas for the interior design and fixings for AXE.

I have discovered that anything with "Caravan/Camper-van" in the title is 50% cheaper for the same product than anything with "Marine" in the title plus it'll be good to see what new 12V products are floating around.

Okay we'll that's all. Not a lot of exciting stuff but will take a couple of pics tomorrow morning.

Cheers all.

Hendo

Sent from iPad using Trawler App
 
G'day all :hello:

Well the epoxy Glue Fillet/Fairing compound application to the sides, glass taped and faired the keel as well as Chine Rail Glassing happened this weekend

All in all it went well, but in hindsight, could have done it different and more efficient.

It was a bit messy and looks a bit ugly with epoxy runs ATM but it will sand up A.O.K :blush:

The Caravan and camping expo was great. we found our tender and got our interior colour scheme sorted.

Below are some pics from this weekend including what our interior will look like (sort of) :thumb:

Cheers
Hendo


The below pic shows me starting to "Tie In" both sides, with the idea to make the bow bullet proof and near impossible to spring open in the event of extreme stress or an impact related accident. I will do this all the way with two layers of 350gsm tape, weaving one piece on top of each other. That's why I hadn't gone right up to the bow with the filler. I was waiting till I had done this before fairing. Once its all weaved and set, I will fair it and add the bow cap piece with a more sharp point and glass it in and fillet/fair it giving it a more Boat like appearance but this piece wont go on until she is flipped because I need to extend the bow flair and want this bow cap piece to be one length. The only pre planning ive done on AXE in a while :blush: :nonono:


Interior design goal


Last edited:
Nic, Nice, NICE!!

Matt - Keep up the great work. She gets better at every post you enter! Will be a damn BEAUT when you get er done! - Art
 
Nic, Nice, NICE!! Matt - Keep up the great work. She gets better at every post you enter! Will be a damn BEAUT when you get er done! - Art

Thanks Brother! Appreciate your support mate

Sent from iPad using Trawler App
 
Anyone got any ideas on what I can use the original Sampson post for? ... I've sanded it, Bote-coted it and am currently 2Pak clear coating it and want to use it in the interior but not sure what for. Anyone got any suggestions?


Hendo...why don't you...ummm...just use it as the Sampson post..? It deserves nothing less.
 
Hendo...why don't you...ummm...just use it as the Sampson post..? It deserves nothing less.

Thanks Pete. Thought about that but I don't really want a SP up front and if I did, she won't be long enough and if I extended her and got her to fit, it will bugger up the design of the cabin because she'll need to go aft of my Excel install and ultimately end up outside of the chain locker and into our bed.

I was thinking more along the lines of neul post or table leg or mount a plaque on it ... Dunno

I Got a great name for her from here so throwing this out for a bit of individual Trawler Forum personalisation and ownership

Sent from iPad using Trawler App
 
Last edited:
Hey Matt - I know! I Know!!! :D

Put a leather wrist strap through the hole and have it hanging next to the pilot station. Then you can use it as a Black Jack against unwanted boarders! One smack alongside the head and over board they Go!!! :thumb:
 
Greetings,
Mr. H. What's wrong with the Samson post in your bed or do you already have a protuberance to fasten the handcuffs around? Hmmmm......

umad.gif
 
Last edited:
Hey Matt - I know! I Know!!! :D Put a leather wrist strap through the hole and have it hanging next to the pilot station. Then you can use it as a Black Jack against unwanted boarders! One smack alongside the head and over board they Go!!! :thumb:

Haha I like it. My mate said it would make a good "Individual disembarkation" tool hahaha ...

Sent from iPad using Trawler App
 
What about as a stern post, for when you have to tow poor beggars home who've conked out..? You could mount a name board with AXE on it to the stern-facing side an'all...
 
Hi all,
RDO day today so went to AXE.:popcorn: ... I did a bit more fibreglassing today and im am happy to announce that the last of the Fibreglass cloth for the hull has been applied Woo hoo:dance:

The bow was strapped up, I did some sanding of the hull sides and I installed the shaft strut and rudder. Couple more items going back on the boat and off the checklist is a great feeling :smitten::smitten::smitten: ...
 

Attachments

  • WP_20140327_003.jpg
    WP_20140327_003.jpg
    137.1 KB · Views: 81
  • WP_20140327_004.jpg
    WP_20140327_004.jpg
    129.7 KB · Views: 96
  • WP_20140327_006.jpg
    WP_20140327_006.jpg
    121.4 KB · Views: 91
  • WP_20140327_008.jpg
    WP_20140327_008.jpg
    122.1 KB · Views: 103
  • WP_20140327_009.jpg
    WP_20140327_009.jpg
    96.1 KB · Views: 96
  • WP_20140327_010.jpg
    WP_20140327_010.jpg
    120.6 KB · Views: 84
Back
Top Bottom