You are using an out of date browser. It may not display this or other websites correctly.
You should upgrade or use an alternative browser.
You should upgrade or use an alternative browser.
Replacing My Teak Deck After 47 Years
- Thread starter Capthead
- Start date
The friendliest place on the web for anyone who enjoys boating.
If you have answers, please help by responding to the unanswered posts.
If you have answers, please help by responding to the unanswered posts.
OP
OP
Capthead
Guru
- Joined
- Mar 17, 2013
- Messages
- 956
- Location
- USA
- Vessel Name
- Heads Up
- Vessel Make
- Grand Banks 42 Classic
Thanks Pack Mule, it looks like we both need encouragement from time to time. 
I'm back on it and will have this section of the sub deck removed tomorrow. It has cooled down a lot but long sleeves and pants with layers and I'll get it done. I am only working on it 4 to 5 days a week with weekends off.
I joined a band and have to learn about 50 songs for the gigs later this month so the mornings when the dew is drying, I'm rehearsing. It's all good.
Keep on it PM and lets get back to boating.") .
.
I'm back on it and will have this section of the sub deck removed tomorrow. It has cooled down a lot but long sleeves and pants with layers and I'll get it done. I am only working on it 4 to 5 days a week with weekends off.
I joined a band and have to learn about 50 songs for the gigs later this month so the mornings when the dew is drying, I'm rehearsing. It's all good.
Keep on it PM and lets get back to boating.
.
OP
OP
Capthead
Guru
- Joined
- Mar 17, 2013
- Messages
- 956
- Location
- USA
- Vessel Name
- Heads Up
- Vessel Make
- Grand Banks 42 Classic
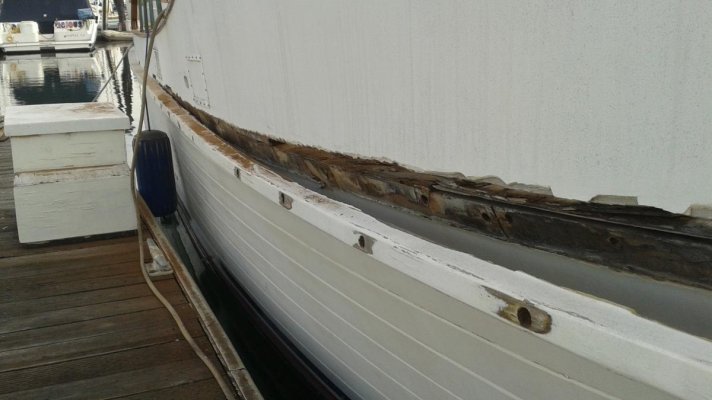
Pulling the screws from the rub rail isn't an easy job. In fact, on the starboard side I have only been able to unscrew one screw so far. I keep trying and even with my heavy duty square shank screwdriver, I just can't get them to budge without destroying the head. They are slotted screws.
What I am doing is prying the rail out just enough for the blade of a reciprocating saw to cut the screw. The I work down the rail prying and cutting as I go. You can see I have tried to unscrew them all. I pull the plugs and try my best to unscrew them.
It doesn't matter anyway because the screw shaft is in the teak I'm throwing away and the head will pop out from the back with a punch.
Attachments
kulas44
Guru
As you well know, there is a quick and easy "fix" for everything you have done. I am exceedingly happy to see someone actually do it the right way instead of the quick or easy way. Very unusuall. There is great pride in any job well done. Thanks
OP
OP
Capthead
Guru
- Joined
- Mar 17, 2013
- Messages
- 956
- Location
- USA
- Vessel Name
- Heads Up
- Vessel Make
- Grand Banks 42 Classic
I appreciate the compliment Kulas44, and the recognition of the level of the work I am striving to do. My dad always said, do it the right way and you'll only do it once. You won't have time to do it over again.
Capthead:
No matter what people say about wood, I would like to see any other floor lasting on a deck, 47 years.
I am very happy not only for you and your boat. I am also happy for choosing wood/epoxy to build my Rainha Jannota
Thanks for your thread
Portuguese
X2
OP
OP
Capthead
Guru
- Joined
- Mar 17, 2013
- Messages
- 956
- Location
- USA
- Vessel Name
- Heads Up
- Vessel Make
- Grand Banks 42 Classic
Let me say this about the teak deck. I think if it had been installed in a different manner I would still keep the deck. However, the system they used to install the deck on my and many other 60's era boats didn't stand up over time.
First, they used an unsealed sub deck that was 3/8" thick and made of mahogany which is prone to dry rot.
Second, they placed 3/4" teak over the bare sub deck with a slight swiping of a glue of some sort.
Third, they used boat nails which cannot be pulled easily nor driven deeper. Therefore, as the deck wears the plugs above the nail heads wear thin and go away.
This is when water seeps into and under the sub deck and rots it. Then when you walk on it the teak crushes the rotted sub deck and the nail comes up further. The rings on the nail act like sandpaper and enlarge the hole so more water can seep below.
Eventually, black mold covers the sub deck and under it.
This is why I am replacing the entire deck and replacing any damaged stringers as I go. I am soaking the sub deck with penetrating epoxy, painting over that with a barrier coat 2 part epoxy primer and over that an epoxy top coat. This should prevent further damage from water and keep the mold issue at bay.
Tangler
Senior Member
- Joined
- Jan 29, 2013
- Messages
- 204
- Location
- canada
- Vessel Name
- Between boats
- Vessel Make
- 38' C & L Puget Trawler
I replaced my upper teak deck with a fiberglass one. Mine is a 1977 and was going to ruin the boat if i did not uproot it. I regret the loss of the wood but there is still PLENTY on this boat and nothing lasts forever. The new deck looks great. great work Capt and I also admire your work. Keep at it. It will end sometime and you will know you have done it right.
OP
OP
Capthead
Guru
- Joined
- Mar 17, 2013
- Messages
- 956
- Location
- USA
- Vessel Name
- Heads Up
- Vessel Make
- Grand Banks 42 Classic
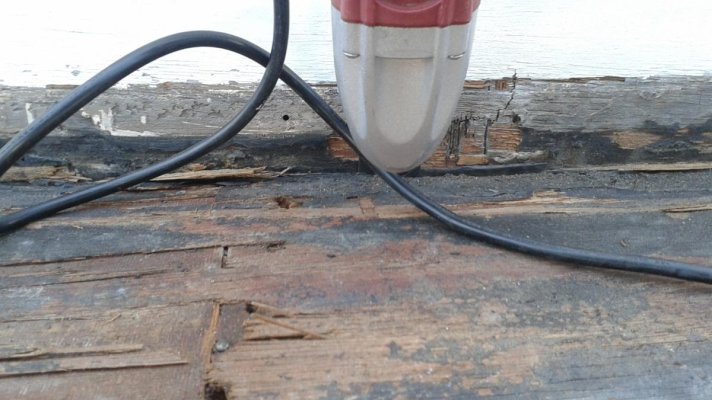
I removed the last piece of teak deck that was underneath the bulwarks. This is the hardest job because there is only the space of the sawzall blade between the bulwarks and the teak. Then you have screws and nails going through the teak.
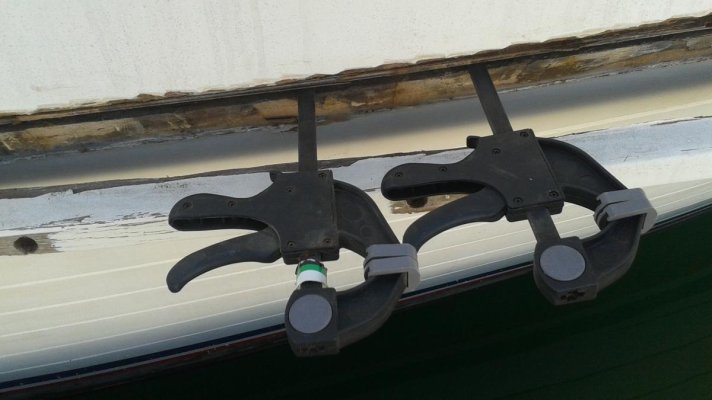
After it was cleaned out I started lifting the sub deck which is also nailed down. I bought clamps from Harbor Freight and I use them to pop the nails up. I get them to go under the subdeck at the house and twist them which raises the deck and pops up a nail. I use two and work them down the deck until it's loose.
I should mention GB used a polysulfide deck caulking at the deck house seam and stuck the sub deck seam down with it. To cut that loose I used the Harbor Freight Fein tool clone and it cut a clean cut. Much better than the razor knife I used port side.
If you break a clamp, they have a lifetime guaranty and free replacement. I know, done it already.
Attachments
RT Firefly
Enigma
Greetings,
Mr. C. So, in essence you are using the clamps as pry bars and not as clamps- correct? If so, why even mention they're clamps or am I missing something?
Mr. C. So, in essence you are using the clamps as pry bars and not as clamps- correct? If so, why even mention they're clamps or am I missing something?
OP
OP
Capthead
Guru
- Joined
- Mar 17, 2013
- Messages
- 956
- Location
- USA
- Vessel Name
- Heads Up
- Vessel Make
- Grand Banks 42 Classic
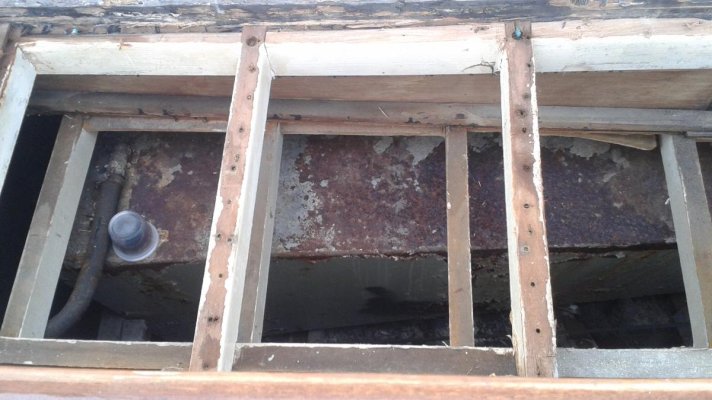
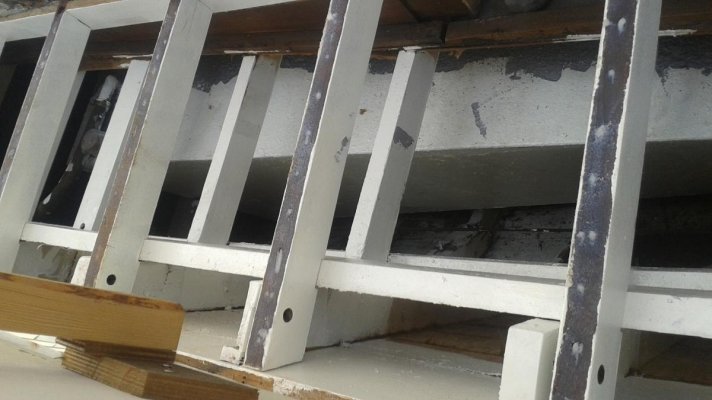
After I removed the sub deck I inspected the stringers and below decks. This side didn't have any cracked stringers or severe water damage. Today I'll remove the stringers, sand to bare wood, soak with CPES and prime them with epoxy water barrier primer. They will get coated with epoxy top coat before being replaced.
I have surface rust on the fuel tank but it's nothing that POR15 can't handle. I'll have the tank top and back painted before I replace the sub deck. The inside of the hull also.
I have surface rust on the fuel tank but it's nothing that POR15 can't handle. I'll have the tank top and back painted before I replace the sub deck. The inside of the hull also.
Attachments

OP
OP
Capthead
Guru
- Joined
- Mar 17, 2013
- Messages
- 956
- Location
- USA
- Vessel Name
- Heads Up
- Vessel Make
- Grand Banks 42 Classic
RTF, You are correctomundo. I simply mentioned them as clamps because for about 6 bucko's each you can use them as pry bars, break them, and take them back and get new clamps for the use they were made for.
It's the American way...
And don't forget to take the 20% off coupon when you buy them.
It's the American way...
And don't forget to take the 20% off coupon when you buy them.
Nomad Willy
Guru
American's are the consumers of the world taken to the highest level.
But here on the Capt's job it's "git er done" as I see it.
I don't think a computer could count the thousands of times I've used a screw driver as a pry bar or chisel. However I usually use the old ones for that.
But here on the Capt's job it's "git er done" as I see it.
I don't think a computer could count the thousands of times I've used a screw driver as a pry bar or chisel. However I usually use the old ones for that.
OP
OP
Capthead
Guru
- Joined
- Mar 17, 2013
- Messages
- 956
- Location
- USA
- Vessel Name
- Heads Up
- Vessel Make
- Grand Banks 42 Classic
I have a crow bar too, actually two of them, but the clamp works the best for this. I only have 3/4" of space where the old teak was taken out from under the bulwarks and the clamp exactly fits it.
The deck is 24" from the house to the outside of the hull. I didn't have a screwdriver that long.
The deck is 24" from the house to the outside of the hull. I didn't have a screwdriver that long.
OP
OP
Capthead
Guru
- Joined
- Mar 17, 2013
- Messages
- 956
- Location
- USA
- Vessel Name
- Heads Up
- Vessel Make
- Grand Banks 42 Classic
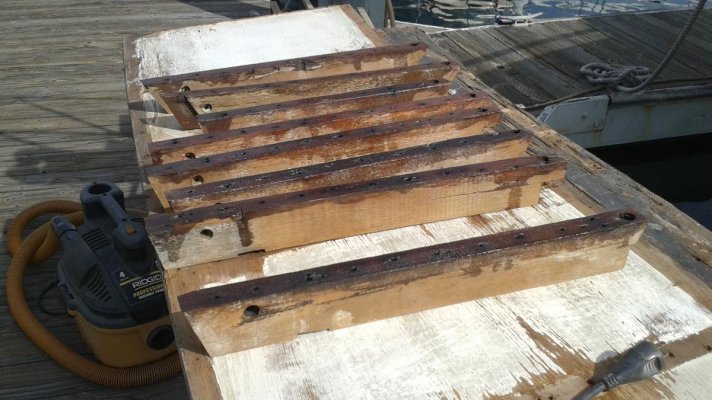
Back at work today and I removed the stringers, cleaned them up and soaked them with Smiths CPES. The tops of them, 8 to be exact, soaked in 9 oz. of the stuff before the wood remained glazed for more than 10 seconds.
The thing I keep noticing is they painted the bottom side of the sub deck and stringers after the deck went down. I find a lot of paint seeped on the top edge of the stringers leaving me to believe there was always a gap between the deck and stringers.
When I replace my deck piece I have thickened epoxy on the stringer tops and the deck screws squish it out evenly. I am not having that problem going back.
Attachments
- Joined
- Apr 15, 2008
- Messages
- 13,731
- Location
- California Delta
- Vessel Name
- FlyWright
- Vessel Make
- 1977 Marshall Californian 34 LRC
Looking great, Stretch! Your work is inspirational! Love the progress reports.
dhmeissner
Guru
- Joined
- Sep 26, 2012
- Messages
- 1,569
- Location
- North America
- Vessel Name
- The Promise
- Vessel Make
- Roughwater 35
Mr. C, great job, my hat's off to you, what kind of band are you playing in?

OP
OP
Capthead
Guru
- Joined
- Mar 17, 2013
- Messages
- 956
- Location
- USA
- Vessel Name
- Heads Up
- Vessel Make
- Grand Banks 42 Classic
I ran out of POR 15 and found it at 4 Wheel Drive that has a huge warehouse close to my house. I also have a paint that is the same as rustoleum but it isn't near as good as POR 15. I'm using that as a top coat. I should have the tank painted today and be able to move on. This side is going much faster because of less damage and the experience I learned on the port side.
I'll post more pictures soon.
I'll post more pictures soon.
Pack Mule
TF Site Team
- Joined
- Jan 24, 2013
- Messages
- 3,749
- Location
- USA
- Vessel Name
- Slo-Poke
- Vessel Make
- Jorgensen custom 44
Dang man ,I was just thinking about taking a little break on mine . I like your "get after it " attitude . I'll be back at it tonight after work . Thanks for the motivation . Wife says we are like madmen .

OP
OP
Capthead
Guru
- Joined
- Mar 17, 2013
- Messages
- 956
- Location
- USA
- Vessel Name
- Heads Up
- Vessel Make
- Grand Banks 42 Classic
I now have a solid coat of POR 15 on my tank 1/2 of top and back side. I'm going to clean the inside hull area somehow so I can paint it with epoxy too.
The tank will get a second coat, then I'll paint it white with rust oleum. They don't make POR 15 in white.
It's coming along nicely. I should be cutting out sub deck pieces next week.
The tank will get a second coat, then I'll paint it white with rust oleum. They don't make POR 15 in white.
It's coming along nicely. I should be cutting out sub deck pieces next week.
Attachments

OP
OP
Capthead
Guru
- Joined
- Mar 17, 2013
- Messages
- 956
- Location
- USA
- Vessel Name
- Heads Up
- Vessel Make
- Grand Banks 42 Classic
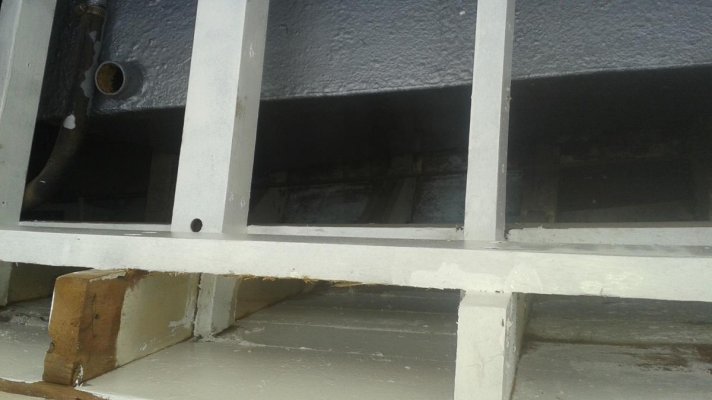
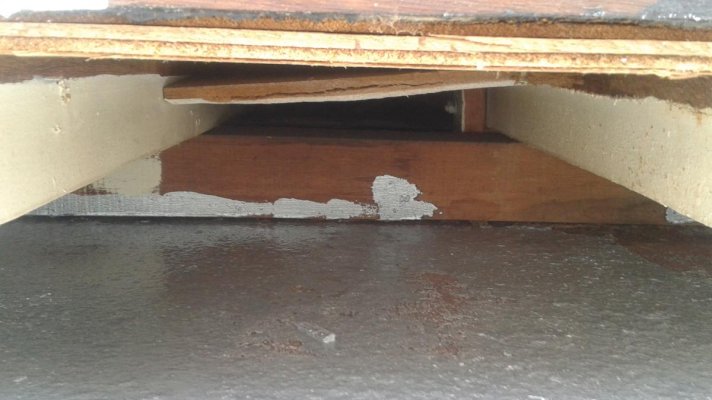
We had warmer dry weather the last few days and I started back finishing the rust stopping and painting on my starboard fuel tank. This is a 250 gallon black iron tank with surface rust.
I cleaned as much loose rust off the tank as I could and prepped the metal with an acid, then painted a first coat with POR 15. Today I'll do a second coat and when that dries I'll paint two white coats of Rustoleum. Simply because I want white and POR 15 doesn't make white paint.
In the pic, you're looking at the top of the tank and the board in the background is the blocking board at the top edge inside the engine room.
The second pic is the area I have to lay on to get inside the less than 3" space between the tank and sub floor. I already painted the outside of the tank white.
Attachments
Codger
Member
Have you considered replacing the non skid with Treadmaster. This is a sheet product that is cut to patterns you decide and it used to be glued down with epoxy. But I see that it is offered with WP self adhesive backing
It comes in two styles and several colors.
One is industrial looking and the other is more genteel. I have used both with success.
Getting rid of all the teak gets rid of useless weight on older boats. The fact that this weight all located above the center of buoyancy is a plus as well.
Defender marine stocks the stuff.
Marine Treadmaster on Sale
RT Firefly
Enigma
Greetings,
Mr. C. Welcome aboard. Holy Cow that stuff is pricey! I think I'll stay with Kiwi-Grip.
Mr. C. Welcome aboard. Holy Cow that stuff is pricey! I think I'll stay with Kiwi-Grip.
N4712
Guru
- Joined
- Apr 22, 2013
- Messages
- 3,607
- Location
- U.S.A
- Vessel Name
- Oliver
- Vessel Make
- Nordhavn 47 Hull# 12
We have that stuff on our Camano from the PO, it's peeling off, and heavily faded.Have you considered replacing the non skid with Treadmaster. This is a sheet product that is cut to patterns you decide and it used to be glued down with epoxy. But I see that it is offered with WP self adhesive backing It comes in two styles and several colors. One is industrial looking and the other is more genteel. I have used both with success. Getting rid of all the teak gets rid of useless weight on older boats. The fact that this weight all located above the center of buoyancy is a plus as well. Defender marine stocks the stuff. Marine Treadmaster on Sale
OP
OP
Capthead
Guru
- Joined
- Mar 17, 2013
- Messages
- 956
- Location
- USA
- Vessel Name
- Heads Up
- Vessel Make
- Grand Banks 42 Classic
I'm buying the mold that Nordhavn uses in their boat molds and making a sheet of nonskid which I'll cut as needed and epoxy down. This should look factory and it'll be all one color.
Molded in nonskid is what I'm after.
And, probably at about what that product costs or less. The good thing is that mold can be reused many many times and I can sell ready made nonskid for other boat projects.
Molded in nonskid is what I'm after.
And, probably at about what that product costs or less. The good thing is that mold can be reused many many times and I can sell ready made nonskid for other boat projects.
Capt. JB
Veteran Member
- Joined
- Feb 16, 2014
- Messages
- 62
- Location
- USA
- Vessel Name
- FREEDOM
- Vessel Make
- 40 BLUEWATER PILOTHOUSE TRAWLER
Do you have the mold already? I'd be interested since I'm doing the same rehab to my boat and located in Shoreline Marina.
Josh
BTW...great job posting your progress. It's looking good!
Josh
BTW...great job posting your progress. It's looking good!
Similar threads
- Replies
- 10
- Views
- 1K