Bulkhead question for builders

The friendliest place on the web for anyone who enjoys boating.
If you have answers, please help by responding to the unanswered posts.

Pack Mule

TF Site Team
Joined
Jan 24, 2013
Messages
3,749
Location
USA
Vessel Name
Slo-Poke
Vessel Make
Jorgensen custom 44
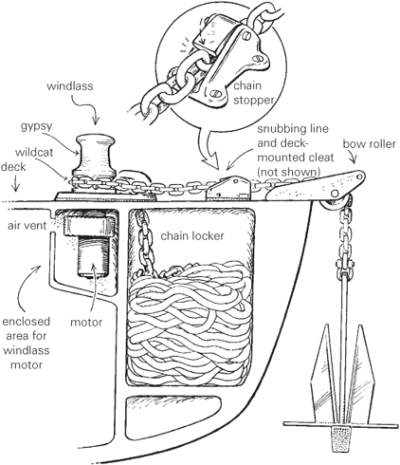
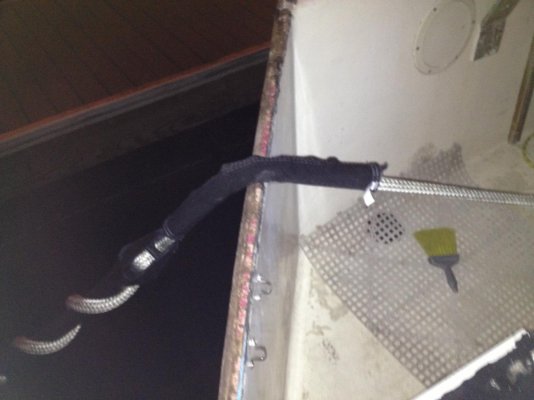
I tore out an exterior bulkhead between my anchor locker bulkhead and my cabin bulkhead. This was an area where line,fenders extra chain and any other junk you don't want rolling around are stored and it's not a structual bulkhead. I tore it out because of some rot. It was made from plywood and solid wood and incapsulated in fiberglass and over half of it rotten and still wet after boat's been under cover for 3 month's .I'm pretty sure it was an afterthought and added after the boat was built .
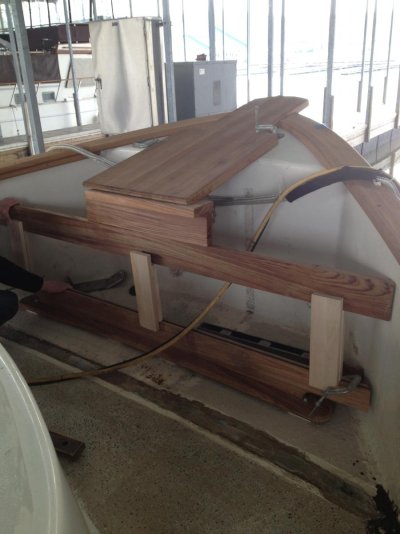
Anyway I'm buliding it back with teak and plywood and not going to glass it just epoxy coat the plywood and paint it and varnish the teak . My problem is I didn't pay attention to how the old bulkhead was installed meaning was it plumb or was it 90 degrees to the deck or was it something else ?:facepalm: Does it matter or should I just go with what looks right ? Is there any hard fast rules about what is right and wrong. It will have a rail on top of it about the same width as my new rail and should this be parallel with the caprail? I hate to get this done and old shipwright sto by and say "hmmm that ain't right ".
 
Did it seem to be structural? Or just a barrier?

Usually angles matter for structural bulkheads depending on what loads it is supporting.... but perpendicular isn't always a requirement. As long as the angles aren't very acute...good tabbing should transfer the load . Often if structural ,they have (or should have) some cushioning in high flex areas.
 
Greetings,
Mr. P. Can't help you with orientation but after sufficient rums the old shipwright might change his comment to "hmmmm that'll work". Keep a couple of quarts on board for just such a contingency.
 
In the Carolina boats we would set the bulkheads plumb with vessel on waterline. For no other reason it makes later interior construction simpler. Nothing wrong with a little angle if it looks better. Try to get it at accurate distance from stem on each side, having it cocked that way looks unprofessional.
 
psneeld It's just a barrier and not structural . You might can see it in my avatar .
Mr RT,
I do keep the rum on board .That what I was in to when I tore the old one out . My wife is usually there to ask the right questions before I tear something out but she was in the rum herself. I keep plenty on board for when I get on the neighbors nerves with all the heavy work we are doing. While everyone else is busy polishing and and rubbing on their boats we are beating ,banging , sawing ,sanding and swearing .
 
Becoming more popular is pics and or videoing every project you get into...

For me half the time I should review it just to see where I left what tools where...:banghead:

I would say place it where it looks the best as long as it won't collect water, dirt, strange looks.....
 
Greetings,
Mr. P. Any chance you could post a pic' of where you're talking about?

attachment.php


Is this the bulkhead (vertical) you're talking about or is it aft of this?
 
This one is staying . It is aft of this one . I'm trying send a pic . My windlass will be dumping chain out between these two bulkheads . The forward bulkhead chain storage area was to crowded area to get windlass mounted . I plan on mounting bulkhead up on about 4 pads so that water can run underneath and not be trapped . This is a good area to wash down chain and line . I will have to hand load chain back into locker after .Sorry didn't rotate pic.
 

Attachments

  • image.jpg
    image.jpg
    97.3 KB · Views: 218
Greetings,
Mr. P. Ah, I See now. I would probably align the new bulkhead parallel to the existing vertical bulkhead I posted and the "cap" piece at the same level and angle as your new cap rail. Or.....you could get all fancy and put in something like this instead of a dull flat piece of ply....
1000x1000.jpg


Bwahahahaha.......
 
Last edited:
Greetings,
Mr. P. Ah, I See now. I would probably align the new bulkhead parallel to the existing vertical bulkhead I posted and the "cap" piece at the same level and angle as your new cap rail. Or.....you could get all fancy and put in something like this instead of a dull flat piece of ply....
1000x1000.jpg


Bwahahahaha.......
That's nice . Looks like a good spider hangout. I plan on using teak frame with only about 10" piece of ply in the center. My teak lumber pile is getting low .
 
The new bulk head will support the aft end of anchor roller/ windlass platform
 

Attachments

  • image.jpg
    image.jpg
    106.7 KB · Views: 178
I agree with RTF. It needs to be the same angle as the front one, which is probably about vertical from the waterline, and you'll certainly need good drainage at the base of it - ? epoxy in a tube into each outer corner..? (? lead drain tube to nearest scupper, if that looked ok - that's what I do with the drains that come down from the aft corners of the flybridge).
 
I agree with RTF. It needs to be the same angle as the front one, which is probably about vertical from the waterline, and you'll certainly need good drainage at the base of it - ? epoxy in a tube into each outer corner..? (? lead drain tube to nearest scupper, if that looked ok - that's what I do with the drains that come down from the aft corners of the flybridge).
Thanks Peter B,
I'm putting the teak base plate for the bulkhead on top of four starboard pads so that it will drain under the base plate.Also I cut the base plate back about 4" on each side from where the deck turns up to the side .The bottom teak frame rail for the bulk head will sit on base plate and have cut out at the bottom on each side where it connects to the sides of the hull. The deck has some camber and this should direct all drainage to the scuppers .
The way it was in before there was only small drainage cut out at each end of base plate and everything was glassed in a fiberglass sandwich . It had some leaks that allowed water to be trapped and when I tore it out last weekend it was a soggy mess.
 
PACK MULE: teak work looks as though it was done by BAREFOOT WOODWORKS OF TN. GOOD JOB:
 
Thanks jimbob
If I have to purchase anymore teak I will be barefoot year round
 
The new bulk head will support the aft end of anchor roller/ windlass platform

how about a stainless steel compression/tension post that doubles as the chain path to the anchor rode locker?.. when in doubt trade stainless for teak!
HOLLYWOOD
 
how about a stainless steel compression/tension post that doubles as the chain path to the anchor rode locker?.. when in doubt trade stainless for teak!
HOLLYWOOD
Hollywood,that's a good idea. I would like to get the chain in the locker without having to hand feed it .The area between the two bulkheads is a good area to store an extra anchor and fenders( or hooters as we call them) while underway . It would have been better if the bulkhead that was forward had been little further aft and I could have put the windlass there. I might still need to brace the windlass under the platform between the two bulkheads with a stainless brace and maybe it could include a tube for the chain path to the locker.
 
Here is a mock up of the beginning of the bulkhead. Needs some heft taken out and and some tweaking .It will have a cap rail on each side of the platform.
 

Attachments

  • 02-16-14 bulkhead.jpg
    02-16-14 bulkhead.jpg
    101.8 KB · Views: 169
Hollywood,that's a good idea. I would like to get the chain in the locker without having to hand feed it .The area between the two bulkheads is a good area to store an extra anchor and fenders( or hooters as we call them) while underway . It would have been better if the bulkhead that was forward had been little further aft and I could have put the windlass there. I might still need to brace the windlass under the platform between the two bulkheads with a stainless brace and maybe it could include a tube for the chain path to the locker.

between the rhode weight pushing down on the cantilevered section of the platform and the windless trying to climb up the chain during retrieval there is a fair amount of tension on the rear of the platform. Don't be afraid to think out of the box.. if the chain needs to lead a bit aft the post that carries the chain can be at a shallow angle.
HOLLYWOOD
 
Hi PM,
I'm not at that stage in my build yet so have been preparing by doing some research into sizes ect for when that time comes.

I found the below pics that may be of use to you. I'd hate to see you go through all that work and then have the chain bunching up and jamming everything.

With the drain, I plan on running mine straight out the side of the hull and put a hood (midget vent) over it. maybe this could work for you also :confused: ... Anywhoo work looks great mate :thumb:
 

Attachments

  • WindlassChart.jpg
    WindlassChart.jpg
    96.3 KB · Views: 622
  • f0329-01.png
    f0329-01.png
    58.6 KB · Views: 2,987
  • Chain%20Connection.jpg
    Chain%20Connection.jpg
    7.5 KB · Views: 655
Hi PM,
I'm not at that stage in my build yet so have been preparing by doing some research into sizes ect for when that time comes.

I found the below pics that may be of use to you. I'd hate to see you go through all that work and then have the chain bunching up and jamming everything.

With the drain, I plan on running mine straight out the side of the hull and put a hood (midget vent) over it. maybe this could work for you also :confused: ... Anywhoo work looks great mate :thumb:
Thanks Hendo,I have a manual horizontal windlass and my plan for the time being is to just let the chain dump out on the deck between the two bulkheads in the open and either leave it there or hand feed it back in the locker . We normally anchor in around a 12' depth here on the Tennessee River .
 
Bulkhead a little further along.Still more cutting and fitting to do before install.
 

Attachments

  • bulkhead 02-18-14 001.jpg
    bulkhead 02-18-14 001.jpg
    94.6 KB · Views: 127
  • bulkhead 02-18-14 002.jpg
    bulkhead 02-18-14 002.jpg
    95.3 KB · Views: 134
Are you going to have any doors so that you can get back in there to untangle a rats nest? Are the sides butted up to the hull or is that a hull liner?
 
The bulkhead is not enclosed and it's not structural .This really just a partition . It's an open area . The chain locker is forward of this about 20" .There was a partition about 6" further aft that had a lot of rot ,so I tore it out . I wanted some more walk around room so I built this one further forward. I can untangle any rats nest from the top . The chain locker has a door in the v berth .I'm attaching the vertical pcs to the side where the deck turns up with screws and 4200 .Then I'm attaching the partition to the bottom plate and to side plate with cleats and screws and adhesive caulk.I should be able to remove it without doing any damage to the area .The previous one was totally glassed in and had rot in the core .All of this will be exposed like on a wood boat with all the surfaces epoxy coated .I'll try to attach a pic of how the hull and deck come together . This was right after I removed the old cap rail .You can see the bulkhead for the chain locker and a part of the old partition before I tore it out.
 

Attachments

  • bulkhead 02-19-14.jpg
    bulkhead 02-19-14.jpg
    92.3 KB · Views: 120
I would examine the old bulkhead to see how tight the fit was.

You do not wish to create a hard spot , a bulkhead that is too stiffly mounted that when the hull flexes it must bend at the bulkhead.

To avoid this a piece of foam between bulkhead and hull will help before glassing in the bulkhead. Glass it only on one side for easier movement.
The old one was glassed in the the side.There was not any eaxtra foam added in this area. I think that this bulkhead was added on and not part of the original build. The hull is about 1/2" thick in this area and it has a foam core of about 1/2" with about a 1/4" skin on the inisde were the bulkhead was attached.The red area in the pic is the foam core . I think I will also add a piece of foam between the inner skin and the teak vertical side plate. unless you think the foam core is already enough for the flex .Thanks for pointing that out .
 
When we remodel the Eagle we lined every up by eye, what look best with what was there. If the eye can no caught/see it then its good enough. :thumb: Besides the trim of the boat is constantly chagning
 
Phil Fill,
I read in some boatbuilding book I think it was George Buehler Backyard Boatbuilding that the chair that you sit in at the end of the day to look at your progress just might be the best tool in the shop. Sometimes as a carpenter and not a boatbuilder it's hard to make it look like it belongs on the boat and not a house.
I sure like the lines on your Roughwater .
 
The first think that you need to do is throw away every framing square that you own. They will just get you in trouble. I went back and looked at the pictures of the cap rail install after I asked about the hull sides and figured out how it was built. I don't think you need to worry about creating a "hard spot' that high up on the hull. As long as you use a solid wood for the cleats where it's fastened to the deck's should last. The cap rail looks top notch.
 
Thanks dsharp. I'm with you on the framing squares. Everything I've have done right now is just dry fitted . It all has to come off and then put back down with caulk . This whole project has been a real challenge .There is not much boat building in my neck of the woods ,mostly it's just house boats that never leave the dock.I build cabinets and furniture for the most part. When it comes to carpentry on a boat I go to books ,wooden boat magazine and this forum.
 

Latest posts

Back
Top Bottom