My Teak Table Project

The friendliest place on the web for anyone who enjoys boating.
If you have answers, please help by responding to the unanswered posts.
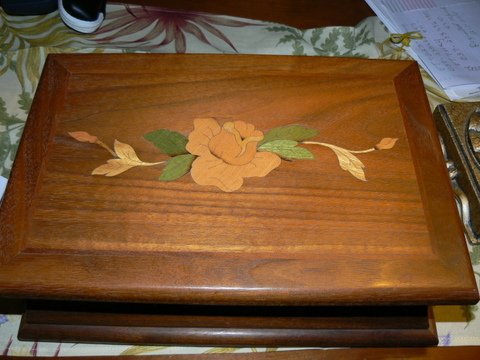
Well guys I decided to go with polyurethane.

I also decided to go with plain old spray on gloss minwax polyurethane. There might be a better "marine" product and I'm sure there is, but I've used this stuff before and it works really well.

All of the maple trim in my house, and all of the maple faced doors are finished with it, and, well they've held up pretty darn well.

That and it was something I could go to Home Depot and actually buy, vs taking a day to drive to Anchorage.

So, I sprayed four light coats so far, leaving about an hour in between coats. I'll spray a couple more tonight and let it set for a few days and see what I want to do next.

I'm thinking after that it'll be a light sanding with say 600 grit, or with a scotch bright pad then I'll put another one or two finish coats on.

Here's what it looks like thus far. Rememvber this was one solid board on Saturday morning

teaktablefourcoats.jpg

Works for me...
 
Thanks guys

In a photo, the table top probably looks just like did in the last photos. I wish I could but I'mtraveling, and not near my table top to take any more photos for a couple of weeks.

The problem with the polyurethane wasnt its looks, it was its performance.

I'm guessing that spraying on a coat or two on a piece of trim is far different than laying down 6 coats on a table top.

This was my first time working with old fashioned Varnish. What I did was to thin by 50% the first coat, then use full strength for the remaining coats.

What I found was that Varnish flowed very nicely, making it pretty much self leveling. It fully dried overnight, making next day sanding a breeze.

Something that photos cant show is that the varnish builds up very quickly making a very thick, deep looking finish.
 
Sounds/looks great. Don't touch it any more - might spoil a good thing. Enough is enough, as they say...
 
Kevin, Very nice job. I am an amateur woodworker myself so I can appreciate the work you put into this. Since buying my boat almost 4 year ago I've not done much wood working, it's a skill that needs to be practiced.

I've got a couple of questions:
Did you consider instead of notching the top to accept the raised sides perhaps finding some wood that would closely match the gain of the top and gluing the routed side on top and to achieve the thickness a similar piece on the bottom. My guess is you wanted the perfect look of no seams so you went with a solid piece.
That leads to my next question; How did you cut the notches out of the top? I would think a band saw or jig saw would not cut straight enough to get the tight fit you did. I'm talking about the fit at the corners, I know the length was over lapped by the routing.

Finishing is not my strong point. I bet it took some time getting the poly out of the joints especially where the top meets the raised edges. Did you spray on the varnish?

I've been thinking of doing the same thing to my boat. My current table is topped with plastic laminate that matches the galley counters. It looks OK, but a table like yours would really make it POP.

Many years ago I made a jewelry box with an inlay. That's what I envision when making my top. The inlay is bought and glued into the top and sanded smooth. The technique I got from an issue of Woodsmith magazine probably 25 years ago.
 

Attachments

  • P1050393.JPG
    P1050393.JPG
    97.2 KB · Views: 71
Kevin, Very nice job. I am an amateur woodworker myself so I can appreciate the work you put into this. Since buying my boat almost 4 year ago I've not done much wood working, it's a skill that needs to be practiced.

I've got a couple of questions:
Did you consider instead of notching the top to accept the raised sides perhaps finding some wood that would closely match the gain of the top and gluing the routed side on top and to achieve the thickness a similar piece on the bottom. My guess is you wanted the perfect look of no seams so you went with a solid piece.

That leads to my next question; How did you cut the notches out of the top? I would think a band saw or jig saw would not cut straight enough to get the tight fit you did. I'm talking about the fit at the corners, I know the length was over lapped by the routing.

Finishing is not my strong point. I bet it took some time getting the poly out of the joints especially where the top meets the raised edges. Did you spray on the varnish?

I've been thinking of doing the same thing to my boat. My current table is topped with plastic laminate that matches the galley counters. It looks OK, but a table like yours would really make it POP.

Many years ago I made a jewelry box with an inlay. That's what I envision when making my top. The inlay is bought and glued into the top and sanded smooth. The technique I got from an issue of Woodsmith magazine probably 25 years ago.


First off that is a very nice inlay!! I dont know how to do that.

As far as the notches, I didnt want the seams, and I wanted the grain to match so I went with the notches in the top. Gluing up the top from three pieces would have been easier though.

I started to cut the notches out with my router table, thinking I'd finish them up with the band saw, but quickly realized that the only bit I had that would do that was dull, so I used the band saw.

As you indicated bandsaws are imperfect, so at the corners I hand fitted the inserts using a file to do the final shaping to a sample piece with the correct notches. (remember there is a dado in the side pieces). Then it was as easy as very carefully cutting the side pieces to the correct length, as there is NO margin for error on the side pieces length wise.

In hind sight I probably could have routed in some overlap at the corners of the side pieces if I thought that part out more. That would have made final fitting easier, as that part took a couple hours.

Also in hind sight I could have used the router table free hand to ease the edges of the corners of the main piece. I was afraid of doing that since its free hand work with the only safety being the ball bearing guide on the router bit. I did this by hand using a vibrating sander.

Getting the poly off was easyer than I expected. There were a couple of corners I had to scrape, but it wasnt cured so the laquer thinner disolved it into mush very quickly.
 
Have you considered adding more than 3 coats? Some varnish experts advise as many as 8-10 coats.

Here's a link with lots of good varnish advice.

I have thought about adding more varnish, and will be looking at that when I get home. It looks pretty thick though.

We'll just have to see.
 
The reason behind 8 to 10 coats of Varnish build

Many boat finishers are reluctant to use wood filler to level the surface of open grain woods like teak and mahogany. The filler dulls the grain and in my opinion loses grain definition. The multiple coats give you enough varnish thickness to sand down to a perfectly smooth surface filling the open grain. The net finish really is only 3-4 coats after sanding.
If you use a penetrating epoxy first, you seal the wood and partially fill the grain. This reduces the number of coats varnish need to flatten the grain. It also tends to reduce black staining in the future from neglected varnish jobs.
In my area Captains varnish is popular with professionals because it can be sanded sooner allowing us to apply repeat coats in the same day. It is not as durable as Epithane.
If you are satisfied with your current results, there is no need to add more finish to your table if used in your interior of your pilot house.
The table looks great, an improvement over the stock setup for sure.
 
Last edited:

Latest posts

Back
Top Bottom