Replacing My Teak Deck After 47 Years

The friendliest place on the web for anyone who enjoys boating.
If you have answers, please help by responding to the unanswered posts.
RT Firefly, you are correctomundo. It was your post, not you.

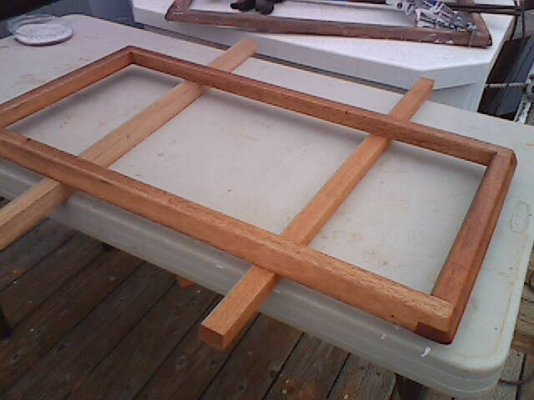
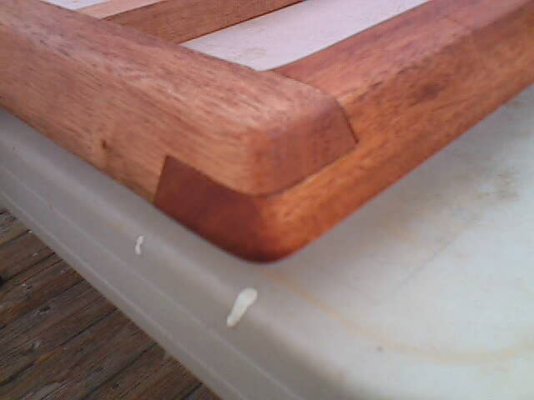
I finished the assembly of my final frame and by now I have figured out a system and can use one tool that strips the mahogany, cuts the angles and makes the lap joint. It's my table saw.

Bought a dado blade, no not a Daddyo a Dado. It was too wide to fit so it has to go back. All these cuts were on my table saw and a regular blade.
 

Attachments

  • 11-12-13-115129.jpg
    11-12-13-115129.jpg
    45.4 KB · Views: 111
  • 11-12-13-115251.jpg
    11-12-13-115251.jpg
    31.5 KB · Views: 96
Very nice! Epoxy and bronze screw from the back to hold the corners together?
 
Only epoxy at the moment. It gets bronze screws from the back for mounting. The original frames were screwed together and not glued. If there was glue, it came lose and didn't break any wood coming apart. I made these as one piece and held tight from through the cabin wall, bedded with butyl and water tight.
 
The port side deck is now screwed and glued with epoxy and more solid than when new. It has a sound that I love. SOLID!!!:dance:
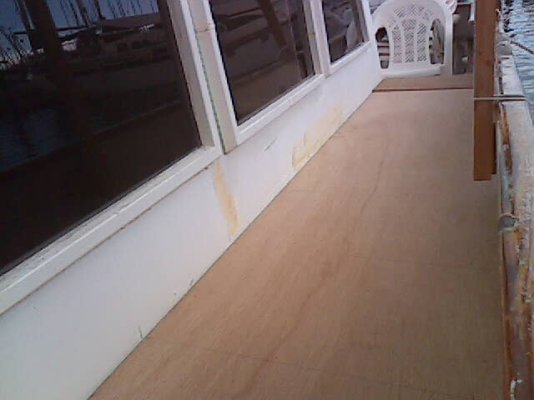
. I can dance on it. :dance:

In this picture the top deck pieces are just in place for pre drilling and fit. I didn't snap an after install pic. It was a "just in time" install too. It started raining a few hours later.

I should have finished this weeks ago but the detail I needed making new window frames and installing them was a time eating project and I didn't have the wood. I can now finish the window installs and move on to securing the bulwarks and glassing over the bow and port side.

Then on to the starboard.

What a project!! :eek:
 

Attachments

  • 11-20-13-123956.jpg
    11-20-13-123956.jpg
    36.4 KB · Views: 116
It's all looking good Capthead nice work . My teak for my cap rail just came in yesterday . I will probably look at for a week and figure out my best yeild before making any cuts.I've been having nightmares about screwing this material up.
 
I shudder when I ask my lumber yard teak prices. It's gold!!

Is your run straight or does it have a curve? If it has a curve will you steam the board first? I have seen two different steaming systems and they both worked well.

Good luck. I usually cut long and sand to fit for piecing in work. It takes time but worth it.
This was 5/4 bermese teak and it was $15.30 per board ft delivered .I bought all 5" wide material and saved a little bit per board ft.Random width price was right at $20 . I have to make stringers for both the inside and outside of the hull for the caprail to screw to . Most of my runs are pretty staright with a slight curve .On these stringers I'mjust going to band saw until the yeild gets out of hand. On the drastic curves for the stringers I have buit jigs and I will rip narrow strips and laminate with epoxy using the jigs to hold in place. The caprail is going to be about 1-1/8" thick and 4 " wide and most of it will be either band sawn or routered to shape with a template.
Your work looks great . I hope mine turns out as nice as yours .
 
It sounds like you have thought it out very well. That's a great price on teak too. I think we are about 20.00 here.

I'm sure your work will be top tier. :thumb:
 
The weather isn't allowing me to continue, which will be glassing over with cloth and epoxy. So, I've been thinking over the non skid and how I'll address that.

One option is to buy this mold pattern and make glass non skid customized to the boat and epoxy it on. It would be gelcoat white. This way if the paint wears off it's still white showing through. It would certainly bring the boat into this century/decade.

What do you think?
 

Attachments

  • GFCC_406N.jpg
    GFCC_406N.jpg
    73.5 KB · Views: 88
I doubt the cloth would stick where you want it and not float thus leaving air gaps and just a raised section. If it did stick then I reckon the bumps will still be slippery and only give the illusion of non slip giving a false sense of security. I've used and will continue to use a product call KIWIGRIP. I love it but Google and YouTube it for your own piece of mind
 
Last edited:
There is a racing sailboat from Australia two slips from my boat and it is covered with Kiwigrip. The owner was in my marina about nine months then moved to Florida where his trimaran is. We spoke about the Kiwigrip on his boat and I read up on it.

It's a very functional non skid but it doesn't have the look I am after.

As to placing glass cloth onto wood with epoxy, I have successfully laid many yards of cloth and used several gallons of epoxy without having it float. It's just getting the technique down and not using too much epoxy. I have seen what you are referring to, I don't lay glass like that.
 
capthead

On my first boat, built from scratch, the non-skid was achieved in two ways. part was by using a long nap paint roller in the gelcoat on the mold, just rolling it through the gelcoat one time, accepting the result. That was a decent non-skid, but not as attractive as the other method: using a plastic 2' x 4' diffuser from a flourescent light fixture (under $10 at the lumber store), pressing it into the wet gelcoat and lifting it out. No gelcoat came up with it, but the diamond pattern remained. That made an attractive non-skid that lasted well.
 
There is a racing sailboat from Australia two slips from my boat and it is covered with Kiwigrip. The owner was in my marina about nine months then moved to Florida where his trimaran is. We spoke about the Kiwigrip on his boat and I read up on it. It's a very functional non skid but it doesn't have the look I am after. As to placing glass cloth onto wood with epoxy, I have successfully laid many yards of cloth and used several gallons of epoxy without having it float. It's just getting the technique down and not using too much epoxy. I have seen what you are referring to, I don't lay glass like that.

Cool cool was Just an idea mate.
 
Thank you Koliver. I have a slip neighbor who has made several runabouts from scratch. He made molds from his designs and made FRP 14' boats. Now that I am to the point where I'm glassing over the deck, using epoxy of course, he wants to lend a hand and especially with the molding of the non skid.

I ran your ideas to him and he has used both of them. He also used the fiberglass screen idea someone else suggested. The roller in the green gel coat according to him produces an excellent non skid and the fluorescent screen mesh works for a neater look. He likes both but his quest is going to be making a sheet of non skid and cutting patterns from it to place on my deck making it look factory.

I am guiding this somewhat but he now is going with the "make it look like Grand Banks made this deck instead of teak" look.

I think I'll make several test panels and select from them. I'll post them here and we can all look. I'll do the screen, the cloth, the roller and the fluorescent diffuser screen and hopefully the mold from Flex Mold. I'm really leaning towards the Flex Mold 301 pattern but haven't found costs yet.
 
Hendo, it is a most interesting looking sailboat too. Certainly a one off and strictly racing. I'll post a picture of it next week. Maybe you or someone you know knows about it.
 
This is a great project thread C/H and love following it. I've given serious thought to a similar project as my biggest dislike of Grand Banks is the teak decks.
 
Yeah cool mate. Give us a look. Just had Another idea mate. Ya know the old trick of chucking some sand in the paint for a non slip surface, what about doing that in epoxy? Would probs have to wait till it flashed off a fair bit or else the sand would probably sink but yeah just another idea :)
 
Yeah cool mate. Give us a look. Just had Another idea mate. Ya know the old trick of chucking some sand in the paint for a non slip surface, what about doing that in epoxy? Would probs have to wait till it flashed off a fair bit or else the sand would probably sink but yeah just another idea :)

A similar process has been used to treat concrete floors in commercial kitchens for years. Works great but would be rough on bare feet. Btw walking on wet epoxy(during application) is easy in golf shoes.
 
A similar process has been used to treat concrete floors in commercial kitchens for years. Works great but would be rough on bare feet. Btw walking on wet epoxy(during application) is easy in golf shoes.

Ah so it wasn't a bad idea after all lol. Yeah good point re: bare feet. Be like a bad case of gravel rash if ya tripped and fell ay?
 
47 y.o. Teak Deck

Capthead:

Merry Christmas.
I am very happy today. I came across this thread which I have overlooked in my recent visits to the forum. I went in it and read all messages only to realize one absolute evidence.
No matter what people say about wood, I would like to see any other floor lasting on a deck, 47 years.
I am very happy not only for you and your boat. I am also happy for choosing wood/epoxy to build my Rainha Jannota
Thanks for your thread
Portuguese
 

Attachments

  • Piso1_Floor.JPG
    Piso1_Floor.JPG
    65.1 KB · Views: 126
I found the non skid I want for my boat.

What do you think?
 

Attachments

  • non skid.jpg
    non skid.jpg
    52.1 KB · Views: 191
Sorry to take so long getting back to the forum. :socool:

I completed the port side deck and laid two layers of 12oz cloth with epoxy. It hasn't been faired yet but it's covered and waterproof. The bulwarks have been epoxied in place also. I have yet to install the rub rail and will need a lot of assistance to do that task as it's one piece and longer than either finger on the sides of the boat. There are screws in it that I need to remove also.

I'm working on the starboard side deck now and need to complete this side ASAP. Weather being the factor here. So far, the drought in CA has helped keep the boat dry. We get a very wet fog occasionally and it takes half a day for it to dry.

This is looking at the starboard side deck with the teak still on it.
 

Attachments

  • 20140128_120528.jpg
    20140128_120528.jpg
    115 KB · Views: 125
I replaced the stanchions with temporary ones and removed the teak deck about 8'. There is a section of sub deck showing. In the picture you see the engine room fresh air vent and fuel fill.

When I removed the teak decking I found the sub deck was wet. Since it hasn't rained I was surprised to see that. When I remove the sub deck today I'll get a good look at the fuel tank below it. Hopefully I won't find too much rust.

It's supposed to rain tonight but they are only expecting a trace.
 

Attachments

  • 20140129_141653.jpg
    20140129_141653.jpg
    89.5 KB · Views: 124
I'm pulling up the subdeck and replacing it with new. I just hope the stringers are sound. In case they need replacing I have mahogany I can use. I'm just at the point of where this job is wearing me out and I need to complete it before I burn out.
 
Back
Top Bottom