Lehman 120 mechanical tach adapter

The friendliest place on the web for anyone who enjoys boating.
If you have answers, please help by responding to the unanswered posts.

psneeld

Guru
Joined
Oct 15, 2011
Messages
28,175
Location
USA
Vessel Name
Sold
Vessel Make
Was an Albin/PSN 40
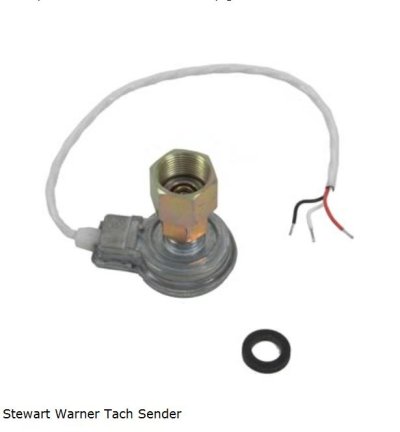
Anyone have one of these and has it ever started leaking oil?

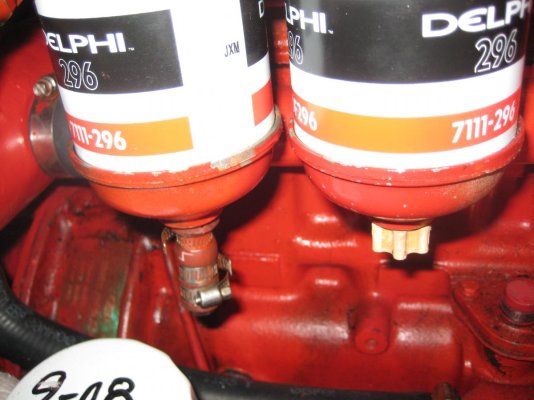
I have one and it's not being used for the alternator takeoff. It has started to leak on this trip and no amount of tightening it seems to last more than 10 hrs of running.

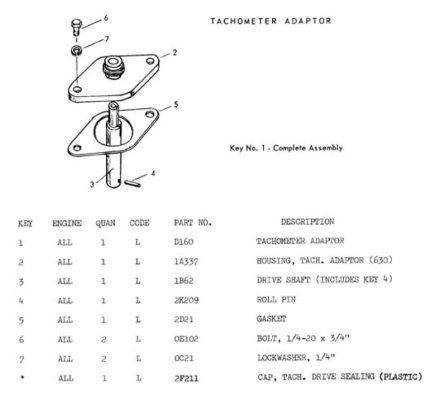
I'm going to call American Diesel later for possible solutions...but I can't find a decent pic of the whole assembly and wonder what I am getting into.

Any seals/"o" rings that are easily replaced or should I just remove and seal with a plate and gasket?
 
Try Nural 27 (is Orange colour) sealer.
It is normally used for engine gaskets improvement.

My ones never were reliable under 800 rpm
 
Try Nural 27 (is Orange colour) sealer.
It is normally used for engine gaskets improvement.

My ones never were reliable under 800 rpm

have you seen a Lehman mechanical tach adapter?
 
I had to overhaul one engine and all parts were disassembled.
Both are now mounted.
What are you interested in?
 
I had to overhaul one engine and all parts were disassembled.
Both are now mounted.
What are you interested in?

Mine is leaking from where the cap nut screws down onto the adapter housing and from where the electrical converter screws onto that nut.

I guess a thread sealer may work...was just wondering what the OEM sealing method was and did anyone tear into one and see what's keeping it from leaking....and more importantly why it's leaking.
 
Here you have a photo and part of the manual.

Providing that the "o" ring is ok, maybe you have a micro crack in the nut.
In that case, Nural27 will seal very probably...
 

Attachments

  • nmhjkl.JPG
    nmhjkl.JPG
    55.2 KB · Views: 101
  • Capturbbbnnjkha.JPG
    Capturbbbnnjkha.JPG
    27.4 KB · Views: 99
Different electrical part...I'm already planning on pulling and cover plate with gasket.

American Diesel sells a plug which I may use when I get someplace I can have it sent.
 
Different electrical part...I'm already planning on pulling and cover plate with gasket.

That is what I would do. Pull the drive altogether and cover the hole with a blank. Save the parts for the next owner.
 
Thanks everyone...just wanted to know if when I pulled the drivehaft that I didn't need safety glasses for 20 hidden parts and springs that would shoot me in the eyes ...you know how those sometimes are on the next exploded image...:D

or even worse the long skinny whatever that would fall back in and wind around the crank....:eek:

Thanks again!
 
Is this (lower right) what you are facing? Mine was like this from the PO.
 

Attachments

  • IMG_0389.jpg
    IMG_0389.jpg
    101.6 KB · Views: 103
Is this (lower right) what you are facing? Mine was like this from the PO.

yes...but mine has this awkward looking canister sitting on top that I assume is some sort of electrical producer that sends a signal to some long gone tachs.

It looks like but a little smaller than a gas engine distributer....but general shape with some screw terminals on top....useless, in the way and now leaking oil...

So after talking to American Diesel who said buy their plug solution, and RickB who agrees with me that a gasket and cap should be fine (at least while I'm travelling and probably forever) ...I feel confident that the solution is easy enough...I was just worried about "the unknown" with items that aren't on diagrams or in the "lehman public knowledge base"....:thumb:
 
If you can get a cap, that's good too but I would remove the flange and drive then make a blank flange to seal it off semi-permanently.

To start, pull off the tach generator (the can thing you described) and see if the threads are the same as a flare fitting cap. If one of those threads on properly then see if that seals it with the help of a small o-ring or something. Also, check with Stewart Warner and see if one of their caps will fit. There are not many different tach generator drives on the market. If you can get the cap from AD for $.50 then that is the easy way - as long as it is a seal and not just a plastic dust cap.

The drawing doesn't show a seal between the drive shaft and the housing but there is probably some type of seal there though it could be just a bushing. The thing is splash lubed and it appears that normal wear has allowed a seep that you are seeing now.

Actually AD sells the cap for something like $11.....though that was high for something akin to a freeze plug.

Brian was also concerned with crankcase pressure forcing some of the oil so I am cleaning my crankcase oil recovery system to reduce any back pressure...

While scrutinizing the engine...I may have a little oil around the head gasket but notice very little or none flowing down the sides of the engine.

My manuals say "don't" retorque the head...but AM recommends every 500 hrs...and I get conflicting info off the web.

Any definitive guidance source? Something about stretch bolts on the newer engines and if mine was a rebuild in 2009 (PO gave NO additional info or documentation on it and AM has no records of it) I'm worried about a blind retorque while cruising....is there any markings on the bolts?

I'm wondering if I can go another 250hrs till I get home and just pull the head, new gasket and new bolts?
 
For $11 I would do some research.

Is the oil around the head gasket or the rocker cover gasket?

Every 500 hours sounds like a good way to snap a bolt to me. The whole idea of torquing a bolt is to stretch it to a preload that exceeds the working load which prevents a fatigue failure. By retorquing that frequently just on speculation you are cycling the bolt load and imposing exactly the condition you want to avoid. You stretch it just a bit more each time.
I would leave well enough alone on all counts until I got home. Then, if you want to do it just for the record, pull the head, inspect the valves (regrind if you like) replace the guides if they need it, look at the bores, install a new head gasket and new head bolts. Then set the valves. After a hundred hours of so of running, check the torque on the head bolts, they may have relaxed a bit from gasket crush.

The "stretch bolts" you are talking about are "torque to yield" bolts that are tightened to a certain torque then a protractor type gauge is used to measure a certain angle of additional rotation to complete the installation. They are usually identified by their funny looking heads with a shoulder and are much different than a standard bolt.

thanks...I agree...will just have to keep a close eye on her.
 
I agree with Rick. Risk of breaking a stud is pretty high.

Keep in mind that torque is an indirect method of applying and measuring the tension of a fastener. The coefficient of friction is certainly greater under the nuts or boltheads and in the threads than the day it was assembled with fresh lube. Therefore the torque required to retension the stud is higher. Often times a lot higher.

I'm a big fan of doing hot torques after equipment has thermally and pressure cycled; but soon after initial assembly.
 
thanks again guys...

I cut an aluminum plate and used some oil pan cork/rubber gasket material...15 hours and not a drop..

While I was at it I really wiped down the engine and tightened a lock nut on an injector fuel line that I had to replace last winter trip...seems like I have narrowed down the last leak to the oil filter housing area (tough place to see on my engine application).

Certainly nothing to be concerned about at this point..the head gasket might be moist but till I Q-tip around in another week or two...I feel pretty comfortable.
 

Latest posts

Back
Top Bottom