Winter Project Replace entire caprail

The friendliest place on the web for anyone who enjoys boating.
If you have answers, please help by responding to the unanswered posts.

Pack Mule

TF Site Team
Joined
Jan 24, 2013
Messages
3,749
Location
USA
Vessel Name
Slo-Poke
Vessel Make
Jorgensen custom 44
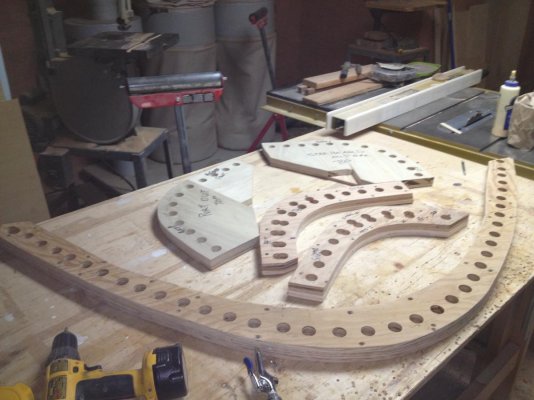
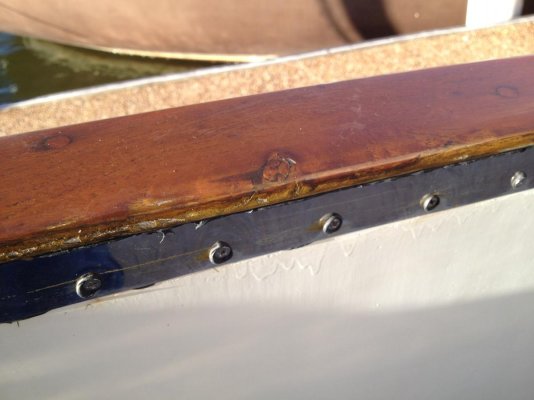
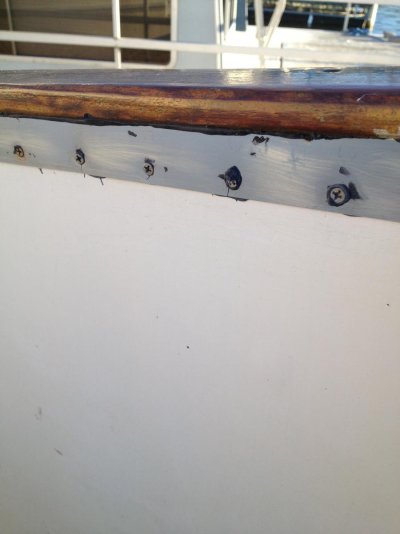
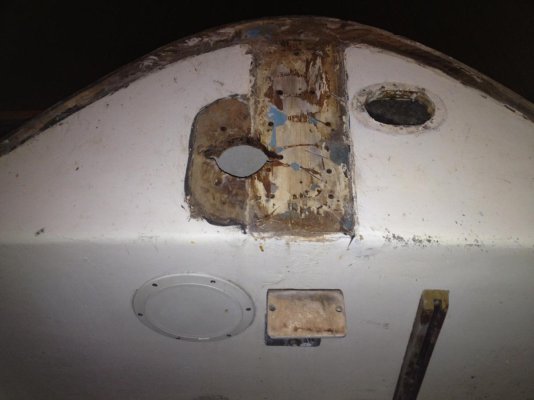
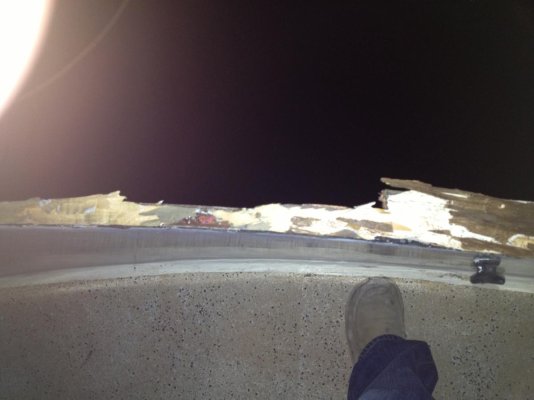
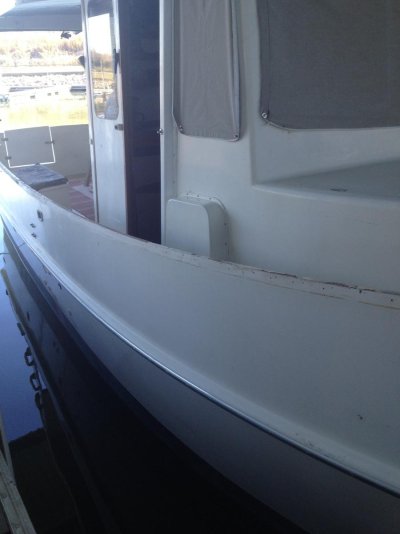
I plan on replacing my entire cap rail this winter .Mine is shot and not done very well.I 'm planning on using Burmese teak. It has mahogany on it now and most of near the end grain joints is rotten.Also if you look at the pic someone put a 1" tall stainless steel strap on the inside with a SCREW every 2" !!!!.I don't what they were trying to achieve but I have taken out all 600 of them and caulked the holes and put new screws in just for a temporary fix.
This my plan for new cap rail and I'm open for suggestions:
1.move the boat into covered slip so I can keep dry.
2.remove all mahogany cap rail , all 600 band screws and stainless steel band
3. epoxy all holes from the 600 screws and any holes left from the where the cap rail was screwed down from top and into the side of the hull
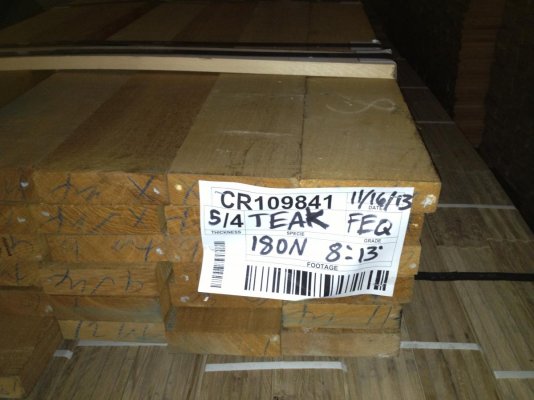
4. Plane 5/4 teak to 1-1/8" thick or whatever it takes to clean it up
5.rip pieces off the edge about 7/8" wide
6 .clamp these to each side of the hull to deck joint with 3m 5200 giving me about 3"of width with 7/8' wide teak on each side of hull only using screws where I have to or no screws at all.
7, make the cap rail 4" wide x 1-1/8" thick giving me about 1/2" overhang on each side and round over the edges.
8.screw the cap rail down using 3m 4200 and only screw the rail down only to the teak on each side and not to the hull but put 4200 on the full 3" width.
I thought about putting a drip groove on the bottom of the cap rail on the overhang part about 1/8" wide and 1/8" deep to keep water from trying to suck in under the rail.
Thanks for looking at this and I would love to hear your ideas.
 

Attachments

  • cap rail 001.jpg
    cap rail 001.jpg
    88 KB · Views: 337
  • cap rail 002.jpg
    cap rail 002.jpg
    55.1 KB · Views: 270
  • cap rail 003.jpg
    cap rail 003.jpg
    71 KB · Views: 259
  • cap rail 004.jpg
    cap rail 004.jpg
    90 KB · Views: 291
I did this job earlier in the spring of this year to my motorsailer and it was a BIG one. Your situation sounds pretty similar to mine although i had a bit more to do as my boat is approaching 40 feet. Also, i did mine in two layers with the first base layer being white oak and the top visible layer was Iroko (sometimes called African Teak). The reason I went with two layers was the original was laid up in two layers and it also served to give me a base to screw the Iroko into without worrying too much about piercing through into the void in the hull to deck joint. It also allowed me to stagger the joints so that water intrusion was less likely. In other words the iroko layer never had an end joint above an end joint on the oak layer. Your idea to use as few fasteners as possible is a good one but keep in mind your hull likely curves up to the bow and i needed quite a few fasteners to screw down and hold the layers to the contours of the hull. If your hull has any curvature at all then your idea to use 1 1/8 thickness is likely not going to work well. The burmese teak is a hardwood and not all that flexible at that thickness. The iroko I used was about 6 to 7 foot lengths at 7/8ths thickness and i needed to stand on the middle of each board with my full weight of 200lbs to get it to countour to the hull while my dad fastened it down on a bed of 5200. In order to get a nice graceful countour that matched the hull I selected boards that had plenty of overlap and then used a guide to router the boards to the shape of the hull. It came out looking much better than the old one. I also rounded over the top edge with a router for looks and less splitting. If you have any questions don't hesitate as the job is still pretty fresh in my mind.
 
Thanks jarod,
I like your idea on using two layers and the white oak does hold fasteners well. Did the 5200 work like you wanted it to? did you screw the white oak down to the hull joint and use 5200 also.My hull does not have a lot of contour .I think I can pull down the little amount in the sheer and i'm going to cut in the curve on a band saw.I did this once before on a 1965 islander 32 ft sailboat.the cap rail was about 7/8" thick.This is a foam filled core and I don't think I will get a good hold screwing into the foam.That's the reason for the teak on each side.a big portion of the rail is flat.
 
I have not removed cap rail yet so I'm not sure what is there to screw to . I hope the builder laminate something in the hull to deck joint that's good to screw to.
 
With respect to how the 5200 worked I guess time will tell. It has only been 6 months and it seems to be doing fine so far. I would guess our climate up in the PNW is quite a bit different from yours in that water intrusion from the steady rains is a constant battle. I have never been to Paris, TN, but when i think of that part of the states I envision nice warm balmy weather with the occasional thunder shower?

I like you had teak stringers on either side of the hull to deck joint which was actually open when i pulled the cap rail with the exception of some butyl goop or similar mushed into the opening. In my case the cap rail is essentially all that stands between water and that hollow void (the hull to deck joint is glassed together on my boat below the void or about 16 inches below the hollow gunnel). I screwed down the white oak onto the teak stringers with a generous application of 5200 down each stringer. I was careful to only screw into the teak and not down the hollow center which would have put me into the void between the hull and deck. My boat came with the teak stringers in place already and they straddled the inboard and outboard side of the hull joint. They were countersunk and through bolted with stainless bolts and nylocks right through the gunnel. If I was re-doing it I would do it the same way but I would bed it in 5200 as well and seal the bolts with 5200 then top with a teak bungs.

I like 5200 but I would not be confident that it would hold those stringers in place without through bolts...also through bolting into both stringers and the joint just makes it that much stronger structurally. With respect to cutting the boards on a band saw that is a possibility. I rough cut mine with a jig saw after marking with a guide that i laid on the hull below the placed board. I then cut it with a jigsaw off the boat and finished it with the router and a guide once all of the boards were screwed and bedded in place. I approached this job as the last time a cap rail would be put on this boat at least by me....so i went for the "all in" permanent approach. If the rail does ever need to be replaced again hopefully it will happen after I have moved on from boating or this life for that matter and even if it did happen in my lifetime I am not doing this job again....once is enough. We did it in the rainy spring of Vancouver with winds howling and tarps flapping trying to keep everything dry...it was a challenge to say the least. It took my dad and I 12 days both of us working 12-14 hours a day to complete.
 
Two things strike me about your project
1- I agree with Jarod that you should not hesitate to use mechnical fastinings where they are needed probably toward the bow. 5200 is great stuff but there is a lot to be said for redundancy here. Do you really want to bet the farm on it always holding?
2- When you remove the old screws you may want to bore out the holes to clean up any damage created if water has seeped in around the screw threads. After the holes have been bored you can decide to either fill everything with thickened epoxy or to bung the holes up with plugs set in epoxy.
 
jarod, On your thru bolts for the teak stringers was the nylock nut in the hollw spot between the inner and outer skin or did the bolt go all the way thru both stringers.?Do you think I should drill thru both skins and use a thru bolt to pull the stringers up against the hull ? I don't think mine is hollow between the two skins.
Rvanoris,The 5200 is tough stuff if you don't sqeeze to much of it out.But your right betting the farm .I would probably always be worried about it turning loose some day.Something about drilling thru both skins drives me crazy.
 
The stringers on my boat were drilled right through both skins and countersunk on either side so that both the bolt head and the nylock could be hidden with bungs. I agree with your hesitancy regarding the penetration of the skins after going to some work to avoid exactly that. In the case of my boat and it sounds like the same case with yours there just isn't any other way to do it other than possibly bonding these stringers to the boat with glass somehow, but that is then getting way beyond my skills in fiberglass ( I couldn't get a nice finish if I tried).

The 5200 cannot be trusted to do this job on its own ... i know it is strong stuff and i have had my share of nasty experiences removing items bedded down with it, but it has a lifespan like all products and the flex of the hull, the flex of the wood and other factors will be working to undermine its holding power 24/7/365. If you do not have a hollow space between the skins like my boat has then you are already in a much better position than I was. In fact the through bolting may ensure that those skins never separate. It may be that the skins of the deck and the hull are already glassed over on your boat? This was not the case on my boat and glassing them over wouldn't have done much good as there just wasnt enough surface area to get good adhesion. My advice would be to through bolt all the way along and seal up those bolts really well both with sealant and then with bungs set in epoxy or sealant to top it off. The stringers on my boat were through bolted about every 16-20 inches or so. If you even through bolted every foot for the entire circumference of the boat you would still be much better off than you are now as you currently have 600 penetrations which sound like they are serving no purpose at all. The through bolting may also reduce stresses on the cap rail to boat bond by decreasing some flexing etc so in this way it could be viewed as a positive thing. I just cannot think of any other way to do it unfortunately and all things considered you would be much better off than you are now.
 
Just to clarify the answer to your first question. The nylock and the bolt head were inboard and outboard of the boat and the threaded portion of the bolt went through everything. There was no nut in the center or hollow portion. It was one bolt every 16 to 20 inches or whatever distance the installer deemed necessary to secure the joint and to get the teak to conform to the curve of the hull.
 
Last edited:
I fitted a few 6" X 6" plywood squares (teak sole panel scraps) to the inside of my hull to mount some relays, so not a great weight involved. I sanded the hull, washed it with acetone, washed the teak with acetone, let them dry then fitted the plywood and held it in place with tape until it cured. Six months later they had all fallen off.
Lesson .... beware the expiry date on the tube.
 
That really does sound like the best way to do this .I might need to make the teak stringers an little thicker to allow for countersink for nut ,washer and a decent bung. This way I could control the thickness of the 5200 and not squeeze it all out..Would you thru bolt caprail as well? What do you think about the drip groove? Is it worth the extra effort?
 
I considered a drip groove on the undersurface of the cap as well and i think it is a good idea; however, i could not think of a way to do it accurately and decided if i needed to I could add something down the line such as an L shaped profile in aluminum or similar that could be secured to the underside of the cap rail. The difficulty will be in cutting that drip channel so that once the cap is placed the groove is a uniform distance from the gunnel and does not stray into the mating surfaces of the cap rail and the top of the gunnel. I hope you understand what I am getting at...I cannot think of another way to say it. Please note i precut and pre-drilled and countersunk every board before laying it down. The only option I could see for a drip rail was to add after the rail was all bolted down and I could not fit a router on the underside of the cap to do so.

You are right in that you will have to cut the stringers thick enough to allow for the bolt head, nylock and a washer as well as a bung. In my case i did not have an option to through bolt the cap rail as the stringers were not accessible from the bottom. My boat had a step if you will in the hull layup that allowed the stringers to sit flush with the hull, which looked nice nut did not allow me access from the bottom. In my case I had to depend on wood screws and 5200 and I think it will be fine. If I had access like you will I might have thrown some through bolts in as well...maybe a couple of bolts every two or three feet in addition to the screws.
 
A cap rail is really part of the hull, it hits lock walls , pilings and anything way big next to you.Fenders get clamped to it / hung from it .

To that service only thru bolts will survive well enough not to make the sealant have to work to hard.

A long thin carriage bolt (3/16 or 1/4in) every foot or closer will give the clamping needed to stay attached to the deck.

5200 can be used as when its time to R&R a section it will be for damage , not failed sealant.So a sharp chisel will be a tool.

IF the teak is bolted it would go through the top surface and thru what the teak is resting/raised on. This will be a big PIA as the entire length of the vessel on both sides will need to be open enough to accept the fastenings.


IF the cap rail is simply varnished decoration and not a working part of the hull, except to direct water aft.It should be fine to epoxy the underpart of the rail, any screws being to locate the base while under construction.

Then just screws , with plugs , would be required to hold a pre shaped , cut or steamed rail in place.In other words no load , ever.

Which to select would require a real good look at the hull construction.
 
I agree you should through bolt if possible. If your cleats sit a top the cap through bolting them will be crucial.
 
This is the beginning of the cap rail project. Started taking off old rail yesterday . We are about a third of the way back on both sides . The port side came off with out hardly any effort. A little ways into the starboard side it was a different story. There is a wild mix of epoxy and 5200.I'm hoping this is just a repair and only a short section. I'm having to bust and chisel the rail off.This side is not giving up. You just don't know what you have till you tear into it .
Some of you asked for pics so here they are . The hull and deck just kinda come together at the top and it's mostly solid but only about 1" wide, You can see why I need to add width to both sides to have something for the rail to screw to . It has width now only on the outside ,but I plan on adding to both inside and outside .
 

Attachments

  • cap rail 10-28-13 001.jpg
    cap rail 10-28-13 001.jpg
    84.8 KB · Views: 223
  • cap rail 10-28-13 002.jpg
    cap rail 10-28-13 002.jpg
    73.6 KB · Views: 220
  • cap rail 10-28-13 003.jpg
    cap rail 10-28-13 003.jpg
    92.3 KB · Views: 234
  • cap rail 10-28-13 004.jpg
    cap rail 10-28-13 004.jpg
    81.9 KB · Views: 210
  • cap rail 10-28-13 006.jpg
    cap rail 10-28-13 006.jpg
    84.4 KB · Views: 213
Your not wasting any time. The end grain on the hull in pictures 2,3 and 5 looks good. I can see where the added thickness is needed.
 
Your not wasting any time. The end grain on the hull in pictures 2,3 and 5 looks good. I can see where the added thickness is needed.
Yeah we started on it Sunday. That starboard side is giving me a tough way to go . I'm hoping it's just a short section that has been repaired . What I have noticed where the stringers are screwed to outside all of the screw holes have rotted from the inside out. There was no sealant against the hull so water found it's way to the screw and rotted the wood from the hull side towards the head of the screw. You can't tell it from the outside of the stringer . I'm having hard time swallowing these teak prices . I haven't ordered the teak yet . I'm sure I will cause I really can't come up with anything else I'd be happy with.
 
.... I'm having hard time swallowing these teak prices . I haven't ordered the teak yet . I'm sure I will cause I really can't come up with anything else I'd be happy with.

What quality are you looking at? I know FEQ quality is out of site and plantation is still pricey but after a finish and some time in the sun...
 
Looks like everything is going according to plan. Too bad you are having some difficulty with that one section, but I am of the opinion if it is coming off easy then it really does need to be redone. I pity the poor future owner who may have to try and remove the cap rail off my boat.... dad and I had a few good laughs about it as we slathered on the 5200. I have to say I was really pleased with the Iroko cap rail I put on and I have already had quite a few unsolicited compliments on it. I think the Iroko (African Teak) came in about half the price or less of standard teak and is supposed to be very durable. There are some complaints about the difficulty of working it, but i found it more pleasant to work with than teak.
 
Making good progress. My wife goes out and works on it during the day,scrapping off old caulking removing any screws she can and then we both go back out after I get off work and work on it a couple hours in the evening. We are over half way back on both sides . No real surprises other than about 8 ft of a repaired section that was epoxied down.The joint looks good. We also are removing the cowlings around the wheel house doors ,the air intake cowlings and the sun visor, sending these off to paint shop while we are working on cap rail. Removed all plastic hand rails ,going to make new ones out of teak.
Ordered the Burmese teak today $20.50 board ft for 5/4.
 

Attachments

  • cap rail 10-30-13.jpg
    cap rail 10-30-13.jpg
    71.1 KB · Views: 229
"Ordered the Burmese teak today $20.50 board ft for 5/4"

Sounds like you will be into this job for only $1000 in teak, plus another $1k in fasteners. For 2 boat bucks you will see a huge benefit to your boat!
 
"Ordered the Burmese teak today $20.50 board ft for 5/4"

Sounds like you will be into this job for only $1000 in teak, plus another $1k in fasteners. For 2 boat bucks you will see a huge benefit to your boat!
I bought 150 ft of 5/4 and I hope this is enough . Plan on building 2 new wheel house sliding doors also.Lumber,fasteners,caulking ,varnish and all the hidden stuff that pops up it will probably be more like 5 boat bucks.
 
The old cap rail is completely off. We took off about 3 pounds of screws (saving them for scrap yard).The rail had some teak on it but mostly mahogany. Under the rail attached to the hull was a wild mix of mahogany,white pine, douglas fir two or three kinds of caulk and epoxy. some of it was a real PITA. I had a small section about 18" where the 5200 took some glass with it.the last pic is of a handmade small draw knife that wound up being the tool of choice to peel off some of the stubborn wood that split away and was still hanging on with epoxy or 5200 .I figure a clean shaving would be more popular that grinding dust at the marina.
 

Attachments

  • cap rail 11-3-13 001.jpg
    cap rail 11-3-13 001.jpg
    92 KB · Views: 153
  • cap rail 11-3-13 002.jpg
    cap rail 11-3-13 002.jpg
    110.5 KB · Views: 145
  • cap rail 11-3-13 003.jpg
    cap rail 11-3-13 003.jpg
    73 KB · Views: 156
  • cap rail 11-3-13 004.jpg
    cap rail 11-3-13 004.jpg
    186.3 KB · Views: 157
Draw knife - cool - nice to see that some of those "useless" old tools can be darned usefull. Good thinking.
 
Keep the pictures coming! Nice project:)
 
Just finished up the jigs for laminating the teak stringers for curved sections bow,inside and outside aft corners .
 

Attachments

  • image.jpg
    image.jpg
    115.3 KB · Views: 143
5/4 Teak came in

Teak came in yesterday
 

Attachments

  • image.jpg
    image.jpg
    111.3 KB · Views: 142
Started my laminations this weekend . Here is the bow . I think it was around 12 pcs 8 ft long 1/8" thick .This one took most of my clamps . Also got the inside and outside aft corners done .
 

Attachments

  • image.jpg
    image.jpg
    103.5 KB · Views: 148
Laminated Bow Stringer

Laminated bow stringer dry fitted.
 

Attachments

  • image.jpg
    image.jpg
    108.3 KB · Views: 139

Latest posts

Back
Top Bottom