Re-bedding hardware and sealing deck

The friendliest place on the web for anyone who enjoys boating.
If you have answers, please help by responding to the unanswered posts.
Joined
Oct 2, 2009
Messages
5,198
Location
USA
Vessel Name
Bucky
Vessel Make
Krogen Manatee 36 North Sea
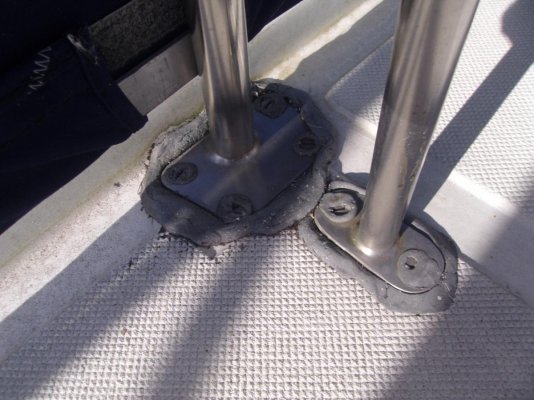
I've been removing and re-bedding stanchions for some time now, but today when I was speaking to a private contractor about sealing and painting my upper deck, he said that when finding rot in the core of decks below the stanchions, one shouldn't fill the area with epoxy and re-drill the holes because the epoxy is too rigid and will eventually crack with force on the stanchion or cleat, eventually leading back to the same water intrusion that causes the problem to begin with. He said it should be bunged with teak or some other moisture resistant wood, using epoxy to adhere the wood, then re-drilled and bolted through the bung instead of the epoxy. Anybody ever hear of this process?
 
Greetings,
Mr. hh. Interesting observation. I've never really thought about the rigidity and re-cracking aspect but he may have a point. One of the problems I can see with that approach is if the rot is fairly substantial, the bung, even though epoxied in, will be attached to, well, rot. At some point, even with a very large "bung", there will still be an epoxy interface which will still be subject to aforementioned rigidity and subsequent re-cracking will there not? I can see some merit to scarfing in a larger wooden patch as opposed to just a bung.
 
HH: Was he talking about using un-thicken epoxy which I could understand could crack/fracture. With properly thickened epoxy and enough of the core removed from around the hole before you fill/drill, the epoxy should be as strong if not stronger than the fiberglass (IMHO). Addressing the rot is an other issue. :)
 
The solution we have been using is to simply raise the level of the stanchon base .

That way the water has to be more than 3/4 or an inch deep to even see the thru deck fastenings.

Low cost , easy and works well.

A very robust backing plate also helps stop leaks from motion.

Here 5200 works well , as does thru bolting , no screws.
 

Gonz....I've been using Butyl Tape for sealing the hardware. After some experiments in the last rainy season, I can see it it an ideal sealant. I purposely left some of the butyl overflow sit around the stanchion bases for about 6 months, and it has lost none of its gummy texture.

FF: Where do you get the material for raising the stanchions. I've seen those base pads on newer Krogens and I agree, it eliminates the area from becoming a deck recess for water to collect. It must also help with deck core compression when tightening up. Backing plates would be tough in some areas over windows....maybe teak blocks with washers.

RC: Of course, your right about the eventual interface with the bung and the deck coring. I haven't really seen much indication of deck rot, but there is some blackening of the end-grain balsa when drilling through. Ultimately, I'd have to replace the coring necessary for the bonding of any epoxy interface.

Larry: Makes sense about the thickening of the Epoxy. I've heard this process being successful on other boats. I think I'll go with the base plates in combination with the thickened epoxy filler.
 
Question: what hardware needs to be bedded? I mounted an outboard motor bracket to the stern and it didn't even occur to me to bed it.
 
Larry...I was instructed by the surveyor & have read since to do exactly as you proposed. The object is to have the new screws embedded their full length in epoxy, not wood.

Remove enough core around the screw holes to make a "mold" per se in the core for the thicken epoxy to settle into leaving a slight hump. Mold should be deeper than the length of the screw. Sand the hump level, drill pilot holes for new screws, chamfer or counter sink the pilot holes, apply non-hardening sealant to deck, set screws to final torque asap. The sealant will form an o-ring around the screw in the chamfer depression.

Adding raised beds for all stations would be nice, wish Krogen would have thought about that in the 80s when our Manatees were built instead of us having to do it now. If you find a source for sheet material suitable for making raised beds let us know your source. I’d would go the extra steps to add those under all my stations.
 
We redid all the stanchions on our sailboat three years ago. The process involved just what is described - overdrilling holes, digging out core, inserting a small amount of unthickened epoxy to soak the balsa, filling with thickened epoxy, then redrilling and installing new hardware with butyl rubber and new, oversized backing plates. In a few spots, we had to cut the deck just smaller than the base of the stanchion in order to dig out enough core to hit dry material. After three years, including a storm incident with another boat that resulted in two stanchions being bent in half (and the other boat being totaled), we have not had one issue with the deck cracking. I'm a firm believer in this process. Also, we bedded everything with the butyl that RC sells on his Compass Marine website (cited above). Even with all the movement of the stanchions from the storm damage, nothing leaked. Prior to buying his butyl rolls, we had used some supposed butyl rubber from a big box store, but it actually dried out after a year, so be careful what you use (it is not all created equal). In other words, I'm a firm believer in this process.
 
Great testamony, Carolena. It sure sounds like your efforts were worth the trouble. And Phil,....I'm sure I can get some scrap glass off of some salvage joints...I just wondered if FF had a resource for the 3/4" bases. It would save time and cleaning/sanding of the scrap.
 
I use West System Epoxy with #4 additive injected into the hole that fills the void and also absorbed into the surrounding teak, re drill, and again using thickened epoxy around the hole under the part and screw/fasten tight.

For large voids, I use a hex L or nail on a drill to clean out and/or enlarge the void, soak paper towels in epoxy and stuff in the void, let dry. For smaller holes facial tissue works. I do not used caulking for refastening
 
Where do you get the material for raising the stanchions.

Scrap, is the source , most solid glass transomes are nice and thick and when a boat is scrapped the yard seldom minds if you saw ourt a chunk.

As sawsall with grit blade makes fast work.

When we did new construction I would lay up a flat using whatever glass , and resin was extra during a lamination. New , free , and legal FR resin.

Pro boat builder now has advertisers for thick material that is solid and sticks well to resin.
 
Curious about your re bedding job on the Manatee. Were you able to disconnect that rail from the base at each stantion or did you have to take the whole railing off? I have one that leaks and I need to get it addressed before the rain starts. I'll do them all next year while I'm hauled the right way by refilling and drilling new holes. In the meantime... I've got the butyl tape. Can I just lift the screws and have enough clearance to clean the bottom? Your experience and recommendations are greatly appreciated.
 
How about Starboard to raise the stantions?
 
the epoxy is too rigid and will eventually crack

Epoxy can be as flexible as the hardener you chose to use.

From a brick to a fishing pole , your choice.
 
What Larry said...
Epoxy is many times more flexible than the original polyester and should not crack in these types of situations. Also a big fan of G/flex for this type of repair; the specs. are just superior. I have owned a balsa cored boat since '74 and have done dozens of minor core repairs successfully with epoxy.
 
Curious about your re bedding job on the Manatee. Were you able to disconnect that rail from the base at each stantion or did you have to take the whole railing off? I have one that leaks and I need to get it addressed before the rain starts. I'll do them all next year while I'm hauled the right way by refilling and drilling new holes. In the meantime... I've got the butyl tape. Can I just lift the screws and have enough clearance to clean the bottom? Your experience and recommendations are greatly appreciated.

I had a few I did the same thing with. When I detected that some may be the source of drips in the cabin, I loosened the retaining screws on the vertical, unbolted the stanchion and held it up with a wood block under one corner of the base, cleaned the underside of the stanchion and surface of the deck with a wet rag of acetone the best I could, formed a 3/4" or so butyl gasket in the shape of the stanchion and plopped it back down on the deck. Then I threaded some butyl around the head of each bolt and while I held the bolt head with a flathead screwdriver, my Admiral tightened the nuts underneath. It kept them from getting any worse till I could get to them. I still have some to do yet. You can see in the photos that I simply allowed the butyl to squeeze out as I tightened. I did this purposely to test whether or not the butyl would retain its flexibility in the Florida sun. One is a year old now and shows no change other than collecting some deck debris. Be aware that this was for a test only, and I wouldn't encourage you to leave so much as I did because even though the perimeter keeps water from draining to the stanchion base, it also keeps a puddle of water from draining out. Thus far, no leaks.

The stanchions on a Krogen Manatee can be done one at a time because each on is held to the horizontal rail with set screws. With the set screws loosened, the flexibility in the horizontal rail is sufficient to raise the stanchion just enough. On my boat, if I disconnected the rail from the life line connection half-way up, I could twist the vertical 360 degrees.
 

Attachments

  • GEDC0020.jpg
    GEDC0020.jpg
    145.5 KB · Views: 75
Thank you healhustler, that was exactly what I was looking for. Being able to loosen the whole stanchion and swing it up made the cleanup process easy. The biggest issue was getting the right size deep sockets to get the nuts off - they were two different sizes of course. Seems like any kind of backing plate that could fit the space inside would be an added benefit. I know after doing this job I won't ever rely on the railings for support as much as I used to. One tip for anyone else doing this - To make my butyal tape pads I laid out three 5 1/2 inch strips overlapping the middle one between wax paper and then rolled them down flat with a rolling pin. Now I have my pads ready to go for the next ones.
 

Latest posts

Back
Top Bottom