Removing teak deck planking

The friendliest place on the web for anyone who enjoys boating.
If you have answers, please help by responding to the unanswered posts.

dwkerch1

Member
Joined
Jul 1, 2009
Messages
9
I am about to start with removal of the teak deck planking from the bow and side decks on my 40 foot Marine Trader Sundeck trawler. Have any of you been through this project, and if so, any advice on process, refinishing the fiberglass under the planking, etc?
 
Look around the site. I think it's in this section, but somebody did this exact job, with great descriptions and pictures. NOT easy!
 
I am doing it at this very moment. Really not hard. The hardest part is getting the screws and bungs out. I have taken to drilling out the head of the screws then prying up the boards and then removing the screws with vise grips. After that stage it's a paint scraper and heat gun to get the black stuff up. Then drill out the holes 3/8" and dry out the core if necessary.* Mix up a slow set epoxy and pour into the holes. Sand and putty the area. Roll on nonskid paint and your done. If you can set up a vacuum bag to dry the area and then pull the epoxy through the core then you would really have a great finished product.

-- Edited by Daddyo on Friday 25th of September 2009 06:26:19 AM
 

Attachments

  • p1000730.jpg
    p1000730.jpg
    194.6 KB · Views: 133
"Mix up a slow set epoxy and pour into the holes"

We have always made our own version of Git Rot.

Epoxy with some (5%) alcohol will "chase" water and penetrate deeper into the rotten muck than plain epoxy.

The trick is to use about 10% more hardener to get it to set up.

As always use a good detergent to scrub the cured surface before continuing the work.

FF
 
Make sure you determine the strength of the fiberglass subdeck before you simply apply nonskid paint. The teak decking adds strength to the deck and this strength is gone when the teak is gone. I've been told by several people who have done this to their boats (an Island Gypsy on our dock for one) that most older fiberglass trawlers with teak decking need a couple of layers of fiberglass added to the subdeck to restore the same strength and stiffness the deck had when the planking was in place. The owner of the Island Gypsy put four layers of glass on his deck before adding the nonskid, which a marine engineer friend said was overkill--- two would have been sufficient in his opinion--- but the Island Gypsy now has a deck as strong as a battleship. He did a beautiful job but it took him a summer and a half to do it all to his exacting standards.

Some boats may not need additional glass applied after the teak is gone, but apparently many of them do. So you might want to check with a yard or a marine engineer or an experienced shipwright who knows your type of boat and can give you a meaningful opinion on whether or not you should add fiberglass on top of the subdeck. If the boat needs this and you don't do it, I'm told it could lead to serious problems farther down the road.
 
"The teak decking adds strength to the deck and this strength is gone when the teak is gone."

Would have to disagree.

The teak paint job may have added stiffness (resistance to flexing) but not strength as a couple of wood screws is not a strong enough attachment to add strength.

We have replaced the teak overlay by prying it all up , filling the rot with Epoxy and then installing a 1/2 or 3/4 inch layer of you favorite core (ours is Airex).

The core bottom is covered with epoxy and filler and glued to the sanded deck , with sandbags as pressure .

When all is covered with foam the surface is laminated with V-ester resin , 3/4 oz matt 24oz woven roving for 5 total layers , ending with mat.

Light weight and will add great stiffness when a comber bangs o0n over the side.

FF
 
Some boats, like GB, do more than just screw the planking down.* The sealant used by GB also served as an adhesive as one will discover if they start to remove the planking from an older*GB.* And given the number of large screws holding the planking down, there is some strength added by this in addition to that provided by the adhesive/sealant.*

On GB woodies, the teak planking is much thicker than the planking used on the glass GBs.* So it does add strength to the deck as well as stiffness.

However I'd go along in general with the "stiffness but not strength" point with regards to fiberglass boats.
 
GB are one class, the usual TT had a really wide plank that had routed groves to look like individual planking.There were plugged in the shop to continue the look.

Frequently only 1/2 dozen screws would hold down a large plank, with just a dab of goop under some of the fastenings.

This construction allowed the build of GRP boats , and if the purchaser could be convinced a ton of teak on deck was a great ($2,000) idea the deck could be installed on a mostly finished boat.

I enjoyed a good cash flow from pulling down the interior and repairing the wiring where the deck screwes punctured the wiring.

I would get rid of the owner and convert the 12v DC current to AC with a bell ringer , sans the bell.

Then a simple current finder would let me know just where to chop a hole in the overhead..


FF.
 
dwkerch1 wrote:

I am about to start with removal of the teak deck planking from the bow and side decks on my 40 foot Marine Trader Sundeck trawler. Have any of you been through this project, and if so, any advice on process, refinishing the fiberglass under the planking, etc?

*
I have removed over 50% of my teak decks, what I found is the area that had plenty of sun light and weather came off pretty easy. The areas that were covered were pure h*ll.
I had to use a chisel, hammer and pry bar to get quite a bit of the teak off the boat.
*

*
Then I used a side grinder and 36 grit sand paper to grind the old glue off, it was like concrete! After that I drilled, cleaned and filled each hole with west system. I had quite a few pics on this site.

http://www.trawlerforum.com/forum.spark?aBID=115492&p=3&topicID=14985947&page=1&sort=oldestFirst

*


-- Edited by troy994719 on Tuesday 29th of September 2009 12:00:22 PM
 
Since you will probable breaking up the teak strips into small pieces, the easiest is a linoleum remover.* I would not even remove the screws, if the screws pull out they are probable not holding any way and repair the old deck. However, I would put down a new core of something to distribute the weight, added strength and maybe insulation value.


I made the decision to maintain and repair the*teak deck rather than remove it as a teak deck if maintained will last the life of the boat. Teak decks give plenty of warning/telltale signs.* The problem is NOT the teak deck but the owner.* Every year I spend*a couple of hour and 50 buck repaing/sealing/maintaining the teak decks.**
 
A REAL ALL teak deck might indeed last the life of the boat.

I have seen many on sailboats,, NONE , yet on a power boat.

What I have seen on TT and power boats is an overlay of teak stuck on usually a "composite" deck.

Composite meaning a layer of GRP over usually house plywood.
It works fine so long as the GRP is intact.

Unfortunatly the scrws used to slather on a layer of teak RUINS the water tight GRP, leaving rotten cores and bouncy decks that leak in the rain.


They are eye candy for the first owner , a nightmare after about 8 years.
 
Teak deck gives plenty of early signs like: when the deck is drying there are wet marks between the caulking and the wood, bungs/plugs missing/popping up, teak is not even/bowed up.* The main problem is the teak wood will swell when its wet and shrink when its dry which causes the screws caulking to loosen. In the summer our 14ft teak deck will shrink a ¼ to ½ inch.*


*
So each year I wet the deck, look for the tell tale wet lines, bung/plugs that are popping up and the deck being uneven.* The lines I mark and re caulk, the bung/plugs screws refasten and replace, and reseal the dock with Dallys Seafin Teak oil, which takes a couple of hours spread over several days to let things dry/cure.


*
Anyway its the swelling and the shrinking of the teak that causes the problem. ****
 
Updated photo. Holes have been over drilled and slow set epoxy is in. All is good and stiff and next is putty/sanding then roll on the nonskid and done.
 

Attachments

  • p1010339.jpg
    p1010339.jpg
    134 KB · Views: 106
Phil Fill wrote:

*
.....and reseal the dock with Dallys Seafin Teak oil, which takes a couple of hours spread over several days to let things dry/cure.
This is actually not a very good idea.* Putting an oil finish on a teak deck hastens its demise.* The wood doesn't need the oil, so you're not doing it any favors by putting oil on it.* In fact the oil can help break down the bond between the deck seams and the wood on either side of them.* The other thing oil does do is trap dirt, soot, etc.* Then as you walk around on the deck, this combination turns into a very effective cutting compound and you gradually wear away the upper cells of the wood as you walk.* And the wood you wear away you can't get back.

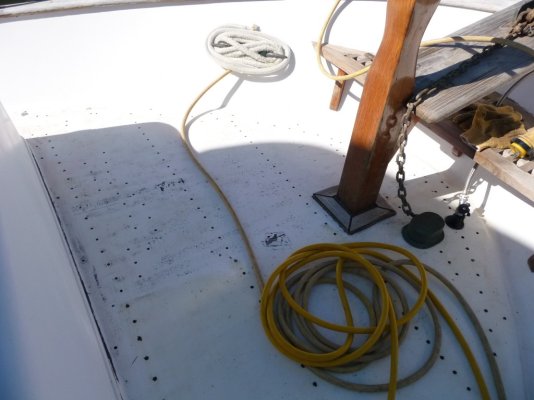
The deck on our boat is original, and is the "eye candy" planking as described by FF.* So it wasn't very thick to begin with and previous owners had sanded away too much of it. * At least half the plugs were missing when we bought the boat and in some spots, the bottoms of the grooves were even with the tops of the planks.* But a shipwright we knew at the time determined there was still enough wood to work with.* So he stripped out all the old seam compound, re-grooved the* main deck (by hand), and re-seamed it.* This was about ten years ago.

The only things we do to the deck are replace plugs that come out (usually the very thin remains of the ones that were still there when we acquired the boat), and repair seams that pull away from one side of the groove in high-use areas.*

On the advice of several shipwrights we've talked to over the years and on some of the better wood care books I've read, the only thing we do to the wood is keep it clean.* So every few weeks we mop the deck down with cold salt water (never fresh water) and Lemon Joy.* Joy is recommended because it makes good suds in cold water.* We use a regular string mop for this.

Then* two or three times a year we give the deck a little stronger cleaning with the same salt water/Lemon Joy mixture but we use a 3M doodlebug pad LIGHTLY on the deck, always going across the grain except where deck hardware makes this impossible.

The "rules" regarding the care and feeding of teak decks that I've collected over eleven years of taking care of a teak deck that was already 25 years old when we bought it are:

*NEVER power wash it.* Ever.
*Keep it clean with salt water and a sudsing detergent.* Use only a string mop, sponge mop, or very soft brush.
*NEVER scrub a teak deck in the direction of the grain except in places where deck hardware prevents going across the grain.* Going with the grain is okay only with a string mop or sponge mop.
*Maintain the integrity of the seam sealant.* (Use TDS---Teak Decking Systems--- sealant, it's superior to any other deck sealant on the planet these days).* Seams that have pulled away from one side of the groove do not have to be stripped out completely but can be repaired using the "45 degree cut" method.
*When redoing a seam completely, make sure to use a bond-breaker in the bottom of the seam.* The material most often used is 3M automotive striping tape.* The prevents the sealant from adhering to the bottom of the groove, so as the wood works from being walked on and expanding and contracting as Phil described, the sealant will flex but remained adhered to the sides of the groove, which is where you want it to stay.* If the sealant adheres to the bottom of the groove, it is just a matter of time before one side or the other will pull away from the wood and moisture will be able to get in.* Also, always thoroughly clean the inside of the groove with acetone before applying new sealant.* This removes the natural oil from the wood so the sealant will adhere better.* (One reason you don't want to be putting any oil on your deck.)

*Replace any plugs that come out asap.
*Re-seat/seal the deck screws that are exposed when a plug comes out before replacing the plug.
*Never oil a teak deck.
*Never apply a "looks good" finish like Cetol, varnish, Deks Olje, etc. to a teak deck.
*Never use a so-called teak cleaner/restorer.* The only way to make a teak deck turn brown again is to remove the weathered gray wood cells in the top layers.* There are two ways to do this--- sandpaper and teak cleaner.* Teak cleaners simply do what sandpaper does only they do it chemically.* Either way, wood goes away and you can't get it back.* And the newly exposed, pretty brown wood cells will weather to gray in a few weeks, so you'll end up using the teak cleaner again and more wood will go away.*

A 120' corporate yacht I was associated with for awhile "went through" its exterior main deck teak planking every eight years or so.* This was because part of the requirement for the boat's appearance was to have a new-teak-colored deck (the yacht was part of the owning company's marketing department and was used with customers year-round). * So the crew used teak cleaner on a regular basis. The yacht's captain, crew, and corporate owner were well aware of the penalty of doing this, and the increcibly high cost of replacing the main deck planking was factored into the operating cost of the yacht

If you keep the deck covered, either with canvas or in a boathouse, the brown color will last a lot longer.* But if your boat is kept outside with no cover, a newly sanded or chemically stripped teak deck will weather back to gray very quickly.* Example--- Our boat is kept outside and has a full cover over the flying bridge.* Since we never run the boat from up there, the flying bridge deck stays covered virtually year round.* It's deck planking is still brownish, and was when we bought the boat eleven years ago.* Our main deck is the normal silver/gray.

The cost of replacing a teak deck on a 36' boat as of a few years ago varied between $20,000 and $30,000 depending on who the bid was from.* Given the skyrocketing cost of good teak (as opposed to the not-as-good plantation teak) these day, the cost has probably near doubled since then.* The upside of replacing a teak deck today is that it can be glued down instead of screwed down.* The teak decks on Grand Banks, Fleming, etc. are all glued down now.* So no screw holes.

Teak is a fabulous deck surface, far better in my opinion, than fiberglass or any other material in terms of traction, wet or dry.* It does get hot in the sun in warm climates if you're a person who likes to boat in bare feet.*

*So, finally, if you want to avoid the cost of replacing a teak deck, or avoid the major hassle of removing one and applying a solid, well-finished fiberglass deck in its place, learn to love the color silver/gray
smile.gif


-- Edited by Marin on Tuesday 3rd of November 2009 01:01:40 PM
 
Marin:
As usual, an excellent post. To that I add: if you lose plugs because they are too thin, the screw under is then too close to the surface, so take it out and discard it. Fill the hole with epoxy to the level of the bevel at the bottom of the screw head and re-install the plug. The screw's usefulness was over years ago. The teak boards won't come up without the screws.
 
koliver wrote:

The screw's usefulness was over years ago. The teak boards won't come up without the screws.
That probably depends on the boat and the manufacturer.* Having heard on the GB owners forum about how hard it is to remove original teak decking (which almost always*seems to destroy the planks) I've asked a few shipwrights in the area about the necessity of the screws if the planks were held down so well by the underlying camel-snot sealant the factory put down before installing the planks.

They all had the same answer--- if they weren't needed the builder wouldn't have put them in.* According to these guys the screws help reduce the movement of the planks and so help preserve the*adhesion of the seam sealant to the sides of the*grooves.* What they advised me to do when*a plug goes missing*is to remove the screw,*re-bore and countersink the hole a bit deeper if necessary, apply sealant to the*bottom third*of the screw, and*install it.* The sealant on the screw threads, which was not used in the original manufacture, helps prevent moisture that might find its way down under the planks from migrating down into the*subdeck or all the way through to the other side*if*the screws penetrate the subdeck as they do in some boats.

We re-use the original screws. On our boat, they are stainless steel and the hundreds that we have removed and reset have come out in great shape even though they were installed in 1973.* The reason we re-use them is that the screws made today have significantly*smaller diameter heads than the screws American Marine used in '73.* So the originals actually get*a better purchase on the wood than the pan-head #8s available today.

All this stuff I've learned applies to GB decks, at least old GB decks.* I have no idea what the situation is on other makes of boats that have teak decking applied over a fiberglass/wood subdeck sandwich.
 
Our screws were slot head brass #8 with a larger head then is available now. As to counter sinking deaper I don't find this to be an option. There isn't enough wood for the screws to sandwich. Our planks are 3/4" and once you drill and countersink the screws there just isn't enough additional wood to go deeper later. What I did in the past is plug the old hole with a teak bung and then drill and add a new screw near the old location.
 

Latest posts

Back
Top Bottom