I like to revert the door lock mechanism on my IG 36 back to the original inside the door lock system. The receiver portion of the lock is in the door jamb but the locking mechanism has been removed and filled with what ever. Does anyone know of a place that sells older locking mechanism for boats.
You are using an out of date browser. It may not display this or other websites correctly.
You should upgrade or use an alternative browser.
You should upgrade or use an alternative browser.
door lock mechanism
- Thread starter sunvale
- Start date
The friendliest place on the web for anyone who enjoys boating.
If you have answers, please help by responding to the unanswered posts.
If you have answers, please help by responding to the unanswered posts.
bobofthenorth
Guru
- Joined
- Oct 18, 2009
- Messages
- 570
- Location
- Canada
- Vessel Name
- Gray Hawk
- Vessel Make
- Defever 43 Offshore Cruiser
I bought a replacement Perko mechanism for our 30+ year old Defever last year. I can't remember where it came from but Google "Perko lock mechanism" and see what comes up. As I recall I had lots of choices of where to buy it and what I bought was an exact replacement.
I have no idea how the door lock mechanism on a GB compares to the ones used on an IG but we replaced the original, corroded, plated latch/deadbolt mechanisms on our main and aft cabin doors with 316 stainless copies from Victory.
We had previously replaced the badly corroded aft cabin door latch/deadbolt mechanism with an identical Perko unit but it began to corrode within a year. The Victory mechanisms (from China) have been on the boat now for at least 12 years and they look the same as the day we installed them new.
Don't know if these are available in your area but they are packaged under plastic on blue cards that say Victory all over them.
I wish the previous owner had left the old lock in the boat. Anything can be repaired or replaced if you have the original to copy. The rear hatch has a similar lock in it but the style won't work on the starboard slider. Hope somebody has some links, till than thanks for the offers on alternatives.
While we bought our Victory door latch/lock mechanisms from a marine supply house in Bellingham, here is the link to a company in Vancouver, BC that carries their hardware (plus a lot of other stuff). Rekord Marine is a distributor of quality marine products including our own Victory Products. On the home page select Products and then Cabin Hardware.
I have no clue if any of Victory's latch mechanisms match or fit an IG.
I have no clue if any of Victory's latch mechanisms match or fit an IG.
BruceK
Moderator Emeritus
- Joined
- Oct 31, 2011
- Messages
- 13,347
- Vessel Name
- Sojourn
- Vessel Make
- Integrity 386
IG is getting a good run on TF today.I like to revert the door lock mechanism on my IG 36 back to the original inside the door lock system. The receiver portion of the lock is in the door jamb but the locking mechanism has been removed and filled with what ever. Does anyone know of a place that sells older locking mechanism for boats.
My aft entry sliding door lock is an old brass/bronze mortise lock,with a key I get hand cut to copy the one original I still have. Maybe remove the receiver part, record the dimensions on the door and visit a vintage building or locksmith shop.
Mine needs a little "lift" with the turning to open so I guess I have some wear inside. Also it can be double locked, ie a second turn of the key.I will check if it has a brand, but chances are it was made in Hong Kong.
Shoalwaters
Guru
- Joined
- Feb 24, 2008
- Messages
- 681
- Location
- St. Lucia, West Indies
- Vessel Name
- "Dragon Lady"
- Vessel Make
- DeFever 41
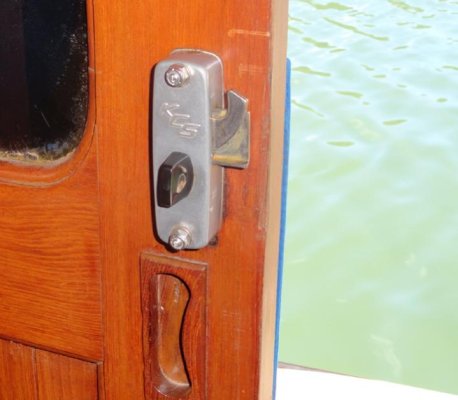
My sliding door locks have a hook that engages a striker plate in the jamb. This is a fairly flimsy arrangement. I would really like to find something more robust that works on the same principal, or an explanation/picture of how I can use an alternative type.
Attachments
Last edited:
HopCar
Guru
- Joined
- Aug 20, 2011
- Messages
- 5,308
- Vessel Name
- Possum
- Vessel Make
- Ellis 28
Merit Metals makes some beautiful brass locks for both sliding doors and swing doors.
Their sliding door locks were standard on high end yachts for many years,
Fine Brass Hardware by Merit Metal
Their sliding door locks were standard on high end yachts for many years,
Fine Brass Hardware by Merit Metal
BruceK
Moderator Emeritus
- Joined
- Oct 31, 2011
- Messages
- 13,347
- Vessel Name
- Sojourn
- Vessel Make
- Integrity 386
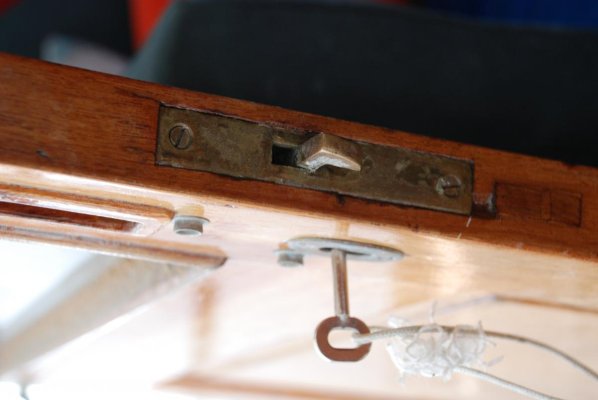
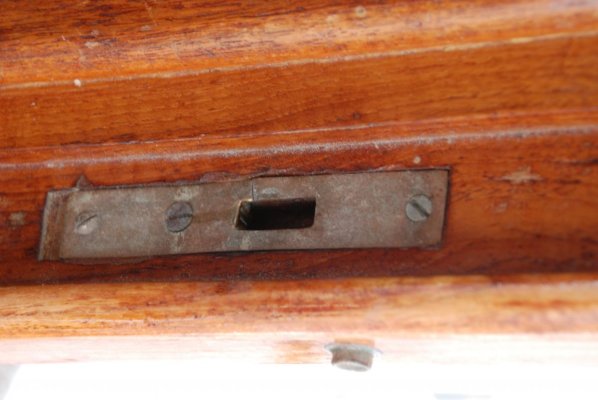
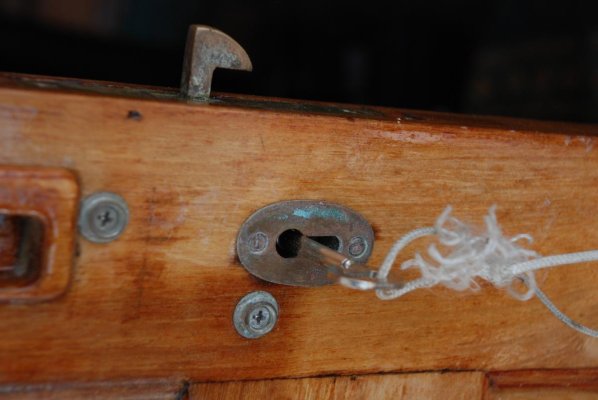
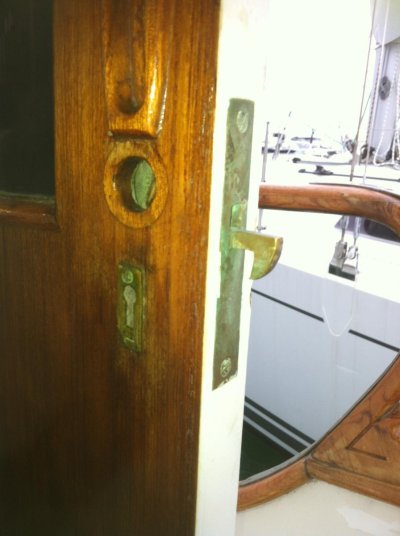
Sunvale, here are pics of the lock. There is no inside pic, but inside is keyed too,and has a finger hole above the keyhole so you can lift the arm with the hooked end to open it. When you open from outside the turn of the key also requires a lifting movement. There is no "knob",inside or outside. When the door is fully open & restrained by the cabin hook, the lock hook is liable to tear clothing (and has), I suggest a more conventional lock without the hooked end, this may require a doorknob both sides. Feel free to ask anything else or request more pics.
Note my IG is a 1981 Europa, with no aft cabin.The door referred to is the aft saloon entry door from the cockpit.
Note my IG is a 1981 Europa, with no aft cabin.The door referred to is the aft saloon entry door from the cockpit.
Attachments
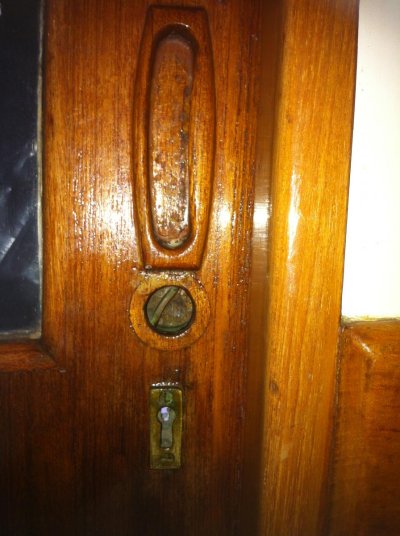

Bruce and Andy, that is the locking mechanism I'm looking for. I have the one Shoalwaters shows and I don't much care for it. It's difficult to manage even though I tried to adjust it several time. Is there a manufacturers name or stamp on the lock?
BruceK
Moderator Emeritus
- Joined
- Oct 31, 2011
- Messages
- 13,347
- Vessel Name
- Sojourn
- Vessel Make
- Integrity 386
Yes Andy, as per my post, there is a finger hole on the inside to lift the hooked lever. I hopefully take redelivery of my boat today after 6 weeks plus of deck repairing (goes back next week for Moorebank Marine Refrigeration, now servicing Pittwater Andy, to reconnect the cockpit freezer) and will look for a makers name on the lock.
Sunvale, you have seen the hook, even with the door wide open it protrudes slightly into the doorway;2 pairs of short pants with repaired tears prove its effect on clothing. Originality vs torn pants? There`s a tough question.
My boat is not quite as tatty as my pix look, there is sanding dust everywhere from the laying of new teak on top of new fibreglass.
Andy G
Hospitality Officer
- Joined
- Sep 20, 2010
- Messages
- 1,897
- Location
- Australia
- Vessel Name
- Sarawana
- Vessel Make
- IG 36 Quad Cabin
Sunvale,
There are no manufacturing details on the lock. They were made in Hong Kong in the early 1980's so probably long gone. I don't particularly like the set up, as Bruce says the lock can catch you out, and those finger holes can be a real killer if your're not careful.Still if I come across anything down here i will PM you.
Bruce.
An exciting day, don't forget to post pictures. I may have given the wrong impression about my eutectic fridge in another post, she is now working very well. Moorebank did the fridge work on Sarawana for the PO.
locks
Thanks for the information. If I might ask, what work have you done on the teak deck. I think that I have a slight leak port side mid ship when it rains for a sustained day. Going to pull up some teak and see if I can find the culprit.
Thanks for the information. If I might ask, what work have you done on the teak deck. I think that I have a slight leak port side mid ship when it rains for a sustained day. Going to pull up some teak and see if I can find the culprit.
Keith
Guru
- Joined
- Oct 5, 2007
- Messages
- 2,715
- Vessel Name
- Anastasia III
- Vessel Make
- Krogen 42
There are easier ways to find the leaks. First, after a rain (or hosing down) look for the seams that are the last to dry. Good clue. Another way I've used is to seal up the boat as much as you can and pressurize it (or the suspected area) with a vacuum cleaner set to blow and spray soapy water. Doesn't take much pressure at all to make bubbles show up where the leaks. Use sidewalk chalk to mark the areas for repair.
CPseudonym
Moderator Emeritus
There are easier ways to find the leaks. First, after a rain (or hosing down) look for the seams that are the last to dry. Good clue. Another way I've used is to seal up the boat as much as you can and pressurize it (or the suspected area) with a vacuum cleaner set to blow and spray soapy water. Doesn't take much pressure at all to make bubbles show up where the leaks. Use sidewalk chalk to mark the areas for repair.
Great advice Keith.
Land based equivalent testing is done with a device called an air door. Some utility companies perform air door testing of homes with these devices free of charge to qualifying customers. Reversing a shop vac would be plenty of air for testing a boat.
BruceK
Moderator Emeritus
- Joined
- Oct 31, 2011
- Messages
- 13,347
- Vessel Name
- Sojourn
- Vessel Make
- Integrity 386
No brand on my door lock either. IG did some copying of GB,check if GB used a similar lock.Thanks for the information. If I might ask, what work have you done on the teak deck. I think that I have a slight leak port side mid ship when it rains for a sustained day. Going to pull up some teak and see if I can find the culprit.
Much of my deck work appears on the "IG teak decks" thread. In short,all teak lifted, surface cleaned of Sika etc, defects repaired, a layer of new fibreglass, surface faired, on bow section another layer of f/g followed by non slip painted finish, on the rest new teak, essentially glued not screwed. And I was lucky,my IG has foam (not teak) sandwich deck substrate, but where there was wood there was rot.
I would not just start pulling up teak for a look. The caulking and the plugs are the aspects to approach first. Depending on deck condition you can recaulk, but if you have rot under in the deck sandwich and the teak is not adhering to the substrate caulking may not help, and even recaulking is not that easy.
The teak will likely fracture coming up,and only comes up after screws are removed or cut around, it will likely be laid on a sika bedding. Then you`ll be buying new teak to relay. I had one area which became "charged" after protracted rain and then leaked into the head at deck level.
Attempts to nip up the port stern gland failed, it now trickles, the boat has to be slipped after Christmas and the HWS and timber plate it sits on removed to access the stern gland. Great design feature Harvey! Fortunately both bilge pumps and switches are in good order. The joys of boating.
My leak is very minor, and the deck is solid wood, glass on top and than the teak. I will take it up and look for obvious cracks and do the vacuum test after the teak is up. Is the teak glued down and screwed to the deck?
Teak is a very brittle wood, particularly as it gets older. Bruce is correct in that trying to pull up the teak planks may very well fracture them. The sealant/bedding under the planks used by most builders like GB, IG, etc. has significant adhesive properties, so removing the screws does not mean the planks will come off nicely. You'll have to pry them off and that is when they fracture or break.
The deck screws are usually the source of leaks into the boat. If water gets down under the planks to lie between the planks and the upper surface of the subdeck, it can migrate down into the deck core and even into the boat itself alongside the plank screws, which often penetrate all the way through the subdeck. The two ways water can get under the plankes is thorugh separated deck seams (most common) and down past deck screws that have lost the teak plug covering them, or the plug is no longer watetight.
Keep in mind that the location of the leak inside the boat may be quite aways away from the spot where the water is getting down through the deck. Water has a nasty habit of migrating, so if the leak is coming out of a headliner or some other decorative fabric that was installed to hide the coarse underside of the deck you may have to remove the headliner or fabric to trace the path of the water back to where it is actually coming through the deck.
Last edited:
BruceK
Moderator Emeritus
- Joined
- Oct 31, 2011
- Messages
- 13,347
- Vessel Name
- Sojourn
- Vessel Make
- Integrity 386
Sunvale,You have the advantage of seeing the issue with your deck, but I`ve been at the yard every day for 7 weeks checking progress on my deck. After the teak was levered up with a pinch bar, chisels and then a sander,were used to remove the black sika like goop the teak adhered to. That took days.
The actual substrate deck under the (near) decorative teak strips almost certainly consists of a top layer of fibreglass, the sandwiched layer of teak blocks, and a bottom layer of fibreglass. (In my case,the only known one, foam material replaced teak blocks). Those myriad screws can conduct water to the substrate, failed caulk can conduct water to the base of the teak strips. That is why a recaulk and or replacing failing plugs may help. The teak strips abrade, reducing thickness, reducing the ability to replace and retain plugs over screws.
You could post pics of your deck,especially the area you suspect.
Marin did a successful full recaulk, AndyG did a full deck reno,(all done by professionals except Andy removed his old teak, did substrate repairs and prep), so we should be able to give some input. I worry if you start pulling teak up you could get into trouble,but I`ve not seen your deck and can`t know your carpentry skills

step up
It does, 2 small steps and right there is were my small leak originates. I will replace the screws with slightly larger metric screws and redo the caulking between the teak and new plugs. See what happens before ripping the teak up.
It does, 2 small steps and right there is were my small leak originates. I will replace the screws with slightly larger metric screws and redo the caulking between the teak and new plugs. See what happens before ripping the teak up.
BruceK
Moderator Emeritus
- Joined
- Oct 31, 2011
- Messages
- 13,347
- Vessel Name
- Sojourn
- Vessel Make
- Integrity 386
The above quote responds to the pic in post 21. My deck has been redone in the same combination of non slip and teak.It does, 2 small steps and right there is were my small leak originates. I will replace the screws with slightly larger metric screws and redo the caulking between the teak and new plugs. See what happens before ripping the teak up.
The 2 worst areas of my deck are pictured,on both sides. Moisture affected the deck-house walls adjacent to the deck. Internal damage to the teak ply lining seen low down to stbd; to port leaks were evident on the side head wall at deck level. The moisture meter read high.
Just fwd of the step up, on both sides, teak sandwich had been used for the substrate instead of foam, presumably to take the load of where every foot would land. Those 2 teak sections, black, damp and soft, were replaced with foam. I believe those areas were conducting leaks to the boat interior.
Before embarking on the full deck reno I renewed all the plugs I could, caulked(in brown) over screws where there was insufficient depth for a plug, and recaulked suspect grooves. I wish you greater success.
I have only a limited amount of teak on my boat. The forward section on the starboard side is my only concern. There I will replace the caulking and the plugs after I replace and caulk the screw holes. The boat is inside for the winter and that should dry everything out quite well. About April I will go to work on the teak.
Andy G
Hospitality Officer
- Joined
- Sep 20, 2010
- Messages
- 1,897
- Location
- Australia
- Vessel Name
- Sarawana
- Vessel Make
- IG 36 Quad Cabin
Is the leak from the top end of the step or from the lower side. I ask this because the deck will drain from the bow to at least to amidships on your boat & with water following gravity, if the leak is from the lower step, it is not coming from the forward section. However, if the leak is from the upper part of the step you really cannot rule out the leak originating from anywhere forward of that point, this has been pointed out by others in this post.
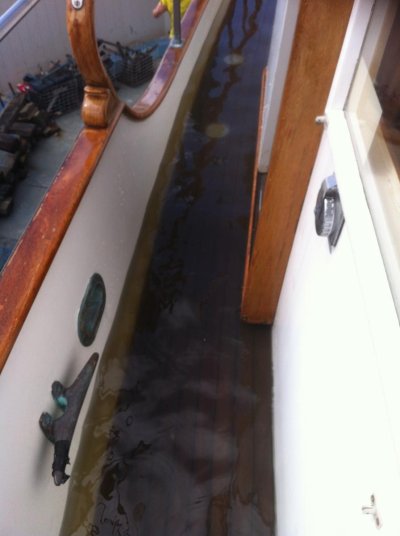
Where you see water exiting may not be where it entered, it may be the lowest point on your deck. Do not automatically assume that the stern of the boat is the lowest point for drainage just because that is where the scuppers are. I got a very nasty shock when slipping my boat and being caught in a storm, although the boat was level on the blocks the picture shows the true level of the boat. Note, in this picture the aft scuppers were still above the water level, so the mid ships of my boat is the lowest point as far as gravity is concerned, it is also where my fuel/water filler pipes are located, not really a good design point. In my case that resulted in some rusty fuel tanks.I assume you have checked the top of your tanks.
To give you an idea, on my boat which had water issues, the water had travelled a good 15 feet from the source of the problem, which in my case was a faulty seal around the foot winch at the bow, and I suspect it had being doing that for a considerable period, yours being a newer boat hopefully won't have that problem.
As others have also said, be very careful about trying to 'lift' the Teak for any reason, it is brittle and will splinter, the stuff they used to stick down the decks with will not let go easily.
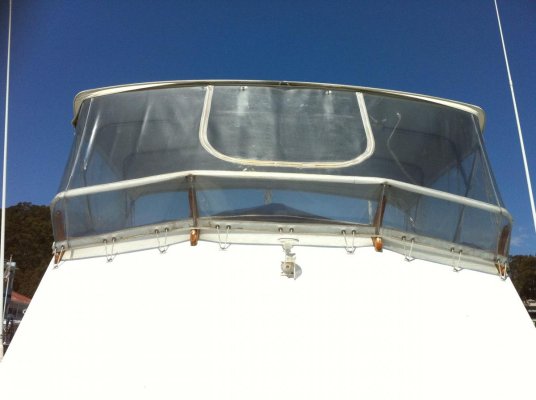
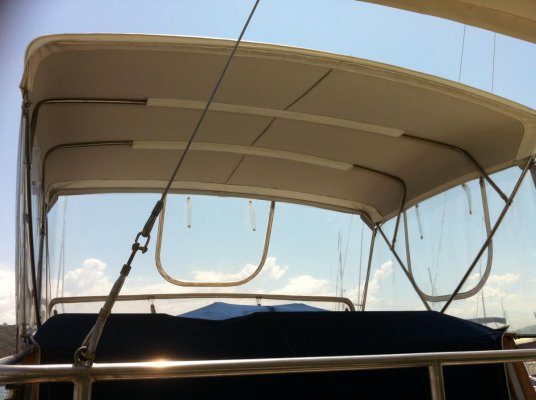
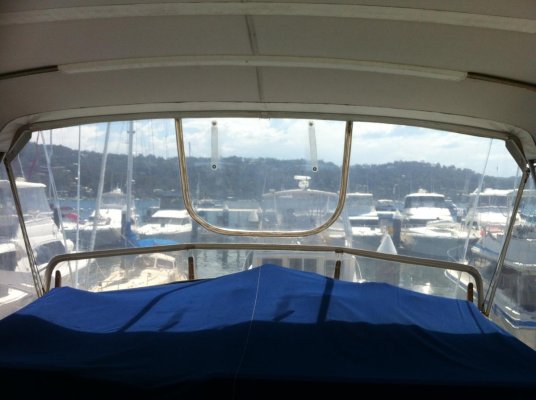
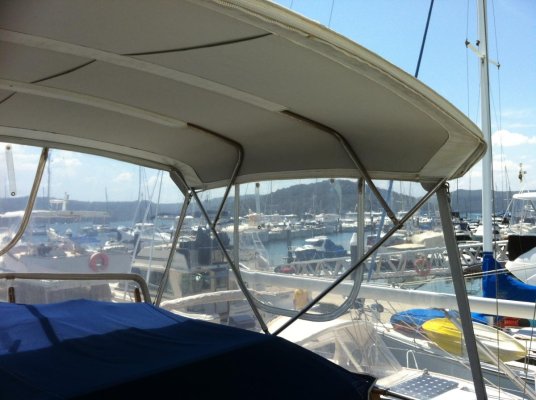
In regard to my flybridge covers they were put on by the PO, and are not the most flattering part of the boat to be honest, but they are immensely useful as we do all our driving from the upper helm, and as we also live in a hot climate the shade and wind protection is excellent. I have this theory that those of us with aft cabin boats tend to use the flybridge more often because it is much easier to access than those with Europa/sedan style boats. I have no idea where your cruising grounds are, but if you are in a warm climate, 'clears' etc are well worthwhile IMHO.
Where you see water exiting may not be where it entered, it may be the lowest point on your deck. Do not automatically assume that the stern of the boat is the lowest point for drainage just because that is where the scuppers are. I got a very nasty shock when slipping my boat and being caught in a storm, although the boat was level on the blocks the picture shows the true level of the boat. Note, in this picture the aft scuppers were still above the water level, so the mid ships of my boat is the lowest point as far as gravity is concerned, it is also where my fuel/water filler pipes are located, not really a good design point. In my case that resulted in some rusty fuel tanks.I assume you have checked the top of your tanks.
To give you an idea, on my boat which had water issues, the water had travelled a good 15 feet from the source of the problem, which in my case was a faulty seal around the foot winch at the bow, and I suspect it had being doing that for a considerable period, yours being a newer boat hopefully won't have that problem.
As others have also said, be very careful about trying to 'lift' the Teak for any reason, it is brittle and will splinter, the stuff they used to stick down the decks with will not let go easily.
In regard to my flybridge covers they were put on by the PO, and are not the most flattering part of the boat to be honest, but they are immensely useful as we do all our driving from the upper helm, and as we also live in a hot climate the shade and wind protection is excellent. I have this theory that those of us with aft cabin boats tend to use the flybridge more often because it is much easier to access than those with Europa/sedan style boats. I have no idea where your cruising grounds are, but if you are in a warm climate, 'clears' etc are well worthwhile IMHO.
Attachments

BruceK
Moderator Emeritus
- Joined
- Oct 31, 2011
- Messages
- 13,347
- Vessel Name
- Sojourn
- Vessel Make
- Integrity 386
Andy, and Sunvale, my worst moisture entry areas were forward of, and at the bottom, of the step. In both areas I renewed the caulking adjacent to the cabin "walls", to no great effect. I concluded the moisture was traveling within the deck across to the cabin.
As well as looking for your deck low point, check the camber of your deck. Does it slope inwards or outwards, because that`s where the water will go. Mine slope inward.
As well as looking for your deck low point, check the camber of your deck. Does it slope inwards or outwards, because that`s where the water will go. Mine slope inward.
I have no teak at the front of my boat. The teak starts at the bottom of the step next to the cabin. The port window has some bad caulking around the window frame. A couple of the teak strips are suspect. Like I said, my leak is very minor and has not infiltrated any place other than right on top of the port fuel tank and than just a very small spot during a prolonged rain. Going to redo the plugs and screws and redo the teak caulking and see were that gets me. Not going to strip any teak, just reseal the stuff and see were that leads. Thanks for all the input. I would love to have some pictures of IG's with a bimini top that has a windshield and side curtains for ideas.
My sliders each have a mortise lock that, when open, has no protrusions whatsoever. One failed and was replaced over 10 years ago. The other is still working well. When I was searching for a replacement, I came across a catalogue from an outfit (name escapes me now) in Georgia, from whom I ordered the lock. It wasn't the same size or configuration, but I was able to fit it into a modified mortise and haven't had any problems with it.
Keep looking, as they do exist.
Keep looking, as they do exist.
Similar threads
- Replies
- 93
- Views
- 6K