I'm about to start a project on an older Chriscraft

The friendliest place on the web for anyone who enjoys boating.
If you have answers, please help by responding to the unanswered posts.
Silicon Bronze

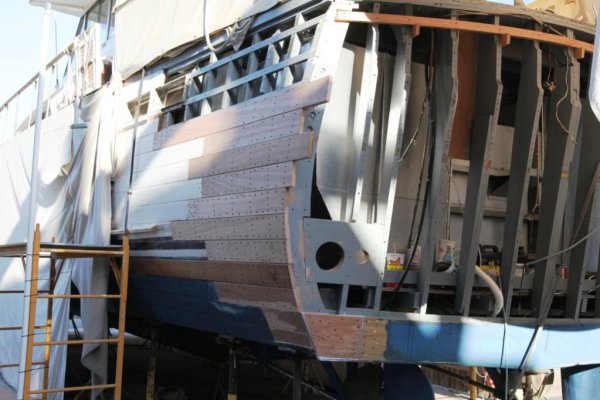
Boatgm, owner builder of "Carabao"(Tagalog for water buffalo)will be impressed with the Philippines mahogany timber choice(see his post under "Homebuilt").
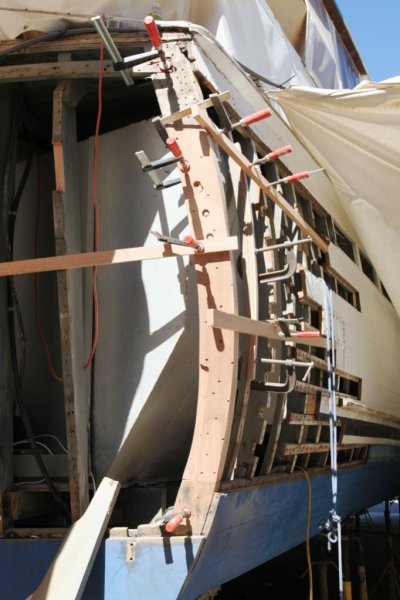
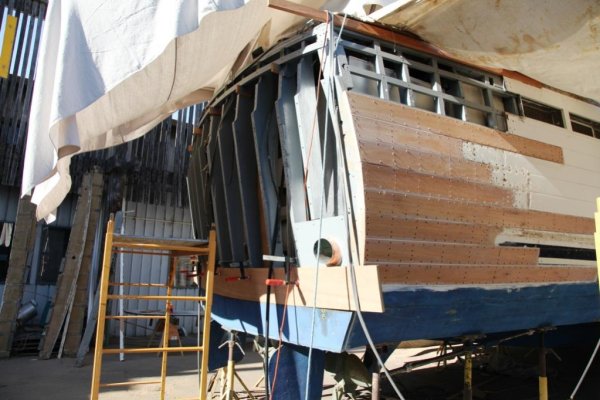
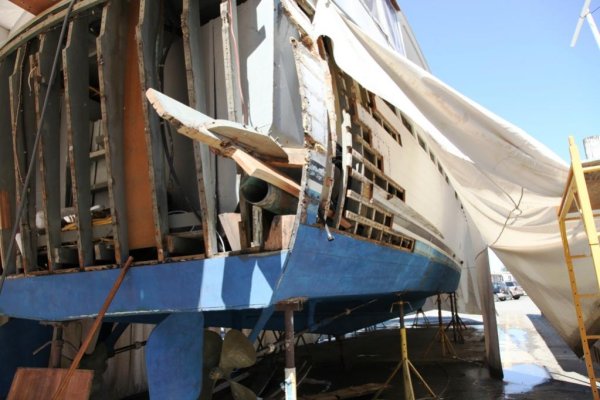
Sounds like you are on the home run,shaping timber to put her back together.Must be a relief.
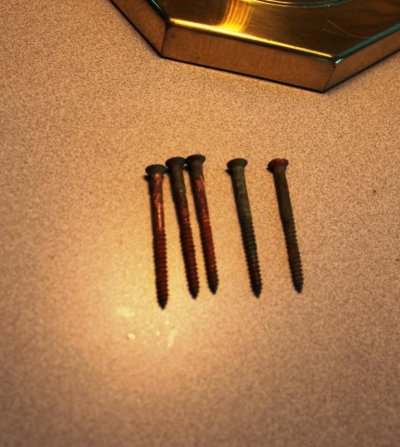
Those thousands of screws,are they s/steel, or silicon bronze or ...BruceK[/QUO
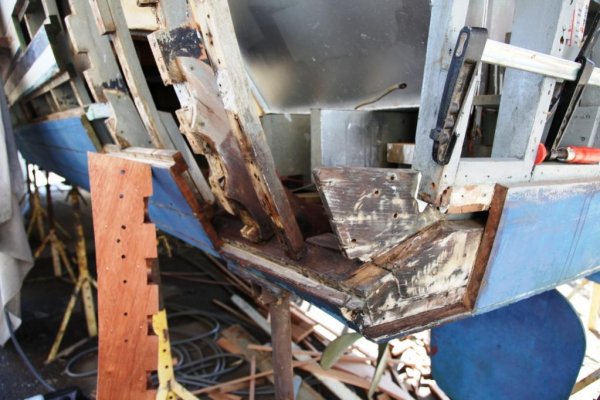
Tough couple of days, The silicon bronze screw god decided to test us. On the starboard side of the boat the number ten 1-3/4 screws stopped cooperating. We had been extracting screws with a Grabit extractor which is a combination drill and easy out in one bit. Screws that we had trouble with were easily removed using this nifty tool. Unfortunately the starboard side stopped cooperating and I had to resort to drilling off the heads of the screws and pulling planks over the top off what ever remained of the screw heads. The planks came off in chunks.
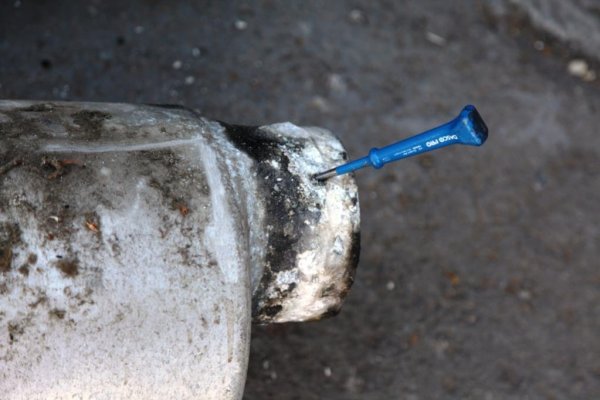
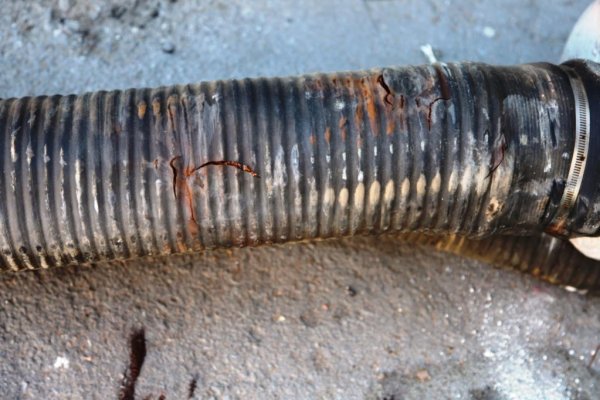
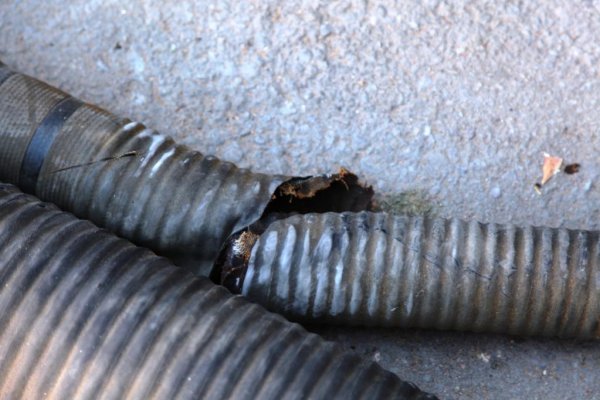
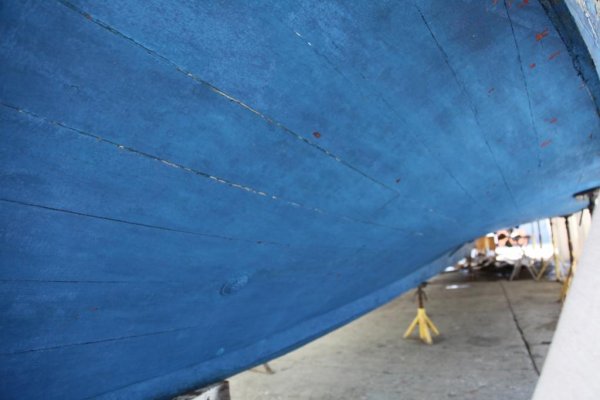
these screws were damaged by what looks like electrolysis. I have never seen this before, the screws were pink and the outer layer peeled off like a nut shell. They looked like the zink had been leached out of them. this is really disturbing as this got worse below the water line. I don't have a clew as to what would cause this. If this is a reaction to bottom paint, how and why. This job may have really gotten hateful. We had a hell of a time getting the screws out of the wood on the hull sides, I don't even want to think about fighting these out under the boat. Anybody ever experienced screws being eaten away like this?
 
Scary Tough couple of days said:
Okay, I’ll put in my 2.5 cents and hope this helps. - - > But, please realize I’m talking about bottom and other location refastening/replanking jobs I assisted shipwrights on in boatyards some 40 +/- years ago; and they were always on boats that were strictly in New England area's Atlantic salt water... none ever having spent time in fresh water, far as I knew. So, my memory may be fuzzy and Atlantic salt is a bit different than Pacific, and, the yacht harbors were usually overcrowded with too many hot leads from 120 v shore power dangling around the water as well as boats not having nearly as good a common ground running throughout the boat to anodes... such as usually is in today’s boats.

The old fasteners we’d remove or “sister fasten” were usually galvanized or bronze. Monel fasteners were scarcely used but lasted very well and if the planks were soft needing replacement the Monels would usually reverse right out for replacement with new. Corroded/rusted galvanized fasteners were the worst to deal with because they would too often be rusted to the point where they would break off at the surface (if we drilled off the head and pried the plank off first). With galve’s, when we did not need to remove an OK plank, we would simply sister fasten and leave the threaded core, shank, and head of the original galve still embedded. Bronze fasteners would corrode somewhat and seem to get skinny. When we could off screw them on a plank that was to remain we would simply drill a bit larger hole in the same hole and screw in a bit larger fastener of the material the boat owner had agreed to pay for. Otherwise we would sister fasten. Few boat owners would use Monel as replacements due to cost. Yankee screw drivers and cut off screw driver shanks tightened into electric drills (often Sears Craftsmen drills) were the usual means of installing new fastenings. The bronze seemed to considerably outlast the galvanized. I do not recall working on boats with stainless fasteners nor installing stainless.

In my opinion the older bronze fasteners needing replacement from loosing their mass to get skinny and loose in their holes were eaten by electrolysis that permeated the berth areas of hot harbors combined with poor maintenance/replacements of zinc anodes. The Chris you are repairing may have been berthed in a hot harbor and not had anodes well maintained regarding the fastener conditions you are experiencing. Not that I well understand it – but – boats with big battery banks can also develop 12 v corrosion on a boats metal parts... unless the boat’s entire battery system can be isolated and separated from the boat’s structure.

Good luck! :thumb:

Art
 
Last edited:
Scary-I don't think that it is electrolysis, but just normal corrosion from the bronze silicon being in damp wood for a lot years. Even fully bedded and with a sealed bung, the screws get and stay damp. The bronze in the alloy corrodes over time. When we bought and rebuilt old Trumpy's, we always refastened with monel. Expensive, but virtually corrosion proof. We also ran into some of the same problems mentioned where the screw would break off right at the neck and could not be removed. We would drive those down a bit and put a little epoxy filler on top and then drill new holes and sister screw (I am not too sure I like that term!!).

Refadtening is a huge, time consuming and tedious job. There is no easy way to do it. I don't envy you the task.
 
Scary - You have close-up picts of the old, corroded fasteners? Would be interesting to see.
 
Scary-I don't think that it is electrolysis, but just normal corrosion from the bronze silicon being in damp wood for a lot years. Even fully bedded and with a sealed bung, the screws get and stay damp. The bronze in the alloy corrodes over time. When we bought and rebuilt old Trumpy's, we always refastened with monel. Expensive, but virtually corrosion proof. We also ran into some of the same problems mentioned where the screw would break off right at the neck and could not be removed. We would drive those down a bit and put a little epoxy filler on top and then drill new holes and sister screw (I am not too sure I like that term!!).

Refadtening is a huge, time consuming and tedious job. There is no easy way to do it. I don't envy you the task.


It sounds like regular corrosion to me as well. I have also seen 40 year old silicon bronze fastenings come out looking like the day they went in. Water will / can enter via the screw area. Usualy leaving a water mark around the fastening on the wood. Water then flows through the plank. I have seen the use of epoxy to dip the new fastenings into prior to being fastened into the hull. Helps keep the screw area water tite. But I have not seen any of these removed after 40 years so YMMV.
 
Scary – Upon closer observation, by enlarging the picture, what I seem to see on the 1st page of this thread in the 1st picture of this Chris’ port side while it’s idling through a water way could be disturbing. It may be, and I hope it is just effects from the light/shadow on the boat... but... from looks of the boot strap and waterline spray/rub rail it appears a hog-back angle may have taken set. I sure hope not for all concerned. Several years ago, for possible purchase, I reviewed a 57’ Chris of same vintage that I found did have this hog-back circumstance at hand. Needless to say, once determined, I quickly squashed that deal. Perhaps you can comment on the condition of the keel and stringers in this boat... They also infected with rot? One reason I’m paying soooo much attention to this extremely descriptive and well pictured thread is that I’m looking at a wood Chris of same general model, size, and year for possible purchase. I really thank you for all you post here... brings back memories and makes me very cautious for thorough checking before I make any moves to own an old Woody, such as a big Chris. - Art
 
Fasteners

look closely at the fasteners. the green layer on the pink screws flakes off and is about .010 of an inch. the green screws are coming out of the same frame above waterline. They are solid and don't show any of the tendency to flake off. Interestingly the aluminum mufflers are strapped to these frames with bronze screws and aluminum straps. The wood contact area is destroyed by electrolysis and we may have to sister the sister frames effected. I'll try to post some pictures tomorrow. The aluminum strapping is mostly destroyed as well. I have seen wood ruined by stray electrical current from poorly grounded" bonded" pumps and motors. this is the first time I've seen it caused by dissimilar metals without electrical connections.
 

Attachments

  • Fasteners.jpg
    Fasteners.jpg
    86.3 KB · Views: 261
Bottom condition after two weeks of heat

The draping of the hull with cotton drop clothes has helped tremendously. The hull has a designed hook that is supposed to hold the boat on plane without tabs. That's what I've been told. We didn't get a chance to run her up on plane as the caulking was streaming out at 8knts. My partner in crime on this repair has skippered this boat for the owner on multiple times and say's she really gets up and scoots. The bottom right at the transom has built in wedges to force the bow down as well. The boat has twin 871's
 

Attachments

  • Starboard side chine.jpg
    Starboard side chine.jpg
    90.3 KB · Views: 263
  • Starboard bottom.jpg
    Starboard bottom.jpg
    67.2 KB · Views: 263
  • Port bow 2.jpg
    Port bow 2.jpg
    57.6 KB · Views: 254
look closely at the fasteners. the green layer on the pink screws flakes off and is about .010 of an inch. the green screws are coming out of the same frame above waterline. They are solid and don't show any of the tendency to flake off. Interestingly the aluminum mufflers are strapped to these frames with bronze screws and aluminum straps. The wood contact area is destroyed by electrolysis and we may have to sister the sister frames effected. I'll try to post some pictures tomorrow. The aluminum strapping is mostly destroyed as well. I have seen wood ruined by stray electrical current from poorly grounded" bonded" pumps and motors. this is the first time I've seen it caused by dissimilar metals without electrical connections.


Any chance there could have been an over zinc issue at some point? Be interested in seeing the damaged wood. Was there any white fuzz with a non salty taste too it present on that damage?

I wonder what side of the boat was dockside for extended time ?

What kind of electrolysis protection system is being used and what has been changed or damaged ?

Oh so many questions.

Any signs of her holding water for a long period of time?

How do the keel bolts look ?

Scary one thing I have seen many times over the years is that rose colored glass deal. Where some one picks up a large old wood boat cause its cheap. You seem to know what you have ! Thanks for sharing I find it realy interesting.
 
Any chance there could have been an over zinc issue at some point? Be interested in seeing the damaged wood. Was there any white fuzz with a non salty taste too it present on that damage?

Oh so many questions.

OFB - Not to hijack this thread, but what you ask regarding "over zinc" may play a part in the corrosion found on these fasteners and I believe it is therefore worth delving further into. Sooo... can you expound on your knowledge of issues created by "over zinc" in boats of any type material? I've heard differing accounts on "over zinc" repercussions to boat fasteners, base hull materials, and metal drive apparatus. You may know best! Always good to hear all opinions.

Scary - My hat's off to you for doing this project and I commend as well as thank you for all the pictures and circumstances you are keeping us abreast of. Please keep em commen! I'm following this thread like a hawk... as it appears many others are too! :thumb: :thumb: :thumb:
 
Art my written word is , bad !

On wood boats the anode sets up an electrical flow or current against the metals under water. Part of that will be through the hull. Over protetcion can damage the wood through this proccess.

Old wood boats get a chance to experience lots and lots of marine experts. Some upon seeing an issue will believe the addition of more anodes will solve an issue when in fact it unbalances the system.

Thats just way too simple of an explanation but my written word usualy just confuses.

My guess is there be several issues goin on within this vessel. It can be a bit of a game.

OFB - TY for your input on over zinc regarding a wood hull. Have any input for over zinc complications that might happen for fiberglass, or aluminum, or steel hulls? :confused: I'm always looking to learn! ;)
 
On metal and frp the loss of paint from the keel or hull can be caused from too much anode protection. Depends.

Usualy the result of attempting to correct other issues. It can get confusing fast.

But Art I am not a pro. Just stuff I have seen. usualy I can find or see stuff thats been changed or added onto a boats system. From there the end result seen can some times be splained.

I have used John C Payne's book along with Nigel Calders when working on old boats.

so YMMV
 
Over zinked

Possibility guess. The boat has three divers zincs and shaft zincs. Rudders are bonded to the divers zincs. After looking at a twin 57 Chris that sank this week and was towed into Ladds who's exhaust hoses had failed and sank her, we decided to check out this boat. The aluminum silencers were both badly corroded and had large build up of corrosion under the hoses at the spigots. most of the hose clamps had snapped from the build up under the hose and spigots. The silencers were secured with aluminum straps and bronze screws that had all but dissolved under the bronze screws. The wood was badly burned white from electrical current. The bonding wires seem small by today's standards as well. This boat doesn't have isolating transformers either. The steel reinforced hoses had all failed or were failing. We pulled everything as now is the time as the who stern is opened up. The boat sits in fresh water at a private covered slip. The slip is new and well wired to code.
 

Attachments

  • Corrosion 1`.jpg
    Corrosion 1`.jpg
    72.1 KB · Views: 224
  • Failed Exhaust hose.jpg
    Failed Exhaust hose.jpg
    101.9 KB · Views: 220
  • Rotten Generator exhaust hose.jpg
    Rotten Generator exhaust hose.jpg
    92.8 KB · Views: 212
  • Transom corner frame.jpg
    Transom corner frame.jpg
    86.6 KB · Views: 235
" The wood was badly burned white "

That realy sounds like over protection. But that can be from bad bonding wires or a change to the system that creats a large cell in a specific area as well. Metals that loose the bond but can see the zinc will creat a cell ( like a battery ) through the hull. Since the cell was originaly balanced and now is not, the current created can be much larger than wanted. If the boat holds water it gets even more interesting.
 
Scary

As we head to our Tolly for a long weekend of R&R with cruisen, hooken, smimming, friends visiting, good eaten and tow behind runabout playing, I plan to stop by Ladds today... hope so anyway. It's 9:15 AM now Thurs 8/30. We have 100 mile drive; hope to hit Ladds just past mid day. Be great if you are around. Surely don't wait, no promises from this end, cause plans can change! I'd love to see your CC project first hand

Great work... Get It On! - Art :D :popcorn:
 
Steve – Good to meet you! Thanks for the Chris Craft “repair tour” and in-depth chat on what you’re doing to bring her back.

It was of great interest last Thursday that I had opportunity to first-hand observe your thorough 1960’s 57' CC restoration project.

In books I keep aboard, when on the hook this long weekend, I pored over galvanization/corrosion as well as bonding/isolation and anode/cathode relationships regarding wet and dry marine material protection methods. After listening to your accounts and seeing corrosion/galvanization/wood-burn problems that occurred over the long haul to the CC upon which you work (and hearing your input of the material failures that caused the recent sinking of a similar circa/size Chris) it is my continued considered opinion that comprehensive bonding (only if its full-on connection integrity can be non-stop maintained) is a viable protection method; but, that complete isolation of all materials (especially metals touching water) away from AC and DC stray currents is the best alternative for marine-material-protection methods... of course with applicably located and regularly serviced zinc anodes always in place. My feelings toward the isolation method stem from my teens and twenties working on wooden boats with shipwrights in New England boat yards. I use isolation/multi-anode method on every boat I’ve owned; to date I have not experienced unexpected galvanization or corrosion developments. In Atlantic waters my dad in the 50’s/60’s/70’s employed the isolation/anode method with equally good results.

I feel you most likely have learned more and better understand the intricacies of marine material protections than most boaters or marine-technicians regarding bonding – vs – isolation methods and would like to learn your opinion on these two virtually diametrically opposite types of protection techniques... that is if you find opportunity out of your schedule to post. ;)

We just returned from several sun filled R&R days aboard our Tolly in the Delta... boating friends and visiting family included. :socool:

I wish you best progress on your entire project! :thumb:

Cheers, Art :D
 
Last edited:
Steve - Any new picts? How's it progressing on the 57' CC?? - Art :popcorn:
 
It's going slow

Things have been frustrating as every time we think we have all the rot I discover more. We pretty much have the starboard framing repaired and ready for planks, we are waiting on new fiberglass mufflers, tomorrow maybe they will be in. This will be the second time for this boat that this repair has been done. It appears that both transom frames were replaced on the first go around. When the prior repair was done the battens were simply cut off and not re-attached to the transom. The picture of the starboard framing shows new transom frames and battens attached to the frame. Unfortunately I discovered the port frame has rot as well and it has been removed to the chine and rebuilt. I'll have pictures tomorrow. This was extremely disappointing to me as I had stared buttoning up the port side when I discovered the dry rot near the bottom of the frame.
 
Update photos

i discovered more concealed rot while cutting batten pockets in the Port side frame. I thought this frame was solid. and was starting to button up this side.
 

Attachments

  • oh no.jpg
    oh no.jpg
    52.6 KB · Views: 238
  • IMG_3597 Compressed.jpg
    IMG_3597 Compressed.jpg
    100.5 KB · Views: 246
Steve

Thanks for input and picts. You've one hell of a project ongoing. If he's got the $$$ seems you got the time! Sounds like last repairs by others were not done to your level of quality. Get It On!

I get opp will stop by next time in area... not sure when yet. Will try to contact you just before to see if you will be at job site.

Cheers! Art
 
Progress

Things have finally turned around and were putting more back in than we're removing. New transom frames and battens, four sister-ed frames and plenty of penetrating epoxy. I've decided to rebuild both gunnels and spray rails as the fastening holes are all punky with dry rot. The chine and bottom transom frame have been saturated with epoxy. The prior I'll post pictures of the current progress which has all the battens and butt blocks replaced, pretty much waiting for some stainless strapping to secure the exhaust system. I've laminated new gunnels and spray rails and will begin shaping them in the next couple of days. The corner frames are assembled with 3M 5200, the battens and caulking with Sinkaflex, all laminating has been done using waterproof Titebond. I used 5200 in the lower corners of the frames as it fills gaps better than Titebond and this is one place I want to keep dry. all planking, battens, frames, are coated with Bilge coat over Coprinal, or penetrating epoxy before or during assembly.
 

Attachments

  • New port transom frame.jpg
    New port transom frame.jpg
    100.8 KB · Views: 244
  • Chine and sole saturated with penitrating epoxy.jpg
    Chine and sole saturated with penitrating epoxy.jpg
    102.5 KB · Views: 258
Last edited:
Steve - Amazing how much rot/softwood can exist in a large woody's butt and yet it keeps its shape. Glad you are turning the corner toward eventual completion. Best luck! - Art
 
Scary-looks like you are finally on the downhill slope. Also looks like yu are doing a very good job. You shuold have a happy, if a bunch poorer, boat owner when you are through!
 
Scary

From the pics to me it looks like you did some work on the tanks while you where at it. What kinda shape they be in ?

I believe they are the water tanks ? but not sure.
 
Tanks

The tanks are black iron and in good shape. We sanded loose scale and rust primed and painted with Rustoleum. Things are moving more rapidly I we are planking the transom and the hull sides are planked as hig as we can until I figure out the steps at the top of the transom. Screws, screws and more screws. Every plank and block glued ans screwed. The new fiberglass exhaust is in. all through hulls have been sand blasted and cleaned up. Deck drains had been routed into the bilge. We have installed through hulls for the deck drains below the swim platform. the swim platform is being surfaced and stripped of all old finish.
 
With the scale of the work you have shown in your pics, can't wait to see the finshed job.
 
Progress

Here are a few photos, I have actually three more transom planks installed. Over 100 screws per plank and 2 tubes of adhesive at $20 and the plank. Screws at .68 each plank around $5.42 bdft rough. 14 bdft per plank, about $78, plus labor. Each plank is machined from rough, fit to size, mounted and pre-drilled, removed, Sinkaflex adhesive applied to frames and backing blocks refit and clamped and screwed to the the frames and clean up. plugging or filling and finish sanding. All planks have been treated with penetrating epoxy and painted with bilge coat on the interior side before installation.
 

Attachments

  • IMG_3679 Comp.jpg
    IMG_3679 Comp.jpg
    102.5 KB · Views: 241
  • IMG_3685 comp.jpg
    IMG_3685 comp.jpg
    78.8 KB · Views: 223
  • IMG_3630 comp.jpg
    IMG_3630 comp.jpg
    92.4 KB · Views: 250
Man you are moving along. Love it.

Thanks
 
Back
Top Bottom