Tacomasailor
Veteran Member
Yanmar 4JH2E exhaust problem on a sailboat but I figured you guys would know way more about diesel engine techy stuff.
Our Yanmar 4JH2E is 20-years old and has 2,900 hours on it. The engine has worked flawlessly except for needing a coolant pump. We have owned the boat and engine since new.
I replaced the heat exchanger bundle as a warranty item in 1997 because Yanmar assembled a bunch of them incorrectly. No other work has been done on the exhaust system.
Last week we noticed a minor exhaust leak was putting exhaust in the engine room and later in the main cabin. Went back to the dock.
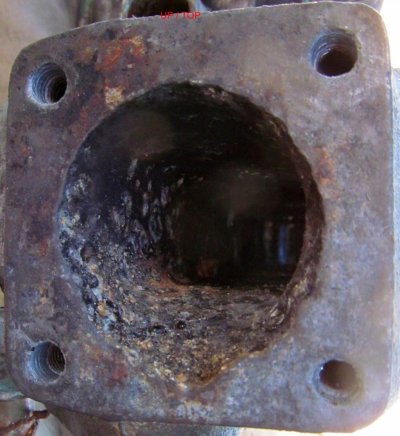
We then could see that there was a ¼” gap on one corner of the mating surface between the heat exchanger and the mixing elbow. Exhaust was leaking out of three of the four sides.
With more close examination, after removing three raw water hoses that blocked the view, we discovered that the bolts holding the mixing elbow / heat exchanger together had serious problems.
- One bolt was completely missing
- One bolt was backed out ½ way
- One bolt was finger loose
- One bolt was still locked tight at 40 foot pounds
The Yanmar Factory Rebuild Manual (purchased in 1995) and the online Yanmar parts manual show that there should be four studs threaded into the heat exchanger. There should then be NUTS holding the mixing elbow flange to the flat face on the heater exchanger exhaust outlet.
Our engine had four (actually three because one is missing and I can not find in in the pan under the engine) BOLTS, which were very damaged. The 12mm head on one bolt was rusted and almost round. The other two bolt heads were clean and clearly marked with a number 7 but no other grade or class markings. The threads on all three bolts were almost completely filled with “material” and my thread cleaners and gauges were of no use picking the material out of the threads.
I was able to thread a new 8mm .125 pitch nut onto one bolt and it did clean some of the threads but the material was in effect, welded to the threads.
The local Yanmar dealer sold me four new 8mmx20mm bolts that were marked 8.8 and JH. They had a 13mm head rather than the 12mm on the original.
I have to lie on top of the Yanmar and look over the back of the engine to see and work on the bolt holes. There is not quite enough room for me to get two really good hands onto the bolts and holes.
I tried to thread the new bolts into the old holes but they did not turn easily and seemed likely to cross thread. I carefully cleaned the holes with a new 8mm .125 tap. I have tapped a lot of holes and have a pretty good feel for the work.
The tap took a lot of in-and-out work and gentle encouragement but eventually I was able to get a clean hole down to 35mm depth. The new bolts threaded in neatly and smoothly and spun down to the bottom as they would in a new hole.
When I mounted the mixing elbow to the heat exchanger I was able to easily turn all four bolts down to where they begin to compress the split washer. Two of the bolts, (the one that was missing the bolt and the one that was backed ½ way out), turned down tightly and “bit” as I would expect.
The bottom two bolts turned down with a socket to about 5 foot pounds but then just slowly turn, as if in thick mush, and never really bite or take a set. The lowest setting on my torque wrench is 10 foot-pounds and neither bolt will make the wrench break or click.
I repeated the process with a 30 mm and 35 mm bolt to see if I could get the bolts into deeper and better material. The longer bolts will not set either.
I believe the heat exchanger is aluminum but am not sure.
There is plenty of material around the two weak holes to drill a bigger hole and use a threaded insert of some kind (Full-Torque or timeset ?) but I am not sure if that is the right thing to do. My big concern is that I have no way to ensure I drill a perfectly straight hold for the insert.
I cannot find anything about the torque that should be applied to good new bolts. The one bolt that was still set when I removed the originals was about 40-foot pounds.
There is no load on the flange – just the exhaust pressure and the heating/cooling due to the exhaust gas.
I know the right thing to do is remove the heat exchanger and take the heat exchanger to a machine shop and have them put in slightly larger holes and threads.
Are there any easier or less drastic possible solutions?
With no real shear or pull on the bolts would epoxy work?
Our Yanmar 4JH2E is 20-years old and has 2,900 hours on it. The engine has worked flawlessly except for needing a coolant pump. We have owned the boat and engine since new.
I replaced the heat exchanger bundle as a warranty item in 1997 because Yanmar assembled a bunch of them incorrectly. No other work has been done on the exhaust system.
Last week we noticed a minor exhaust leak was putting exhaust in the engine room and later in the main cabin. Went back to the dock.
We then could see that there was a ¼” gap on one corner of the mating surface between the heat exchanger and the mixing elbow. Exhaust was leaking out of three of the four sides.
With more close examination, after removing three raw water hoses that blocked the view, we discovered that the bolts holding the mixing elbow / heat exchanger together had serious problems.
- One bolt was completely missing
- One bolt was backed out ½ way
- One bolt was finger loose
- One bolt was still locked tight at 40 foot pounds
The Yanmar Factory Rebuild Manual (purchased in 1995) and the online Yanmar parts manual show that there should be four studs threaded into the heat exchanger. There should then be NUTS holding the mixing elbow flange to the flat face on the heater exchanger exhaust outlet.
Our engine had four (actually three because one is missing and I can not find in in the pan under the engine) BOLTS, which were very damaged. The 12mm head on one bolt was rusted and almost round. The other two bolt heads were clean and clearly marked with a number 7 but no other grade or class markings. The threads on all three bolts were almost completely filled with “material” and my thread cleaners and gauges were of no use picking the material out of the threads.
I was able to thread a new 8mm .125 pitch nut onto one bolt and it did clean some of the threads but the material was in effect, welded to the threads.
The local Yanmar dealer sold me four new 8mmx20mm bolts that were marked 8.8 and JH. They had a 13mm head rather than the 12mm on the original.
I have to lie on top of the Yanmar and look over the back of the engine to see and work on the bolt holes. There is not quite enough room for me to get two really good hands onto the bolts and holes.
I tried to thread the new bolts into the old holes but they did not turn easily and seemed likely to cross thread. I carefully cleaned the holes with a new 8mm .125 tap. I have tapped a lot of holes and have a pretty good feel for the work.
The tap took a lot of in-and-out work and gentle encouragement but eventually I was able to get a clean hole down to 35mm depth. The new bolts threaded in neatly and smoothly and spun down to the bottom as they would in a new hole.
When I mounted the mixing elbow to the heat exchanger I was able to easily turn all four bolts down to where they begin to compress the split washer. Two of the bolts, (the one that was missing the bolt and the one that was backed ½ way out), turned down tightly and “bit” as I would expect.
The bottom two bolts turned down with a socket to about 5 foot pounds but then just slowly turn, as if in thick mush, and never really bite or take a set. The lowest setting on my torque wrench is 10 foot-pounds and neither bolt will make the wrench break or click.
I repeated the process with a 30 mm and 35 mm bolt to see if I could get the bolts into deeper and better material. The longer bolts will not set either.
I believe the heat exchanger is aluminum but am not sure.
There is plenty of material around the two weak holes to drill a bigger hole and use a threaded insert of some kind (Full-Torque or timeset ?) but I am not sure if that is the right thing to do. My big concern is that I have no way to ensure I drill a perfectly straight hold for the insert.
I cannot find anything about the torque that should be applied to good new bolts. The one bolt that was still set when I removed the originals was about 40-foot pounds.
There is no load on the flange – just the exhaust pressure and the heating/cooling due to the exhaust gas.
I know the right thing to do is remove the heat exchanger and take the heat exchanger to a machine shop and have them put in slightly larger holes and threads.
Are there any easier or less drastic possible solutions?
With no real shear or pull on the bolts would epoxy work?