Westerbeke 8BTD thrust plate failure

The friendliest place on the web for anyone who enjoys boating.
If you have answers, please help by responding to the unanswered posts.

High Wire

Guru
Joined
Dec 22, 2007
Messages
4,985
Location
USA
Vessel Name
Irish Lady
Vessel Make
Monk 36
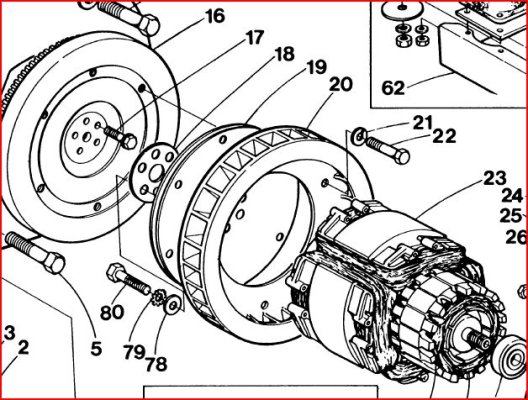
In Dec 2014, our WB 8 BTD generator (~2100 hours) tore up its thrust drive plate disc. Actually it is 2 discs Siamese'd together (#19 in pic). This plate connects the engine flywheel to the generator armature. The gen was running at light load powering the battery charger, house loads with no air cond running. The plates are made of aluminum. The aluminum plates sheared 360 degrees around the outside of the armature bolt pattern, not between the holes.
Long story short, the diesel mechanic never saw this type of part failure before (ie freeky failure). New plates were installed, the roller bearing on the end of the armature was good. Everything back together and all was well.
EXACTLY one year to a couple minutes and 20 runtime hours later, the same failure occurs.
The previous owner had some type of problem with the gen set about 6 months prior to our purchase but I have no records from that repair other than the generator was "rebuilt". Its likely that the same thing happened to him as well.
Other than this, the gen runs smooth, quiet and trouble free. It has plenty of life left.
I do not want to get into a costly troubleshooting effort for a generator this old calendar wise.
I want to take a new plate to a machine shop and make one out of steel.
 

Attachments

  • WBdriveplate.JPG
    WBdriveplate.JPG
    96.9 KB · Views: 82
Last edited:
If there is any misalignment between rotor bearing CL and crankshaft CL, the plates will flex with each rev, and that will fatigue the plates. Also any play in crank or rotor bearings will do it. A sloppy fit between rotor brg and housing too.

A jig can be made to measure the alignment with stator installed but rotor out.

Last one I was into the plates were steel.
 
Agree the failure is from fatigue. And also probably caused from mis-alignment somewhere. Question is would it be worth spending a couple boat units of mechanic time on a 30 year old genny to build a jig to try to find out where the problem is IF the cause could be found at all. To me the answer is no. Try steel plates or part out engine and gen then bite the bullet to go completely new. :banghead:
The old engine and gen separately are worth something more than scrap, right?
 
20 run hrs between failures means alignment must be way off. Stator flush with adapter plate? Not cocked on one of the alignment pins? Are the alignment pins intact?

Also check where the rotor bearing fits in the stator. If that is "wallowed out", that will flex the plates.

Are you sure the plates are Al? I've taken a bunch of these apart and all I recall seeing is steel.

If you get a shop to fab them, go with multiple thin plates, that will be much more fatigue resistant than one or two stout.

Sometimes the best thing is to cut losses and put in a new unit. As you posted, the flaw may be a devil to find and it will still fail and piss you off.

The machine has value. Out of the boat it can be repaired or the engine can be used by a sailboater, or whole gen used by a "prepper" etc.

I have a dead one in my shop. Maybe go for a "twofer" deal.
 
Thanks, I'll be pulling it apart next week. I was right there with the mech last time it went together. He was looking for alignment problems too but not with a dial indicator. Nothing obvious. Alignment pins were there and machined surfaces mated clean. I have two new WB plates coming to ude as templates but its holiday time. From what i can recall they were AL but did not put a magnet to it.
 
Started to tear down the gen end looking for mis-alignment issues. I found what looks like the top half of GASKET #12 between PLATE #13 and the engine block. It looks like the partial piece of gasket is bending the plate enough to see a visible gap in the mating surface between bolts of maybe .030". The parts list says GASKET #12 is NOT USED for gensets.
Why would it be there at all unless this is not the original engine?
Since the generator end bolts to that plate, maybe that is the cause of the mis-alignment?
 

Attachments

  • WBdriveplate-2.JPG
    WBdriveplate-2.JPG
    83.1 KB · Views: 76
  • WBdriveplate-3.JPG
    WBdriveplate-3.JPG
    66 KB · Views: 65
  • WB gap-1.jpg
    WB gap-1.jpg
    108.4 KB · Views: 65
Last edited:
Archie:

I own a generator service shop so I've dealt with a lot of issues like this.

Yes, I totally agree with your diagnosis. The gasket should either be used complete or not used at all. Half a gasket will create misalignment between the plate and engine block.

...and yes, the lifetime of drive discs within commonly encountered limits of alignment is normally infinite.

If you choose to go to steel drive discs, they're probably available from stock. The flywheel pattern looks like an SAE standard. You can Google "SAE flywheel sizes" to download a list of the sizes.

When I do it, I measure the bolt circle diameter on the flywheel and go down the chart to find the corresponding SAE size.

As far as the pattern on the generator rotor shaft, that's manufacturer specific. That generator end in that era was probably made by Marathon, and you can order the drive discs from them.

I may have some discs around here that would fit - send me a private message with the measurements and I'll take a look in our "I might need that some day" pile.

Good Luck!

JS
 
I pulled off the generator end today.
The drive discs are steel.
The rotor bearing looked like it had some wear marks from in and out movement. The bearing housing did not look damaged at all. I will try to get some decent pics tomorrow.
To get the back plate #13 off, I need to pull the flywheel off. I could not budge the 5 flywheel bolts with 2 breaker bars due to tight spaces.
Right now the back plate is resting on a block of oak so I would need to support the engine some other way to take that plate off. I will check the backplate with a straight edge tomorrow.
First time I've seen a 5 bolt pattern. Don't have a puller for that even if I could get the bolts out.
 
Last edited:
Get about four links of 3/8 chain and put one link with bolt into flywheel, other end of chain put a bolt into a link into the flywheel housing. That will hold it while you remove the fw bolts. Once bolts are out you can wiggle fw off by hand.
 
Thanks guys! To be continued...
 
Some pics from today.
BTW, the chain worked perfect! :dance::dance::dance:
Before:


Behind the plate:


After:
 

Attachments

  • SDC17046.jpg
    SDC17046.jpg
    98.4 KB · Views: 68
  • SDC17048.jpg
    SDC17048.jpg
    170.6 KB · Views: 67
  • SDC17044.jpg
    SDC17044.jpg
    79.1 KB · Views: 68
Last edited:
Its been an up and down day. :banghead: Guess I'll have to try some machine shops.

[FONT=Arial, Verdana]...Thank you very much for your purchase. I am sorry but we do not have the Westerbeke, Plate, Drive Disc, 35927, 035927 in your order in stock and it is no longer available from the manufacturer. We have cancelled your order and will issue you a full refund. I am sorry about any inconvenience this may cause you.
[/FONT]
 

Latest posts

Back
Top Bottom