Pressure Cap Access on a Kohler 8.5KW Generator

The friendliest place on the web for anyone who enjoys boating.
If you have answers, please help by responding to the unanswered posts.

Capt GB

Member
Joined
Aug 2, 2014
Messages
13
Location
USA
Vessel Name
Nebulae
Vessel Make
Mainship 400
My 400 Mainship trawler has a Kohler 8.5 KW generator installed in a sound box and mounted under the cockpit flooring. I have a fair amount access to the gen-set by removing the sound box's side access panels.

The problem is the sound box's top access panel only clears the bottom of the cockpit floor by about 1/16" and is not removable. Furthermore, the pressure cap is mounted on top of the engine and is compressed into the sound box's thermal insulation making it non accessible from above or below the sound box when the side panels are removed.

By rendering the pressure cap not accessible, the manufacturer has all but limited the end user (me) from being able to add or change the coolant to the engine.

I've tried adding coolant to the reserve tank, but to get the pressure cap (double valve and seat) to open, the engine has to be started and allowed to automatically shut down on "Loss of Coolant". This pulls a vacuum and allows the liquid to siphon from the reserve tank back into the engine. However, this only allows a few ounces of coolant to enter the engine at a time, thus requiring multiple restarts to add any appreciable amount of coolant (not acceptable).

Currently, I'm considering cutting an access hole on the cockpit floor and sound box (Not easy to do and I really don't want to do it for obvious reasons).

Has anybody ever had the same problem? How did you address it? Any suggestions would be helpful,
Thanks!

Capt GB
 
Last edited:
While eventually you will have to gain access to the cap, from a theoretical standpoint there is a way to change the anti freeze. Undoubtedly somewhere on engine block or the heat exchanger there is a drain plug. Probably has a 1/4" pipe plug or drain petcock. You will need to replace that with a hose barb that you can attach a hose to. When you open the valve or plug, most of the antifreeze may slowly drain through the opening as the radiator cap vent will open because of vaccum created. Siphoning the antifreeze out of the overflow tank first will speed up the process as lifting the antifreeze from the overflow bottle up into the engine will offset some of the vaccum.

You will need the smallest diaphragm water or bilge pump you can find. If the inlet and outlet are the same size, so much the better. You will need to adapt the hose barb that you installed on the engine or heat exchanger to the inlet of your 12 volt diaphragm pump. When you turn the pump on, it will suck the antifreeze out of the engine with air coming in through the vent in the radiator cap. Once all the antifreeze is sucked out, put the hose from the engine on the output side of the pump. Then run a hose from the input side of the pump into the new antifreeze mixture.

CAUTION: The pump will develop too much pressure and blow a seal or worse on your generator. To avoid this, add enough cooland mix to the overflow tank to cover the inlet tube where it enters the tank. Now turn your pump on then off. You will need to repeat this process numerous times. What will happen eventually is that the pump will push the new antifreeze into the generator. The pressure will build inside the generator because the vent cap may not be able to vent the air as fast as your pushing the antifreeze in (that's why you need to turn the pump off). By looking at the overflow bottle, you will see the air venting from the radiator cap and bubbling in the bottle. When the bubbling has stopped, most (not all) of the excess pressure is gone. Turn the switch on and off again repeating the process. When bubbles no longer enter the overflow bottle and the liquid level rises, the generator is full of anti freeze. All that's left is to remove and seal the hole where you installed the hosebarb.

Should work as described, but no guarantee.

Ted
 
Last edited:
On my 40T, my mechanic was able to pop the latch on upper sound shield. Then squeeze his hand in and loosen the cap. He can then fill either with a small tube and funnel or the through the overflow tank. It's tight though. Maybe you could remove a small bit of insulation?

If you are in SW Fl, I'd be happy to put you in touch with him.
 
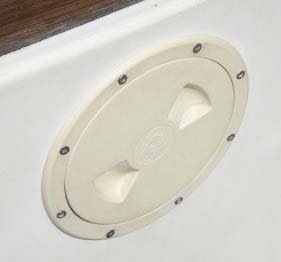
Not having access to the coolant filler-cap on any motor seems like a really bad idea to me. I suggest installing an 8" water-tight inspection hatch in the cockpit floor. This would give you the working space to cut a 4" hole in the top of the sound box. Use the piece you cut out to fabricate a removable plug so sound insulation is not compromised. The pic shows a plastic hatch mounted vertically but same idea. Brass and stainless are available.
 

Attachments

  • Inspection-Hatch.jpg
    Inspection-Hatch.jpg
    17.1 KB · Views: 253
I removed the sound shield on our 400T for this exact reason, it's still not easy to reach (I changed my coolant last week) but it is much, much better. I can also now change the pencil zinc on the heat exchanger without pulling hoses, which means I do it more often.

I don't notice any difference in sound volume when we are inside the cabin. It is a little louder if you are standing in the cockpit, but worth it.

Sucks that I had to do it that way, but I can't live with the idea of not being able to work on the genset, or struggling to do the most basic tasks.

I had a relay go bad last summer, it would have been very difficult to reach with the sound shield on, maybe impossible.
 
Sorry for the duplication (I'm new to the site). When you removed the sound shield did you simply remove the access panels or the entire shield? If you removed the entire shield I'm assuming you had to pull the generator and re-set it in place afterwards (I'm guessing that would be a very labor intensive job). Anyways, very informative reply and it has me thinking, Thanks!
 
I actually had my mechanic do it. They removed the entire sound shield with the exception of the housing on the port side which holds the data panel, main breaker, etc. They did have to do some shifting, but they didn't have to pull the entire gen set.

It cost me about $250, so roughly three hours labor.

Doug
 

Latest posts

Back
Top Bottom